U N I Q U E U G P 6 F
6
evaporator tubing. This will slow the circulation of hydrogen and ammonia gas, or in
severe cases, completely block it, resulting in a loss of cooling. Warranty will not cover
recharge/rebuild if caused by not running the freezer level.
This freezer operates LP Gas (Propane), 110V (Electricity)
Note: After changing an LP tank, or after a long shut off period, the gas line is likely to be filled with air.
You may have to repeat the lighting procedure several times to purge the air out of the gas lines. We suggest
first turning off gas at the control panel, then the tank, this will reduce an air trap in the gas line.
Gas Operation
“Start Up” Procedure
Electronic Ignition (battery)
1.
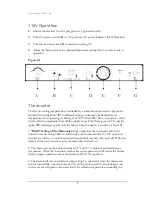
To start the freezer, turn the thermostat knob
E
to maximum setting, #4.
2.
Turn button
G
to “Gas” position, then push
B
button in first and hold, proceed to
push in and hold the
D
button until you see the needle on the flame sensor
C
moving
from the red into the green area. Release the
B
button, while continuing to hold in
the
D
button for an additional 10-15 seconds, now release the
D
button. The burner
should now stay on indicated by the needle staying in the green area, if not repeat the
lighting instructions above.
3.
Adjust the thermostat knob
E
to desired temperature setting after 8 or more
hours of operation.
4.
To change the battery in the electronic ignition, turn the far left knob
A
to the
left to expose the battery, remove AAA battery and replace with a new one,
positive outwards, replace the knob by turning to the right to close.
Shut Down Procedure – Gas Operation
1.
Turn selector knob
G
to the
OFF
position
2.
Shut the gas off at the LP-gas supply cylinder when the appliance is not in use.
3.
If the freezer will not be in operation for a period of weeks, it should be emptied,
defrosted, cleaned and the door left open.

