background image

58

7


EXPLANATION OF HOLD FUNCTIONS

58

EXPLANATION OF HOLD FUNCTIONS

Chapter

7

7-4.

Auto reset function

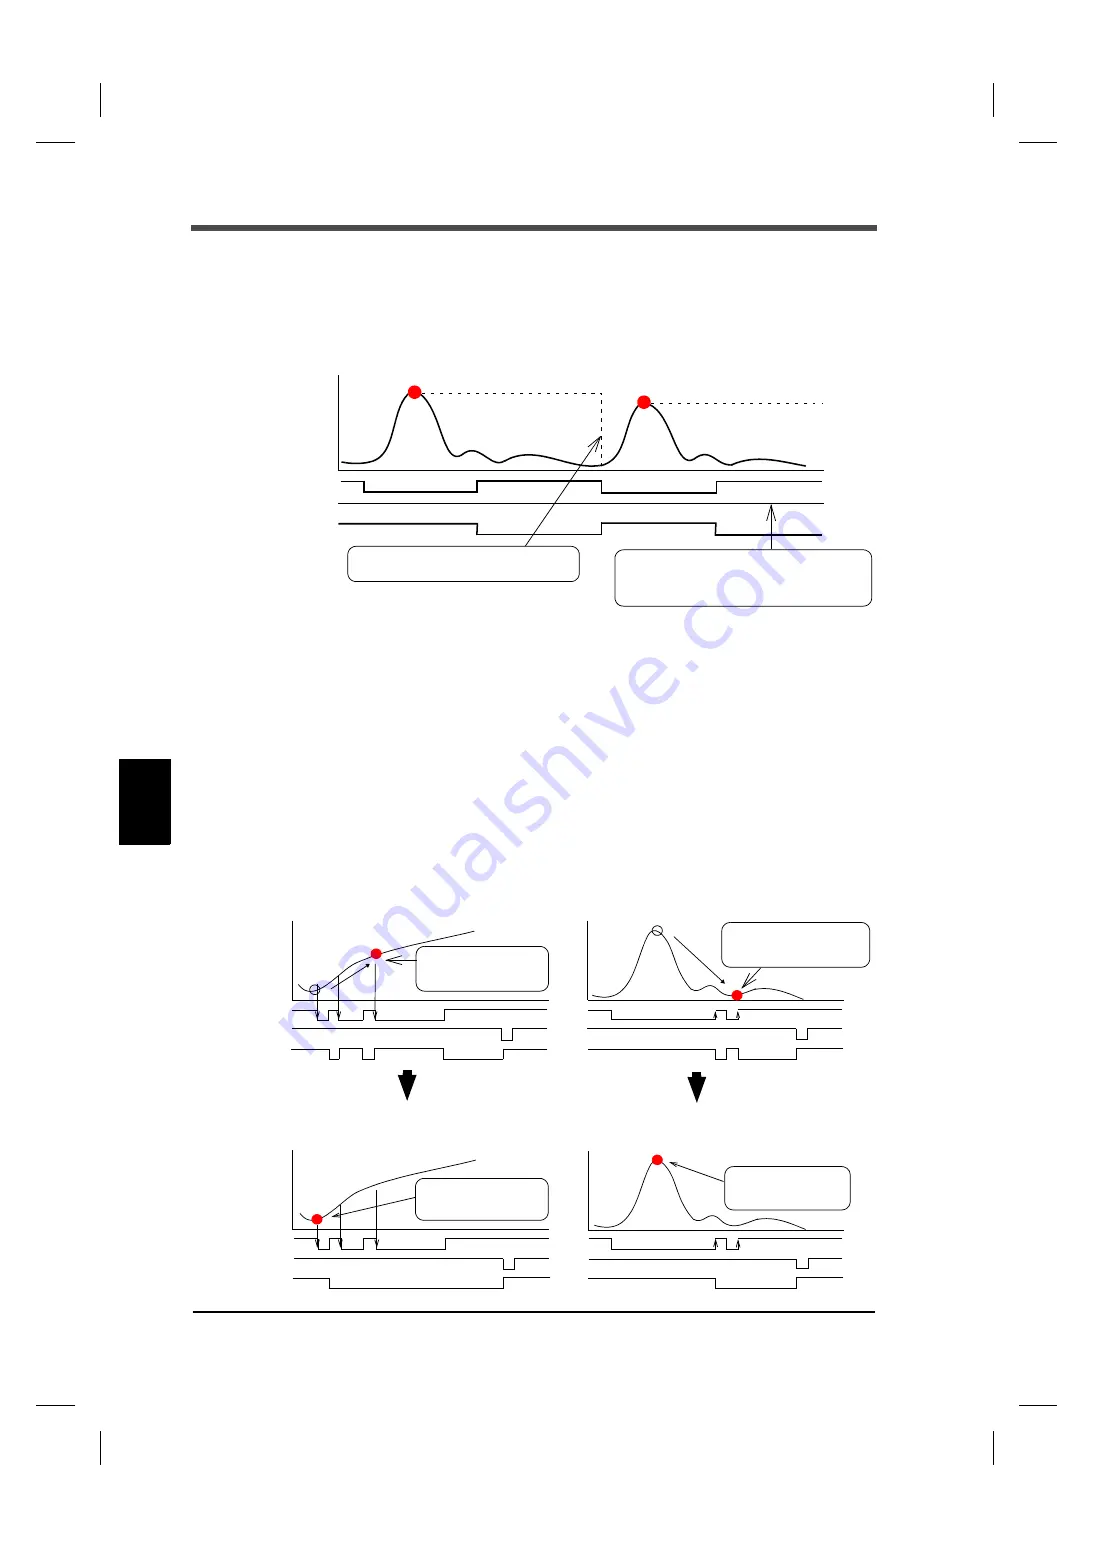
It is factory-set that each hold is automatically reset at the start of the detection section, and
therefore, simple control can be performed by one signal without releasing the hold.

However, when the auto reset functions, if the signal causes chattering, the point that should be
taken originally may deviate. Switching is provided so as to prevent the next detection from being
performed until the T/H signal is turned on even if the SECTION signal is turned on again.

Setting value

0

OFF

After a hold is fixed, the next detection is not started until the T/H
signal is turned on even if the SECTION signal is turned on.

1

ON

After a hold is fixed, the next detection is started when the SECTION
signal is turned on again even if the T/H signal is not turned on. This is
the initial setting (factory default setting).

SECTION

T/H

H/E

Example) Auto reset in externally specified section peak hold 

Upon turning-ON of the SECTION signal,
hold reset is performed and detection starts.

Control can be performed without inputting the T/H
signal.
However, a hold value is maintained until the
SECTION signal turns ON.

When auto reset is on in externally 

SECTION

H/E

T/H

When auto reset is off in externally 

SECTION

H/E

T/H

SECTION

H/E

T/H

SECTION

H/E

T/H

When auto reset is on in externally 

 When auto reset is off in externally

If the SECTION signal
chatters, the point shifts
from the proper one.

The first hold value is
maintained until T/H is
inputted.

If the SECTION signal
chatters, the point shifts from
the proper one.

The first hold value is
maintained until T/H is
inputted.

specified section sample hold

specified section peak hold

 specified section peak hold

specified section sample hold

Summary of Contents for F350

Page 1: ...01MAR2015REV 1 04 F350 OPERATION MANUAL ...

Page 2: ...d peek hold and HI LO limit comparison functions the F350 is for general purpose use such as an automatic assembly machine and testing machine To take full advantage of high performance of F350 thoroughly read this operating manual first before use and understand the explanations contained herein for correct operating procedures Also carefully store this instruction manual so that it can be referr...

Page 3: ...or fatality when incorrectly handled WARNING CAUTION CAUTION This sign forewarns the presence of hazards that could result in personnel injury or property damage when incorrectly handled WARNING For the entire system to function safely when the F350 becomes faulty or malfunctions provide a safety circuit outside the F350 Since the F350 has no power switch install a breaker Before using the F350 as...

Page 4: ...k the signal names and pin assignment numbers and then carry out wiring properly After wiring be sure to mount the attached terminal block cover Otherwise it may cause an electric shock To take measures against lightning surge install a lightning surge protector optionally available Do not connect anything to unused terminal s Before applying power carefully check the wiring etc Use a power supply...

Page 5: ...ommon wiring Do not use it broken down Tighten the screws for the power input terminal at the specified torque If they are loose shorts fire or malfunctions may occur Tightening torque 0 5N m For sensors external inputs outputs and options use shielded cables The temporary overvoltage applied to the power should not exceed 1500V For turning on off the power be sure to keep intervals of 5 seconds o...

Page 6: ... take adequate measures against shocks by using polyurethane materials etc separately If you dispose of the product handle it as industrial waste WARNING Never disassemble deform under pressure or throw the battery into fire The battery may explode catch fire or leak This sign forewarns the presence of hazards that could result in personnel injury or property damage when incorrectly handled Cautio...

Page 7: ...ould be given to the following 1 Since the F350 is defined as open type built in equipment be sure to use it as installed and fixed to a panel etc 2 The power cable attached to this product as standard can be used with 100V AC power in Japan Nominal rated voltage 125V AC For using this product in a country outside Japan use a power cable certified in that country 3 For cables other than the power ...

Page 8: ... contact our sales department RoHS Compliant Product The parts and attachments including the instruction manual packaging box etc used for this unit are compliant with the RoHS Directive restricting the use of hazardous substances with regard to adverse effects on the environment and human body What is RoHS It is an abbreviation for Restriction on Hazardous Substances which is implemented by the E...

Page 9: ...10 How to connect and install the terminal block 11 Attachment of a ferrite core 11 Strain gauge sensor connection 12 Strain gauge sensor cable coloration 13 Voltage output connection 13 External I O connection 14 How to assemble the connector 15 SI F interface connection 15 3 SETTING MODE CONFIGURATION 16 3 1 Setting mode composition 16 3 2 Key operation 18 3 3 Calling a setting mode 22 4 CALIBRA...

Page 10: ...ero Tracking setting method 40 5 7 Motion Detect 41 Motion Detect setting method 42 5 8 Display frequency 43 Display frequency setting method 43 6 EXPLANATION OF COMPARISON FUNCTIONS 44 6 1 Calculation mode 44 Calculation mode setting method 44 6 2 HI LO limit comparison of calculated value ch1 value ch2 value 45 HI LO limit setting method 45 6 3 Hysteresis 45 Hysteresis setting method 46 6 4 Near...

Page 11: ...0 8 1 External I O 60 Connector pin assignment 60 About outputs 60 About inputs 61 About the RUN signal 61 8 2 SI F Serial interface 62 SI F Indicated value format 62 SI F print 62 9 OPTION INTERFACE 64 9 1 BCD interface 64 Connection 64 Connector pin assignment 65 Output data select 66 Signal timing 66 Logic switching 67 BCD data hold 67 Output rate 68 BCD binary select 68 Pin assignment at binar...

Page 12: ... 85 Standard equipment 85 Equipped with BCD parallel data output interface option 85 Equipped with RS 232C interface option 86 Equipped with D A converter option 86 10 3 F350 block diagram 87 11SUPPLEMENTS 88 11 1 The list of initial setting value 88 11 2 Self check function 94 Self check method 94 11 3 Setting protect 95 Setting protect setting method 95 11 4 Key protect 96 Key protect setting me...

Page 13: ...CONTENTS XII CONTENTS XII 11 9 About disposal of the lithium battery 101 Removal of the lithium battery 101 ...

Page 14: ...d with comparison judgments on the input value of each channel and analog voltage output The A D conversion speed of each channel and the digital processing speed for calculations and judgments are as high as 3 000 times sec It can also be switched to 300 times sec The F350 is equipped with hold functions with respect to calculated values sample peak bottom and average holds The F350 s compact siz...

Page 15: ...If it is used at voltages exceeding the rating or it is used overseas have a suitable AC cable ready separately F350 body 1 F350 operation manual 1 AC input cord 1 Conversion plug for Mini screwdriver for Connector for BCD parallel with BCD parallel data output option AC input code 1 with D A converter option Ferrite core 2 with unity band External input output with solderless terminal connector 1...

Page 16: ...tion Front panel Strain gauge type sensor Option D A Converter Valve recorder Option Option Printer Display Various converters PC 1 1 1 1 1 2 J J 0 5 1 41 1 F350 Main status display Sub status display Setting key pad Main numerical display Sub numerical display section section section section ...

Page 17: ...error message when an error occurs Setting value Displays setting values in setting mode Sub status display section The status with respect to ch1 ch2 values is indicated HI Lights when the indicated value is larger than the ch1 ch2 HI limit Indicates that the external output ch1 ch2 HI output is ON LO Lights when the indicated value is smaller than the ch1 ch2 LO limit Indicates that the external...

Page 18: ...ey to select a trailing setting item number in a setting mode state Use this key to select the previous item number in a setting item select state Use this key to increment the numerical value by one in a setting value input state Use this key to select a leading setting item number in a setting mode state Use this key to select the next item number in a setting item select state Use this key to d...

Page 19: ...or connection see Power input terminal connection on page 9 Protective ground Be sure to ground the protective ground terminal to prevent electric shocks Frame ground Please ground the frame ground terminal to prevent failures due to static electricity The frame and the frame ground terminal are conducted It may be better to remove depending on the environment of the installation location Options ...

Page 20: ...s limited to category II specified by EN61010 Overvoltage applied to the signal input output terminals should not exceed the value defined to category II After wiring make sure to mount the attached terminal block cover Otherwise you may receive an electric shock Turn on the power after carefully checking the wiring etc Do not touch the signal input output terminals while the power is on Otherwise...

Page 21: ...to the panel cut dimensions 2 Remove the screws two and remove the guide rails from both sides Do not use other screws than those installed to the F350 body 3 Fit in the F350 from the front of the panel 4 Install from the rear the guide rails having been removed from both sides in Step 2 and fix them with the screws two 92mm Panel cut 1 0 Panel thickness 1 6 to 3 2mm dimensions 92mm 1 0 ...

Page 22: ...1 Make sure that no power is applied 2 Remove the screws two and remove the terminal block cover 3 Remove the two screws M3 at the terminal block 4 Align the solderless terminals with the screw holes and then tighten the screws L Black N White 5 Install the terminal block cover and fix it with the screws two 6 Remove the screws M4 of the protective ground align the crimp contacts with the screw ho...

Page 23: ...ELD 11 MONITOR ch2 10 MONITOR ch2 9 MONITOR ch1 8 MONITOR ch1 7 SIG ch2 6 SIG ch2 5 SIG ch1 4 SIG ch1 3 EXC 2 EXC 1 SHIELD EXC is common to ch1 and ch2 Compatible connector ETB42 12P OSADA CO Ltd or equivalent Connector optional type CN81 CAUTION Before connecting a strain gauge sensor make sure to check the setting of excitation voltage For the setting of excitation voltage see 4 2 Excitation vol...

Page 24: ... the connection hole so as not to let the tip spread out 5 Tighten the screw with the screwdriver 0 5Nm of tightening torque is recommended 6 Lightly pull the wire to make sure that it is securely clamped 7 Insert the wire connected plug into the F350 body and tighten the screws two Attachment of a ferrite core It is necessary to twist a power supply cable and sensor cables such as a load cell aro...

Page 25: ...n 4 wire sensor 6 wire sensor SIG EXC EXC SIG SHIELD IN OUT IN OUT 5 4 3 2 1 SHIELD SIG SIG IN OUT IN OUT F350 12 7 6 SHIELD SIG SIG 12 7 6 SIG EXC EXC SIG SHIELD IN OUT IN OUT F350 S S 5 4 3 2 1 IN OUT IN OUT S S Short circuit EXC with S and EXC with S for connecting a 6 wire strain gage sensor ...

Page 26: ...instrument Since the output voltage is taken out in a step prior to A D conversion of the sensor input signal it is not synchronized with indicated values processed digitally such as Digital Zero and digital filter Output in synchronization with indicated values requires an optional D A converter Since the MONITOR terminals are not insulated from the internal circuit use two core shielded twisted ...

Page 27: ...hort circuiting or opening the input terminal and the COM2 terminal Short circuiting is effected by means of a contact such as a relay or a switch or a noncontact such as a transistor or an open collector TTL Output Data Tr OFF OFF For driving have an external power source ready 24V DC is shown in the illustration ON ON Vceo 30V max Output Output COM1 Ic 30mA max COM Input F350 Sink type PLC etc P...

Page 28: ...12 of the external input output connector The interface is nonpolarized and up to three external devices can be connected Wiring materials should use a two core parallel cable cabtyre cable electric wire with covering thickened for construction etc When a two core parallel cable or a cabtyre cable is used the transmission distance is approximately 30m When a two core shielded twisted pair wire is ...

Page 29: ...elect P48 P49 ESC F3 Mode3 Ch Operation F2 Mode2 Calculation common Operation F1 Mode1 Comparison hold FNC ESC HI LO H I Ch1 Ch 2 OK LO PEAK HOLD H I LO H I LO H I Ch1 Ch 2 OK LO PEAK HOLD H I LO H I LO H I Ch1 Ch 2 OK LO PEAK HOLD H I LO H I LO 2 SI F function select P62 4 D Z synchronous mode P39 3 Display frequency P43 7 Average sample number P53 6 Detection time P57 5 Calculation hold function...

Page 30: ...tion select P23 F9 Mode9 Protect initialize As for an option setting a setting item is different depending F4 Mode4 Calibration setting H I Ch1 Ch 2 OK LO PEAK HOLD H I LO H I LO Ch1 H I LO H I Ch 2 OK LO PEAK HOLD H I LO H I Ch1 Ch 2 OK LO PEAK HOLD H I LO H I LO 2 ch1 Zero calibration P27 Moreover a set item is not displayed when there is no option 2 Output rate P68 2 Zero scale value P80 3 Deli...

Page 31: ...ng the setting value when available press F9 of setting mode 9 FNC ESC Go back to setting mode 1 ESC Go back to the indicated value Ch1 H I LO Ch1 H I LO For setting values available for ch1 and ch2 individually and inputting a setting value is displayed is displayed setting mode setting item F1 of setting mode 1 is displayed on the SUB display ch1 side switch with If key operation is not performe...

Page 32: ...H I LO H I LO H I Ch 2 OK LO PEAK HOLD H I LO H I Ch1 Ch 2 OK LO PEAK HOLD H I LO H I LO H I Ch1 Ch 2 OK LO PEAK HOLD H I LO H I LO Ch 2 H I LO Ch 2 H I LO Setting mode 1 COP HLD Setting mode 3 SYS ch Setting mode 2 SYS OPR Setting mode 4 CAL Setting mode 9 PRT INI Setting mode 5 OPTION The protect state of each setting mode is visible at a glance Protect information Protect ON Protect OFF For the...

Page 33: ...O PEAK HOLD H I LO H I LO Normal setting item Normal setting item with separate H I Ch1 Ch 2 OK LO PEAK HOLD H I LO H I LO Selected ch display 1 ch1 2 ch2 Item number 1 9 Mode number 1 5 9 Calibration operation item Zero calibration equivalent input Selected ch display Example 1 ch1 selected Indicated value Example ch1 indicated value 99 97 settings on ch1 and ch2 calibration actual load calibrati...

Page 34: ... go back to the HI LO limit setting item state HI LO Ch 2 H I LO Ch 2 H I LO LO Ch 2 H I H I Ch 2 LO Ch 2 H I LO Ch 2 H I LO HI LO H I Ch1 Ch 2 OK LO PEAK HOLD H I LO H I LO H I Ch1 OK LO PEAK HOLD H I LO H I Ch1 OK LO PEAK HOLD H I LO H I Ch1 OK LO PEAK HOLD H I LO H I Ch1 OK LO PEAK HOLD H I LO H I Ch1 OK LO PEAK HOLD H I LO H I Ch1 OK LO PEAK HOLD H I LO HI LO HI LO ESC Indicated value display ...

Page 35: ...he change can be cancelled by pressing While a signed setting value is being input press to select whether or not to sign it 5 Upon validation you will go back to the setting item select state H I Ch1 Ch 2 OK LO PEAK HOLD H I LO H I LO FNC H I Ch1 Ch 2 OK LO PEAK HOLD H I LO H I LO H I Ch1 Ch 2 OK LO PEAK HOLD H I LO H I LO H I Ch1 Ch 2 OK LO PEAK HOLD H I LO H I LO H I Ch1 Ch 2 OK LO PEAK HOLD H ...

Page 36: ...Gain will be automatically decided by registering the values indicated as follows Actual load calibration This approach provides calibration by applying an actual load to the strain gauge sensor and inputting the actual load value This calibration is without little errors and more correct Perform either actual load calibration or equivalent input calibration If an actual load cannot be applied mak...

Page 37: ...sensor unloaded Equivalent input calibration Register the rated output value of the strain gauge sensor and the indicated value of that time Actual load calibration Set the span gain point of the strain gauge sensor with a load applied to the sensor The calibrated value can be offset in advance When not using set 0 Set the load limit that allows Digital Zero Set the HI LO limit for monitoring over...

Page 38: ...ress to validate it 3 Press twice to go back to the indicated value display Excitation voltage setting Select the bridge voltage excitation voltage supplied to the strain gauge sensor The bridge voltage can be selected from 2 5V and 10V After this setting make sure to perform calibration Setting value 0 2 5V 1 10V Common to ch1 and ch2 Decimal place setting Set the decimal place for load value rel...

Page 39: ...r digit with Initial value 0 Select decimal place Input the decimal place with and move to the lower digit with Initial value 2 Select min scale division Input the min scale division with and validate it with Initial value 0 3 Press twice to go back to the indicted value display CAUTION The maximum excitation voltage value of the strain gauge sensor connected to the F350 should always be larger th...

Page 40: ...ration 1 Select setting mode 4 Press three times 2 Set Zero calibration Press twice Zero calibration is displayed For performing ch2 zero calibration switch with Enter a setting value input state with and the entire setting value blinks Initial value 0 000 Unload the sensor check the current load value on the sub display ch2 and press 3 Zero calibration is executed A message as shown on the right ...

Page 41: ...ed when an error occurs Equivalent input calibration setting method Example ch1 equivalent input calibration 1 Select setting mode 4 Press three times 2 Set Rated output value of the sensor Press three times Equivalent input calibration is displayed For performing ch2 equivalent input calibration switch with Enter a setting value input state with and the highest digit blinks Initial value 3 000 Ch...

Page 42: ...t input calibration is executed normally you will go back to the setting item select state H I Ch1 Ch 2 OK LO PEAK HOLD H I LO H I LO H I Ch1 Ch 2 OK LO PEAK HOLD H I LO H I LO H I Ch1 Ch 2 OK LO PEAK HOLD H I LO H I LO If the calibration error is displayed take measures according to each error and redo calibration For details see 11 7 Error message list on page 97 After completion of calibration ...

Page 43: ... load calibration on ch2 switch with Enter a setting value input state with and the highest digit blinks Initial value 100 00 Check the capacity of the actually applied load and input the value with For inputting a negative sign press Move to the lower digits with Recheck that the load is properly applied on the sub display ch2 side and press to validate it 3 Actual load calibration is executed If...

Page 44: ...ting value of digital offset Setting value 19999 19999 Digital offset setting method 1 Select setting mode 4 Press three times 2 Set Digital offset Press five times Digital offset is displayed Switch desired ch with Press and the highest digit blinks Input the setting value with Move to the lower digits with Validate it with For inputting a negative sign press 3 Press twice to go back to the indic...

Page 45: ...setting value is common to ch1 and ch2 The amounts of Digital Zero obtained from the point where zero calibration was performed are monitored Digital Zero limit setting method 1 Select setting mode 4 Press three times 2 Set Digital Zero limit Press six times Digital Zero limit is displayed Press and the highest digit blinks Input the setting value with Move to the lower digits with Validate it wit...

Page 46: ...is also possible Alarm HI and LO limits setting method 1 Select setting mode 4 Press three times 2 Set Alarm HI limit Press seven times Alarm HI limit is displayed Press and the highest digit blinks Input the setting value with Move to the lower digits with Validate it with Initial value 99999 For inputting a negative sign press while the input digit is blinking 3 Set Alarm LO limit Press once Ala...

Page 47: ...ng method 1 Select setting mode 9 Press five times 2 Set Calibration protect Press once Setting protect is displayed Press twice to make the digit of the calibration protect blink Input the setting value with Initial value 0 Press to validate it 3 Press twice to go back to the indicated value display Ch1 Ch 2 H I LO H I LO FNC H I Ch1 Ch 2 OK LO PEAK HOLD H I LO H I LO 0 0 0 Calibration protect 0 ...

Page 48: ...set at 300 times sec 30 times 300 times sec 100msec See 5 3 Digital filter on page 37 I O scan time For example the delay time of output signals changes The delay time is 0 7 msec at 3000 times sec and 7 msec 10 times at 300 times sec BCD output interface option The fastest setting of update rate is 300 times sec when the A D conversion speed is 300 times sec D A converter option output Updating o...

Page 49: ...frequencies With an increase in the cut off frequency the response becomes faster but noise components may be displayed It can be set for each of the ch1 and ch2 inputs Setting value 0 3Hz 1 30Hz 2 300Hz 3 1kHz Analog filter setting method 1 Select setting mode 3 Press twice 2 Set Analog filter Press twice Analog filter is displayed Press and present set value blinks Input the setting value with P...

Page 50: ... inputs becomes slower It can be set for each of the ch1 and ch2 values Setting value OFF 0 2 999 times One time corresponds to one sampling for A D conversion Digital filter setting method 1 Select setting mode 3 Press twice 2 Set Digital filter Press once Digital filter is displayed It changes according to to execute the setting of ch2 Press and the highest digit blinks Input the setting value w...

Page 51: ... screen in 2 for execute wait of both ch1 and ch2 5 During execute wait as in 2 4 Press once to zero the indicated value for execute wait Press once to perform Digital Zero reset of the indicated value for execute wait Press once to cancel the state for execute wait and go back to the indicated value display state H I Ch1 Ch 2 OK LO PEAK HOLD H I LO H I LO ZERO H I Ch1 Ch 2 OK LO PEAK HOLD H I LO ...

Page 52: ...ime Setting value 0 ch1 and ch2 synchronous When the external input D Z 1 B11 is turned ON Digital Zero functions on both ch1 and ch2 at the same timing 1 ch1 and ch2 independent When the external input D Z 1 B11 is turned ON Digital Zero functions on ch1 and when the external input D Z 2 B12 is turned ON Digital Zero functions on ch2 D Z synchronous mode setting method 1 Select setting mode 3 Pre...

Page 53: ...tting method 1 Select setting mode 3 Press twice 2 Set Zero Tracking Press twice Zero Tracking is displayed It changes according to to execute the setting of ch2 Press and the highest digit blinks Set Zero Tracking time Input the setting value with Move to the lower digits with Initial value 0 0 Set Zero Tracking rande Input the setting value with Move to the lower digits with Initialvalue 00 Pres...

Page 54: ...alue has already exceeded the tracking band When displacement of the zero point is within the set count of tracking and it continues more than the set time it is automatically made zero by Zero Tracking function The time tracking delay is set in the range of 0 1 9 9 sec and the band tracking band is set in the range of 01 to 99 If the time is set at 0 0 sec and the band at 00 the zero tracking fun...

Page 55: ...t Press once Motion Detect is displayed Press and the highest digit blinks Set Motion Detect time Input the setting value with Move to the lower digits with Initial value 0 0 Set Motion Detect range Input the setting value with Move to the lower digits with Initial value 00 Press to validate it 3 Press twice to go back to the indicated value display d1 d2 d3 d4 d5 d6 d7 d8 Motion Detect time 0 4se...

Page 56: ...es not change Setting value 0 3 times 1 6 times 2 13 times 3 25 times Display frequency setting method 1 Select setting mode 2 Press once 2 Set Display frequency Press three times Display frequency is displayed Press and present set value blinks Input the setting value with Press to validate it Initial value 3 3 Press twice to go back to the indicated value display Ch1 Ch 2 H I LO H I LO FNC H I C...

Page 57: ...he ch2 value results 4 Low select A smaller value is always selected When the ch1 value ch2 value the ch 1 value results and when the ch1 value ch2 value the ch2 value results Calculation mode setting method 1 Select setting mode1 Press once 2 Set Calculation mode Press four times Calculation mode is displayed Press and the highest digit blinks Input the setting value with Initial value 0 Press to...

Page 58: ...f the HI LO limit comparison is turned off Normally HI is turned on when the indicated value exceeds the HI limit and is turned off when the indicated value falls below it However by setting the hysteresis HI is turned off when the indicated value falls below the HI limit further lowered by the hysteresis value This function is effective to prevent chattering phenomenon in which signals repeat tur...

Page 59: ... with Initial value 0000 Press to validate it 3 Press twice to go back to the Indicated value display High limit value Low limit value 0 Hysteresis range Time HI output HI status display LO output LO status display OK status display Output ON Status ON Output OFF Status OFF Status ON Status ON Output ON Status ON Output ON Status ON Output OFF Status OFF Output OFF Status OFF Indicated value OK ou...

Page 60: ...1 Press once 2 Set Near Zero Press twice Near Zero is displayed Press and the highest digit blinks Input the setting value with Move to the lower digits with Initial value 100 Press to validate it 3 Press twice to go back to the indicated value display Near Zero ON OFF is closely related to the SI F print stable value function and calculation comparison timing For details see 6 5 Calculation compa...

Page 61: ... when the calculated value is stable and Near Zero is off 4 Hold HI LO limit comparison is performed when a hold is fixed Calculation comparison timing setting method 1 Select setting mode1 Press once 2 Set Calculation comparison timing Press once Calculation function select is displayed Press and the highest digit blinks Input the setting value with Initial value 0 Press to validate it 3 Press tw...

Page 62: ... HI limit LO limit ch1 HI limit LO limit and ch2 HI limit LO limit are all off Comparison OK output conditions setting method 1 Select setting mode1 Press once 2 Set Comparison OK output conditions setting Press once Calculation function select is displayed Press and the highest digit blinks Press once and the lower digits blinks Input the setting value with Initial value 0 Press to validate it 3 ...

Page 63: ...ent 1 Select a hold you want to use 2 If the hold has the setting of section set a section you want to use For details see 7 3 Setting of hold section on page 54 3 Set the special setting value required for the hold used 4 After confirmation of wiring perform hold control by external input and start measurement Hold mode Hold section 0 OFF None 1 Sample 0 All section 1 External signal 2 Peak 0 All...

Page 64: ... the instant when the indicated value is held Approximately 0 7ms MAX t2 A delay time between the instant when the T H signal is released and the instant when the indicated value returns to tracking Approximately 0 7ms MAX t3 A minimum reset signal width required for releasing the hold Approximately 0 7ms MIN The delay time and signal width expressed apply when the A D conversion speed is 3000 tim...

Page 65: ...hen the T H signal is inputted and the instant when the indicated value is held Approximately 0 7ms MAX t2 A delay time between the instant when the T H signal is released and the instant when the indicated value returns to tracking Approximately 0 7ms MAX t3 A minimum reset signal width required for releasing the hold Approximately 0 7ms MIN The delay time and signal width expressed apply when th...

Page 66: ...ue detection time is exceeded detection is automatically terminated and the average value of that time is held Average sample number In the average hold the maximum average value detection time for average processing by each sampling depends on the A D conversion speed as follows When the A D conversion speed is 300 times sec 50sec When the A D conversion speed is 3000 times sec 5sec Then if this ...

Page 67: ...Select setting mode 1 Press once 2 Set Hold section Press four times Calculation hold function select is displayed Press and the highest digit blinks Press twice to make the digit of the Hold section blink Initial value 0001 Input the setting value with Press to validate it 3 Press twice to go back to the indicated value display Ch1 Ch 2 H I LO H I LO FNC H I Ch1 Ch 2 OK LO PEAK HOLD H I LO H I LO...

Page 68: ...alue returns to tracking Approximately 0 7ms MAX t3 A minimum reset signal width required for releasing the hold Approximately 0 7ms MIN The delay time and signal width expressed apply when the A D conversion speed is 3000 times sec They become 10 times when the A D conversion speed is 300 times sec Note During the undetermined sections the judging output varies with fluctuations in the input wave...

Page 69: ...be held is detected Approximately 0 7ms MAX t2 A delay time between the instant when the SECTION signal is released and the instant when the value to be held is determined Approximately 0 7ms MAX t3 A minimum reset signal width required for releasing the hold Approximately 0 7ms MIN The delay time and signal width expressed apply when the A D conversion speed is 3000 times sec They become 10 times...

Page 70: ...e and signal width expressed apply when the A D conversion speed is 3000 times sec They become 10 times when the A D conversion speed is 300 times sec By turning on the SECTION signal again without turning on the T H signal while the hold is fixed the hold is released and re detection is started For details see 7 4 Auto reset function on page 58 Detection time Set the hold detection time Setting v...

Page 71: ...CTION signal is turned on again even if the T H signal is not turned on This is the initial setting factory default setting SECTION T H H E Example Auto reset in externally specified section peak hold Upon turning ON of the SECTION signal hold reset is performed and detection starts Control can be performed without inputting the T H signal However a hold value is maintained until the SECTION signa...

Page 72: ...igit blinks Press three times to make the digit of the auto reset blink Initial value 0001 Input the setting value with Press to validate it 3 Press twice to go back to the indicated value display Ch1 Ch 2 H I LO H I LO FNC H I Ch1 Ch 2 OK LO PEAK HOLD H I LO H I LO Hold section Hold mode 0 0 0 1 Calculation mode Auto reset Setting value 0 OFF 1 ON This setting is required when the hold section is...

Page 73: ... B12 IN D Z 2 A1 A7 B1 Common for external output signals External I O connection on page 14 A2 Outputs the calculated value HI limit signal 6 EXPLANATION OF COMPARISON FUNCTIONS on page 44 A3 Outputs the calculated value OK signal A4 Outputs the calculated value LO limit signal A5 Outputs the ch1 value HI limit signal A6 Outputs the ch1 value LO limit signal A8 Outputs the ch1 value alarm signal ...

Page 74: ... display etc SI F interface connection on page 15 8 2 SI F Serial interface on page 62 B7 Common for external input signals External I O connection on page 14 B8 B9 Inputs the hold control signal 7 EXPLANATION OF HOLD FUNCTIONS on page 50 B11 B12 Inputs the Digital Zero signal 5 4 Digital Zero on page 38 Refer to 11 7 Error message list on page 97 about the contents of errors OFF RUN ON OFF RUN ON...

Page 75: ...tting value with Initial value 0 Press to validate it 3 Press twice to go back to the indicated value display SI F print Setting value 0 None No print command is sent 1 Stable value When stability of the calculated value is detected a print command is sent to the SI F to make the connected printer print automatically When Near Zero is OFF the calculated value is held until Near Zero ON after stabl...

Page 76: ... selected be aware that automatic printing is not performed in the following case When Motion Detect is set in time 0 0 sec count 00 Also the indicated value is not held in the following case Hold mode When any item other than none is selected Point Ch1 Ch 2 H I LO H I LO FNC SI F print 0 None H I Ch1 Ch 2 OK LO PEAK HOLD H I LO H I LO 0 0 0 Undefined 1 Stable value SI00 F Indicated value 2 Hold v...

Page 77: ...process controller sequencer or the like The I O and internal circuits are electrically insulated by photocoupler Connection Output The signal output circuit employs the TTL open collector output 9 OPTION INTERFACE BCD data output connector Internal transistor status Output data Negative Positive 0 OFF ON 1 ON OFF Vceo 30V max Output pin level Output data Negative Positive 0 H L 1 L H Through logi...

Page 78: ...c 10mA Leakage from the external element is required to be 30μA or below A1 COM B1 COM A2 OUT 1 B2 OUT 1000 A3 OUT 2 B3 OUT 2000 A4 OUT 4 B4 OUT 4000 A5 OUT 8 B5 OUT 8000 A6 OUT 10 B6 OUT 10000 A7 OUT 20 B7 OUT 20000 A8 OUT 40 B8 OUT 40000 A9 OUT 80 B9 OUT 80000 A10 OUT 100 B10 OUT Minus Polarity A11 OUT 200 B11 OUT OVER A12 OUT 400 B12 OUT STAB A13 OUT 800 B13 OUT STROBE A14 IN Data Hold B14 IN L...

Page 79: ...g value with Initial value 0 Press to validate it 3 Press twice to go back to the indicated value display Signal timing Minus Turns on when the output indicated value data is negative OVER Turns on at over scale time LOAD LOAD OFL1 OFL2 STAB Turns on at stable time See 5 7 Motion Detect on page 41 STROBE Strobe pulses are output in synchronization with BCD data For reading the data use the rising ...

Page 80: ...D data output signal is stopped Also the STROBE output turns OFF Make selection with A14 When COM and A14 are open Update stop canceled When COM and A14 are short circuited Update stopped Read at least 2 cycles after inputting the BCD data hold As long as the BCD data hold is input data can be read reliably but because the data is not updated it may be different from original data BCD data OVER St...

Page 81: ...displayed Press and present set value blinks Input the setting value with Initial value 3 Press to validate it 3 Press twice to go back to the indicated value display BCD binary select The output data selection can be changed to binary Setting value 0 BCD 1 Binary Even if this setting is changed A D conversions speed does not change Make the output rate slower when reading fails due to a low proce...

Page 82: ...tputs the data specified by the output data selection or by A15 and B15 data select can be checked A1 COM B1 COM A2 OUT 20 B2 OUT 212 A3 OUT 21 B3 OUT 213 A4 OUT 22 B4 OUT 214 A5 OUT 23 B5 OUT 215 A6 OUT 24 B6 OUT 216 A7 OUT 25 B7 OUT A8 OUT 26 B8 OUT Data Switching 0 Response A9 OUT 27 B9 OUT Data Switching 1 Response A10 OUT 28 B10 OUT Minus Polarity A11 OUT 29 B11 OUT OVER A12 OUT 210 B12 OUT S...

Page 83: ...232C Transmitting distance Approx 15m Transmitting method Asynchronous Full duplex Baud rate 9600 19200 38400 57600bps Selectable Bit configuration Start bit 1bit Character length 7 or 8 bit Selectable Stop bit 1 or 2 bit Selectable Parity Parity none odd or even Selectable Delimiter CR CR LFSelectable Code ASCII Connector pin assignment Adaptable connector 9 pin D SUB connector Connector XM3D 092...

Page 84: ...ite in set values 1 Continuous send This mode continuously transmits the indicated values and the status 2 Print send mode When the indicated value is printed a print command is output to the SI F the indicated value and status are sent from the F350 to host Communication mode setting method 1 Select setting mode 5 Press four times 2 Set Communication mode Press once Communication mode is displaye...

Page 85: ...he delimiter for sending messages from the F350 Setting value 0 CR 1 CR LF Delimiter setting method 1 Select setting mode 5 Press four times 2 Set Delimiter Press three times Delimiter is displayed Press and present set value blinks Input the setting value with Initial value 11100 Press to validate it 3 Press twice to go back to the indicated value display Ch 2 H I LO Ch1 H I LO FNC H I Ch1 Ch 2 O...

Page 86: ...decimal point 5 digit indicated value R 3 2 1 B R CR B 5 4 Delimiter Host F350 Sign decimal point 5 digit indicated value R 3 2 1 C R CR C 5 4 Delimiter Host F350 Sign decimal point 5 digit indicated value R 0 0 0 0 0 D R CR D 0 0 Delimiter Host F350 Hold Stable Near Zero HI OK LO 0 OFF 1 ON 0 OFF 1 ON 0 OFF 1 ON 0 OFF 1 ON 0 OFF 1 ON 0 OFF 1 ON Undefined Calculated value Calculated value Calculat...

Page 87: ... 0 0 0 F R CR F 0 0 Delimiter Host F350 OFL2 ch1 0 OFF 1 ON 0 OFF 1 ON 0 OFF 1 ON 0 OFF 1 ON 0 OFF 1 ON Undefined Undefined LOAD ch1 LOAD ch1 OFL1 ch1 cErr ch1 R 0 0 0 0 0 G R CR G 0 0 Delimiter Host F350 OFL2 ch2 0 OFF 1 ON 0 OFF 1 ON 0 OFF 1 ON 0 OFF 1 ON 0 OFF 1 ON Undefined Undefined LOAD ch2 LOAD ch2 OFL1 ch2 cErr ch2 R 3 2 1 J R CR J 5 4 Delimiter Host F350 Sign decimal point 5 digit indicat...

Page 88: ...t a zero in the 3rd digit 1 0 5 1 0 W CR 0 Example Time 1 5sec Range 10 For a setting value with a decimal point simply write When the setting value is unsigned put a zero in the sign digit the numerical value excluding the decimal point W 4 3 2 1 1 1 1 1 5 Delimiter Host F350 CR W Sign decimal point 5 digit indicated value command A setting value with a decimal point results in the numerical valu...

Page 89: ...C G Digital Zero reset with channel switching C H SI F print command C I SECTION ON C 1 SECTION OFF C 2 T H ON C 3 T H OFF C 4 C CR Z Host F350 C CR S Host F350 C CR E Host F350 C CR F Host F350 C CR G Host F350 C CR H Host F350 C CR I Host F350 C CR 1 Host F350 C CR 2 Host F350 C CR 3 Host F350 C CR 4 Host F350 Give commands with channel switching after setting the channel by ch switching For det...

Page 90: ...and is received while the 5 0 6 8 4 7 1 1 3 2 10 9 8 7 6 5 4 3 2 12 11 0 1 S8 S7 S6 S5 S4 S3 S2 S1 S9 F350 G S Delimiter 5 4 3 2 1 ch2 Calculated value ch1 S1 S2 S3 S4 S5 S Stable M Not Stable H Calculated value Hold O ch1 Over Load LOAD OFL1 2 A ch1 Alarm C ch1 Calibration error N No error O ch2 Over Load LOAD OFL1 2 A ch2 Alarm C ch2 Calibration error N No error H Calculated value HI ON L Calcul...

Page 91: ...h respect to the predetermined digital value The output circuit and the main unit circuit are isolated The resolution is 1 10000 with respect to the ranges of 10 to 10V and of 4 to 20mA and the conversion speed follows the A D conversion speed The maximum voltage output range are about 11V the maximum current output range are about 2 4 21 6 mA Connection For the output terminals of the D A convert...

Page 92: ...2 value Output is made in synchronization with the ch2 value 3 Zero fix Output is fixed at the zero output 0V for voltage output 4mA for current output After fixing you will go to the output adjustment mode so that zero adjustment can be made See Adjustment by fixed output on page 81 4 Full scale fix Output is fixed at the full scale 10V for voltage output 20mA for current output After fixing you ...

Page 93: ... Full scale Set the indicated value to output 10V for voltage output and 20mA for current output Setting value Zero Full scale value 99999 99999 Set so that the Zero scale value Full scale value Zero Full scale setting method 1 Select setting mode 5 Press four times 2 Set Zero scale value and Full scale value Set Zero scale value Press twice Zero scale value is displayed Press and the highest digi...

Page 94: ...e it so that the adjusted value is registered Zero fixed output Full fixed output Keeping on pressing results in continuous operation The adjustable range of voltage output is approximately 2 0V and that of current output is approximately 1 6mA Press to bring the adjusted value back to the central point 0 Press to stop adjustment and go back to the indicated value display screen By initializing th...

Page 95: ... to 1mV V Voltage output Approximately 2V per load cell input of 1mV V load resistance 2kΩ or more Display section Display 7 segment LED LED lamps Main display Character height 15mm 6 digit indicated value 99999 to 99999 Sub display Character height 8mm 5 digit indicated value 19999 to 19999 At the highest digit of the display or nothing is displayed Status display HI OK LO PEAK HOLD Red LED Decim...

Page 96: ...d value ch1 value calculated value ch2 value or ch1 value ch2 value Options BCD parallel data output BCD Open collector output circuit sink type Data format BCD or binary selectable Output rate 10 30 50 100 300 500 1000 times sec Rated voltage 30V Driving current 30mA or less Output data Selected by the setting of calculated value ch1 value or ch2 value or externally RS 232C interface 232 Transmit...

Page 97: ...power source 50 60Hz Power consumption 10W max Operating conditions Temperature Operation 10 40 Storage 40 80 Humidity 85 RH or less non condensing Dimension 96 W 96 H 138 D mm Projections excluded Panel cutout size 92 92 mm Weight Approximately 1 0 kg Attachment External input output connector 1 AC input cord with solderless terminal 1 Conversion plug for AC input code 1 Ferritic core with unity ...

Page 98: ...85 10 SPECIFICATIONS 85 SPECIFICATIONS Chapter 10 10 2 Dimensions Standard equipment Equipped with BCD parallel data output interface option Unit mm Unit mm ...

Page 99: ...86 10 SPECIFICATIONS 86 SPECIFICATIONS Chapter 10 Equipped with RS 232C interface option Equipped with D A converter option Unit mm Unit mm ...

Page 100: ...bit External SRAM Serial Port ROM 256KB Serial Port SI F 7 segment LED LED lamps LED Driver Membrane keys input 100 240V L N 9V 12V LED Lithium battery 2 1 1 OPTION 2 Indicates the insulation by Photo coupler MONITOR1 MONITOR2 MPU DAV DAI Gain adjustment Low pass Fillter Excitation Voltage 2 5 10V Buffer A D Conversion 24bit Power Supply Unit Control Input Control Output Gain adjustment Low pass F...

Page 101: ...n protect NOVRAM Saved in NOVRAM No mark Saved in SRAM lithium battery backed up Reference Reference page on which the details of each item are described Mode 0 work setting comparison Setting item Initial value Setting range Setting by ch Operat ion Protect NOV RAM Refere nce No Name 1 Calculated value HI limit 2000 99999 99999 P21 P45 2 Calculated value LO limit 2000 99999 99999 3 Ch HI limit 75...

Page 102: ... 0 0 0 0 Undefined Calculation comparison timing 0 All time 1 Stable Calculation comparison OK 1 Calculated value OK Undefined 2 Calculated value OK 3 Calculated value OK 2 Near Zero OFF 3 Stable and Near Zero OFF 4 Hold 0 Calculated value OK only output condition ch1 value OK ch2 value OK ch1 value OK ch2 value OK 0 0 1 0 Auto reset Calculation mode 0 Ch1 Ch2 1 Ch1 Ch2 Hold mode 0 OFF 1 Sample Ho...

Page 103: ...e Setting by ch Opera tion Protec t NOV RAM Refere nce No Name 1 Digital filter 0 0 OFF 2 999 times P37 2 Analog filter 2 0 3 1 30 2 300 3 1k Hz P36 3 Zero Tracking 0 0 00 P43 4 D Z synchronous mode 0 0 ch1 and ch2 synchronous 1 ch1 and ch2 independent P39 5 A D conversion speed select 1 0 300 1 3000 times sec P35 6 7 8 9 H I OK LO PEAK HOLD 0 0 0 0 Range 00 99 count Times 0 0 9 9 sec 0 0 0 Undefi...

Page 104: ... Digital Zero limit 19999 0 19999 P32 7 Alarm HI limit 19999 19999 19999 P33 8 Alarm LO limit 19999 19999 19999 P33 9 Setting item Initial value Setting range Setting by ch Opera tion Protec t NOV RAM Refere nce No Name 1 Output data select 0 0 Calculated value 1 ch1 2 ch2 3 External selection P66 2 Output rate 3 0 10 4 300 1 30 5 500 2 50 6 1000 3 100 times sec When the conversion speed is 300 ti...

Page 105: ...imiter 0 0 CR 1 CR LF P72 4 5 6 7 8 9 Setting item Initial value Setting range Setting by ch Opera tion Protec t NOV RAM Refere nce No Name 1 Output data select 0 0 Calculated value 1 ch1 2 ch2 3 Zero fix 4 Full fix P79 2 Zero scale value 0 99999 99999 P80 3 Full scale value 10000 99999 99999 P80 4 5 6 7 8 9 H I OK LO PEAK HOLD 1 1 1 0 0 Flow control 0 None 1 RTS CTS Character length 0 7bit 1 8bit...

Page 106: ...ere nce No Name 1 Setting protect 000 P95 2 Key protect 000 P96 3 Initialize 0 0 Undefined 1 Work setting 2 System setting 3 Calibration setting P97 4 Password 0000 P97 5 6 7 8 9 H I OK LO PEAK HOLD 0 0 0 Calibration protect Work protect 0 OFF 1 ON System protect 0 OFF 1 ON 0 OFF 1 ON 0 0 0 Undefined ZERO key protect 0 OFF 1 ON HOLD key protect 0 OFF 1 ON ...

Page 107: ...H I Ch1 Ch 2 OK LO PEAK HOLD H I LO H I LO H I Ch1 Ch 2 OK LO PEAK HOLD H I LO H I LO H I Ch1 Ch 2 OK LO PEAK HOLD H I LO H I LO H I Ch1 Ch 2 OK LO PEAK HOLD H I LO H I LO H I Ch1 Ch 2 OK LO PEAK HOLD H I LO H I LO H I Ch1 Ch 2 OK LO PEAK HOLD H I LO H I LO H I Ch1 Ch 2 OK LO PEAK HOLD H I LO H I LO H I Ch1 Ch 2 OK LO PEAK HOLD H I LO H I LO H I Ch1 Ch 2 OK LO PEAK HOLD H I LO H I LO Self check di...

Page 108: ...est digit blinks Input the setting value of Work protect with Move to the lower digit with Input the setting values of System protect and Calibration protect in a like manner Press to validate it 3 Press twice to go back to the indicated value display 0 0 0 Calibration protect 0 OFF 1 ON System protect 0 OFF 1 ON Work protect 0 OFF 1 ON Ch1 Ch 2 H I LO H I LO FNC H I Ch1 Ch 2 OK LO PEAK HOLD H I L...

Page 109: ...s displayed Press and the highest digit blinks Input the setting value of ZERO key protect with Move to the lower digit with Input the setting values of HOLD key protect in a like manner Press to validate it 3 Press twice to go back to the indicated value display ZERO HOLD 0 0 0 Undefined HOLD Key protect 0 OFF 1 ON ZERO Key protect 0 OFF 1 ON Ch1 Ch 2 H I LO H I LO FNC H I Ch1 Ch 2 OK LO PEAK HOL...

Page 110: ...lize setting method 1 Select setting mode 9 Press five times 2 Excecute initialization Press three times Initialize is displayed Press and blinks Input the setting value for initialization with Press to validate it Upon validation initialization is executed and the setting value goes back to 0 3 Press twice to go back to the indicated value display 11 6 Password This setting is for maintenance and...

Page 111: ...direction Beyond the rated capacity value The signal input range is greatly exceeded when calibration is performed In the case of equivalent input calibration check the rated output value and in the case of actual load calibration check for an excessive load applied to the sensor and for breaks Also Check the setting of rated capacity value display value sets it exceeding 19999 cErr5 Rated capacit...

Page 112: ...r goes out and the value becomes stable Setting and operation It is desired to decrease the number of digits of the numerical value Since there is a need to decrease the number of digits of the value input during equivalent input calibration or actual load calibration perform calibration again Also set the load related setting values such as HI and LO limit values again according to that number of...

Page 113: ... see if it is in synchronization with the strobe signal Make the output rate slower or use the BCD data hold if the processing performance of the device that should receive BCD is low Hold values do not result The output data differ according to the setting or external selection Check to see if it is a calculated value RS 232C option Communications fail Check to see if the communication cable is p...

Page 114: ...y 1 Disconnect all cables 2 Open the top plate 3 Pull out the connector at the tip of the cable of the lithium battery Pinch and pull out the connector while tilting it upward for easy removal 4 Cut the binding band that fixes the lithium battery with nippers or the like 5 Cut the red and black cables one by one at the root of the lithium battery with nippers or the like so as not to short circuit...

Page 115: ......

Reviews: