


88
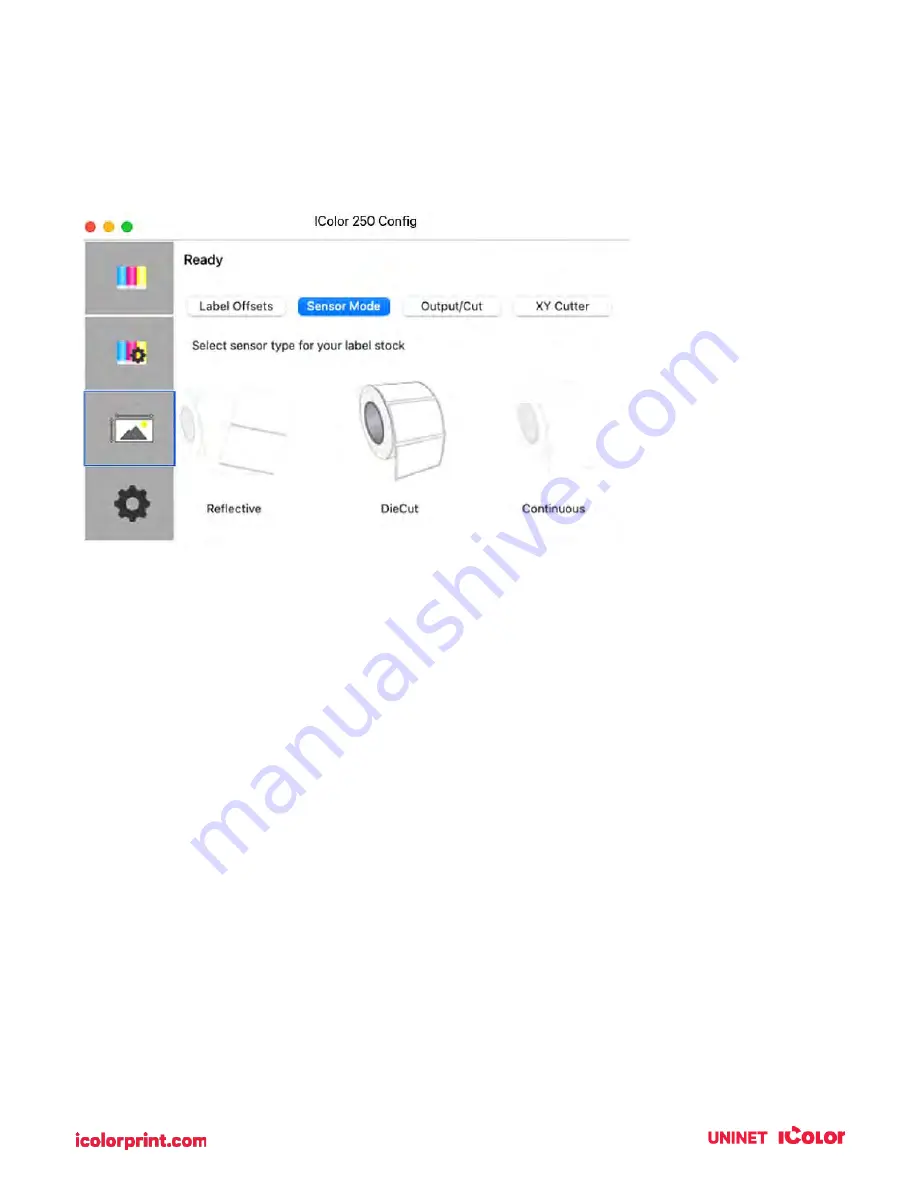
6C. Set the Stock Sensor Mode (Pre-Die-Cut Only)
The stock sensor mode refers to the method the printer will use to detect the print starting position for
each label. To access the Stock Sensor Mode, click on the Alignment button, then select Stock Sensor
Mode. In most cases, you will not need to change this setting.
•
Die Cut (Default). If you are using standard die-cut labels that look similar to the graphic
use this setting regardless of the size of the label. Also, use this setting for through-hole
label material where a hole is punched through each label or a notch is cut on the side.
•
Reflective. Use Reflective for label material where a black preprinted line (black mark) on
the back of the label stock indicates the break between labels. Black marks are required
on clear label stock rolls or labels where the label waste matrix (waste) is left on the liner.
Black marks can also be used for irregular shaped labels, circles larger than 4.6 inches, or
on any stock where the print starting position cannot be sensed using the label itself.
•
Continuous. (Sensor off) If you have continuous stock with no die-cut, reflective mark, or
holes, set the Sensor Type to Continuous. This will turn off the stock sensor. In this
mode, there is no way to set the print starting position. The printer will simply start
printing the first label and print each subsequent label immediately after the previous. To
produce a gap between prints simply add the desired amount of white space to the end
of the label being printed.
NOTE: This
section only
applies to Pre-
Die-Cut Stock.
For an explanation
of stock types,
please see section
2A.
IMPORTANT NOTE: Set the Stock Sensor Mode BEFORE loading the label stock. You must also set
the Stock Sensor Position (section 2D) so that the sensor is sensing the correct point on the label
stock.
Summary of Contents for IColor 250
Page 1: ......
Page 52: ...51 2 Browse to the file you would like to use and choose Open ...
Page 59: ...58 8 Center the image horizontally and vertically to the page ...
Page 73: ...72 2 Select Blank Template Click Next 3 Select IColor 250 Label Click Next ...
Page 104: ...103 Printing from Preview Click on the Preview dropdown menu and choose Printer Features ...
Page 114: ...113 4 Prepare items needed for the procedure 5 Soak the paper towels in water for 5 seconds ...


