Main Menu Configuration
11
3.1.2. Camera Name
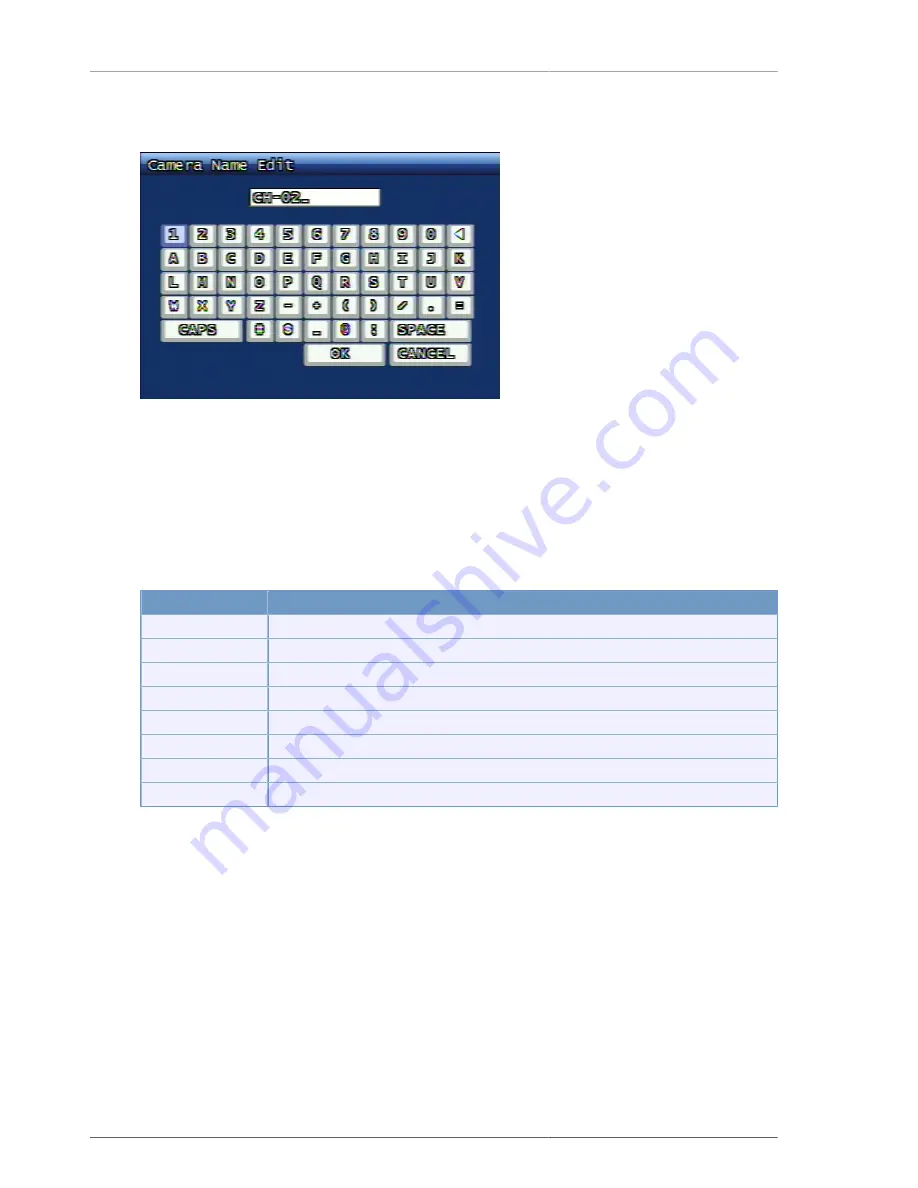
Figure 3.3. Camera Setup Screen
This is to set up camera name from the above selected channel. The virtual keyboard is provided to enter and to
edit the name of each channel. The user can select the letters to configure the name and the maximum length of
camera name is up to 12 digits. The nominated camera name is to be displayed on the left top corner on live view.
By using CAPS button, capital or small letters are selectable and by using RPLAY button, wrong input letters can
be erased. OK button confirms the input name and proceeds to upper menu. CANCEL button will terminate the
activitiy without saving the new name, but keeping the previous name, proceeding to upper menu.
Key
Explanation
Direction Key
Movement of button
OK
Pressing the selected button
Numeric Key
Numeric Input
SEQ
'.' Input
MULTI
Change of small or capital letters (CAPS)
PLAY
Space Input
R.PLAY
Back Space Input
MENU
Movement to OK button
Table 3.1. Key operation on Keyboard Screen
3.1.3. Hiding the screen
This is to set up live screen display option per channel. When this function is ON, then the live screen of the
relevant set channel will be invisible. If it's on recording mode, recording continues without any display of relevant
channel on screen.
Summary of Contents for H.264 Real Time DVR
Page 1: ...FULL MANUAL H 264 Real Time DVR Version 1 0 0 Unimo Technology ...
Page 70: ...PC Client Introduction 60 Figure 4 7 When DVR is not on recording ...
Page 72: ...PC Client Introduction 62 Figure 4 9 This screen shows the searched recoreded data on DVR ...
Page 73: ...PC Client Introduction 63 Figure 4 10 Backup Guide Screen ...
Page 75: ...PC Client Introduction 65 Figure 4 12 This screen shows the searched recoreded data on DVR ...
Page 81: ...PC Client Introduction 71 Figure 4 17 D Zoom Example ...
Page 111: ...PC Client Introduction 101 Figure 4 59 Calendar Search Screen ...
Page 115: ...PC Client Introduction 105 Figure 4 62 Still Image Screen Figure 4 63 Watermark Except Screen ...


