background image

12

KLEv2

KLEv2 Default Setting


The factory default network settings for KLEv2 are as follows:


IPv4 Address: 

 192.168.1.200


Subnet Mask:

  255.255.255.0


Default Gateway:

  192.168.1.254


DNS Servers:

  192.168.1.254


The default access KLEv2 Web Browser Management Interface:

  https://192.168.1.200:5908

 The default administrator account name and password:


User nam

e:


superuser


Passw

ord:


superu

Configuring KLEv2 Network Setting

 Temporary create a isolated network, not connected to the local or company network, 

with KLEv2 and a computer that has a browser.

 Connect with the KLEv2 Remote I/O or 

Ethernet Port, by having the computer in the same subnet as the KLEv2.


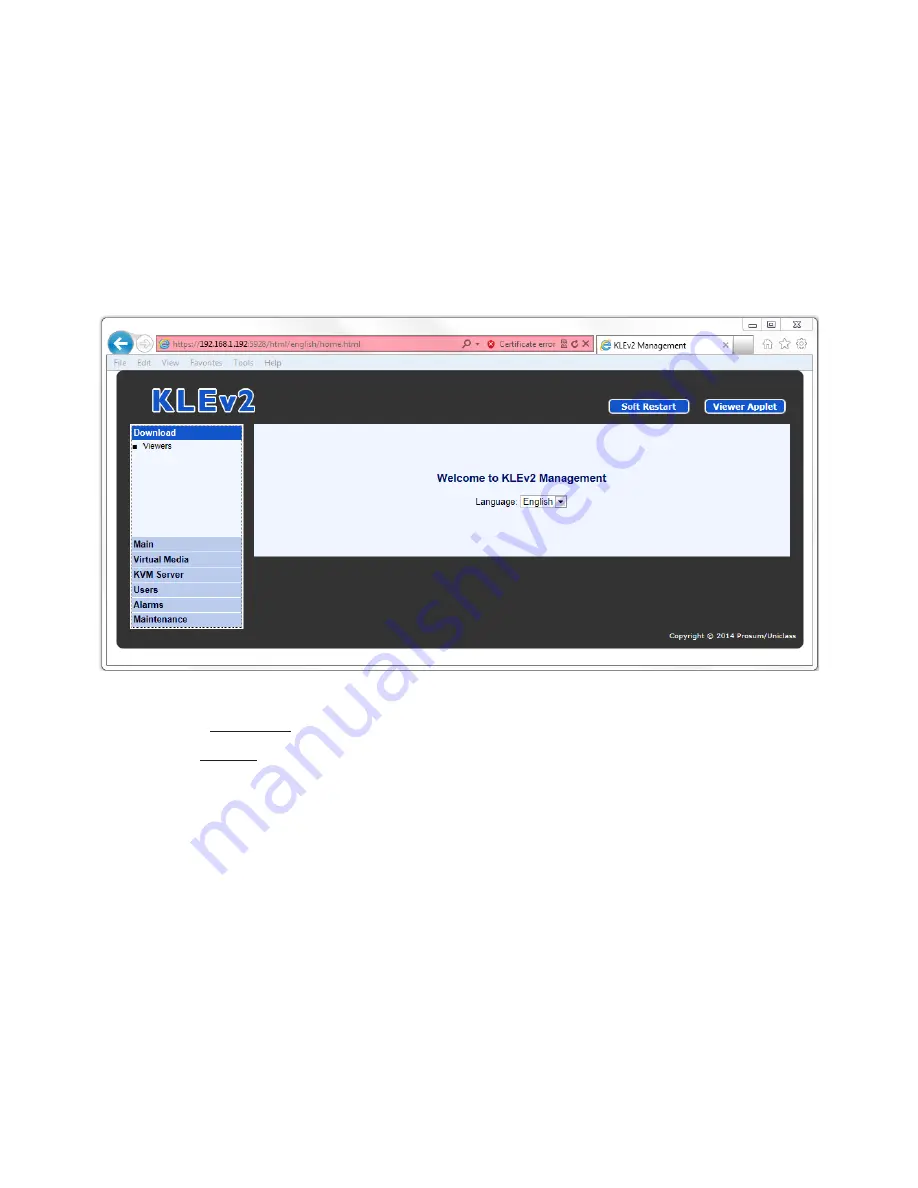
Using the computer browser, login into the KLEv2 Web Browser Management Interface.


Expand 

Main

 on the left menu --> Go to 

Networks

 to modify the IP settings in 

accordance to your network or the information provided by your network administrator. 

Click the 

Store Settings

 button to save the network setting. Then press the 

Soft Restart


to apply the settings. Once it restarts, you can add KLEv2 to your network and access to 

KLEv2 will need to use the new network information.

Summary of Contents for KLEv2 Series

Page 1: ...User s Manual KLEv2 Series KVM Link Extender Generation 2 Version 1 0...

Page 2: ...ing 12 Configuring KLEv2 Network Setting 12 Configuring TCP Port Base for the KLEv2 13 Accessing the Remote Server 14 Title Bar Information 16 KLEv2 Web Management Interface 17 Viewers Menu Bar 20 Con...

Page 3: ...ssive DVI to VGA adapters will provide VGA connection at both the console and system ends KLEv2 options give user total control from the pre boot stage such as BIOS level CMOS setting with USB interfa...

Page 4: ...phone Jack Female Console USB Connector 2 x USB 2 0 Type A Female Connector Ethernet Connector 2 x RJ45 Female 10 100 Base T with auto sensing Push Button 1 x Momentary LEDs 2 Power Video 3 Power Vide...

Page 5: ...D Video source in status 2 Power LED Power on status 3 USB Device Ports Plug in USB keyboard USB mouse or USB storage device 4 Speaker Port Plug in stereo analog speaker 5 DVI I Video Out Port Connect...

Page 6: ...into this socket 2 Power Out Socket Plug cable of the device being powered 3 DVI I Video In Port Connect to DVI D PC system video source or with a passive converter connect to analog VGA 4 USB Connect...

Page 7: ...o the USB Type A connector which a keyboard icon marked on the unit Connect a mouse to the USB Type A connector which a mouse icon marked on the unit Connect a speaker to the audio jack Connect to DVI...

Page 8: ...onnect a mouse to the USB Type A connector which a mouse icon marked on the unit Connect a speaker to the audio jack Connect to DVI or VGA monitor Connecting to VGA monitor would require passive DVI A...

Page 9: ...USB peripheral on the server source has been installed if necessary before plugging into KLEv2 Connect the PC Side DVI to the DVI Video Out of the Server Connecting using VGA would require passive DV...

Page 10: ...necessary before plugging into KLEv2 Connect the PC Side DVI to the DVI Video Out of the Server Connecting using VGA would require passive DVI A to VGA converter Plug the PC Side Audio In to the Speak...

Page 11: ...et you will find there is no mouse movement to disable this message So it is suggested that you should install your USB mouse on your computer first before connecting to this KVM switch Configuring th...

Page 12: ...cted to the local or company network with KLEv2 and a computer that has a browser Connect with the KLEv2 Remote I O or Ethernet Port by having the computer in the same subnet as the KLEv2 Using the co...

Page 13: ...a choice of Windows viewer or OS independent Java viewer 2 Java Applet viewer which uses your browser to access The system that you are viewing the distant computing resource must have the latest Jav...

Page 14: ...start When login into the KLEv2 please use the new network settings Accessing the Remote Server Please select methods of accessing the KLEv2 to have virtual presence of using your computing resources...

Page 15: ...ou continuously use the current system to access through Java recommend the jar file be save at a convenient location Run or double click the jar file and it will pop up the Connection Dialog similar...

Page 16: ...e given to the current video server CompName The name given to the connected computer 33 ms The time it takes to capture the image 0 ms The time it used to transmit the video refresh shared Currently...

Page 17: ...d PKI authentication use by the device Also set the level of security for the SSL viewer connection Finally it sets the User Password Policy No Password Global Password and User Password Network see p...

Page 18: ...r Sets the information to be use on the connected port Items like Name to be use Type of system Video Type and Mouse settings Power Control Additional settings are display once enabled Selection is se...

Page 19: ...nformation and simple operation on the Power Control Unit KLEv2P only Reboot Emergency use of restarting from the boot loader Settings Reminders After you have finish making the modification to the se...

Page 20: ...computer This command needs administrator privilege and Power Control Unit attached for its function It will power up the attached port New Connection Win Open another Connection Dialog to login to o...

Page 21: ...is use to balance the Video Quality against the Data Volume Higher Video Quality would generate greater Data Volume which would be recommended for better performance network infrastructure The listin...

Page 22: ...ot would help some identify when the mouse is at the local computer or remote system when the access is not full screen window The choices for the settings are No Cursor Dot and Normal Session Most of...

Page 23: ...r to the instruction of KCenter System requirement Please check the supported operating systems listed below before installing the application of KCenter Operating system Windows 8 32 and 64 bits Wind...

Page 24: ...ge the directory to kcenter folder If you are root type java jar kcenter jar Otherwise type sudo java jar kcenter jar Mac OS X 1 Click the kcenter_mac zip to create the installKceter pkg 2 Run the pro...

Page 25: ...must specify their Internet location in order for them to be detected by KCenter Note 1 To detect dynamic devices KCenter sends a broadcast message on the local network If some devices are not detecte...

Page 26: ...cal network and devices that are explicitly specified in the static device list The device list will be updated after completing the detection process The ways to detect the devices Manually by clicki...

Page 27: ...access Note All IP settings modified directly by KCenter are only available before rebooting the device You must run the device management for permanent settings Manage Click to launch your browser s...

Page 28: ...elected device A file containing the device configuration is built by KCenter and saved in the folder of your choice You will be able to restore the saved configuration by clicking the Restore Config...

Page 29: ...es You can use group actions to reboot devices upgrade devices backup and restore device configurations For each device a message is printed in the Action Log You can check it after the operation 1 2...

Page 30: ...imestamp of message receipt Note that it may be different from the date and time of the message transmission you can see into the Log page of the device web management Location IP address where the me...

Page 31: ...nd Device Name Device name as configured in the device management IP Address Device IP address as configured in the device management User Name Name of the user that makes the session Session ID Sessi...

Page 32: ...Time Stamp Time elapsed since the device has rebooted Object 1 Object 2 Trap event as defined in the device SNMP MIB For more information about objects consult the device user s manual 2 Clear Click t...

Page 33: ...s Device setting IP Viewer For Windows system 1 2 3 1 Select a desired viewer application when clicking the Viewer icon Make sure the viewer application has been installed completely before selecting...

Page 34: ...el manually The device detection will be operated periodically Tick the option of Detect Devices Periodically to run the device detection periodically Also fill a desired period in minutes Security Se...

Page 35: ...now the file name of report lists Note that the lists cleared by clicking the Clear buttons are not concerned by this option Debug Logs By default KCenter program sends messages resulting from unatten...

Page 36: ...ple take care to specify a public IP address or host name i e the Internet address and not the LAN IP address set up in the device web management 2 You can transform a Dynamic Device into Static Devic...

Page 37: ...r to Reports panel You can also configure new or old radius clients in the Static Device Management The list of IP addresses and ports of client devices set up for Radius Accounting is displayed To mo...

Page 38: ...re Restart fails or having hardware issue 4 My viewer s menu bar disappears Please the mouse cursor on the title of the windows and right click for the mouse menu and select Show Menu Bar 5 My remote...

Page 39: ...ted in a commercial environment This equipment generates uses and can radiate radio frequency energy and if not installed and used in accordance with this User Guide may cause harmful interference to...

Page 40: ......

Reviews: