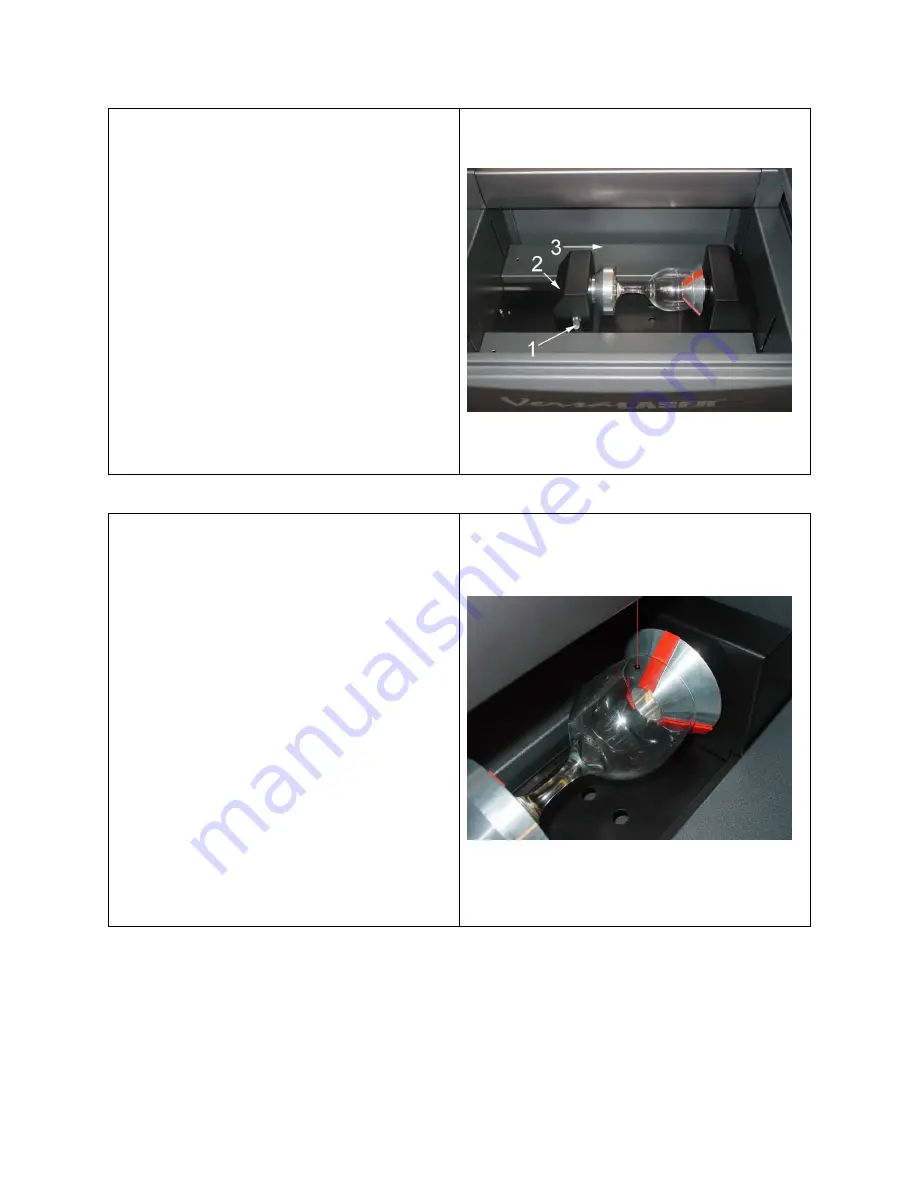
Lift
the
lever
(1)
on
the
adjustable
end
of
the
fixture
(2)
and
slide
it
to
the
left,
out
of
the
way.
Place
the
open
end
of
the
glass
into
the
cone,
and
slide
the
adjustable
end
of
the
fixture
to
the
right
(3)
up
against
the
base
of
the
glass
so
the
glass
rests
firmly
centered
inside
of
the
inverted
cone.
Apply
light
pressure
to
the
right,
only
enough
force
to
prevent
the
glass
from
slipping
while
it
rotates,
and
push
the
lever
down
(1)
to
lock
it
in
place.
By
hand,
rotate
the
cone
or
the
glass,
until
your
mark
points
as
straight
up
as
possible.
The
electrical
power
to
the
CORA
motor
is
lowered
when
it
is
sitting
idle
so
that
you
can
rotate
the
cone
of
the
fixture
easily.
This
is
OK
and
will
not
damage
the
CORA.
Click
the
Rotary
button
in
the
Focus
tab
of
the
VCP.
This
will
bring
the
X
‐
axis
arm
directly
over
the
centerline
of
the
fixture
and
will
also
turn
on
the
Red
Dot
pointer.
Align
the
Red
Dot
pointer
with
the
center
of
your
mark
by
using
your
mouse
to
click
on
the
main
window
in
the
Focus
tab
of
the
VCP.
Notice
that
your
Y
‐
axis
coordinates
will
be
locked
in
place
and
you
can
only
click
left
and
right
(in
the
X
‐
axis
direction).
The
Red
Dot
will
move
to
the
location
where
you
clicked
(or
type
in
the
coordinates
in
the
X
‐
Axis
and
Y
‐
Axis
boxes
and
click
Move).
Adjust
the
position
of
the
Red
Dot
until
it
lines
up
with
your
mark,
left
and
right.
If
your
mark
does
not
line
up
with
the
Red
Dot
in
the
rotational
direction,
simply
grasp
the
glass
or
the
cone
and
manually
rotate
it
while
it
is
in
the
fixture.
Continue
repositioning
until
the
Red
Dot
is
on
top
of
your
mark.
When
it
is
aligned,
in
the
VCP,
locate
the
X
‐
axis
coordinate
number.
Either
write
this
number
down
or
remember
it.
This
is
the
coordinate
of
the
Red
Dot
pointer
and
it
is
also
where
you
will
need
to
position
your
graphic.
Ignore
all
other
coordinates.
Summary of Contents for VersaLaser VL-200
Page 1: ...Models VL 200 VL 300 Safety Installation Operation...
Page 17: ......


