background image


GO


HOME


will


move


the


Focus


Carriage


to


the


upper


right


edge


of


the


work


area.


RESET


X

Y


button


will


electronically


and


mechanically


re

home


the


Focus


Carriage


if


you


accidentally


bump


it


out


of


position.


RESET


Z


will


electronically


and


mechanically


re

home


the


Z

axis


table.


You


MUST


select


this


if


you


accidentally


stall


the


t


able


by


placing


excessive


weight


on


it


otherwise


the


VersaLASER


will


not


focus


the


beam


properly.


The


UP


and


DOWN


arrow


buttons


are


identical


to


the


up


and


down


buttons


on


the


VersaLASER


keypad


and


will


raise


or


lower


the


Z

axis


respectively.


ABOUT


This


tab


displays


the


version


of


the


VCP


software,


information


about


us,


and


the


serial


number


and


the


firmware


version


of


your


VersaLASER


(only


shown


if


your


VersaLASER


is


connected


to


your


computer).


Running


Your


First


Job,


Step

By

Step


We


will


now


illustrate


how


to


use


the


VersaLASER


with


CorelDRAW11


by


creating


a


wooden


keychain.


In


this


example,


we


will


Etch


and


Cut


the


key


chain


from


a


2


by


4


inch,


1/8


inch


thick


piece


of


hardwood.


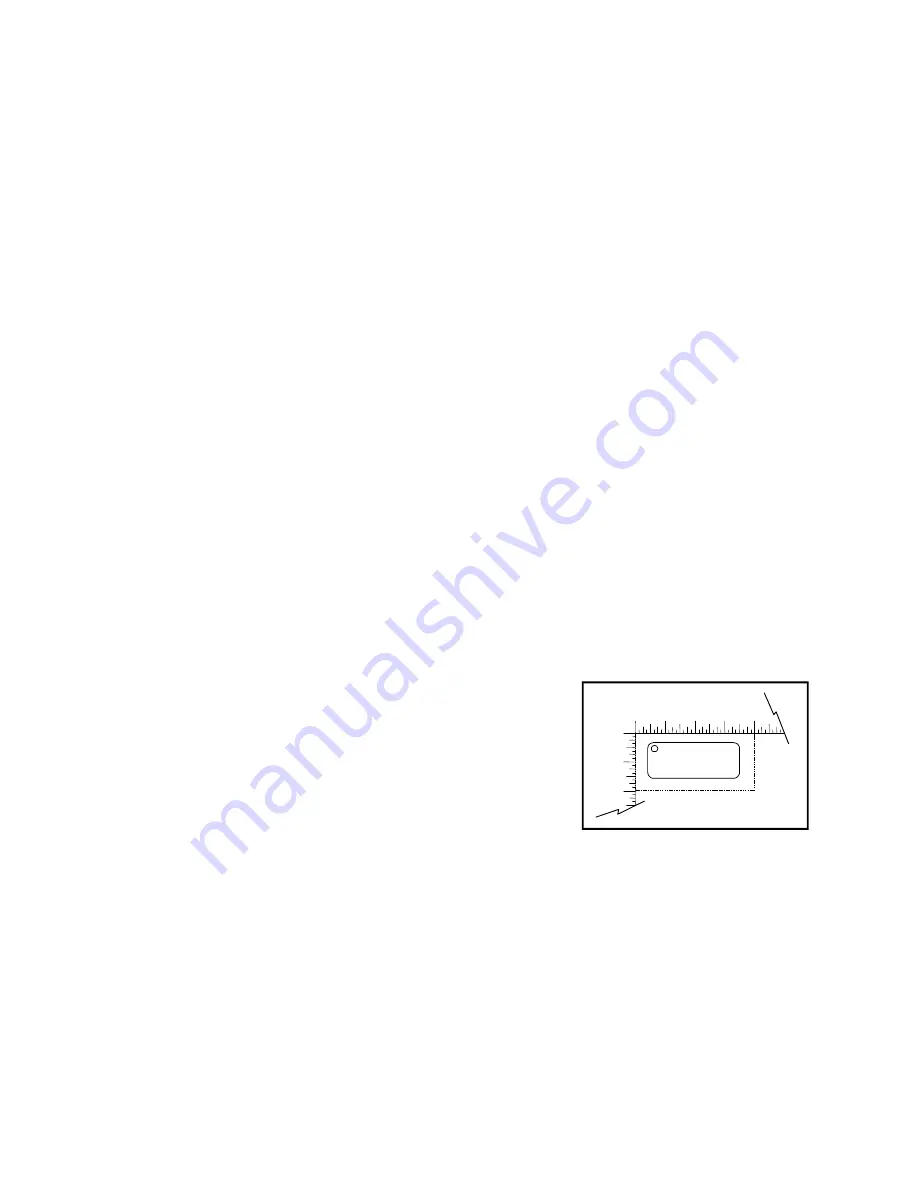
Step


1

 ‐ 

Creating


Your


Artwork


Open


CorelDRAW11


and


create


a


new


graphic.


Draw


some


text


using


a


BLACK


colored


fill


and


NO


outline.


For


example,


type


in


the


word


“KEYCHAIN”.


Then,


draw


a


RED


hairline


rectangular


outline


(with


no


fill)


around


the


text


and


round


the


edges


if


desired.


Add


a


circle


(

RED


hairline


outline


also


with


no


fill),


for


the


key


ring.


Position


the


graphic,


on


your


computer


screen,


in


the


upper


left


corner


of


the


page


as


shown.


Step


2


Printing


Your


Artwork


When


you


are


ready


to


print


the


file,


select


PRINT,


in


CorelDraw11,


from


the


FILE


menu.


When


the


print


dialog


appears,


ensure


that


the


VersaLASER


printer


name


is


in


the


dropdown


list,


and


then


click


PRINT.


The


VersaLASER


Settings


dialog


box


will


pop


up.


Choose


your


material


by


selecting


the


appropriate


1

2

1


0

2


3


4

KEYCHAIN


Summary of Contents for VersaLaser VL-200

Page 1: ...Models VL 200 VL 300 Safety Installation Operation...

Page 2: ...Universal Laser Systems Inc 16008 North 81st Street Scottsdale AZ 85260 USA Customer Support Department Phone 480 609 0297 Fax 480 609 1203...

Page 3: ...written permission of ULS ULS provides no warranties whatsoever on any software used in connection with a ULS Laser Engraving System express or implied Neither does it guarantee software compatibility...

Page 4: ...CE STRICT LIABILITY PATENT OR COPYRIGHT INFRINGEMENT OR MISAPPROPRIATION OF INTELLECTUAL PROPERTY HP is a registered trademark of Hewlett Packard Corporation Windows is a registered trademark of Micro...

Page 5: ...udes important information about safety assembly use troubleshooting and basic maintenance How To Get Help Before contacting our Technical Support Department make sure that you have read this entire m...

Page 6: ...it can be operated while speaking on the telephone Step 4 If your local VersaLASER reseller cannot assist you and you would like to use our FREE email based support system log on to our website www Ve...

Page 7: ...Particulate Odor Outside Ventilated Exhaust System High pressure vacuum blower capable of 150 CFM cubic feet per minute 6 inches static pressure 255m3 hr at 1 5kPa Computer Requirement Windows XP Home...

Page 8: ...6 System Weight System 85 lbs 38 kg System 100 106 lbs 45 48 kg Laser Cartridge Weight 25 30 Watt 20 lbs 9 kg 40 Watt 23 lbs 10 kg 50 Watt 26 lbs 12 kg Available Options Cart Integrated Air Cleaner Ro...

Page 9: ...Proper Operating Environment 2 1 Providing a Suitable Electrical Power Source 2 1 Extracting Fumes and Particulates 2 1 Computer and Operating System 2 2 Recommended Software Programs 2 3 Unpacking an...

Page 10: ...4 Step 7 Powering Off the VersaLASER 3 4 Section 4 Basic System Maintenance Safety 4 1 Cleaning and Maintenance Supplies 4 1 Optics 4 2 Optics Handling Guidelines 4 2 Optics Cleaning Procedure 4 2 Ac...

Page 11: ...Section 5 Accessories Rotary Fixture 5 1 Cutting Table 5 4 Integrated Cart 5 6 Computer Controlled Air Cleaner Cart 5 6 Computer Controlled Compressed Air Unit 5 9 Air Assist Cone 5 10 Back Sweep 5 12...

Page 12: ...the laser beam may cause physical burns and can cause severe eye damage Proper use and care of this system are essential to safe operation Never operate the laser system without constant supervision...

Page 13: ...or Severe bodily injury may occur if improper lifting techniques are applied or the system is dropped Dangerous voltages are present within the electronics and laser enclosures of this system Although...

Page 14: ...d The Red Dot Pointer is NOT safety interlocked and is activated when the user access door is open DO NOT OPERATE THE LASER SYSTEM IF ITS SAFETY FEATURES HAVE BEEN MODIFIED DISABLED OR REMOVED This ma...

Page 15: ...AND VISIBLE LASER RADIATION WHEN OPEN AVOID EYE OR SKIN EXPOSURE TO DIRECT OR SCATTERED RADIATION AVOID EXPOSURE INVISIBLE LASER RADIATION IS EMITTED FROM THIS APERTURE 221 0016 0 221 0017 0 221 0018...

Page 16: ...tions or to manufacture medical devices See the Safety Installation Operation and Basic Maintenance Manual or the OEM Laser Integration Manual for further information NOT 221 0065 0 221 0081 0 WARNING...

Page 17: ......

Page 18: ...6008 N 81st St Scottsdale AZ 85260 Phone 480 483 1214 Fax 480 483 5620 USA This equipment Is manufactured in conformity with the following directives 89 336 EEC EMC Directive 73 23 EEC Low Voltage Dir...

Page 19: ...3 2003 3 V m EN 61000 4 4 2002 2 kV power line 0 5 kV signal line EN 61000 4 5 2001 class 2 Note This is not a declaration of conformity The importer of this equipment supplies the declaration of conf...

Page 20: ...ese limits are designed to provide reasonable protection against harmful interference when the equipment is operated in a commercial environment This equipment generates uses and can radiate radio fre...

Page 21: ...Step Installation In this section we will step you through site preparation computer and software setup and unpacking and assembling the VersaLASER Please follow the instructions in the order shown E...

Page 22: ...nd possible damage to the device s electronics If electrical power fluctuations brown outs or constant power outages are a problem in your area an electrical power stabilizer UPS Uninterruptible Power...

Page 23: ...air handlers are inadequate and inappropriate for this type of installation A high pressure blower MUST be used to meet minimum airflow requirements...

Page 24: ...Have the blower electrically wired to a wall switch in the same room for easy ON OFF control The following diagram shows a typical exhaust system layout Use this as a guideline to proper exhaust syste...

Page 25: ...ssory exhausting to the outside environment is not required but is recommended Refer to the Accessories section for more details 1 High Pressure Exhaust Blower 2 Weather proof Cover 3 Rigid Ducting 4...

Page 26: ...MacIntosh computers are NOT compatible with the VersaLASER 1 5GHz processor with 256 MB RAM and a 40 GB hard drive CDROM drive Monitor minimum 800 x 600 resolution Mouse or other pointing device Avai...

Page 27: ...indows XP by default displays many visual effects that slow down the computer by utilizing RAM and processor time We recommend that you turn OFF these effects by right clicking on the My Computer icon...

Page 28: ...treamline recommended or CorelTRACE CAD Software AutoCAD or AutoCAD LT for Windows FONTS Use True Type fonts ONLY Do not use PostScript or bitmapped fonts Most users purchase the CorelDRAW12 Graphics...

Page 29: ...SERIOUS DAMAGE MAY OCCUR Gently move the arm toward and away from you It should slide freely 3 The motion system arm cover is hinged and is held down by magnets Grasp the bottom of the cover and rotat...

Page 30: ...cted the USB cable and within about 15 seconds the Found New Hardware Wizard dialog box will appear 6 Windows asks if you would like to install the software automatically or you choose to install from...

Page 31: ...ndscape and page size to a width of 16 inches 406 4mm model VL 200 or 24 inches 609 6mm model VL 300 and height of 12 inches 304 8mm Set the default line thickness to Hairline or the smallest availabl...

Page 32: ...s by clicking the outline tool and then the outline pen dialog in the flyout With Graphic being the only selection checked click OK Click the down arrow in the Color dropdown box to expand the list an...

Page 33: ...ER as you would to any other type of printer The VersaLASER printer driver will then pop up and prompt you for the type of material you are processing and its measured thickness After choosing a mater...

Page 34: ...CONDITION RED LED GREEN LED OFF The user door is closed The VersaLASER is off ON The user door is open The VersaLASER is on...

Page 35: ...nt jobs stored on your hard drive The open folder button displays and allows you to select your print jobs in a file management style It also allows you to delete print jobs stored from your hard driv...

Page 36: ...olute position in the field to either manually focus the laser beam to the surface of your material instead of using the Autofocus feature or to locate an absolute position within the table area by us...

Page 37: ...b Step By Step We will now illustrate how to use the VersaLASER with CorelDRAW11 by creating a wooden keychain In this example we will Etch and Cut the key chain from a 2 by 4 inch 1 8 inch thick piec...

Page 38: ...eady pre programmed laser power setting We suggest that you always leave it set to 0 until you are more comfortable using the system When you have made all the appropriate selections and entered the m...

Page 39: ...Z axis table so that the flat edge of the tool rests against the front side of the Focus Carriage 3 Slowly raise the table until you observe the tool either tilting or sliding away from the Focus Carr...

Page 40: ...WHILE THE VERSALASER IS POWERED ON THIS MAY CAUSE THE USB PORT OF YOUR COMPUTER TO ELECTRONICALLY LOCK ITSELF OUT OF THE WINDOWS OPERATING SYSTEM RENDERING IT UNUSABLE UNTIL RECONFIGURED IF THIS OCCUR...

Page 41: ...dling procedure printed on its label NEVER pour or spray any chemical directly onto or into the VersaLASER Always dampen your cotton swab paper towel or cloth with the cleaning solution outside of the...

Page 42: ...per towels cotton cloth or terrycloth normal facial tissue Denatured alcohol Regular acetone and reagent grade acetone Cotton swabs Lens cleaner supplied Set of Allen wrenches sized from 050 to 3 16 i...

Page 43: ...c immediately after using the VersaLASER Wait for the optic to cool at least 3 5 minutes otherwise it may crack from thermal shock DO NOT use compressed air to clean the optic DO NOT clean an optic th...

Page 44: ...the X axis Arm forward 2 Grasp the bottom lip of the cover 1 Rotate the cover up and over the top of the X axis Arm The cover is held down by magnets so it may stick slightly when you first begin to p...

Page 45: ...he 2 Mirror Holder over and inspect the optic for visual contamination Clean as necessary Re insert the 2 Mirror Holder by sliding it into the mounting slot until it stops NOTE Installing the mirror b...

Page 46: ...bscrews completely They are held captive by retaining clips so they will not come out all the way Grasp the Front Cover Plate Gently slide it forward and out of the Focus Carriage Inspect the 3 Mirror...

Page 47: ...place and clean if necessary 1 Beam Window The Motion System Using a vacuum cleaner vacuum all loose dirt and debris from the inside of the device Outside the device dampen a paper towel cotton cloth...

Page 48: ...the top and the bottom side of the bearing Also use the dampened swab to clean the v groove 4 Make sure you clean all 4 bearings where the Y axis Bearings not visible make contact with the rail Dampe...

Page 49: ...bricate the bearings The belts are fiber reinforced and will not stretch under normal use Optical alignment is not necessary under normal use Interlock Safety Check As mentioned earlier in the Safety...

Page 50: ...a small screwdriver or your fingernails to push the two retaining tabs arrows toward each other and pull out the fuse holder Pull out the two fuses from the holder and check them with an ohmmeter or f...

Page 51: ...ocate the filters on the inside of the cover not shown Remove the plastic retainer and the filter media Rinse the filter media with soap and water Allow them to air dry off or dry them off before re i...

Page 52: ...s remained relatively clean you can extend your cleaning intervals Keep in mind that a clean machine is a better performing machine and can extend the life of the parts as well as reduce the possibili...

Page 53: ...the actual object Installation Lower the table all the way down to the bottom of its travel or down far enough so that you can remove the table and install the CORA without interfering with the movin...

Page 54: ...he connector engages the pins protrude through the alignment holes and the fixture sits flat It will indicate that it is installed properly by automatically rotating its cone slightly and a Rotary but...

Page 55: ...other marking device make a mark on the glass where you would like the place the TOP CENTER point of the graphic measure the diameter across the area of the glass where you marked Either remember this...

Page 56: ...centerline of the fixture and will also turn on the Red Dot pointer Align the Red Dot pointer with the center of your mark by using your mouse to click on the main window in the Focus tab of the VCP N...

Page 57: ...its RIGHT CENTER anchor point which was the TOP CENTER before we rotated it 90 degrees is located at the same X axis coordinate as the Red Dot pointer The vertical placement of where you position you...

Page 58: ...ext job ready to be processed For each glass that you would like to etch your graphic in a precise location you must follow each of the steps from the beginning of this section If it does not matter t...

Page 59: ...without interfering with the moving parts of the VersaLASER Remove the table by loosening the two captive thumbscrews 1 Insert your fingers into the two holes 2 and slowly lift the table out of the V...

Page 60: ...te a new graphic Layout your graphic the same way as if the regular table is installed The border of the honeycomb material of the VCA is slightly larger than the printable area of the VersaLASER Sinc...

Page 61: ...light notching effect on the backside edge of the material This is due to the reflectivity of the honeycomb material and is normal To reduce the effect try reducing the Intensity setting To completely...

Page 62: ...sters so that the cart does not roll Obtain the assistance of another person One person should grasp the front of the machine and place his hands where the arrows indicate The other person should stan...

Page 63: ...fumes from processing Controlled through a USB port connected to the VersaLASER and is activated only when jobs are in process Filters are concealed within the two drawers Foot ports to secure the Ve...

Page 64: ...ilter to remove coarse larger particulates a HEPA filter to remove fine smaller particulates an activated charcoal filter to remove fumes and odors and a high pressure vacuum motor to pull these bypro...

Page 65: ...ercent of its useful life has expired starting at 85 That would be a good time to reorder filters The air cleaner is recommended only if you have no other choice than to filter the exhaust Keep in min...

Page 66: ...person should stand in the back of the machine and place his hands where the arrows indicate Pick up the VersaLASER place it on top of the cart and locate the VersaLASER s four feet into the four foot...

Page 67: ...o the CCAC s power inlet 5 and then connect a 3 ft USB cable between the second USB port 2 of the VersaLASER and the USB port located towards the bottom of the CCAC 3 NOTE Windows will indicate to you...

Page 68: ...rsaLASER Actually it has been known to increase the frequency of cleaning maintenance due to debris being blown around inside the machine during processing This device is not intended for continuous u...

Page 69: ...aLASER and loading the VersaLASER Installation Software If not go back to that section complete the installation and return here Make sure you computer is powered on and booted into Windows Connect a...

Page 70: ...that are designed to absorb the water that was generated from condensation In humid areas you may need to check the sponges more than once per week In drier areas it is possible to extend that period...

Page 71: ...onto the surface of your material to reduce the burning effects of the material from the laser beams intense heat It also helps disperse the smoke and gases that are created from the processing of ma...

Page 72: ...the side of the Focus Carriage if already attached Insert the cone 2 by pushing it straight up into the bottom of the Focus Carriage ensuring that it is up all the way and is seated properly and gent...

Page 73: ...e needle valve as necessary NEVER install the AAC without having the CCCAU installed and operating and NEVER shut off the needle valve completely The lack of pressurized air present in the cone during...

Page 74: ...to the Focus Carriage for the next time you install the Cone The same needle valve is also used for the AABS accessory Air Assist Back Sweep AABS This accessory also requires the CCCAU The AABS attac...

Page 75: ...r Attach the mounting block 2 if not already attached with the 4 40 screw and using a 3 32 Allen wrench Using a 3 16 socket tool or 5mm wrench attach the needle valve 1 to the port where you removed t...

Page 76: ...ace of the table ensure that the motion of the Focus Carriage will not cause the AABS to mechanically interfere with your material or components of the VersaLASER otherwise serious damage may occur Us...

Page 77: ...e plug the same way you installed it or by the preferred method of un attaching the hose from the needle valve by either using a wrench to loosen the nut at the end of the hose or by simply using the...

Reviews: