background image

SKU 97706  

      For technical questions, please call 1-800-444-3353. 

PAGE 10

Connect the Gauge (1) to the Pressure Testing and Bleed-off Assembly (25).

6. 

Attach the female quick coupler on the Pressure Testing and Bleed-off Assembly 

7. 

to the male quick coupler on the GM TBI Adapter (5).
Start the engine and check for leaks.  Read the fuel pressure.  Compare the 

8. 

value on the Gauge (1) to the value in the service manual. 
Stop the engine and turn the ignition OFF.

9. 

With free end of bleed-off hose in a suitable container, press the button on side of 

10. 

bleed-off assembly slowly to de-pressurize the fuel system.
Refer to the 

11. 

General Safety Rules

 section before removing tester from vehicle.

Remove the fuel pressure Adapter following the above instructions for removing 

12. 

the fuel filter.
Re-install the fuel filter.  Start the vehicle and check for leaks.

13. 

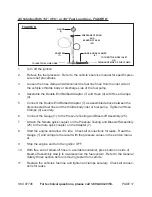
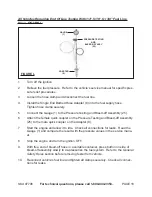
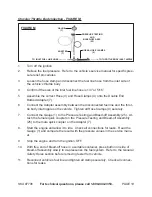
GM Throttle Body Injection (TBI) With Quick Connect Fuel Filter (2.5L 1989 And 

Up, 5.7L 1991 And Up - FIGURE E:

gaUgE

(1)

PRESSURE TESTINg

aND

BLEED-OFF aSSY.

(25)

aDaPTER

(2)

FIgURE E

1. 

Turn off the ignition.

Relieve the fuel pressure.  Refer to the vehicle’s service manual for specific pres

-

2. 

sure relief procedures.

Locate the fuel filter on the vehicle.

3. 

Remove the fuel filter by compressing the tabs while pulling outward on each fuel 

4. 

line.  Use a container to catch any fuel that may spill out.  Wipe off any excess 

fuel that may spill on the vehicle.

Summary of Contents for 97706

Page 1: ...Oaks Blvd Camarillo CA 93011 Visit our website at http www harborfreight com Read this material before using this product Failure to do so can result in serious injury Save this manual Copyright 2006...

Page 2: ...influence of drugs alcohol or medication A moment of inattention while op erating tools and equipment may result in serious personal injury 3 Wear eye protection Wear ANSI approved safety impact glas...

Page 3: ...ervice must be performed only by qualified service technician 11 Service or maintenance performed by unqualified personnel could result in a risk of injury When servicing the Pressure Test Kit use onl...

Page 4: ...ssion is placed in PARK or NEUTRAL and the emergency brake is applied When the test is complete de pressurize the system and remove the Pres 26 sure Test Kit Re assemble the vehicle s fuel line s to i...

Page 5: ...licing into 1 4 5 16 or 3 8 fuel line hose 8 Single End Barbed Hose Adapter All vehicles requiring end of line testing with 1 4 5 16 or 3 8 fuel line hose 9 Honda Acura Sterling Multi Port PGM FI For...

Page 6: ...e protective cap from test fitting on vehicle 4 Attach the swivel female fitting on the Adapter 27 to the test fitting on the ve 5 hicle Hand tighten Attach the female quick coupler on the Pressure Te...

Page 7: ...mbly 25 4 Attach the female end of Ford Adapter 26 to test the valve Hand tighten 5 Attach the female quick coupler on the Pressure Testing and Bleed off Assembly 6 25 to the male quick coupler on the...

Page 8: ...tch any spilled fuel Install one of the five pressure test Adapters 10 11 12 13 14 with the corre 5 sponding sealing washer and one of the gaskets from the banjo fitting so that the fuel inlet is once...

Page 9: ...when re assembling fuel lines Check for leaks GM Throttle Body Injection TBI With Fuel Filter Threaded On Both Sides FIGURE D GAUGE 1 PRESSURE TESTING AND BLEED OFF ASSY 25 GM TBI ADAPTER 5 FIGURE D...

Page 10: ...em Refer to the 11 General Safety Rules section before removing tester from vehicle Remove the fuel pressure Adapter following the above instructions for removing 12 the fuel filter Re install the fue...

Page 11: ...ue on the Gauge 1 to the value in the service manual Stop the engine and turn the ignition OFF 9 With free end of bleed off hose in a suitable container press button on side of 10 bleed off assembly s...

Page 12: ...nylon clip on the tube is seated inside the fuel line connector Connect the Gauge 1 to the Pressure Testing and Bleed off Assembly 25 6 Attach the female quick coupler on the Pressure Testing and Blee...

Page 13: ...Pin Adapter 28 for Ford and 29 for GM and Chrysler to the dis 4 connected fuel line Make sure both ends of mating parts are seated and locked together Connect the Gauge 1 to the Pressure Testing and B...

Page 14: ...the line making sure both ends of the mating couplings are locked together Connect the Gauge 1 to the Pressure Testing and Bleed off Assembly 25 At 6 tach the female quick coupler on the Pressure Tes...

Page 15: ...he smaller hex bolt 5 Screw the small male end of the Honda Adapter 9 into the hole where the re 6 moved hex bolt was Hand tighten Connect the Gauge 1 to the Pressure Testing and Bleed off Assembly 25...

Page 16: ...ff Assembly 25 4 Attach the female end of the Ford Adapter 26 to the test valve 5 Attach the female quick coupler on the Pressure Testing and Bleed off Assembly 6 25 to the male quick coupler on the A...

Page 17: ...d Adapter 7 as assembled above between the 5 disconnected fuel line and the throttle body inlet or fuel pump Tighten all Hose Clamps 4 securely Connect the Gauge 1 to the Pressure Testing and Bleed of...

Page 18: ...t the Gauge 1 to the Pressure Testing and Bleed off Assembly 25 5 Attach the female quick coupler on the Pressure Testing and Bleed off Assembly 6 25 to the male quick coupler on the Adapter 8 Start t...

Page 19: ...ter assembly between the disconnected fuel line and the throt 6 tle body inlet nipple on the vehicle Tighten all Hose Clamps 4 securely Connect the Gauge 1 to the Pressure Testing and Bleed off Assemb...

Page 20: ...ntrol pressure regula tor known as the warm up compensator The side of the test with the ball valve is connected to this circuit Connect the Gauge 1 to the Pressure Testing and Bleed off Assembly 25 5...

Page 21: ...4 Install Adapter s 10 11 12 13 15 16 18 19 20 21 22 23 or 24 and O 5 Ring to the engine as required Attach the female quick coupler on the Pressure Testing and Bleed off Assembly 6 1 to the male quic...

Page 22: ...aintenance service and repairs not discussed in this manual should only be performed by a qualified service technician PLEASE READ THE FOLLOWING CAREFULLY THE MANUFACTURER AND OR DISTRIBUTOR HAS PROVI...

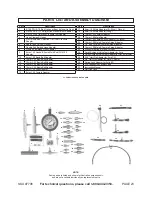
Page 23: ...Honda Acura Multi Port PGM FI Adapter 10 8mm 1 00 Banjo Bolt Adapter 11 10mm 1 00 Banjo Bolt Adapter 12 12mm 1 25 Banjo Bolt Adapter 13 12mm 1 50 Banjo Bolt Adapter 14 14mm 1 50 Banjo Bolt Adapter 15...

Page 24: ...cidental or consequential damages so the above limitation of exclusion may not apply to you This warranty is express ly in lieu of all other warranties express or implied including the warranties of m...

Reviews: