


15
103536-08 - 4/18
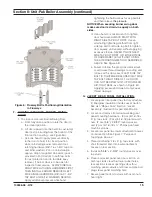
Figure 6: Flueway Baffle Positioning/Orientation
in Flueways
F. CLOSING / SECURING BURNER SWING
DOOR.
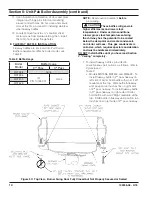
1. To close and secure Burner Swing Door:
a. From fully open position, rotate the door to
the closed position.
b. Lift door upward into the build-in cast ramp/
door rest (protruding from the bottom of the
front section casting – see Figure 5A).
c. Use one hand to apply pressure directly
to the door to hold it in closed position
while re-installing earlier removed door-
latching hardware (3/8”-16 x 1-3/4” tap bolt
and 5/16” washer). Prior to re-installation,
apply a drop of supplied Anti-seize (pouch
provided in Part Carton) to both tap bolts
for rust protection and to facilitate easy
removal, if burner door is to be open for
inspection and service. ALWAYS INSTALL
RIGHT SIDE LATCHING HARDWARE FIRST,
THEN INSTALL EARLIER REMOVED LEFT
SIDE HINGE HARDWARE (3/8”-16 X 1-3/4”
TAP BOLT AND 5/16” WASHER) SECOND.
Apply additional pressure while hand
tightening the hardware as far as possible
and then release
the pressure.
d. Use a hand or socket wrench to tighten
door hardware. ALWAYS START WITH
RIGHT SIDE TAP BOLT FIRST. Use an
alternating tightening method from right
side tap bolt to left side tap bolt to tighten
door equally, until sealed, without applying
excessive torque. NEVER TIGHTEN LEFT
SIDE TAP BOLT FIRST, OR, EITHER PIECE
OF HARDWARE 100% WITHOUT USING
THE ALTERNATING METHOD DESCRIBED
ABOVE. See Figure 5B.
e. Failure to follow the prescribed procedure
could cause thread damage to casting and
/or leak at the door seal. IF LEFT SIDE TAP
BOLT IS TIGHTENED BEFORE RIGHT SIDE
TAP BOLT, RIGHT SIDE OF THE DOOR
CAN NOT BE DRAWN-IN TO PROVIDE AN
AIR-TIGHT SEAL, as shown in Figure 5C.
Applying excessive torque will only cause
thread damage.
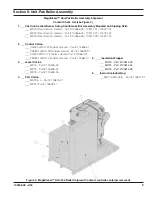
G. JACKET REAR PANEL INSTALLATION.
1. Locate jacket rear panel (has factory attached
3” fiberglass insulation) inside Jacket Carton.
See also “Repair Parts” Section, “Jacket
Assembly” illustration for part identification.
2. Locate and remove from Hardware Bag rear
panel mounting hardware – (2 pcs) 5/16”-18 x
3” lg. tap studs, (2 pcs) 5/16”-18 plated acorn
nuts, (2 pcs) 5/8” x 2-9/32” round spacers
and (2 pcs) 5/16”-18 x ½” Phillips pan head
machine screws.
3. Locate rear panel two lower attachment bosses
on rear section. See Figure 7 “Purpose of
Tappings & Bosses”.
4. Thread both 5/16”-18 x 3” lg. tap studs, with
short threaded end, into lower attachment
bosses on rear section.
5. Install both 5/8” x 2-9/32” round spacers over
tap studs.
6. Place rear jacket panel over rear section, so
both tap studs clear thru lower panel holes,
rear section cleanout openings clear thru
matching panel cutouts and brass sample port
plug clears panel matching hole.
7. Secure panel bottom to studs with acorn nuts
hand tight.
Section II: Unit-Pak Boiler Assembly (continued)
NOTICE
When securing burner swing door
make sure door is drawn-in equally on both
sides.
Summary of Contents for MegaSteam MST288
Page 54: ...54 103536 08 4 18 Bare Boiler Assembly Section XII Repair Parts continued...
Page 56: ...56 103536 08 4 18 Bare Boiler Assembly Section XII Repair Parts continued...
Page 58: ...58 103536 08 4 18 Jacket Assembly Section XII Repair Parts continued...
Page 62: ...62 103536 08 4 18 Beckett AFG Burner Section XII Repair Parts continued...
Page 65: ...65 103536 08 4 18...
Page 66: ...66 103536 08 4 18...
Page 67: ...67 103536 08 4 18...


