background image

QUICK START GUIDE

u-line.com

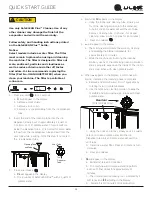
Ice

The Nugget Ice Machine produces cylindrical bits of com

-

pressed ice approximately 3⁄4” x 1⁄2”.

Ice is produced until the machine senses the bin is full. 
As ice slowly melts in the bin, the level of ice drops and 
ice production resumes. This ensures a constant supply of 
fresh ice is always available.

The factory default ice setting is 0, which produces a firm 
and compact ice nugget. U-Line’s exclusive U-Choose™ ice 
adjustability feature allows you five levels of adjustment 
from 0 to -5. At -5 the ice is soft and chewable. 

To adjust the ice density:

1. 

Hold       for 5 seconds - display will flash current ice 

setting.

2.  Adjust using         or     

3. 

Confirm setting by pressing     

CLEANING VS. SANITIZING

This guide will address both the cleaning and the sanitizing 
of the unit.

Clean the unit to remove dried food and spills, to prevent 

build-up of grime, and to maintain the natural luster 

stainless steel surfaces.

Sanitize the unit when exposed to raw meat juice or 
human germs such as from a sneeze or being touched by 
someone who is ill. Sanitizing the unit can also be part of 
regular cleaning routine.

Stainless Surfaces

Stainless door panels, handles and frames can discolor 
when exposed to chlorine gas, pool chemicals, saltwater or 
cleaners with bleach.

Keep your stainless unit looking new by cleaning with a 
good quality all-in-one stainless steel cleaner and polish 

monthly. For best results use Claire

®

 Stainless Steel 

Polish and Cleaner. Comparable products are acceptable. 
Frequent cleaning will remove surface contamination that 
could lead to rust. Some installations may require cleaning 
weekly.

Cleaning

Do not clean with steel wool pads.

Do not use stainless steel cleaners or polishes on 
any glass surfaces.

Clean any glass surfaces with a non-chlorine glass cleaner.

Do not use cleaners not specifically intended for 
stainless steel on stainless steel surfaces (this 
includes glass, tile, and counter cleaners).

If any surface discoloring or rusting appears, clean it 

quickly with Bon-Ami

®

 or Barkeepers Friend Cleanser

®

 and 

a nonabrasive cloth. Always clean with the grain. Always 

finish with Claire

®

 Stainless Steel Polish and Cleaner or 

comparable product to prevent further problems.

Using abrasive pads such as ScotchBrite™ will
cause the graining in the stainless steel to
become blurred.

Rust not cleaned up promptly can penetrate the
surface of the stainless steel and complete
removal of the rust may not be possible.
CLEAN INTERIOR COMPONENTS

Use warm or hot water with dish soap to clean all removed 
components and interior surfaces. You may use a vinegar 
and water solution in place of soap. Proceed to sanitizing.

Note: Cleaning soaps and vinegar solutions are not 
sanitizers.

SANITIZE INTERIOR COMPONENTS AND SURFACES

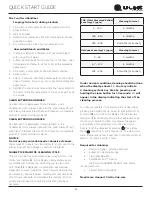
Choose a Commercial Sanitizer Safe for Stainless 
Steel

•  Read the directions for proper use to ensure that the 

surface will actually be sanitized

•  Many products require rinsing with water after use, 

especially when food will be touching the surface

•  Some products require a wait time before rinsing

•  Verify the sanitizer you are using is safe for stainless 

steel.

13

Summary of Contents for UCNP115

Page 1: ...QUICK START GUIDE 30657_B ICE UCNP115 15 NUGGET ICE MACHINE...

Page 2: ...consin USA and select products are available worldwide PRODUCT INFORMATION Looking for additional information on your product User Guides Spec Sheets CAD Drawings Compliance Documentation and Product...

Page 3: ...your product For more details see the complete User Guide Service Manual on u line com CONTENTS Safety and Warning 4 Environmental Requirements 5 Electrical 5 Water Hookup 5 Drain 7 Door Swing 8 Door...

Page 4: ...r use Do not use sharp objects to expedite defrosting Do not service without consulting the R600a specifications section included in the User Guide Do not damage the refrigerant circuit Service must b...

Page 5: ...Always keep your working area dry NOTICE Electrical installation must observe all state and local codes This unit requires connection to a grounded three prong polarized receptacle that has been plac...

Page 6: ...pressure at all times Plastic may crack or rupture with age and cause damage to your home Do not use tape or joint compound when attaching a braided flexible water supply line that includes a rubber g...

Page 7: ...is to be installed with adequate backflow protection to comply with applicable federal state and local codes Model numbers including CL or NB do not include a factory installed drain pump Model numbe...

Page 8: ...ter Waste Shut O Valve Disposal Assembly P60 Pump Required Waste Cold Water Shut O Valve Hot Water Air Gap Optional Hook Up Y Branch Tailpiece P60 Pump Required 21 21 16 1 2 16 1 2 90 Door Swing 90 Do...

Page 9: ...or To align and adjust the door 1 Gently pry off hinge cover from top of unit 2 Loosen do not remove top and bottom hinge screws using a Torx T 25 screwdriver 3 Align door squarely with cabinet 4 Make...

Page 10: ...Replace nuts if used Prepare door for reinstallation 1 Remove gasket This will reveal mounting holes for the magnet assembly 2 Remove magnet assembly from door with T 10 TORX driver Be sure to only re...

Page 11: ...otal unit rear height of 1 8 3 mm less than opening s rear height Shorten the unit height in the front by adjusting the front legs This allows the unit to be gently tipped into the opening Readjust th...

Page 12: ...fied See www star k org for more details DOOR ALERT NOTIFICATION When the door is left open for more than 30 minutes Ice production will cease A tone will sound for several seconds every minute will a...

Page 13: ...r Comparable products are acceptable Frequent cleaning will remove surface contamination that could lead to rust Some installations may require cleaning weekly Cleaning Do not clean with steel wool pa...

Page 14: ...hine Poor ice quality and reduced ice output are signs that cleaning is necessary Under normal conditions cleaning should be done when the display shows CL You may initiate a cleaning cycle at any tim...

Page 15: ...d cleaning tube slowly pour 3 4 of the cleaning solution into the dispenser tube Air and some water will exit the vent tube Remove cleaning tube Optional for deeper cleaning allow solution to soak for...

Page 16: ...d or other natural disasters The product must be installed operated and maintained in accordance with your product s User Guide The remedies described above for each warranty are the only ones that U...

Reviews: