background image

QUICK START GUIDE

u-line.com

If your U-Line unit did not come with a factory 
installed drain pump you must use a gravity 
style drain connection. For assistance in 
determining if your unit has a pump please 
contact U-Line. The floor drain must be large 
enough to accommodate drainage from all 
attached drains. Follow these guidelines when 
installing drain lines to prevent water from 
flowing back into the ice maker storage bin and/
or potentially flowing onto the floor, which may 
result in personal injury or property damage

Drain can NOT be located directly below the 
unit. Unit has a solid base that will not allow the 
unit to drain below itself.

There is a possibility that hose connections may 
have loosened during shipment. 

Verify all connections and fittings are free from 
leaks.

This equipment is to be installed with adequate 
backflow protection to comply with applicable 
federal, state and local codes

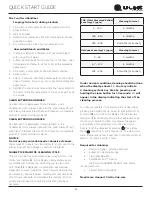
Model numbers including “CL” or “NB” do not include a 

factory installed drain pump.

Model numbers including “CP” or “NP” include a factory 
installed drain pump.

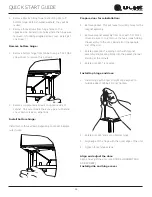
DRAIN CONNECTION

NOTICE

Drain

CAUTION

!

CAUTION

!

Failure to connect water supply or drain line 
connections properly can result in personal injury 
and property damage. Gravity drain connections 
must be routed downward from the rest of the 
unit at the rate of 1/4” per foot (1 cm per 50 cm). 

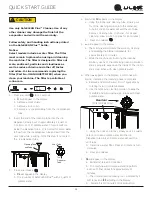
A gravity drain may be used if:

Drain line has at least a 1” drop per 48” (approximately 
2 cm drop per 100 cm) of run.

Drain line does not create traps and is vented per local 
code.

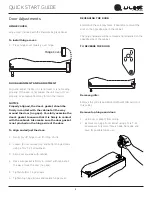
1. 

Cut the pre-installed drain tube to length.

2.  Connect to your local plumbing per the local code.

3.  If necessary, insulate drain line to prevent 

condensation.

GRAVITY DRAIN

CAUTION

!

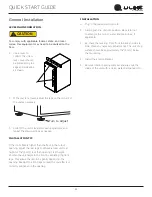
Normal

Proper Drain

With Trap

Poor Drainage, Water Will Back Up

With Trap and Vent

Proper Drain

7

Summary of Contents for UCNP115

Page 1: ...QUICK START GUIDE 30657_B ICE UCNP115 15 NUGGET ICE MACHINE...

Page 2: ...consin USA and select products are available worldwide PRODUCT INFORMATION Looking for additional information on your product User Guides Spec Sheets CAD Drawings Compliance Documentation and Product...

Page 3: ...your product For more details see the complete User Guide Service Manual on u line com CONTENTS Safety and Warning 4 Environmental Requirements 5 Electrical 5 Water Hookup 5 Drain 7 Door Swing 8 Door...

Page 4: ...r use Do not use sharp objects to expedite defrosting Do not service without consulting the R600a specifications section included in the User Guide Do not damage the refrigerant circuit Service must b...

Page 5: ...Always keep your working area dry NOTICE Electrical installation must observe all state and local codes This unit requires connection to a grounded three prong polarized receptacle that has been plac...

Page 6: ...pressure at all times Plastic may crack or rupture with age and cause damage to your home Do not use tape or joint compound when attaching a braided flexible water supply line that includes a rubber g...

Page 7: ...is to be installed with adequate backflow protection to comply with applicable federal state and local codes Model numbers including CL or NB do not include a factory installed drain pump Model numbe...

Page 8: ...ter Waste Shut O Valve Disposal Assembly P60 Pump Required Waste Cold Water Shut O Valve Hot Water Air Gap Optional Hook Up Y Branch Tailpiece P60 Pump Required 21 21 16 1 2 16 1 2 90 Door Swing 90 Do...

Page 9: ...or To align and adjust the door 1 Gently pry off hinge cover from top of unit 2 Loosen do not remove top and bottom hinge screws using a Torx T 25 screwdriver 3 Align door squarely with cabinet 4 Make...

Page 10: ...Replace nuts if used Prepare door for reinstallation 1 Remove gasket This will reveal mounting holes for the magnet assembly 2 Remove magnet assembly from door with T 10 TORX driver Be sure to only re...

Page 11: ...otal unit rear height of 1 8 3 mm less than opening s rear height Shorten the unit height in the front by adjusting the front legs This allows the unit to be gently tipped into the opening Readjust th...

Page 12: ...fied See www star k org for more details DOOR ALERT NOTIFICATION When the door is left open for more than 30 minutes Ice production will cease A tone will sound for several seconds every minute will a...

Page 13: ...r Comparable products are acceptable Frequent cleaning will remove surface contamination that could lead to rust Some installations may require cleaning weekly Cleaning Do not clean with steel wool pa...

Page 14: ...hine Poor ice quality and reduced ice output are signs that cleaning is necessary Under normal conditions cleaning should be done when the display shows CL You may initiate a cleaning cycle at any tim...

Page 15: ...d cleaning tube slowly pour 3 4 of the cleaning solution into the dispenser tube Air and some water will exit the vent tube Remove cleaning tube Optional for deeper cleaning allow solution to soak for...

Page 16: ...d or other natural disasters The product must be installed operated and maintained in accordance with your product s User Guide The remedies described above for each warranty are the only ones that U...

Reviews: