Installation Instructions
Your new Professional System should come with all necessary cords pre-plugged into the transmitter and power
stacker. Do not unplug any cords. If the cords come unplugged, the following instructions include directions to
re-plug in the cords.
Before you start
The transmitter and power stacker should already be stacked. If they are not, place the transmitter on top of the power
stacker. This stacked combination will be called the stack throughout the instructions.
Step 1
|
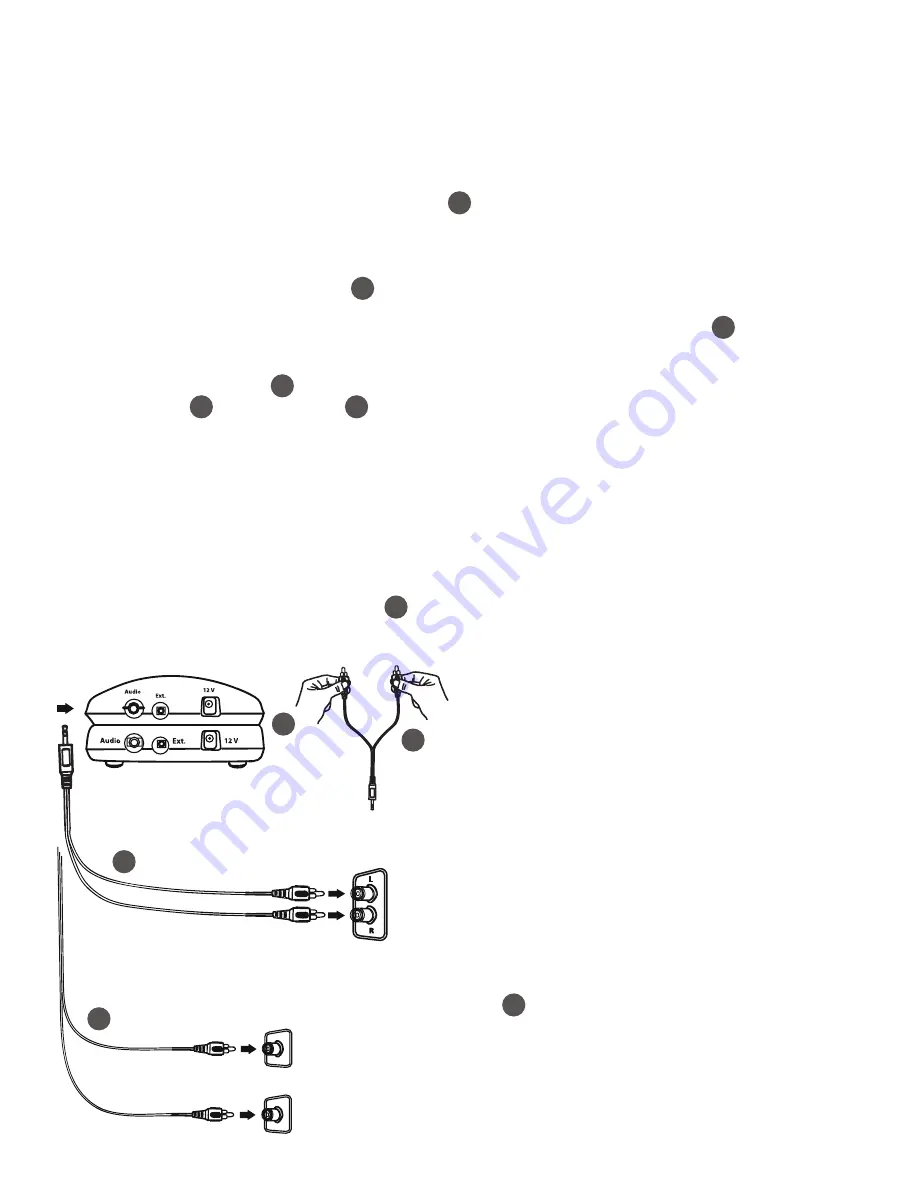
Plug in the Audio Cord
For best results, plug the audio cord into your television’s analog (RCA) audio out ports.
1. Plug the dual end of the audio cord (red and black male plugs) into the analog (RCA) audio out ports on the
back of the television. *
2. The single end of the audio cord should already be plugged into the port labeled ‘Audio’ on the back of the
TV Ears transmitter.
If the audio cord is not plugged into the transmitter, plug it in now.
3. The power stacker cord should already be plugged into the port labeled ‘EXT’ on the back of both the
transmitter and power stacker .
If the power stacker cord is not plugged in, plug the red end of the cord into the port labeled
‘EXT’ on the back of the transmitter. Plug the black end of the power stacker cord into the port
labeled ‘EXT’ on the back of the power stacker.
* If audio out ports are not available on the back of your television: use the audio out ports on
your cable or satellite box.
* If outside the U.S and audio out ports are not available on the back of your television: use a
SCART to RCA signal out adapter.
To use a DVD player or VCR when the audio cord is plugged into a cable or satellite box:
1. Take the dual end of the audio cord (red and black male plugs); gently pull apart the red and black
plugs.
2. Insert the red plug into the analog (RCA) audio out ports of the cable or satellite box.
16
16
TV
AUDIO OUT
DVD
SATELLITE
AUDIO OUT
AUDIO OUT
16
16
14
3. Insert the black plug into the analog (RCA) audio out
ports of the DVD player or VCR.
4. The single end of the audio cord should already be
plugged into the audio port labeled ‘Audio’ on the
back of the TV Ears transmitter. If the audio cord is not
plugged into the transmitter, plug it in now.
When installed this way, you must turn off whichever
device is not in use. Turn off the cable/satellite box when
watching a DVD or video. Turn off the DVD/VCR player
when watching TV.
Alternate Installation Kit:
This kit comes with your Professional System. Use this kit if audio
out ports are not available or not present.
Option 1: Power Microphone
1. Plug the power microphone into the female end of the
extender cord.
2. Plug the male end of the extender cord into the port labeled
‘Audio’ on the back of the transmitter.
3. Remove the protective cover from the Velcro on the power
microphone. Stick the power microphone to the television
speaker.
The TV volume must be on for the power microphone to
work. The TV volume cannot be muted when using the
power microphone.
16
14
11
17
13
20
11
Page 4


