background image

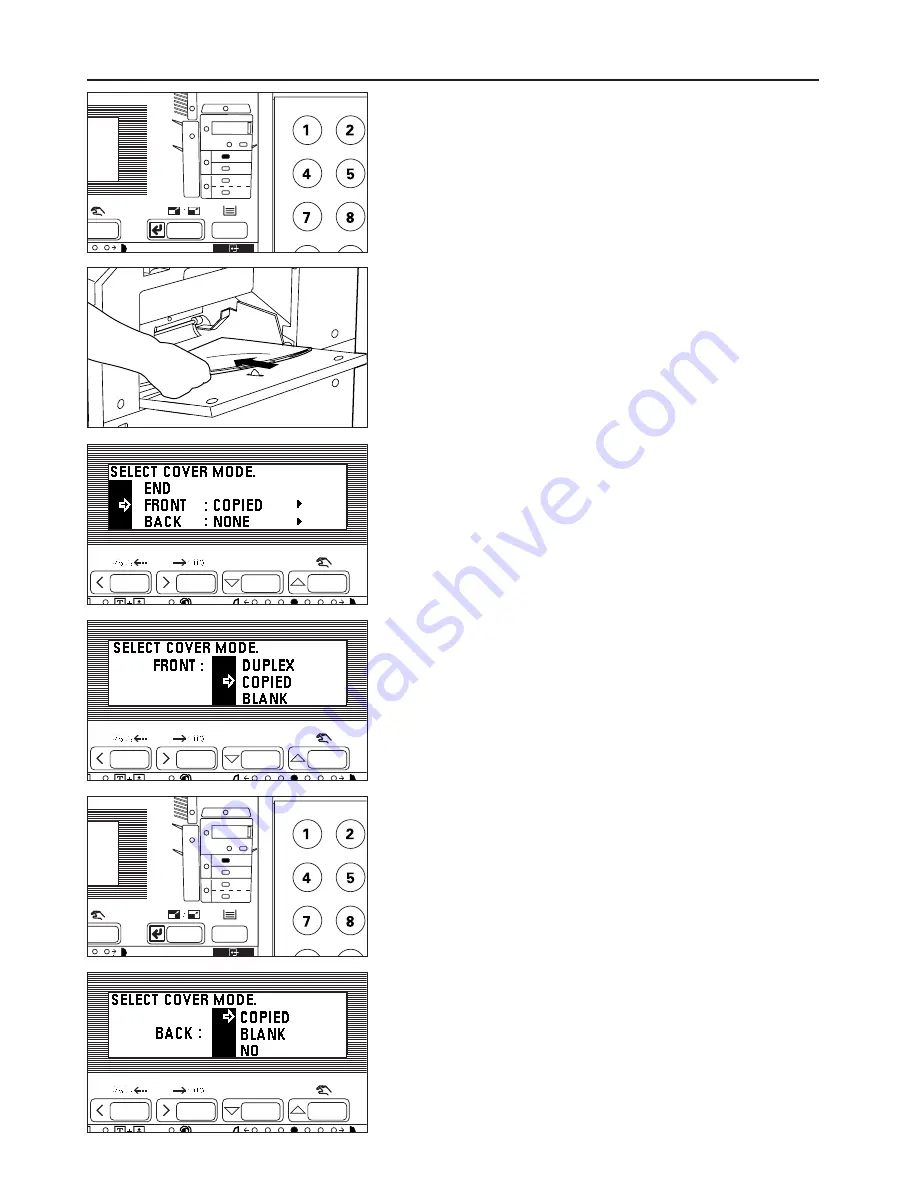
11. Press the enter key. Select other modes as follows.

* When selecting two modes, the cover mode setting screen will appear first.

Cover mode settings

12. Set the paper that will be the cover in the multi-bypass.

13. The current cover mode setting is displayed. To change the setting, press the

cursor down or up key and select "FRONT" or "BACK". If not changing the
setting, go to step 19.

14. Press the enter key.

If changing "FRONT", go to next step. When changing "BACK", go to step 17.

15. Press the cursor down or up key to select whether to copy onto the front cover

sheet or not. To copy onto the front cover sheet, select "COPIED". Otherwise,
select "BLANK".
* When selecting "2-SIDED" in step 6 and performing duplex copy onto the

cover sheet, select "DUPLEX".

16. Press the enter key.

When finished setting the cover mode setting, go to step 19. To change the
setting of the back side, press the cursor down key to select "BACK", and press
the enter key.

17. Press the cursor down or up key to select whether to copy onto the back side

cover sheet or not. To copy onto the back side cover sheet, select "COPIED".
Otherwise, select "BLANK". When the back cover is not attached, select "NO".

18. Press the enter key.

33

FUNCTIONS

Summary of Contents for DC 2023

Page 1: ...Instruction Handbook DC 2023 2031 Digital Multifunctional System...

Page 2: ...the Swiss Energy 2000 program Attention This instruction handbook is for the DC 2031 31 ppm and DC 2023 23 ppm The instruction is described based on the 31 ppm copier Specific matters for 23 ppm copie...

Page 3: ...attention to or incorrect compliance with the related points Symbols The symbol indicates that the related section includes safety warnings Specific points of attention are indicated inside the symbo...

Page 4: ...rlay 39 14 Inverting black and white Invert copy 41 15 Making mirror image copies Mirror image mode 41 16 Printing page numbers on copies Print page numbers 42 17 Unifying the different size originals...

Page 5: ...paper jam or when replacing toner Label 3 High temperature inside Do not touch parts in this area because there is a danger of getting burned Label 1 High voltage inside NEVER touch parts in this area...

Page 6: ...y around 65 RH and avoid the following locations when selecting a site for the copier Avoid locations near a window or with exposure to direct sunlight Avoid locations with vibrations Avoid locations...

Page 7: ...ing the copier For safety purposes ALWAYS remove the power plug from the outlet when performing cleaning operations If dust accumulates within the copier there is a danger of fire or other trouble It...

Page 8: ...zoom mode page 17 Enlarging reducing length and width separately XY zoom mode page 18 Making clear reproductions of photographs Copy quality selection page 16 Copying two page originals onto separate...

Page 9: ...page 45 Managing the number of copies made by different departments by ID code Copy management mode page 49 Changing the language used for messages Language selection function page 64 A full range of...

Page 10: ...ccurs in the paper feed section 8 Toner cartridge 9 Toner cartridge release lever Operate to replace the toner cartridge 0 Paper feed section knob Operate to remove paper misfed in the paper feed sect...

Page 11: ...ain switch Turn ON before trying to copy Copy store section Copied paper is stored here Multi Bypass Load paper here when copying onto small size paper or transparencies A4 horizontal size or smaller...

Page 12: ...ted at present is indicated by the lit drawer select indicator Also the paper size is indicated on the message display Preset R E Enter key Press to change the magnification ratio or to confirm select...

Page 13: ...to staple copies finished with the optional finisher The indicator is lit while the staple mode is ON See page 66 Sort key Sort indicator Group indicator Press to sort copies into separate sets or fo...

Page 14: ...p to 550 sheets of standard paper 80g m2 standard paper specified by our company The drawer can be set to hold paper of any desired size from A3 to A5 vertical and Folio 1 Pull the drawer out toward y...

Page 15: ...ack in Before leaving the copier in disuse for a prolonged period of time remove the paper from the drawer s and seal in its original packaging to protect it against moisture 2 Loading paper into the...

Page 16: ...t the paper all the way in along the guides as far as it will go When loading paper into the multi bypass make sure the copy side is facing upward The copy side is the side facing upward when the pack...

Page 17: ...1 Open the multi bypass 2 Align the insert guides with the envelop size 3 Set the envelop without opening with the print side face up and lip to your side and insert it into the multi bypass as far a...

Page 18: ...tion can also be turned off See 8 PAPER SELECTION on page 59 A drawer paper feed drawer to be selected automatically can be specified without setting any originals See 9 DEFAULT DRAWER on page 59 6 Co...

Page 19: ...ing of the copy exposure adjustment can be set to auto exposure See 1 EXPOSURE MODE on page 58 6 6 2 2 10 At the end of copying Finished copies are ejected onto the copy store section Up to 250 sheets...

Page 20: ...he paper size The magnification ratio will be displayed Copying will start when the Start key is pressed 2 Zoom copy mode The zoom ratio can be set to any value from 25 to 400 in 1 increments If origi...

Page 21: ...message display will return to the READY TO COPY screen 4 XY zoom mode It is possible to change the length and width of the copy separately The zoom ratio can be set to any value from 25 to 400 from...

Page 22: ...at the same settings as before after the rush job is finished Interrupt copying cannot be used if the transparency mode the transparency backing sheet mode or the hand out mode has been selected 1 Pre...

Page 23: ...ze used in this mode is limited to A4 Duplex copying from one sided originals The one sided original is copied on both sides back and front of the paper When an odd number of originals are copied the...

Page 24: ...in the numeric keys Scanning of the originals will start Carry out the same procedures to the originals of which copying will be performed and finally press the Start key Copying will start 4 Copying...

Page 25: ...COPY screen If BOOK ORIGINAL is selected go to the next step 5 Press the cursor down or up key to select the binding direction 6 Press the enter key The message display will return to the READY TO CO...

Page 26: ...e following table indicates that the setting is possible 1 Set the original s Set the originals so that the top left side of the original is at the rear side Setting them in the wrong direction may ca...

Page 27: ...and press the enter key The setting screen of the front side will appear 10 Press the cursor down or up key to select the margin mode for the front side 11 Press the enter key If LEFT MARGIN RIGHT MAR...

Page 28: ...s Book Erase Use for making neat copies from thick books The border width can be selected from 6 12 and 18 mm a is the width of erasing border The initial value of the erasing border width can be set...

Page 29: ...n cause problems This mode automatically places a backing sheet between the transparencies during copying The image of the original can also be copied onto the backing sheet Transparencies must be fed...

Page 30: ...Select 1 SIDED for a 1 sided original and 2 SIDED for a 2 sided original 8 Press the enter key The message display will return to the READY TO COPY screen 8 Copying onto transparencies Hand out mode...

Page 31: ...n set 2 Set the original s 3 Press the Hand out Sheet Insert key to light the indicator The function selection screen will appear 4 Press the cursor down key to select HAND OUT 5 Press the enter key T...

Page 32: ...the Start key Scanning of the originals will start When setting the original in the DF copying will be performed When setting the original on the platen go to the next step 29 FUNCTIONS 14 Replace th...

Page 33: ...the following table indicates that the setting is available When copying on the front or back side of the insert sheets An example of duplex copying is illustrated 30 FUNCTIONS See the following table...

Page 34: ...de from 1 sided or 2 sided originals sheets of paper can be specified as chapter pages that will be copied on the front only Specified pages are copied only onto the front even if the original is an e...

Page 35: ...or up key to specify how copies to be finished Select 1 SIDED for a 1 sided and 2 SIDED for a duplex copy 7 Press the enter key When having selected 1 SIDED in step 4 and 2 SIDED in step 6 go to the n...

Page 36: ...down or up key to select whether to copy onto the front cover sheet or not To copy onto the front cover sheet select COPIED Otherwise select BLANK When selecting 2 SIDED in step 6 and performing duple...

Page 37: ...s 24 When inserting multiple insert sheets highlight the page number enter box with the cursor right or left key and enter the page numbers with the numeric keys Up to 5 insert sheets can be created a...

Page 38: ...mode to copy two originals onto one sheet It can be used in conjunction with the duplex copy mode to copy four originals onto one sheet though this will require the optional duplex unit When setting...

Page 39: ...ke sure they are in a sequence that produces images in the numbered positions Select the paper according to the situation 11 Press the Start key If originals are set in the DF all originals are scanne...

Page 40: ...reen will appear 3 Press the cursor down or up key to specify the type of original Select 1 SIDED for a 1 sided original and 2 SIDED for a 2 sided original 4 Press the enter key 5 Press the cursor dow...

Page 41: ...it must be installed to use this function The original and copy paper must be A3 and A4R Copied The original to be copied onto the front cover is read first The paper onto which it is copied will come...

Page 42: ...page 9 Press the Start key After the original has been scanned remove it 10 Set the next 2 page original on the platen 11 Press the key in the numeric keys Start scanning the original When finished sc...

Page 43: ...l can be selected from 10 steps between 10 and 100 4 Press the enter key 5 Make sure that ENTER has been selected and press the enter key 6 Set the original s If originals are set in the DF set the im...

Page 44: ...OW ADDING TONER may appear 1 Set the original s 2 Press the Image key to light the indicator The function selection screen will appear 3 Press the cursor down or up key to select INVERT 4 Press the en...

Page 45: ...otal number of pages is printed as the denominator The page to be started to print can be set between pages 10 to 1 and 1 to 900 1 Set the original s 2 Press the Page key to light the indicator The pr...

Page 46: ...press the Start key Copying will start 17 Unifying the different size originals into one size Filing mode Different size originals can be separated to the same size group and scanned and copied onto...

Page 47: ...s the Paper Select key to select the paper size 9 Set originals of the same size in the DF 10 Press the Start key Scanning will start 11 After all the originals have been scanned set other size origin...

Page 48: ...nd copies originals one at a time When setting the originals on the platen go to the next step 4 Set the next original and press the key in the numeric keys Repeat this operation for all originals 5 A...

Page 49: ...or up key to select the program number in which to register settings The numeric keys can also be used to set the program number Pressing the cursor right key displays details of each setting When a p...

Page 50: ...en 21 Rotate copy Even when the orientation of original is different from that of paper in the drawer the image will be turned 90 degrees counter clockwise for copying For this function no setting is...

Page 51: ...switch to the ON l position Auto shut off function The auto shut off function is a power saving feature which automatically turns OFF O the main switch when a certain time elapses without copying bei...

Page 52: ...of 1 000 sheets up to a maximum of 999 000 Entering 0 enables unlimited copying When a department reaches its limit the copier will not make any more copies 50 Deleting ID codes Deletes registered ID...

Page 53: ...election screen will appear See the following 3 How to make various settings and make settings 3 How to make various settings Registering new ID codes 1 Display the copy management selection screen Se...

Page 54: ...ess the enter key The message display will return to the READY TO COPY screen Deleting ID codes 1 Display the copy management selection screen See page 49 2 Press the cursor down key to select COPY MG...

Page 55: ...the enter key 6 Press the cursor down or up key to select the ID code whose limit to be altered 7 Press the enter key 8 Enter the new limit with the numeric keys Limits are set in units of 1 000 s up...

Page 56: ...n step 4 7 Press the cursor up key to select END and press the enter key The message display will return to the screen in step 2 8 Press the cursor up key to select END and press the enter key The mes...

Page 57: ...n in step 2 13 Press the cursor up key to select END and press the enter key The message display will return to the READY TO COPY screen Printing copy management list 1 Display the copy management sel...

Page 58: ...EYS will appear on the message display 1 Enter the ID code for your department with the numeric keys 2 If READY TO COPY appears carry out copying in the usual manner When copying is finished press the...

Page 59: ...erase width for the sheet erase or book erase in the border erase mode page 25 Specifies whether the drawer with paper of the same size as the original is automatically selected or whether paper size...

Page 60: ...screen will appear 2 Press the cursor down key to select DEFAULT 3 Press the enter key 4 Enter the management code 3100 with the numeric keys The 4 digit management code can be changed See 8 MANAGEME...

Page 61: ...ter key 4 MIX ORI DENSITY 1 Press the cursor right or left key to move the cursor on the exposure scale Move the cursor to the right to make copies darker and to the left to make copies lighter 2 Pres...

Page 62: ...T or PHOTO 2 Press the enter key 8 PAPER SELECTION 1 Press the cursor down or up key to select AUTO or MANUAL 2 Press the enter key 9 DEFAULT DRAWER 1 Press the cursor down or up key to select the dra...

Page 63: ...o select the paper length The size can be selected from 94 to 214 mm in increments of 8 mm 2 Press the cursor down key to highlight the paper to the width orientation 3 Press the cursor right or left...

Page 64: ...lection mode or automatic drawer switching page 10 Selects a certain length of time from when copying ends to when the energy saver function page 47 is actuated Selects a certain length of time from w...

Page 65: ...default settings will appear 7 Press the cursor down or up key to select the machine default setting to be changed See Machine default settings on page 61 for the settings can be changed 8 Press the...

Page 66: ...ark will appear aside of the paper feed drawer Press the cursor right or left key again to cancel it More than two marks can be put 3 Press the cursor up key to select END and press the enter key 4 AP...

Page 67: ...ter a new 4 digit management code with the numeric keys 2 Press the enter key 9 SILENT MODE 1 Press the cursor down or up key to select ON or OFF 2 Press the enter key 3 Selection of language Selects...

Page 68: ...lection mode setting 1 Press the Auto Selection Filing key to light the indicator The function selection screen will appear 2 Make sure that AUTO SEL has been selected and press the enter key The mess...

Page 69: ...r from the drawers and seal in its original packaging to protect it against moisture 4 Finisher The finisher stores a large quantity of copies It also sorts multiple copies into sets by shifting the e...

Page 70: ...can be used as a fax For details see the fax s instruction handbook 9 Job separator When using the optional fax function and printer function the paper eject point can be changed according the current...

Page 71: ...gement on a department or even company level Setting the key counter Insert the key counter securely into the key counter opening When the key counter function is used copies cannot be made unless the...

Page 72: ...e copying using another drawer CHECK PAPER SIZE No paper that can be used in the selected mode is loaded Check the paper REPOSITION ORIGINAL OR SELECT OTHER PAPER DRAWER The orientation of the origina...

Page 73: ...the misfeed will be displayed on the message display Remove the misfed paper with the main switch ON in accordance with the procedure 72 INSTALL FINISHER The finisher optional is not installed correct...

Page 74: ...mes and shake it from side to side 8 to 10 times 5 Fit the new cartridge into the copier Insert it in the direction of the arrow on the top of the cartridge Align the projection of the bottom with the...

Page 75: ...n 2 Misfeed in the left 1 cover page 76 3 Misfeed in DF optional page 78 4 Misfeed in finisher optional page 78 5 Misfeed in mail box optional page 78 2 Cautions WARNING High voltage is present in the...

Page 76: ...paper feed unit is installed PAPER MISFEED OPEN LEFT3 COVER and the misfeed location indicator shown as a in the illustration appear Remove the misfed paper in the same way 1 Open left 2 or 3 cover o...

Page 77: ...arge capacity deck type paper feed unit optional 1 Open the left 3 cover 2 Remove the misfed paper without tearing it If the paper does tear remove any scraps of torn paper from inside the copier 3 Cl...

Page 78: ...The drum green is highly sensitive to light and dirt Be careful not to expose it to strong light such as room lighting or to touch the drum with hands 4 Turn the paper feed knob green in the directio...

Page 79: ...curred inside the left 1 cover or the ejection section 1 Remove the paper from the side of the copy store section 2 Open left 1 cover Go to step 4 if the copier dose not have the optional duplex unit...

Page 80: ...e the copier If the misfed paper is difficult to remove because of the branch unit do not force the paper out Go to the next step 8 Open the cover a of the branch unit and remove the misfed paper with...

Page 81: ...4 Misfeed in finisher optional If the misfeed location indicator shown in the illustration appear a misfeed has occurred in the finisher See the instruction handbook provided with the finisher and re...

Page 82: ...sure mode Perform A E 58 Is the copier in the manual exposure mode Adjust the exposure to the correct degree using the copy exposure adjustment keys 15 Is add toner message displayed Replace the toner...

Page 83: ...n originals are set in the optional DF align the original insertion guide securely and set the original 16 Paper keeps being misfed Is the paper set correctly in the drawers Set paper correctly 11 Is...

Page 84: ...with alcohol or mild detergent Never use thinner or other organic solvents for this purpose Cleaning the platen Lift open the original cover Wipe the platen with a soft cloth dampen with alcohol or m...

Page 85: ...64 80g m2 Multi bypass Standard paper 60 160g m2 Special paper letterheads coloured paper and transparencies envelop only when using the printer function COM 10 Monarch DL and C5 Continuous copying 1...

Page 86: ...cond paragraph on page 50 the third paragraph on page 57 and the third paragraph on page 62 The management code can be changed See 8 MANAGEMENT CODE ENTRY on page 64 The following item applies only in...

Page 87: ...ic feeding from drawers 2 drawers capacity 550 sheets each 80g m2 Copy paper Drawer Standard paper 64 80g m2 Continuous copying 1 999 sheets Light source Rare gas lamp Developing system Dry process Fi...

Page 88: ...ser no radiation can leak from the machine This machine is classified as Class 1 laser product under IEC 825 CAUTION Performance of procedures other than those specified in this manual may result in h...

Page 89: ...ly functional switches and are not suitable for isolating the equipment from the power source VORSICHT Der Netzstecker ist die Hauptisoliervorrichtung Die anderen Schalter auf dem Ger t sind nur Funkt...

Page 90: ...UTAX GmbH Ohechaussee 235 22848 Norderstedt Germany...

Reviews: