background image

CHIRP Signal Processing

SeaKing & SeaPrince Imaging Sonars

0374-SOM-00001, Issue: 08

47

© Tritech International Ltd.

T1

T2

Combined  echo

Target 2 echo

Target 1 echo

Transmitted  Pulse

Sonar range

resolution

Target

seperation

Time

Target

Seperation

Both  targets

are visible.

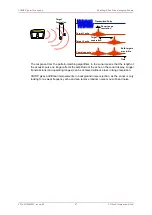
The response from the pattern-matching algorithms in the sonar means that the length of

the acoustic pulse no longer affects the amplitude of the echo on the sonar display. Longer

transmissions (and operating ranges) can be achieved without a loss in range resolution.

CHIRP gives additional improvements in background noise rejection, as the sonar is only

looking for a swept frequency echo and can remove random noise or out-of-band noise.

Summary of Contents for SeaKing

Page 1: ...SeaKing SeaPrince Imaging Sonars 0374 SOM 00001 Issue 08 1 Tritech International Ltd SeaKing SeaPrince Imaging Sonars Product Manual 0374 SOM 00001 Issue 08 ...

Page 2: ...ent is supplied by Tritech International Ltd on the understanding that it may not be copied used or disclosed to others except as authorised in writing by Tritech International Ltd Tritech International Ltd reserves the right to change modify and update designs and specifications as part of their ongoing product development programme All product names are trademarks of their respective companies ...

Page 3: ... Tools 26 6 Maintenance 32 6 1 After using the sonar 32 6 2 If storing the sonar for extended periods 32 6 3 SeaKing regular maintenance 32 6 3 1 Disassembly of the SeaKing unit 33 6 3 2 Reassembly of the SeaKing unit 35 6 4 Super SeaPrince regular maintenance 36 6 4 1 Disassembly of the Super SeaPrince unit 37 6 4 2 Reassembly of the Super SeaPrince unit 38 7 Troubleshooting 39 A Help Support 40 ...

Page 4: ...the current topic Important When this is shown there is potential to cause harm to the device due to static discharge The components should not be handled without appropriate protection to prevent such a discharge occurring Caution This highlights areas where extra care is needed to ensure that certain delicate components are not damaged Warning DANGER OF INJURY TO SELF OR OTHERS Where this symbol...

Page 5: ... the SCU or SeaHub using the ARCNET LAN telemetry protocol This is the standard protocol that is used in all SeaKing devices and provides a high bandwidth at a default communications rate of 156kbit s 1 It is also possible to reconfigure sensors to communicate at a lower baud rate or using serial protocols such as RS232 The DST SeaKing DFS Super SeaPrince sonar heads have the following features Sc...

Page 6: ...tech software as well as electronic copies of manuals for Tritech International Ltd products Cable whip this is an optional item but is usually supplied for units fitted with a standard Tritech International Ltd connector Ensure that the surface controller has Seanet Pro installed onto it using the supplied CD if necessary The CD will contain a version of Seanet Pro that would have been appropriat...

Page 7: ...5 A and RS485 B pins may be configured differently Using the test cable connect the Sonar unit to your surface controller Your surface controller can be a SCU SeaHub MicronNav Hub or a PC with a RS232 or RS485 port Run Seanet Pro and if working over a serial interface configure the serial ports using the Utilities Com Setup drop down menu option For the COM Port being used ensure that an AIF devic...

Page 8: ...90 The Status of the Sonar Node should be OK If the Status is UNKNOWN check the following For RS232 wiring Pin 5 is properly connected For all wiring The main comms pins 1 and 2 on the waterblock are wired correctly and have not been crossed With the Status showing as OK select the Applications Single Sonar option The data screen will report a centering message as part of the Sonar boot up then wi...

Page 9: ... supplied should be fitted to prevent the ingress of dirt or moisture 3 2 Seanet Pro Software Warning SeaPrince Sonars with serial numbers 318289 and above incorporate the Mod B improvements and updated firmware If being used with Seanet Pro version V2 24 dated prior to Feb 2020 do not Update the firmware as this will install a previous version and may render the unit inoperable It is recommend th...

Page 10: ...opper such as brass or bronze Care should be taken to mount sonar heads to ensure that they are mounted as close to the true vertical as possible in relation to the trim position of the vehicle The front filling plug and red LED should be aligned with the natural direction of travel of the vehicle Errors in the head alignment can give rise to unreliable results 3 3 1 SeaKing Communication Configur...

Page 11: ...le of communicating on all three protocol options as standard Refer to the Seanet Pro and Seanet SCU manuals for more information on serial RS232 RS485 configuration and baud setup 3 3 2 Subsea Sensor Electrical Installation If using a rectified transformer PSU the output of the PSU must have a filter capacitor of not less than 470μF for each head being powered If an unregulated PSU is used then m...

Page 12: ...erblock Pin out Diagram 1 4 6 2 3 5 Figure 3 1 Tritech Waterblock Pin MAIN port AUX port Cable colour 1 RS232 TX ARCNET A RS485 A RS232 RX ARCNET A RS485 A Yellow 2 RS232 Rx ARCNET B RS485 B RS232 TX ARCNET B RS485 B Blue 3 DC Power Red 4 DC Power Black 5 RS232 Ground Green 6 Earth cable shield cable screen ...

Page 13: ...operating with SeaKing V5 or older SeaKing Sonars that are V5 or older models need to be opened in order to change their configuration Additionally these Sonars may or may not have a V6 COMS PCB installed and so will use physical jumpers to set up the communications options Please see 0374 SOM 00003 for jumper configurations as well as V6 COMS PCB DIP switch settings for these units SeaKing V6 A V...

Page 14: ... ensure that you can see the Node of the Sonar typically Node 2 3 In the Action column click on the down arrow and select Setup 4 Click Ok on the pop up warning and the Sonar Setup page should now appear 5 Select the desired communication options from the MAIN and AUX drop down lists 6 If required click on the Baud Rates button to open and change the baud rates used by the ARCNET and serial output...

Page 15: ...P address of the controlling computer to the same domain as the Sonar typically in the 192 168 2 xxx range 3 Using the Applications Setup ensure that you can see the Node of the Sonar typically Node 2 4 In the Action column click on the down arrow and select Setup 5 Click Ok on the pop up warning and the Sonar Setup page should now appear 6 In the Sonar Setup page click on the COMV7 tab to show th...

Page 16: ...Setup SeaKing SeaPrince Imaging Sonars 0374 SOM 00001 Issue 08 16 Tritech International Ltd Note The SeaKing Sonar uses a set Subnet Mask of 255 255 255 0 ...

Page 17: ...nce Interpretation of sonar data develops with experience Sonar reflections of isolated small objects give no indication of shape or attitude Man made structures such as platforms or rock walls tend to have regular patterns that are easier to identify Using sonar is rather like looking at a world made of shiny black plastic in the dark with only a narrow torch beam for illumination Remember that w...

Page 18: ... a similar layout Figure 5 1 The main areas of the display are 1 Display Header This part of the screen is used for system software identification 2 Menu Bar This is where system set up functions can be accessed Printing Application selection Colour Scheme setup and Logging are some of the features that can be accessed in this screen area 3 Settings Bar This is where the Sensor can be controlled a...

Page 19: ...ets the sonar receive gain as required typically this is around 50 but is varied according to water and target conditions and user preference Contrast C2 This sets the display contrast between hard and soft targets Usually set to user preference it can help find small features in generally featureless situation or exclude clutter from a heavily featured seabed Range C3 This sets the maximum range ...

Page 20: ...plication Tools Acoustic Zoom The Zoom window size and magnification can then be adjusted in Zoom Setup in the Application Tools RES F4 Sonar Resolution Resolution toggles through preset step sizes for the sonar scanning Available step sizes is dependant on the sonar being used Smaller angles give a higher resolution picture but slower scan speeds Usually a Lo or Med resolution is used for trackin...

Page 21: ...onment Used to enter environmental parameters such as system Velocity Of Sound 3 Always On Top Main Screen is Always on Top of Windows desktop Figure 5 5 This Menu Item will only be present in Seanet Pro and not from running Seanet Setup from the desktop icon Application examples include Single Sonar Sonar Profiler and Sonar Bathy Profiler There is also an Application Wizard available at the top o...

Page 22: ...received serial data 7 Auxiliary Device Diagnostic Terminal window for viewing received serial data 8 Barometer Diagnostic Terminal window for viewing received serial data Figure 5 7 1 Sidebar Enable Disable the Sidebar Note In certain applications i e Sonar Video the Sidebar will be opened and docked to the blank window panel filler 2 Toolbars There are several toolbars containing shortcut button...

Page 23: ...ly functional in multi Sensor Applications 1 Cycle F1 Cycle to the next Display Window can also be done using the F1 key 2 Zoom F2 Enlarge the current Display Window to fill the window click again to display all the Display Windows can also be done with the F2 key 3 Sonar Switch focus to Sonar Display window 4 Sidebar Will be replaced with name of another Sensor in a Multi Sensor Application Figur...

Page 24: ...formation of computer resources in use 5 2 4 Measurement Tool By left button clicking and dragging on the Sonar display window or Acoustic Zoom window an elastic band is laid for range and position measuring of targets Dx Dy Cartesian co ordinates of current pointer position relative to Sonar Rng Brg Polar position of pointer relative to where elastic band was laid Note The range units used are th...

Page 25: ... the right button move the mouse up down to increase decrease the size of the bar The sampling window can be any size between a range of 9 25dB Decrease the size of the sampling window to increase the sonar display contrast Ideally the control should be set somewhere in the centre of the allowed range 16 18 dB to give the best results under most conditions Select a high value to reduce the contras...

Page 26: ... relative bearing are shown Click on the symbol to deploy on the Marker panel and that marker symbol will be dropped at the Origin 0 0 on the Sonar display Then pick up the Marker using the left mouse button and drag it to the position required Figure 5 17 When both markers are dropped on the display a line will be drawn which connects them The Delta Range and Bearing at the bottom of the panel in...

Page 27: ...f zoom box The Size shows the screen zoomed area red outline as a percentage of the Acoustic Zoom display window The Factor shows the number of zoomed range bins for each normal range bin For instance a Factor of 4 will take four times the number of samples within the zoomed area than will be taken outside the zoomed area Position Used to move and size the Sonar PPI display in its display window C...

Page 28: ...hat they can be disconnected and the position will remain persistent simply click the appropriate button Set Fixed from GPS or Set Fixed From USBL From GPS Position Updates If a GPS input is active select this option A Heading input will also need to be active for the Geo referencing to be functional From USBL Position Updates If a USBL input is active select this option A Heading input will also ...

Page 29: ...ition co ordinates when the mouse cursor is moved around the sonar plotter Note There must be active sonar data as well as position and heading data for the position co ordinates to be reported Setup Figure 5 21 8 Bit Usually checked Selects the intensity sampling of sonar data 4 bit or 8 bit No Sens Must be off grayed out as shown for normal use to synchronise angular head alignment Invert Swaps ...

Page 30: ... samples on the Sonar display Blends out contrast and blockiness on lower ranges and resolutions Auxiliary Compass Figure 5 23 Sonar heads fitted with an Auxiliary AUX port can connect a serial RS232 or RS485 compass The compass string such as from a TCM 2 or CDL Gyro includes Heading Pitch and Roll data which is then displayed in the Aux Compass pop up form Ensure that the correct compass is sele...

Page 31: ...8 31 Tritech International Ltd Style Select the type of shape from Circle Rectangle Triangle Size Set the Width and Height of the shape Pos Move the Shape with X Y position offset from display origin Line Width Line width Centre On Enable centre marker for the shape ...

Page 32: ...air before stowing Pack into storage container along with several pouches of silica gel 6 3 SeaKing regular maintenance General Guidelines Caution It is essential to have a regular maintenance schedule so that any defects arising from corrosion or erosion can be spotted early and corrected before they cause severe damage to the unit It is recommended that the unit is annually serviced and can be r...

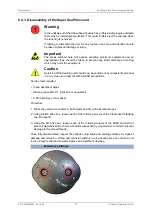
Page 33: ...serviceable items if in doubt please contact Tritech International Ltd to establish the correct service routine The o ring seals should be regularly inspected cleaned and lubricates with the appropriate greasing compound The body of the unit should also be inspected for any obvious signs of corrosion especially in mating surfaces such as the waterblock 6 3 1 Disassembly of the SeaKing unit Warning...

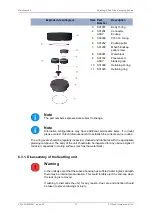
Page 34: ...M3 Allen key loosen each of the retaining screws of the MAIN and AUX if present waterblocks Each screw should be loosened by a quarter turn in order to prevent damage to the screw threads 4 Remove the connector endcap locking ring 5 Using the endcap puller pull the connector endcap off the unit 6 The electronics block will then slide out of the housing attached to the connector endcap 7 On the top...

Page 35: ...e taken to prevent any static discharge occurring which may harm the equipment Caution Servicing of the SeaKing unit should only be carried out by competent personnel in a dry clean environment with full ESD precautions Service tools required Clean absorbent wipes Silicon grease MS 111 lubricant or equivalent A M3 Allen Key or Hex driver A 5 5mm spanner or nut spinner A small nose flush plier or M...

Page 36: ...not to be used 13 Visually inspect the unit to ensure that all surfaces have mated correctly 6 4 Super SeaPrince regular maintenance General Guidelines Caution It is essential to have a regular maintenance schedule so that any defects arising from corrosion or erosion can be spotted early and corrected before they cause severe damage to the unit It is recommended that the unit is annually serviced...

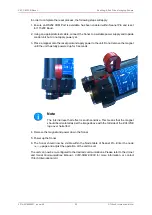
Page 37: ...t should only be carried out by competent personnel in a dry clean environment with full ESD precautions Service tools required Clean absorbent wipes Silicon grease MS 111 lubricant or equivalent A M3 Allen Key or Hex driver Procedure 1 Rinse the unit and connector in fresh water and dry with absorbent wipes 2 Using the M3 Allen key loosen each of the retaining screws of the Pressurised blanking c...

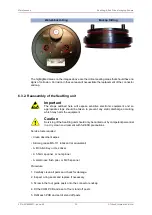
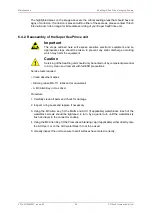
Page 38: ...tion Servicing of the SeaKing unit should only be carried out by competent personnel in a dry clean environment with full ESD precautions Service tools required Clean absorbent wipes Silicon grease MS 111 lubricant or equivalent A M3 Allen Key or Hex driver Procedure 1 Carefully clean all parts and check for damage 2 Inspect o ring seals and replace if necessary 3 Using the M3 Allen key fit the MA...

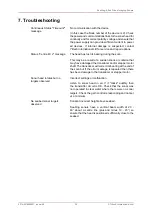
Page 39: ...lt of a sudden knock or collision that may have damaged the transducer and or stepper motor shaft The transducer will correct its bearing at the end of the scan but if the error message is repeated then there has been damage to the transducer or stepper motor Sonar head rotates but no targets observed Incorrect settings or malfunction Listen to sonar head in air If it clicks audibly then the trans...

Page 40: ...oftware or firmware revision numbers 3 A clear fault description 4 Details of any remedial action implemented Contamination If the product has been used in a contaminated or hazardous environment you must de contaminate the product and report any hazards prior to returning the unit for repair Under no circumstances should a product be returned that is contaminated with radioactive material The nam...

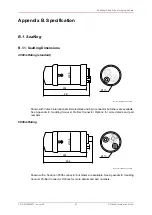
Page 41: ...sions in mm Shown with Tritech International Ltd waterblock and 6 pin connector but others are available See Appendix E SeaKing Sonar Profiler Connector Options for more details and part numbers 6800m Rating 224 Ø105 256 Ø110 Not to scale dimensions in mm Shown with a SeaConn 5506 connector but others are available See Appendix E SeaKing Sonar Profiler Connector Options for more details and part n...

Page 42: ...ontal Pulse length 400μs 200μs Maximum range 300m 100m Minimum range 0 4m Range resolution approximately 15mm minimum Source level 210dB re 1μPa at 1m B 1 4 SeaKing Display Characteristics Mechanical resolutions 0 45 0 9 1 8 3 6 Scanned sector Variable up to 360 Continuous 360 Yes Sector offset mode Yes B 1 5 SeaKing Electrical and Communication Connector options Tritech 6 pin standard Others avai...

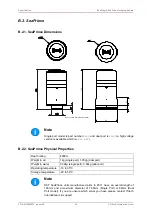
Page 43: ...is available which is 8250 48V B 2 2 SeaPrince Physical Properties Depth rating 4000m Weight in air 1kg single port 1 05kg dual port Weight in water 0 39kg single port 0 44kg dual port Operating temperature 10 to 35 C Storage temperature 20 to 50 C Note DST SeaPrince units manufactured prior to 2011 have an overall length of 146mm and a maximum diameter of 74 5mm Single Port or 86mm Dual Port mode...

Page 44: ...e 1m B 2 4 SeaPrince Display Characteristics Mechanical resolutions 0 45 0 9 1 8 3 6 Scanned sector 360 Continuous 360 Yes Sector offset mode Yes B 2 5 SeaPrince Electrical and Communication Power requirement 12 to 36V DC at 10W 18 to 56V DC optional Communication Protocols ARCNET RS232 RS485 Data rate ARCNET 156kbit s 1 maximum RS232 RS485 115 2kBd maximum Drive capability ARCNET only 1500m at 15...

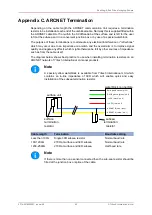
Page 45: ... such as from the cable itself The diagram below shows best practice to use when installing termination resistors on an ARCNET network of Tritech International Ltd sonar products Note A special yellow waterblock is available from Tritech International Ltd which contains an in line impedance of 39Ω which will enable quick and easy installation of the subsea termination resistor waterblock connector...

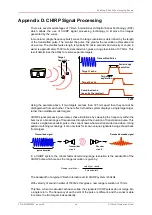
Page 46: ...tinguished from each other The net effect is that the system displays a single large target rather than multiple smaller targets CHIRP signal processing overcomes these limitations by sweeping the frequency within the burst over a broad range of frequencies throughout the duration of transmission pulse This creates a signature acoustic pulse the sonar knows what was transmitted and when Using patt...

Page 47: ...ets are visible The response from the pattern matching algorithms in the sonar means that the length of the acoustic pulse no longer affects the amplitude of the echo on the sonar display Longer transmissions and operating ranges can be achieved without a loss in range resolution CHIRP gives additional improvements in background noise rejection as the sonar is only looking for a swept frequency ec...

Page 48: ... V6 4000m 325 675 Burton Seaconn 5506 1508 08540 SSK DFS V6 6800m 385 725 Burton Seaconn 5506 1508 07525B SSK DFS V6 4000m 325 675 Burton Seaconn 5506 1508 06756 SSK DFP V5 4000m 580 1210 Burton Seaconn 5506 1508 06731 SK DFP V5 6800m 580 1200 Burton Seaconn 5506 1508 08652 SSK DFS V6 4000m 325 675 Burton Seaconn 5506 1508 08803 SK DFS V6 6800m 385 725 Burton Seaconn 5506 1508 07578 SSK DFS V6 400...

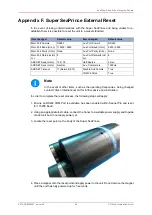
Page 49: ...Duplex False ARCNET Sens Hi Lo Neutral Aux Comms rate 1000ms ARCNET Timeout 11 Normal ET3 Disable AutoComms True COMV6 Fitted True Note In the event of other items such as the operating frequencies being changed contact Tritech International Ltd for further advice and instruction In order to complete the reset process the following steps will apply 1 Ensure an RS232 COM Port is available has been ...

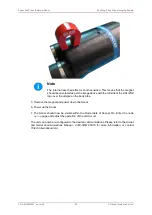
Page 50: ...de of the ECLIPSE logo over the dimple on the body tube 5 Remove the magnet and power down the Sonar 6 Power up the Sonar 7 The Sonar should now be visible within the Node table of Seanet Pro Enter the node Setup page and adjust the operation of the unit to suit The unit can now be re configured to the desired communications Please refer to the Arcnet and Serial Communications Manual 0374 SOM 0000...

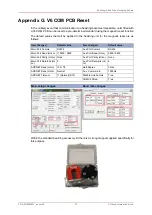
Page 51: ...s follows Item changed Default value Item changed Default value Main Port Comms RS232 Aux Port Comms RS232 Main Port Baud Hi Lo 115200 9600 Aux Port Baud Hi Lo 9600 9600 Main Port Parity Hi Lo None Aux Port Parity Hi Lo None Main Port Data bits Hi Lo 8 Aux Port Data bits Hi Lo 8 ARCNET Baud Hi Lo 156 78 Half Duplex False ARCNET Sens Hi Lo Neutral Aux Comms rate 1000ms ARCNET Timeout 11 Normal ET3 ...

Page 52: ...he unit Do not remove the magnet until the unit has fully powered up for 5 seconds Note The internal reset hall effect is south sensitive This means that the magnet should be orientated as per the image above with the SE side of the ECLIPSE logo over hall effect 4 Remove the magnet and power down the Sonar 5 Power up the Sonar 6 The Sonar should now be visible within the Node table of Seanet Pro E...

Page 53: ...S485 A standard for defining the electrical characteristics of drivers and receivers for use in a balanced digital multipoint system also known as EIA 485 RX Receive data SCU Surface Control Unit a specially manufactured computer which is rack mountable and capable of processing the data from the sonar equipment running either Windows XP Embedded or Windows 7 and Seanet Pro or Gemini software SeaH...

Page 54: ...onars 0374 SOM 00001 Issue 08 54 Tritech International Ltd Tritech waterblock The 4000m depth rated connector developed by Tritech International Ltd for their subsea equipment TX Transmit data USBL Ultra Short Base Line positioning system ...

Reviews: