


55
7. Administration
(continued)
2. Fill in the form with the appropriate information for your company. The table below is an example of a filled out form.
Field
Example
Country (2 letter code)
TW
State or Province
Taiwan
Locality
Taipei
Organization
Your Company, Ltd.
Unit
Techdoc Department
Common Name
www.mycompany.com
Note
: This entry must be the exact domain name of the site that you want the certificate to be valid
for. If the site’s domain name is www.mycompany.com, and you enter mycompany.com, the certificate will not be valid.
Email Address
3. When all fields have been filled out (all fields are required), click the
Create
button.
4. Click the
Get CSR
button, and then save the certificate file to a convenient location on your computer. This is the file that you give to the
third party CA to apply for their signed SSL certificate.
5. After you have received the certificate from the third party CA, save it to a convenient location on your computer. In the
Certificate Signing
Request
section of the
Security
page, click the
Browse
button and navigate to and select the certificate.
6. Click the
Upload
button.
Note
: When uploading the file, the KVM checks to make sure the specified information still matches. If it does, the file is accepted. If it
does not match, the file will be rejected. If you want to remove the certificate (e.g. to replace it with a new one because of a domain name
change), click the
Remove CSR
button.
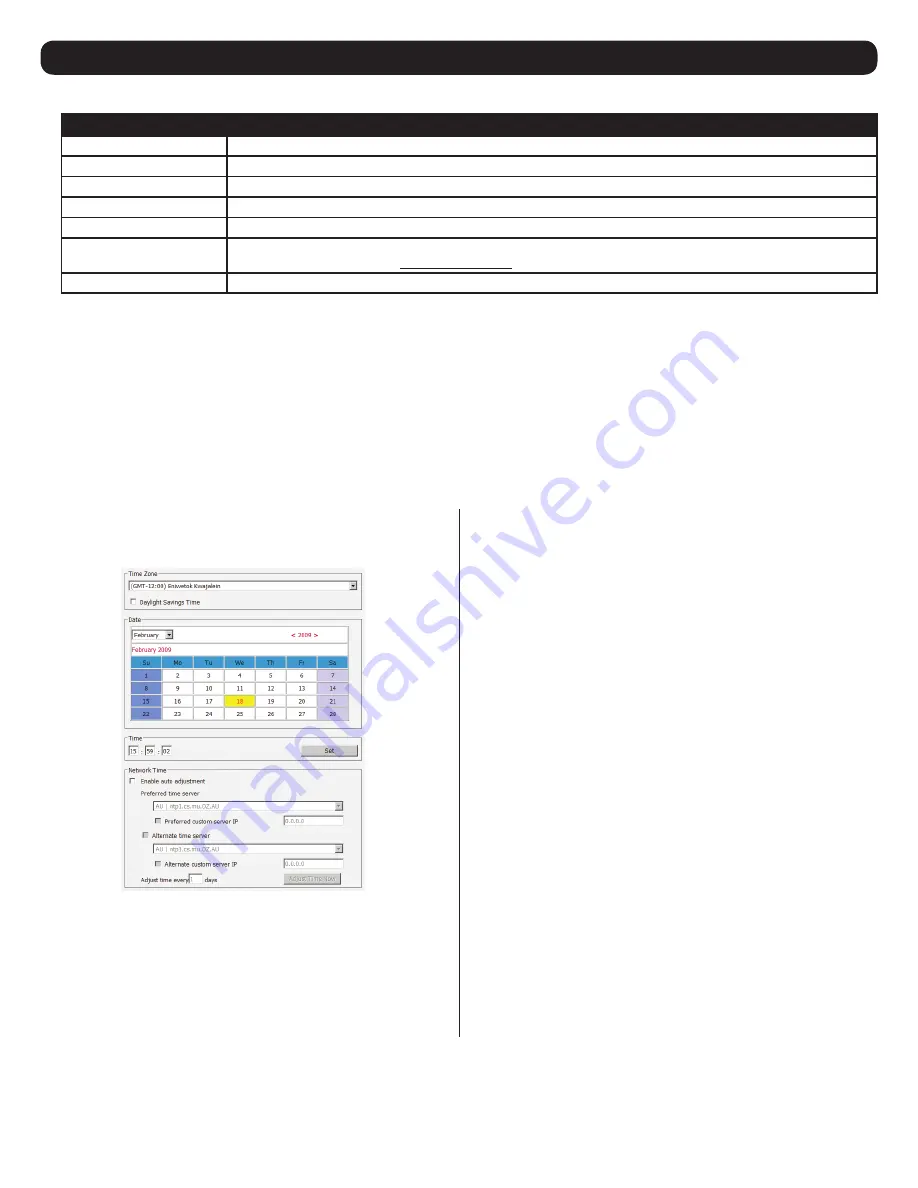
The
Date/Time
page allows the user to set the date and time
parameters for the KVM switch. The following section describes the
settings on this page.
Time Zone
• Select the Time Zone and City that most closely resembles where
the KVM switch is in using the drop-down menu at the top of this
section.
• If your area uses Daylight Savings Time, check the
Daylight
Savings Time
checkbox.
To manually set the date and time, do the following:
1. In the
Date
section, select the current month using the drop-
down menu.
2. If needed, click the < or > buttons in the
Date
section to move
backward or forward to the correct year.
3. In the calendar in the
Date
section, click on the current day.
4. In the
Time
section, enter in the current time using the 24 hour
HH:MM:SS format.
5. Click the
Set
button in the
Time
section to apply your changes.
Network Time
To have the time automatically synchronized to a network time
server, do the following:
1. Check the
Enable Auto Adjustment
checkbox.
2. Select a time server from the
Preferred Time Server
drop-down
list; or, check the
Preferred Custom Server IP
checkbox and enter
in the IP of your preferred time server.
3. If desired, repeat step two to enter an
Alternate Time Server
.
4. Key in the desired number of days between synchronization in
the
Adjust Time Every __ Days
field.
5. Click the
Adjust Time Now
button to synchronize immediately.
7.2.17 Date/Time