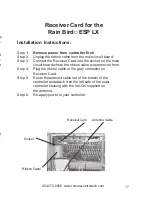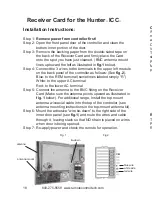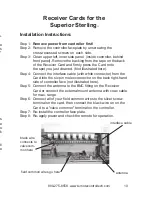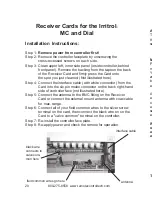
To connect the DCI-1 Cable:
Remove the faceplate from the controller. Hook the molex re-
ceptacle directly to the 6 pins on the circuit board of controller.
Do not force it in--it should fit only one way. Punch knockout
hole from the bottom of the controller. Position circular end of
DCI-1 cable through knockout hole and attach with screws. This
connector should remain with controller. Replace controller face-
plate.
To connect the DCI-2 Cable:
WARNING
TRC COMMANDER RECEIVER MUST BE
CONNECTED TO 37-PIN CLAMSHELL BEFORE
CONNECTING DCI-2 CABLE TO CONTROLLER.
First connect the 37-pin clamshell directly to the TRC Commander
Receiver. To operate the Receiver, attach the DCI-2 circular plug
to the DCI-1 connector at the controller knockout location. Align
pins and twist connector on with a clockwise motion. Do not
force it in--it should fit only one way. This cable is removable and
allows portable hookup at each controller.
Direct Controller Interface
Cable
For the Irritrol MC
, Dial and Superior
Controllers
24
800-275-8558 www.remotecontroltech.com
Special Features
•
Connects to any 24VAC sprinkler system
•
Silent Running
-Turn off all of the zones from 1 - 7 days
•
Adjustable Time Duration
-2 Minutes to 2 Hours (default 20 minutes)
• Multiple Receiver operation from a single Transmitter
- Field programmable dipswitches offer
199 unique Receiver numbers
• Programmable security codes
-9999 different security group codes
• Audible low power indicator
-Field replaceable 9 volt battery
• Master Valve disable key
-Pump Start/Master Valve
Permanent Receiver Cards are available for the following
controllers:
Rain Bird ESP MC
®
(contact factory for SAT upgrades)
Rain Bird ESP LX
®
Irritrol Dial & MC
®
Superior Sterling
®
HIT Logic 2 & 3
®
Griswold IDC
®
5
800-275-8558 www.remotecontroltech.com


