VALVE
ON
3
VALVE
ON
VALVE
OFF
To turn off valve 3:
To turn on valve 3:
Turns zone 3 back on:
Transmitter Operating Instructions
Error Tone
You will hear a squak error tone if an incorrect series of keys have
been pressed. When the error tone is heard, wait 10 seconds and
simply restart the series of commands.
Low Battery Tone
A rapid sequence of beeps after the transmission beep indicates low
battery power.
Replace with a new alkeline 9V battery.
Valve On/Valve Off
To turn a valve on press the desired zone number then press the
"Valve On" key. Pressing "Valve Off" will turn off the last zone acti-
vated.
When "Valve Off" is pressed by itself the current zone will turn off. To
turn that zone back on just press "Valve On". The Transmitter re-
members which valve you were testing.
Pressing "0", "Valve Off" will turn off all zones.
Example:
8
800-275-8558 www.remotecontroltech.com
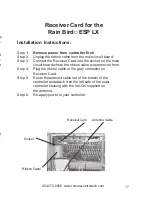
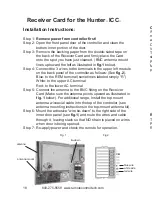
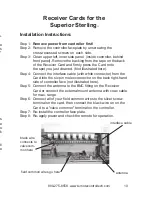
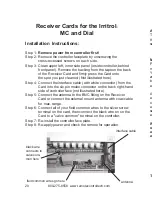
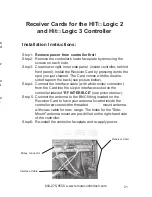
Installation Instructions:
Step 1:
Remove power from controller first!
Step 2: Remove the controller's lower faceplate by removing the
screws on each side.
Step 3: Clean lower right, inner side panel (inside controller, behind
front panel). Install the Receiver Card by pressing it onto the
spot you just cleaned. The Card comes with the double-
sided tape on the back (see picture below).
Step 4: Connect the interface cable (with white molex connector)
from the Card into the six pin interface socket on the
controller labeled "
RF INTERFACE
" (see picture below).
Step 5: Connect the antenna to the BNC fitting located on the
Receiver Card to have your antenna located inside the
controller
or
connect the threaded
external
mount antenna
with coax cable for max. range. The holes for the "Side-
Mount" antenna mount are pre-drilled on the right-hand side
of the controller.
Step 6: Re-install the controller faceplate and re-apply power.
Receiver Cards for the HIT
Logic 2
and Hit
Logic 3 Controller
Receiver Card
Molex connector
Interface Cable
21
800-275-8558 www.remotecontroltech.com


