25
Control Panel
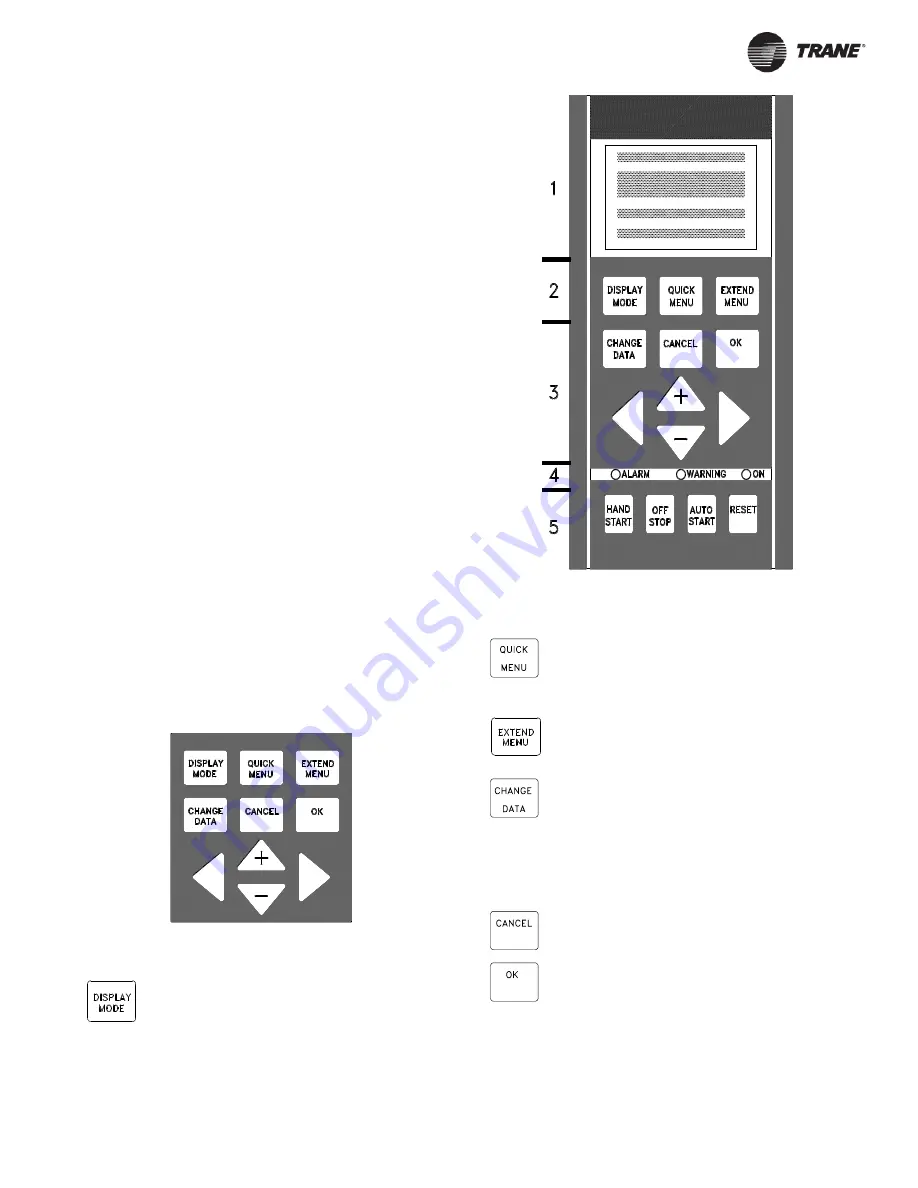
The Local Control Panel (LCP), normally mounted on the front of the
drive, is a complete interface for programming and operating the drive.
The control panel can be removed from the drive and installed up to 10
feet (3 meters) from the drive by using a remote mounting kit.
The control panel has five functions:
1. Display
2. Keys for changing the display
3. Keys for changing programming parameters
4. Indicator lamps
5. Keys for controlling drive operation
The LCP uses a four-line, alpha-numeric, back-lit, LCD display. The
display can show four operating data values and three operating
condition values continuously. During programming, all the information
required for quick, effective parameter setup of the drive will be
displayed. As a supplement to the display, there are three indicator
lamps for power on (ON), warning (WARNING) and alarm (ALARM).
All drive parameters can be changed from the control panel, unless this
ability has been locked out by setting parameter 016,
Lock for Data
Change
, to Locked, or by a digital input to terminals 16 through 33. See
the related parameters for more information.
Keys for Parameter Changes
The keys are divided into groups by function. The keys between the
display and indicator lamps are used for parameter setup, selecting the
display indication during normal operation and controlling the drive
speed during local speed control operation. The keys below the
indicator lamps are used for Start/Stop control and selection of the
operating site.
The DISPLAY MODE key is used to change the mode
of the display or to return to the Display Mode from
either the Quick Menu or the Extend Menu mode.
The QUICK MENU key gives access to the parameters
available for the Quick Menu setup. Parameters in this
menu are the 12 most important setup parameters for
the drive.
The EXTEND MENU key gives access to all parameters.
The CHANGE DATA key is used for changing the value
of a parameter selected either in the Extend Menu or
the Quick Menu mode. The desired parameter is first
selected. Then the CHANGE DATA key is pressed to
enable the editing of the parameter. The underline in the
display will move under the parameters value to show
that it is being edited.
The CANCEL key is used if a change of the selected
parameter is not to be carried out.
The OK key is used for confirming a change of the
parameter selected.


