LC2MM_OM60T13E_(GE)
20.04.16 09:33
373
1. Toyota Link overview (Type 2)
To
yota
Lin
k
7
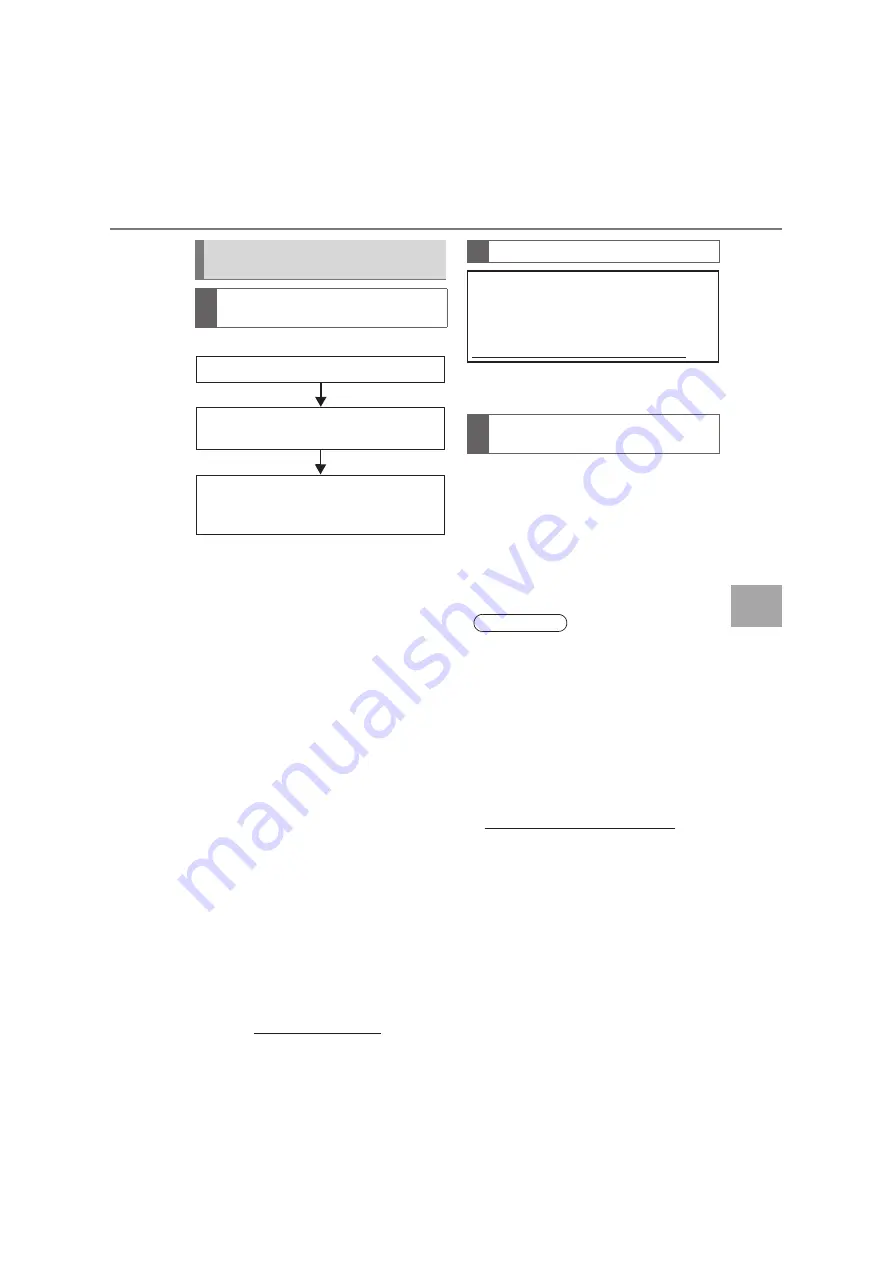
Perform the settings in the following order.
In order to use Toyota Link, the following
setup steps must first be performed:
z
User registration with the service contract.
(
→
P.373)
z
Download the Toyota Link application onto
your smartphone, and login to the applica-
tion. (
→
P.373)
z
Pair the smartphone that the Toyota Link
application was downloaded to with the
navigation and multimedia system via
Bluetooth
®
. (
→
P.56)
1
Perform user registration from the des-
ignated web address.
1
Download the Toyota Link application
to your smartphone.
2
Activate the Toyota Link application on
your smartphone.
3
Enter the information required into the
Toyota Link application. Login to the
application.
Preparation before using Toyota
Link
Settings required to use Toyota
Link
1
User registration
2
Download the Toyota Link application
to your smartphone.
3
Pair the smartphone with the
navigation and multimedia system via
Bluetooth
®
.
User registration
Before using Toyota Link, you will
need to set up an account. Getting
started is easy and takes only a few
minutes. Please visit
http://www.toyota. com.au/owners.*
1
Registering the Toyota Link
application
INFORMATION
●
Applications can only be used when the
Toyota Link application has been down-
loaded to your smartphone and the
application is active.
●
In order to use applications, it is neces-
sary to pair your smartphone with the
navigation and multimedia system via
Bluetooth
®
. (
→
P.56)
●
If an iPhone is connected via Bluetooth
®
and USB at the same time, system oper-
ation may become unusable. For known
phone compatibility information, refer to
http://www.toyota.com.au /owners.*
1
●
If a Toyota Link application is used while
iPod audio is being played back, system
operation may become unstable.
*
1
: Toyota Link is available in Australia. For information on availability of the service in New Zealand,
refer to http://www.toyota.co.nz/.
Summary of Contents for Land Cruiser Station Wagon 2020
Page 1: ......
Page 2: ......
Page 4: ...ii LC200_Navi MM_OM60T13E_ GE 20 02 10 17 28 ...
Page 34: ...LC200_Navi MM_OM60T13E_ GE 20 04 16 09 32 30 4 Function index ...
Page 82: ...LC200_Navi MM_OM60T13E_ GE 20 04 16 09 32 78 3 Other settings ...
Page 372: ...LC200_Navi MM_OM60T13E_ GE 20 04 16 09 33 368 3 What to do if Type 2 ...
Page 384: ...LC200_Navi MM_OM60T13E_ GE 20 04 16 09 33 380 3 Setup Type 2 ...
Page 385: ...LC200_Navi MM_OM60T13E_ GE 20 02 10 17 28 381 Index ...
Page 397: ...LC200_Navi MM_OM60T13E_ GE 20 02 10 17 42 393 Map database information and updates ...
Page 398: ...LC200_Navi MM_OM60T13E_ GE 20 02 10 17 42 394 Map database information and updates ...
Page 400: ...LC200_Navi MM_OM60T13E_ GE 20 02 10 17 42 396 Certification ...
Page 402: ...LC200_Navi MM_OM60T13E_ GE 20 02 10 17 42 398 Certification XFor vehicles sold in Jamaica ...
Page 403: ...LC200_Navi MM_OM60T13E_ GE 20 02 10 17 42 399 Certification XFor vehicles sold in Paraguay ...
Page 404: ...LC200_Navi MM_OM60T13E_ GE 20 02 10 17 42 400 Certification XFor vehicles sold in St Martin ...
Page 405: ...LC200_Navi MM_OM60T13E_ GE 20 02 10 17 42 401 Certification XFor vehicles sold in Micronesia ...
Page 406: ...LC200_Navi MM_OM60T13E_ GE 20 02 10 17 42 ...
Page 428: ...LC200_Navi MM_OM60T13E_ GE EE 20 03 24 14 47 22 4 Function index ...
Page 620: ...LC200_Navi MM_OM60T13E_ GE EE 20 03 24 14 47 214 1 Speech command system operation ...
Page 658: ...LC200_Navi MM_OM60T13E_ GE EE 20 03 24 14 47 252 3 What to do if ...
Page 677: ...LC200_Navi MM_OM60T13E_ GE EE 20 03 24 14 47 271 Index ...
Page 688: ...LC200_Navi MM_OM60T13E_ GE EE 20 03 24 14 47 282 Certification ...
Page 689: ...LC200_Navi MM_OM60T13E_ GE EE 20 03 24 14 47 283 Certification ...
Page 690: ......


