background image

LC2MM_OM60T13E_(GE)

20.04.16     09:33

254

4. Rear seat entertainment system operation

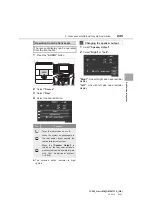
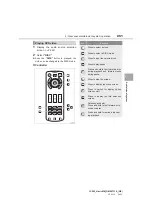
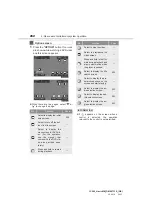
1

Display the option screen. (

P.252)

2

Select 

“Setup”

.

3

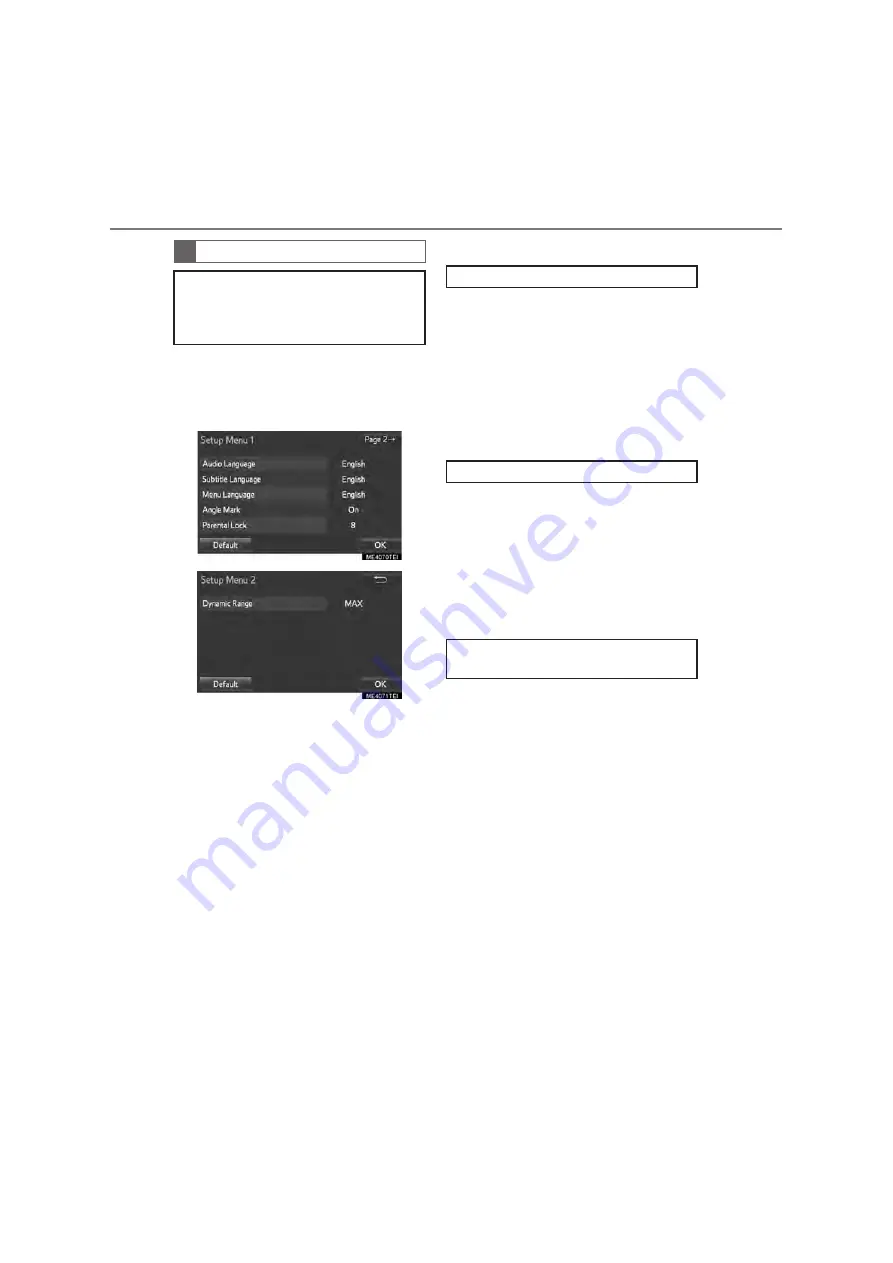
Select the items to be set.

4

After the initial setting has been
changed, select 

“OK”

.

z

This screen will close, and the system will
return to the DVD video screen.

z

When 

“Default”

 is selected, all menus are

initialized.

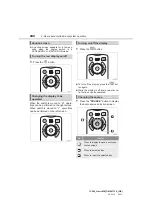
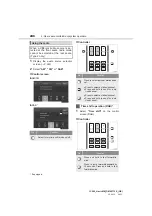
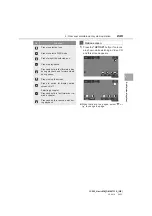
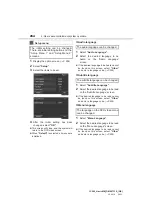
Audio language

1

Select 

“Audio Language”

.

2

Select the desired language to be
heard on the “Audio Language”
screen.

z

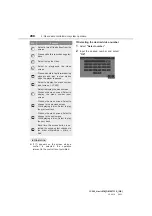
If the desired language to be heard cannot
be found on this screen, select 

“Other”

and enter a language code. (

P.255)

Subtitle language

1

Select 

“Subtitle Language”

.

2

Select the desired language to be read
on the “Subtitle Language” screen.

z

If the desired language to be read cannot
be found on this screen, select 

“Other”

and enter a language code. (

P.255)

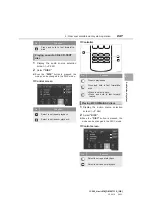
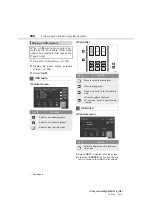
Menu language

1

Select 

“Menu Language”

.

2

Select the desired language to be read
on the “Menu Language” screen.

z

If the desired language to be read cannot
be found on this screen, select 

“Other”

and enter a language code. (

P.255)

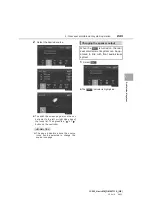
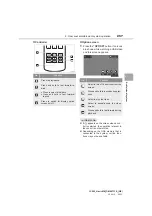
Setup menu

The initial setting can be changed.
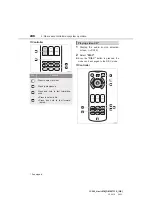
There are initial setting buttons on the
“Setup Menu 1” and “Setup Menu 2”
screens.

The audio language can be changed.

The subtitle language can be changed.

The language on the DVD video menu
can be changed.

Summary of Contents for Land Cruiser Station Wagon 2020

Page 1: ......

Page 2: ......

Page 3: ...esponding section z Operations that differ based on the navigation system are further divided in the 1st section into Type 1 and Type 2 Check the corresponding type by comparing the button layout below the screen to those shown in the table below Reading this manual How to check the navigation system Screen type Section Button type Type How to check Press the SETUP button X Without Wi Fi switch 1s...

Page 4: ...ii LC200_Navi MM_OM60T13E_ GE 20 02 10 17 28 ...

Page 5: ...isual system 197 5 Speech command system 285 6 Phone 301 7 Toyota Link 369 Index 381 For more information about the following items see the Owner s Manual Air conditioning Fuel consumption Vehicle customization settings Toyota parking assist sensor Toyota parking assist monitor Multi terrain monitor 1st section ...

Page 6: ...The navigation system is designed to select efficient routes from your present starting location to your destination The system is also designed to direct you to a destination that is unfamiliar to you in an efficient manner The map data base was made based on AISIN AW maps whose information sources are HERE maps for Middle East and South Africa and TomTom maps for South east Asia The calculated r...

Page 7: ...io in structions will announce the distance remaining and the direction to turn when approaching an intersection These voice instructions will help you keep your eyes on the road and are timed to provide enough time to allow you to maneu ver change lanes or slow down Please be aware that all current vehicle navigation systems have certain limita tions that may affect their ability to perform prope...

Page 8: ...urself and others NOTICE This is a warning against anything which may cause damage to the vehicle or its equip ment if the warning is ignored You are informed about what you must or must not do in order to avoid or reduce the risk of damage to your vehicle and its equipment Symbols used in illustrations Safety symbol The symbol of a circle with a slash through it means Do not Do not do this or Do ...

Page 9: ...perations The steps of an operation are explained Related Operations A main operation s supplementary operations are described Information Useful information for the user is described INFORMATION Illustrations may differ from the actual screen displayed depending on the specifications of the vehicle If so see in brackets for example Phone Telephone switch ...

Page 10: ...sible manner follow all the safety tips shown below This system is intended to assist in reach ing the destination and if used properly can do so The driver is solely responsible for the safe operation of your vehicle and the safety of your passengers Do not use any feature of this system to the extent it becomes a distraction and prevents safe driving The first priority while driving should alway...

Page 11: ... any instructions from the system look to see whether the instruction can be done safely and legally This system cannot warn about such things as the safety of an area condition of streets and availability of emergency ser vices If unsure about the safety of an ar ea do not drive into it Under no circumstances is this system a substitute for the driver s personal judgement Use this system only in ...

Page 12: ...n system 44 2 Bluetooth settings Type 1 45 Registering connecting Bluetooth device 45 Setting Bluetooth details 49 2 Bluetooth settings Type 2 56 Registering connecting Bluetooth device 56 Setting Bluetooth details 60 3 Other settings 66 General settings 66 Voice settings 72 Vehicle settings 73 1 Basic operation Type 1 84 Quick reference 84 Map screen operation 86 Map screen information 91 Traffic...

Page 13: ...on 210 CD 210 Video CD 214 DVD 216 USB memory 220 iPod 226 Bluetooth audio 230 AUX 233 VTR 235 4 Rear seat entertainment system operation 238 Rear seat entertainment system features 238 5 Audio visual remote controls 265 Steering switches 265 6 Setup 267 Audio settings 267 7 Tips for operating the audio visual system 274 Operating information 274 1 Speech command system operation For South Africa ...

Page 14: ...ing on the Bluetooth phone 348 Bluetooth phone message function 350 2 Setup Type 2 354 Phone message settings 354 3 What to do if Type 2 364 Troubleshooting 364 1 Toyota Link overview Type 2 370 Toyota Link service 370 2 Toyota Link operation Type 2 374 Toyota Link 374 3 Setup Type 2 379 Toyota Link settings 379 Alphabetical index 382 7 Toyota Link Index Toyota Motor Europe NV SA Avenue du Bourget...

Page 15: ...n screen 18 3 Navigation operation Type 1 Registering home 20 Registering quick access 21 Operation flow Guiding the route 22 Setting home as the destination 23 3 Navigation operation Type 2 Registering home 24 Registering preset destinations 25 Operation flow Guiding the route 26 Setting home as the destination 27 4 Function index Function index 28 Quick guide ...

Page 16: ... For South Africa XType 2 z This illustration is for right hand drive vehi cles z The button positions and shapes differ for left hand drive vehicles Buttons overview No Function Page Press to display the home screen 13 Press to display the map compass screen 84 89 143 Press to display the Information screen 18 Press to display the au dio visual screen 198 Press to display the hands free operation...

Page 17: ...e navi gation system screen audio system screen and fuel consumption screen simultaneously When a screen is se lected the selected screen is switched to a full screen display The home screen can be set to either a three way split screen or a two way split screen For details about setting the home screen P 36 No Function Page Displays the condition of the Bluetooth connec tion 14 Select to change t...

Page 18: ...ditions and or places The cellular phone is obstructed by certain objects such as when it is behind the seat or in the glove box or console box The cellular phone is touching or is cov ered with metal materials Leave the Bluetooth phone in a place where the condition of the Bluetooth con nection is good The level of reception Poor Excellent The level of reception does not always correspond with th...

Page 19: ...harge left Empty Full The amount displayed does not always correspond with the amount displayed on the Bluetooth device The amount of battery charge left may not be displayed depending on the type of the Bluetooth device connected This system does not have a charging function No Indicators Conditions ...

Page 20: ...3E_ GE 20 04 16 09 32 16 2 Quick reference XType 1 For Middle East XType 1 For Southeast Asia and South Africa Setup screen The items shown on the Setup screen can be set Press the SETUP button to display the Setup screen ...

Page 21: ...Quick guide 1 LC200_Navi MM_OM60T13E_ GE 20 04 16 09 32 17 2 Quick reference XType 1 For Latin America XType 2 ...

Page 22: ...navigation settings 132 178 186 Select to set the phone sound contacts mes sage settings 1 etc 319 Select to set vehicle infor mation such as mainte nance information 73 Select to adjust the con trast and brightness of the screens turn the screen off etc 42 2 Select to set traffic infor mation 135 Select to set Toyota Link settings 379 1 If equipped 2 This function is not made available in countri...

Page 23: ...Select to view pictures in the USB memory con nected to USB port 1 224 Select to view pictures in the USB memory con nected to USB port 2 2 Select to display traffic in formation 95 Select to display the Toyota Link screen 374 1 Owner s Manual 2 This function is not made available in countries areas where the due infor mation service is not provided ...

Page 24: ... Select Home Select Yes There are different kinds of meth ods to search for your home P 97 Select Enter Registration of home is complete XRegistering home in a different way P 121 XEditing the name location phone num ber and icon P 121 XSetting home as the destination P 99 Registering home 1 2 3 4 With navigation system 5 6 7 ...

Page 25: ...ess screen buttons Select Yes There are different kinds of meth ods to search for a destination P 97 Select Enter Registration of quick access is com plete XRegistering quick access in a different way P 122 XEditing the name location phone num ber and icon P 123 XSetting quick access as the destination P 99 Registering quick access 1 2 3 4 With navigation system 5 6 7 ...

Page 26: ...tination There are different kinds of meth ods to search for a destination P 97 Select Enter Select Start Selecting routes other than the one recom mended P 108 Guidance to the destination is displayed on the screen and can be heard via voice guidance Operation flow Guiding the route 1 2 3 With navigation system 4 5 6 ...

Page 27: ...the NAV button Select Menu Select Destination Select Home Select Enter Select Start Selecting routes other than the one recom mended P 108 Guidance to the destination is displayed on the screen and can be heard via voice guidance Setting home as the destination 1 With navigation system 2 3 4 5 6 ...

Page 28: ... Go home Select Yes There are different kinds of meth ods to search for your home P 156 Select Enter Select OK Registration of home is complete XRegistering home in a different way P 179 XEditing the name location telephone number and icon P 179 XSetting home as the destination P 158 Registering home 1 2 3 4 5 6 7 ...

Page 29: ...lect Yes There are different kinds of meth ods to search for a destination P 156 Select Enter Select OK Registration of preset destinations is com plete XRegistering preset destinations in a dif ferent way P 180 XEditing the name location telephone number and icon P 180 XSetting preset destinations as the desti nation P 158 Registering preset destinations 1 2 3 4 5 6 7 ...

Page 30: ...on Select Dest There are different kinds of meth ods to search for a destination P 156 Select Go Select OK Selecting routes other than the one recom mended P 166 Guidance to the destination is displayed on the screen and can be heard via voice guidance Operation flow Guiding the route 1 2 3 4 5 ...

Page 31: ...gation operation Type 2 Press the NAV button Select Dest Select Go home Select OK Selecting routes other than the one recom mended P 166 Guidance to the destination is displayed on the screen and can be heard via voice guidance Setting home as the destination 1 2 3 4 ...

Page 32: ...169 Selecting the map mode 88 146 Displaying traffic information 95 153 Searching for destinations Page Type 1 Page Type 2 Searching for the destination 98 156 Changing the search area 99 158 Before starting or during route guidance Page Type 1 Page Type 2 Starting route guidance 106 166 Editing the route 115 174 Viewing the entire route map 118 170 Suspending route guidance 109 168 Adjusting rout...

Page 33: ... 2 Displaying vehicle maintenance 74 74 Hands free system for cellular phone Page Type 1 Page Type 2 Registering connecting a Bluetooth phone 45 56 Making a call on a Bluetooth phone 306 343 Receiving a call on the Bluetooth phone 311 347 Speech command system Page Type 1 Page Type 2 Operating the system with your voice 286 293 ...

Page 34: ...LC200_Navi MM_OM60T13E_ GE 20 04 16 09 32 30 4 Function index ...

Page 35: ...iles 48 Setting Bluetooth details 49 Bluetooth Setup screen 49 Detailed Bluetooth Settings screen 54 2 Bluetooth settings Type 2 Registering connecting Bluetooth device 56 Registering a Bluetooth phone for the first time 56 Registering a Bluetooth audio player for the first time 57 Profiles 59 Setting Bluetooth details 60 Bluetooth Setup screen 60 Registering a Bluetooth device 61 Deleting a Bluet...

Page 36: ...tomatically switches to the home screen Select Show Map or press the HOME button to display the home screen XType 2 z After about 5 seconds the caution screen automatically switches to the home screen Select Continue or press the HOME button to display the home screen z Press the NAV button to display the map screen Initial screen z Images shown on the initial screen can be changed to suit individ...

Page 37: ...icle reaches a previously set driving distance or date specified for a scheduled maintenance check the Information Maintenance re minder screen will be displayed when the navigation system is turned on z This screen goes off if the screen is not operated for several seconds z To prevent this screen from being dis played again select Do not show this info again Do not display this message again z T...

Page 38: ... above operations Touch screen gestures Operations are performed by touching the touch screen directly with your finger Operation method Outline Main use Touch Quickly touch and release once Changing and selecting various set tings Drag Touch the screen with your finger and move the screen to the desired posi tion Scrolling the lists Flick Quickly move the screen by flicking with your finger Scrol...

Page 39: ...e the touch screen INFORMATION If the system does not respond to touch ing a screen button move your finger away from the screen and then touch it again Dimmed screen buttons cannot be oper ated The displayed image may become darker and moving images may be slightly distorted when the screen is cold In extremely cold conditions the map may not be displayed and the data input by a user may be delet...

Page 40: ... 2 Check that Customize Home Screen is displayed Home screen operation The home screen can display multiple information screens such as the navi gation system screen audio system screen and fuel consumption screen simultaneously Customizing the home screen The display items area on the home screen and the home screen layout can be changed No Function Page Select to change the dis play items area 3...

Page 41: ...hange Layout 2 Select the desired screen layout XType 1 INFORMATION When the selected item is already being displayed and another area is selected for that item the item that it is replacing will be displayed in the original item s location Entering letters and numbers list screen operation When searching for an address name etc or entering data letters and num bers can be entered via the screen E...

Page 42: ...haracters Select to change character and key board types P 39 Select to enter characters in lower case or in upper case Select to display other symbols INFORMATION Keyboard character is automatically changed with the search area P 99 No Function Text field Entered character s will be displayed During entering character s when there is only one available option for the next character s the next cha...

Page 43: ... The list will be displayed automatically if the maximum number of characters is entered or matching items can be dis played on a single list screen Changing character and keyboard type Type 1 only INFORMATION Depending on the conditions data is being entered it may not possible to change keyboard characters With navigation system List screen Displaying the list The list screen may be displayed af...

Page 44: ...t all items List screen operation When a list is displayed use the appro priate screen button to scroll through the list Icon Function Select to skip to the next or previ ous page Select and hold or to scroll through the displayed list This indicates the displayed screen s position If appears to the right of an item name the complete name is too long to display Select to scroll to the end of the n...

Page 45: ... a list displayed on the screen can be sorted in the order of distance from the current location date category etc With navigation system Character screen buttons in lists Some lists contain character screen buttons ABC DEF etc which al low a direct jump to list entries that be gin with the same letter as the character screen button INFORMATION Every time the same character screen button is select...

Page 46: ... Select the desired group 1 Press the SETUP button 2 Select Display Displaying the group list Type 1 only It is possible to display the desired group items in the memory point list With navigation system Screen adjustment The contrast and brightness of the screen display and the image of the camera display can be adjusted The screen can also be turned off and or changed to either day or night mode...

Page 47: ...n the audio panel Select to turn day mode on off 43 Select to adjust the screen display 43 Select to adjust the camera display Changing between day and night mode Depending on the position of the head light switch the screen changes to day or night mode This feature is available when the headlight is switched on INFORMATION If the screen is set to day mode with the headlight switch turned on this ...

Page 48: ...ation system The following functions of the naviga tion and multimedia system are linked with the multi information display in the instrument cluster z Navigation z Audio etc These functions can be operated using multi information display control switches on the steering wheel For de tails refer to Owner s Manual If equipped ...

Page 49: ...l that comes with it z To cancel the registration select Can cel 5 Register the Bluetooth device using your Bluetooth device z A PIN code is not required for SSP Secure Simple Pairing compatible Bluetooth devices Depending on the type of Bluetooth device being con nected a message confirming registra tion may be displayed on the Bluetooth device s screen Respond and operate the Bluetooth device ac...

Page 50: ...displayed follow the guidance on the screen to try again 1 Turn the Bluetooth connection setting of your audio player on z This function is not available when the Bluetooth connection setting of your audio player is set to off 2 Press the AUDIO button 3 Select Source Registering a Bluetooth audio player for the first time To use the Bluetooth Audio it is nec essary to register an audio player with...

Page 51: ...47 2 Bluetooth settings Type 1 Basic function 2 4 Select Bluetooth 5 Select Connect 6 Follow the steps in Registering a Bluetooth device from step 1 P 50 The Bluetooth word mark and logos are registered trademarks owned by the Bluetooth SIG Inc ...

Page 52: ...tions Bluetooth Phone HFP Hands Free Profile Hands free system Ver 1 0 Ver 1 6 OPP Object Push Profile Transferring the contacts Ver 1 1 Ver 1 2 PBAP Phone Book Access Profile Ver 1 0 Ver 1 1 MAP Message Access Profile Bluetooth phone message Ver 1 0 Bluetooth Audio Player A2DP Advanced Audio Distribution Profile Bluetooth audio system Ver 1 0 Ver 1 2 AVRCP Audio Video Remote Control Profile Ver 1...

Page 53: ...m to be set Displaying the Bluetooth Setup screen in a different way 1 Display the phone top screen P 306 2 Select Connect Phone Connect telephone The Bluetooth word mark and logos are registered trademarks owned by the Bluetooth SIG Inc Setting Bluetooth details No Function Page Select to set up Bluetooth device 49 Select to display Bluetooth setup informa tion 54 Bluetooth Setup screen Function ...

Page 54: ...r SSP Secure Simple Pairing compatible Bluetooth devices Depending on the type of Bluetooth device being con nected a message confirming registra tion may be displayed on the Bluetooth device s screen Respond and operate the Bluetooth device according to the confir mation message 4 Check that the following screen is dis played when registration is complete z The system waits for connection request...

Page 55: ... player z Supported profile icons for currently con nected devices will illuminate z Dimmed icons can be selected to connect to the function directly Deleting a Bluetooth device INFORMATION When deleting a Bluetooth phone the contact data will be deleted at the same time Connecting a Bluetooth device Up to 5 Bluetooth devices Phones HFP and audio players AVP can be registered If more than 1 Blueto...

Page 56: ...e that was last connected if it is nearby Connecting manually 1 Press the SETUP button 2 Select Bluetooth 3 Follow the steps in Connecting a Bluetooth device from step 1 P 51 The Bluetooth word mark and logos are registered trademarks owned by the Bluetooth SIG Inc INFORMATION It may take time if the device connection is carried out during Bluetooth audio playback Depending on the type of Bluetoot...

Page 57: ...tically re connects the Bluetooth phone Editing the Bluetooth device information The Bluetooth device s information can be displayed on the screen The displayed information can be edited No Information The name of the Bluetooth device can be changed to a desired name P 54 Device address is unique to the de vice and cannot be changed The phone number of the Bluetooth phone Compatibility profile of ...

Page 58: ...Depending on the audio player the Vehi cle or Device connection method may be best As such refer to the manual that comes with the audio player z To reset the connection method select Defaults 1 Display the Bluetooth screen P 49 2 Select Detailed Bluetooth Set tings 3 Select the desired item to be set The Bluetooth word mark and logos are registered trademarks owned by the Bluetooth SIG Inc INFORM...

Page 59: ...ed trademarks owned by the Bluetooth SIG Inc No Information Page Select to set Bluetooth connection on off 55 Displayed system name can be changed to a desired name 55 PIN code used when the Bluetooth device was reg istered It can be changed to a desired code 55 Device address is unique to the device and cannot be changed Select to set the phone con nection status display on off Select to set the ...

Page 60: ...mes with it z To cancel the registration select Can cel 5 Register the Bluetooth device using your Bluetooth device z A PIN code is not required for SSP Secure Simple Pairing compatible Bluetooth devices Depending on the type of Bluetooth device being con nected a message confirming registra tion may be displayed on the Bluetooth device s screen Respond and operate the Bluetooth device according t...

Page 61: ... try again 1 Turn the Bluetooth connection setting of your audio player on z This function is not available when the Bluetooth connection setting of your audio player is set to off 2 Press the AUDIO button 3 Select Source 4 Select Bluetooth The Bluetooth word mark and logos are registered trademarks owned by the Bluetooth SIG Inc Registering a Bluetooth audio player for the first time To use the B...

Page 62: ...vi MM_OM60T13E_ GE 20 04 16 09 32 58 2 Bluetooth settings Type 2 5 Select Connect 6 Select Yes to register a audio player 7 Follow the steps in Registering a Bluetooth phone for the first time from step 5 P 56 ...

Page 63: ...oth Phone HFP Hands Free Profile Hands free system Ver 1 0 Ver 1 6 OPP Object Push Profile Transferring the contacts Ver 1 1 Ver 1 2 PBAP Phone Book Access Profile Ver 1 0 Ver 1 1 MAP Message Access Profile Bluetooth phone message Ver 1 0 SPP Serial Port Profile Toyota Link function Ver 1 1 Bluetooth Audio Player A2DP Advanced Audio Distribu tion Profile Bluetooth audio system Ver 1 0 Ver 1 2 AVRC...

Page 64: ...Connect telephone The Bluetooth word mark and logos are registered trademarks owned by the Bluetooth SIG Inc Setting Bluetooth details LA026IN Bluetooth Setup screen Function Page Registering a Bluetooth device 61 Deleting a Bluetooth device 62 Connecting a Bluetooth device 62 Editing the Bluetooth device infor mation 63 Bluetooth system settings 64 Displaying the Bluetooth Setup screen in a diffe...

Page 65: ...Bluetooth device using your Bluetooth device z A PIN code is not required for SSP Secure Simple Pairing compatible Bluetooth devices Depending on the type of Bluetooth device being con nected a message confirming registra tion may be displayed on the Bluetooth device s screen Respond and operate the Bluetooth device according to the confir mation message 5 Check that the following screen is dis pl...

Page 66: ...colour z Selecting a profile icon which is not cur rently connected will switch the device linked to that icon 3 Select the desired connection XWhen another Bluetooth device is con nected z To disconnect the Bluetooth device select Yes The Bluetooth word mark and logos are registered trademarks owned by the Bluetooth SIG Inc Deleting a Bluetooth device INFORMATION When deleting a Bluetooth phone t...

Page 67: ...uetooth phone manually 1 Display the Bluetooth Setup screen P 60 2 Select the desired device to be edited 3 Select Device info The Bluetooth word mark and logos are registered trademarks owned by the Bluetooth SIG Inc INFORMATION It may take time if the device connection is carried out during Bluetooth audio playback Depending on the type of Bluetooth device being connected it may be nec essary to...

Page 68: ...and logos are registered trademarks owned by the Bluetooth SIG Inc No Information The name of the Bluetooth device Can be changed to a desired name P 64 Select to set the Bluetooth audio player connection method P 64 Device address is unique to the de vice and cannot be changed Telephone number of the Bluetooth phone Compatibility profile of the Bluetooth device Select to reset all setup items INF...

Page 69: ...d logos are registered trademarks owned by the Bluetooth SIG Inc No Information Page Select to set Bluetooth connection on off 65 Displayed system name can be changed to a de sired name 65 PIN code used when the Bluetooth device was reg istered It can be changed to a desired code 65 Device address is unique to the device and cannot be changed Select to set the telephone connection status display o...

Page 70: ...Other settings 1 Press the SETUP button 2 Select General 3 Select the items to be set XType 1 For Middle East Southeast Asia and South Africa General settings Settings are available for auto screen change operation sounds etc General settings screen ...

Page 71: ...air condi tioning control screen to the previ ous screen on off When set to on the screen will automatically return to the previous screen from the au dio air conditioning control screen after 20 seconds Select to change the screen button color Select to change the unit of measure for distance fuel consumption Select to delete personal data P 71 Select to update software versions For details conta...

Page 72: ...me zone Clock settings Used for changing time zones and the on off settings of daylight saving time and automatic adjustment of the clock by GPS No Function Select to change the time zone P 68 Select to set daylight saving time on off Select to set automatic adjustment of the clock by GPS on off When set to on the system will automatically adjust the clock to the current posi tion s time zone when...

Page 73: ... hour Select to set the time forward one minute and to set the time back one minute Rounds to the nearest hour Customizing the startup and screen off images An image can be copied from a USB memory and used as the startup and screen off Images When the engine switch is in ACCESSORY or IGNITION ON mode the initial screen will be displayed P 32 When Screen Off on the Display screen is selected the s...

Page 74: ...z The remaining number of image files that can be transferred is displayed at the bot tom of the screen 4 Select Yes when the confirmation screen appears INFORMATION When saving image files to a USB mem ory to be transferred to this system save the images in a folder named Image I m a g e case sensitive If a different folder name is used this system will not recognize the image files The compatibl...

Page 75: ... Display the General Settings screen P 66 2 Select Delete Personal Data 3 Select Delete 4 Select Yes when the confirmation screen appears z Registered or changed personal settings will be deleted or returned to their default conditions For example General settings Navigation settings Audio settings Phone settings Toyota Link settings Type 2 only With navigation system No Function Select to set an ...

Page 76: ...3 Other settings 1 Press the SETUP button 2 Select Voice 3 Select the items to be set XType 1 For Middle East and Southeast Asia XType 1 For South Africa XType 1 For Latin America Voice settings Voice guidance etc can be set Voice settings screen ...

Page 77: ...he voice recognition prompts on off Select to set the voice guidance dur ing audio visual and or air condition ing system use on off Select to set the voice guidance dur ing route guidance on off Select to set the beep sound of nav igation guidance Select to reset all setup items INFORMATION Voice settings screen can also be dis played from the voice recognition top screen Type 2 only P 294 Vehicl...

Page 78: ...the desired item XType 1 XType 2 No Function Page Select to set maintenance 74 Select to set vehicle cus tomization 1 Select to set Toyota parking assist sensor 1 1 Owner s Manual With navigation system Maintenance When the navigation system is turned on the Information Maintenance re minder screen displays when it is time to replace a part or certain compo nents P 33 ...

Page 79: ...tenance information with the In formation Maintenance reminder screen P 33 Select to cancel all conditions which have been entered Select to reset the items which have expired conditions Select to register edit dealer informa tion P 76 Select to call the registered dealer INFORMATION When the vehicle needs to be serviced the screen button color will change to orange Maintenance information setting...

Page 80: ...Depending on driving or road conditions the actual date and distance mainte nance should be performed may differ from the stored date and distance in the system Dealer setting Dealer information can be registered in the system With dealer information registered route guidance to the deal er is available No Function Page Select to enter the name of a dealer 77 Select to enter the name of a dealer m...

Page 81: ... the desired point P 91 and select OK Editing phone number 1 Select Ph no Tel no 2 Enter the phone number and select OK XType 2 Editing dealer or contact name 1 Select Edit next to Dealer or Con tact 2 Enter a name and select OK Editing the location 1 Select Edit next to Location 2 Scroll the map to the desired point P 149 and select OK Editing telephone number 1 Select Edit next to Tel no 2 Enter...

Page 82: ...LC200_Navi MM_OM60T13E_ GE 20 04 16 09 32 78 3 Other settings ...

Page 83: ...on of the map 85 Switching map configurations 86 Screen scroll operation 88 Adjusting location in small increments 89 Map screen information 89 Displaying POI 2 icons 89 Route trace 91 Displaying information about the icon where the cursor is set 91 Standard map icons 93 Traffic information for Southeast Asia and South Africa 93 Traffic information 93 1 If equipped 2 Point of Interest Navigation s...

Page 84: ...g by motorway entrance exit 103 Searching by coordinates 103 Searching by phone number 103 Searching by postal code for Southeast Asia 104 Starting route guidance 104 Starting route guidance 104 Suspending guidance 107 3 Route guidance Type 1 Route guidance screen 108 Route guidance screen 108 During motorway driving 110 When approaching intersection 111 Turn list screen 111 Arrow screen 112 Typic...

Page 85: ... navigation system Type 1 GPS Global Positioning System 137 Limitations of the navigation system 137 Map database version and covered area 139 Map data 139 About the map data 140 1 Basic operation Type 2 Quick reference 141 Map screen 141 Navigation options screen 142 Map screen operation 142 Current position display 142 Map scale 143 Orientation of the map 144 Switching the map mode 144 Screen sc...

Page 86: ...tersection and motorway 162 Searching by map 163 Searching by coordinates 163 Starting route guidance 164 Starting route guidance 164 Pausing guidance 166 3 Route guidance Type 2 Route guidance screen 167 Screen for route guidance 167 Route overview 168 During motorway driving 169 When approaching intersection 170 Turn list screen 171 Turn by turn arrow screen 171 Typical voice guidance prompts 17...

Page 87: ...eting previous destinations 183 5 Setup Type 2 Detailed navigation settings 184 Screens for navigation settings 185 Traffic settings 188 Screen for traffic settings 189 Show traffic info 189 Auto avoid traffic 189 6 Tips for the navigation system Type 2 GPS Global Positioning System 191 Limitations of the navigation system 191 Map database version and covered area 192 Map information 192 About the...

Page 88: ...ellular phone Border guidance for South Africa When a vehicle crosses a borderline the na tional flag of that country is displayed Speed limit icon 132 Displays speed limits Route information change button 110 Select to display the current street name ex pected travel time arrival time to the destina tion or the traffic information bar Route information bar 110 Displays the current street name exp...

Page 89: ...s screen is used for functions such as setting a destination and registering memory points Press the NAV but ton and then select Menu if the map screen is displayed to display the nav igation menu screen No Name Page Function No Function Page Select to search for a desti nation 97 Select to suspend or re sume guidance 109 Select to change routes and or destinations and to view route overview 115 S...

Page 90: ...route if the destination has been set Map screen operation Current position display z To correct the current position manually P 134 INFORMATION While driving the current position mark is fixed on the screen and the map moves The current position is automatically set as the vehicle receives signals from the GPS Global Positioning System If the current position is not correct it is auto matically c...

Page 91: ... mode The direction of vehicle travel is always up A red arrow indicates north Heading up symbol When in 3D map mode The direction of vehicle travel is always up A red arrow indicates north City map The city map is available for some ma jor cities When a map scale of 50 m is selected the map display will change to the city map in either 2D or 3D Orientation of the map The orientation of the map ca...

Page 92: ...Dual map z The map on the left is the main map Switching map configurations No Function Page Select to display the single map screen 88 Select to display the dual map screen 88 Select to display the com pass mode screen 89 Select to display the turn list screen 113 Select to display the arrow screen 114 Select to display the motor way information screen 112 Select to display the inter section guid...

Page 93: ...elect to display POI icons 91 Select to show traffic infor mation 136 Select to change the map scale 86 Information about the destination cur rent position and a compass is dis played on the screen INFORMATION The destination mark is displayed in the direction of the destination When driv ing refer to the longitude and latitude coordinates and the compass to make sure that the vehicle is headed in...

Page 94: ...ve the de sired point to the center of the screen for looking at a point on the map screen that is different from the current position No Information Function Page Cursor mark Select to return to the cur rent position Select to register as a memory point To change the icon name etc P 123 Select to set as a destina tion 106 Select to register the cursor location as area to avoid 90 Registering the ...

Page 95: ...t Show POI 3 Select the desired POI categories and select OK Adjusting location in small increments The exact target location can be ad justed in small increments by selecting one of the 8 directional arrows Map screen information Displaying POI icons POI icons such as petrol stations and restaurants can be displayed on the map screen Their location can also be set as a destination and used for ro...

Page 96: ...h for POIs along the route When set to on the indica tor will illuminate 3 Check that the selected POI is dis played on the map screen P 90 No Information Function Page Displays up to 5 selected POI icons on the map screen Select to turn the POI icons on the map screen off Displays up to 6 POI icons as favorite POI categories 134 Select to display other POI categories if the desired POIs cannot be...

Page 97: ...te trace 1 Place the cursor over an icon 2 Select Info Route trace Up to 200 km of the traveled route can be stored and retraced on the display This feature is available when the map scale is 50 km or less Start recording the route trace z To edit the route trace name or confirm the start point etc P 128 Displaying information about the icon where the cursor is set When the cursor is placed over a...

Page 98: ...ayed Add to Select to add a desti nation Replace Select to delete the existing destination s and set a new one Select to register as a memory point Select to call the registered phone number Select to edit a memory point P 124 Select to delete a memory point Select to display a QR code Desti nation information can be acquired by scanning the QR code with a cel lular phone Select to delete a destin...

Page 99: ...000 200 000 people Town with 20 000 100 000 people Town with 10 000 20 000 people Town with 10 000 people Park Monument Golf Course Airport Hospital Polyclinic Shopping center University College Traffic information for Southeast Asia and South Africa This system can receive traffic infor mation from RDS TMC Radio Data System Traffic Message Channel sta tions based on FM multiple broadcast ing It a...

Page 100: ...urgent traffic information is detected around the current position a pop up message is displayed on the screen Select Yes to display the traffic infor mation Traffic information on the map screen Traffic information such as traffic con gestion accidents and road closures are displayed on the map screen For setting traffic information icons dis played on the screen P 136 No Function The icons show ...

Page 101: ...le East and South Africa XFor Southeast Asia Destination search screen The Destination screen enables you to search for a destination Press the NAV button and then select Menu if the map screen is displayed to dis play the navigation menu screen Then select Destination to display the Destination screen ...

Page 102: ...lect to change the search area 99 Select to search for a desti nation by the last displayed map 102 Select to search for a desti nation by memory points 103 Select to search for a desti nation from previously set destinations 103 Select to search for a desti nation by intersection 104 Select to search for a desti nation by motorway en trance exit 105 Select to search for a desti nation by postal c...

Page 103: ...me 1 Display the Destination screen P 98 2 Select any of the quick access screen buttons 1 5 Selecting the search area INFORMATION Included countries may be different by map version or sales countries For map database information and updates P 141 Setting home as destination To use this function it is necessary to register a home address P 121 Setting quick access as destination To use this functi...

Page 104: ... 100 3 Select the desired town name Select to display a map of the central area of the desired town Selecting a town in a different way 1 Select Option 2 Select the desired item XFor Middle East and South Africa Searching by address No Function Page Select to enter the search area 99 Select to enter the town name 100 Select to enter the street name 101 Select to enter the house number Select to re...

Page 105: ...xists in more than 1 town a screen requesting the town name to be entered or selected will be dis played Please enter name Select to enter a town name to narrow down the listed items 1 Display the Destination screen P 98 2 Select POI 3 Enter the name of the POI and select OK 4 Select the desired POI Category Select to narrow down the category Town Select to narrow down a town z When entering the n...

Page 106: ... Destination screen P 98 2 Select Map 3 Scroll the map to the desired point P 91 and select Enter 1 Display the Destination screen P 98 2 Select POI near cursor 3 Set the search point by one of the fol lowing methods Searching by map By selecting Map the last displayed location is displayed again on the map screen You can search for a destina tion from this map Searching by POI near cursor The des...

Page 107: ...OIs along the route When set to on the indica tor will illuminate When Please enter town centre is selected 1 Select Please enter town centre 2 Enter the town name 3 Select the desired town name 1 Display the Destination screen P 98 2 Select Memory 3 Select the desired memory point 1 Display the Destination screen P 98 2 Select Previous No Function Select to enter the town name P 103 Select to set...

Page 108: ...he confirmation screen appears 1 Display the Destination screen P 98 2 Select Intersection 3 Enter the name of the first intersecting street and select OK 4 Select the desired street name 5 Enter the name of the second inter secting street and select OK 6 Select the desired street name INFORMATION The previous starting point and up to 100 previously set destinations are dis played on the screen Se...

Page 109: ...rance or exit name to narrow down the listed items 1 Display the Destination screen P 98 2 Select Coordinates 3 Enter the latitude and longitude and select OK Used to enter coor dinates in DMS format Used to enter coordinates in DEG format 1 Display the Destination screen P 98 2 Select Phone no Telephone no Searching by motorway entrance exit Searching by coordinates Searching by latitude and long...

Page 110: ...p screen z For details about this screen P 107 2 Select Start on the starting route guidance screen z For details about this screen P 108 INFORMATION To set a memory point as a destination using the phone number the number must already be registered with the memory point P 123 Searching by postal code for Southeast Asia Starting route guidance After entering the destination the screen changes and ...

Page 111: ...ed on a road is set the vehicle will be guided to the point on a road nearest to the desti nation The road nearest to the selected point is set as the destination Destination map screen No Function Page Select to scroll the map to the desired point 91 Select to display POIs around the destination 91 Select to view the name address and phone num ber of the selected point Select to change the road p...

Page 112: ...e route cannot avoid includ ing a motorway in some cases If the calculated route includes a trip by ferry the route guidance shows a sea route After traveling by ferry the current position may be incorrect Upon recep tion of GPS signals it is automatically corrected Starting route guidance screen No Information Function Current position Destination point Type of route and its distance Distance of ...

Page 113: ...nce 1 Select Resume Guidance No Function Select to display the recommended route Select to display the alternative route Select to display the route that is the shortest distance to the set destina tion Select to display the information about the 3 routes No Information Time necessary for the entire trip Distance of the entire trip Distance of the toll road Distance of the motorway Distance of the...

Page 114: ...the vehicle goes off the guidance route the route is searched again For some areas the roads have not been completely digitized in our data base For this reason the route guid ance may select a road that should not be traveled on When arriving at the set destination the destination name will be displayed on the top of the screen Selecting Off clears the display Changing route information The curre...

Page 115: ... Function Shows when more than 5 destina tions are set Select to display desti nation information on another page Displays the distance to the destina tion Displays the estimated arrival time Displays the estimated travel time INFORMATION When the vehicle is on the guidance route the distance measured along the route is displayed Travel time and arrival time are calculated based on the set vehicle...

Page 116: ...mated travel time delay caused by road repairs an accident etc During motorway driving During motorway driving this screen displays the distance and time to the junction exit or POIs in the vicinity of the motorway exit No Icon Information Function Displays the exit number junction name or POIs that are close to a mo torway exit Distance and time from the current position to the road traffic facil...

Page 117: ...tion to the exit or junction Bar showing the remaining distance to the guidance point INFORMATION If Automatic zoom is set to on these screens are not displayed P 132 When approaching intersection When the vehicle approaches an inter section the intersection guidance screen will be displayed No Information Function Next street name Select to hide the intersection guid ance screen To return to the ...

Page 118: ...ary the system s voice guidance will provide various messages WARNING Be sure to obey the traffic regulations and keep the road condition in mind especially when you are driving on IPD roads roads that are not completely dig itized in our database The route guid ance may not have the updated information such as the direction of a one way street INFORMATION If a voice guidance command cannot be hea...

Page 119: ... Select Add 3 Search for an additional destination in the same way as a destination search P 97 4 Select Add destination here to in sert the new destination into the route Editing route No Function Page Select to set search condi tions 116 Select to set detours 116 Select to set road prefer ences 118 Select to add destinations 115 Select to delete destina tions 116 Select to reorder destina tions ...

Page 120: ...list z If more than 1 destination has been set the system will recalculate the route s to the set destination s as necessary 1 Display the Route screen P 115 2 Select Search condition 3 Select the desired type and select OK 1 Display the Route screen P 115 2 Select Detour Reordering destinations When more than 1 destination has been set the arrival order of the desti nations can be changed Deletin...

Page 121: ...ute Select to make the system search for the route based on the traffic congestion information received from traffic information P 95 INFORMATION This picture shows an example of how the system would guide you around a delay caused by a traffic jam This position indicates the location of a traffic jam caused by road repairs an accident etc This route indicates the detour sug gested by the system W...

Page 122: ...isplay the Route screen P 115 2 Select Route overview 3 Check that the entire route map is dis played Road preference The conditions to determine the route can be selected from various choices such as motorway toll roads etc Route overview The entire route from the current posi tion to the destination can be viewed during route guidance No Function Page Select to display a list of the turns requir...

Page 123: ...Distance to the next turn Turn direction at the intersection Select to display the map of the se lected point INFORMATION However not all road names in the route may appear on the list If a road changes its name without requiring a turn such as on a street that runs through 2 or more towns the name change will not appear on the list The street names will be displayed in order from the starting poi...

Page 124: ...ts or areas on the map screen can be registered The registered points can be used on the Destination screen P 97 Registered areas to avoid will be avoided when the system searches for a route No Function Page Select to set home 121 Select to set the memory points 123 Select to set quick access 122 Select to set areas to avoid 126 Select to set route traces 128 Select to copy from a USB memory 130 ...

Page 125: ...hen the confirmation screen appears Setting up home If a home has been registered that in formation can be recalled by selecting Home on the Destination screen P 99 No Function Page Select to register home 121 Select to edit home 121 Select to delete home 121 Registering home Editing home No Function Page Select to change the icon to be displayed on the map screen 124 Select to edit the home name ...

Page 126: ...this quick access 4 Select OK when the editing quick ac cess screen appears P 123 Setting up quick access If quick access has been registered that information can be recalled by us ing the quick access screen buttons on the Destination screen P 99 No Function Page Select to register quick ac cess 122 Select to edit quick access 123 Select to delete quick ac cess 123 Registering quick access INFORM...

Page 127: ... Select the desired item Editing quick access No Function Page Select to change the icon to be displayed on the map screen 124 Select to edit the quick ac cess name 125 Select to display the quick access name on the map screen When set to on the indica tor will illuminate Select to edit location infor mation 125 Select to edit the phone number 125 Deleting quick access Setting up memory points Poi...

Page 128: ...elect the desired sound icon Select to play the sound Registering memory points INFORMATION Up to 500 memory points can be regis tered Editing memory points The icon name location phone num ber and or group of a registered mem ory point can be edited No Function Page Select to change the icon to be displayed on the map screen 124 Select to edit the memory point name 125 Select to display the mem o...

Page 129: ... the number and select OK Setting the group 1 Select Group 2 Select the group the memory point is to be registered with XTo register a new group 1 Select New group 2 Enter the group name and select OK XTo edit group name 1 Select the group to be edited 2 Select Edit Name 3 Enter the group name and select OK XTo delete group 1 Select Delete group 2 Select the group to be deleted and se lect Delete ...

Page 130: ...e avoid ed and select OK 5 Select OK when the editing area to avoid screen appears P 127 Deleting memory points Setting up area to avoid Areas to be avoided because of traffic jams construction work or other rea sons can be registered as Area to avoid No Function Page Select to register areas to avoid 126 Select to edit areas to avoid 127 Select to delete areas to avoid 127 Registering area to avo...

Page 131: ...the area to be avoid ed and select OK 1 Select Delete 2 Select the area to be deleted and se lect Delete 3 Select Yes when the confirmation screen appears Editing area to avoid The name location and or area size of a registered area can be edited No Function Page Select to turn the area to avoid function on off When set to on the indica tor will illuminate Select to edit the name of the area to av...

Page 132: ...Setting up route trace Route traces P 93 can be edited or deleted No Function Page Select to edit route traces 128 Select to delete route trac es 129 Editing route traces The route trace name can be edited and start and end points can be con firmed No Function Select to edit route trace names P 128 Select to display registered route traces on the map screen When set to on the indicator will illu m...

Page 133: ...ay the My memory screen P 120 3 Select Backup to USB 4 Select Start backup Set password Select to set a pass word P 130 This function is not available in some coun tries areas Deleting route traces Backup to a USB memory for Middle East and South Africa Memory points registered in the navi gation system can be copied to a USB memory A password must first be set in order to back up data P 130 z Exp...

Page 134: ... to be copied and select Start 3 Check that a progress bar is being dis played while the data copy is in progress z To cancel this function select Cancel 4 Check that a confirmation screen is displayed when the operation is com plete This function is not available in some coun tries areas Setting password Once a password has been set it will be requested not only to back up data but also when copy...

Page 135: ...f the map s data range cannot be regis tered A maximum of 500 memory points can be registered When there are 21 or more memory points stored on a USB memory only 20 memory points will be displayed at a time If memory points which have the same name are already stored in the naviga tion system the system may not update those memory points ...

Page 136: ...le speed 133 Select to set displayed POI icon categories 134 Select to set display of 3D landmarks on off Select to set speed limit in formation on off Select to set the automatic zooming function on off When the vehicle ap proaches a guidance point Select to set display of cau tionary messages on off e g When the route in cludes traffic restrictions or seasonally restricted roads Select to set di...

Page 137: ...n be dis played 141 Select to set map slide touch on off If On is se lected operations can be performed by dragging and flicking with your finger P 90 Select to reset all setup items No Function Page Average speed The speed that is used for the calcula tion of the estimated travel time and estimated arrival time can be set INFORMATION The displayed time to the destination is the approximate drivin...

Page 138: ...gories 5 Select the desired POI icon 1 Display the Navigation settings screen P 132 2 Select Calibration 3 Select the desired item POI category change Select POI icons Up to 6 POI icons which are used for selecting POIs on the map screen can be selected as favorites Current position Tire change calibration The current position mark can be ad justed manually Miscalculation of the distance caused by...

Page 139: ...le in coun tries areas where the due information service is not provided When driving the current position mark will be automatically corrected by GPS signals If GPS reception is poor due to location the current position mark can be adjusted manually The tire change calibration function will be used when replacing the tires This function will adjust miscalculation caused by the circumference diffe...

Page 140: ...ff Select to cancel all the selec tions Traffic settings screen No Function Page Select to set voice guid ance for traffic information on off Select to set display of traf fic information icon 136 Select to set the avoid traf fic events function auto manual 137 Select to set selection of traffic stations auto manu al 138 The selected station is dis played Select to reset all setup items Show traff...

Page 141: ...lect manually whether or not to change routes when traffic informa tion of the guidance route has been received In this mode a screen will appear to ask if you wish to reroute P 137 Select to not reroute when traffic in formation for the guidance route has been received When the navigation system calcu lates a new route the following screen will be displayed No Function Select to start route guida...

Page 142: ... Select RDS TMC station 3 Select Manual z A list of traffic stations and the country in which it can be received is displayed 4 Select the desired traffic station Search Select to search for traffic sta tion again RDS TMC station If Manual is selected traffic stations must be searched for before being memorized ...

Page 143: ...dings trucks or even the placement of objects on the instrument panel may ob struct the GPS signals The GPS satellites may not send signals due to repairs or improvements being made to them Even when the navigation system is re ceiving clear GPS signals the vehicle po sition may not be shown accurately or inappropriate route guidance may occur in some cases GPS Global Positioning System Limitation...

Page 144: ...intersection for which there is no route guidance When passing through an intersection for which there is no route guidance During auto reroute the route guidance may not be available for the next turn to the right or left During high speed driving it may take a long time for auto reroute to operate In auto reroute a detour route may be shown After auto reroute the route may not be changed If an u...

Page 145: ...ap Data 4 Check that the map data screen is dis played Map database version and covered area Map data Coverage areas and legal information can be displayed No Function Map version Select to display legal information Select to display map data coverage areas INFORMATION Map data updates are available for a fee Contact your Toyota dealer for fur ther information ...

Page 146: ...of the audio control panel Do not eject the SD card as doing so may deactivate the navigation system WARNING Do not allow children to touch the SD card If the card is accidently swallowed the card may become stuck in the throat leading to serious injury or even death NOTICE Do not edit or delete the map data on the SD card as doing so may deactivate the navigation system INFORMATION microSDHC Logo...

Page 147: ...nce for traffic infor mation Scale indicator 145 This figure indicates the map scale Zoom in out button 145 Select to magnify or reduce the map scale When either button is selected the map scale indicator bar appears at the bottom of the screen Footprint map button 145 Select to display the footprint map screen Current position button Select to display the current position ad dress Voice guidance ...

Page 148: ...ersion and coverage ar ea 194 Select to edit the set route 174 Select to pause or re sume route guidance 168 Select to display the over view of the entire route 118 Map screen operation Current position display z To correct the current position manually P 134 INFORMATION While driving the current position mark is fixed on the screen and the map moves The current position is automatically set as th...

Page 149: ...ale is displayed above the zoom in button at the bottom left of the screen In areas where the footprint map is avail able the map scale changes from to when at the minimum range When the map scale is 100 m or less a one way street is displayed by Footprint map For areas covered by the footprint map some major cities a footprint map on a scale of 25 m can be selected When the map is scaled down to ...

Page 150: ...up 3D Heading up symbol The direction of vehicle travel is always up z The letter s beside this symbol indicate the vehicle s heading direction e g N for north 1 Select Options on the map screen 2 Select Map mode 3 Select the desired configuration but ton Orientation of the map The orientation of the map can be changed between 2D north up 2D heading up and 3D heading up by se lecting the orientati...

Page 151: ...47 Select to display the dual map screen 147 Select to display the com pass mode screen 147 Select to display the turn list screen 173 Select to display the motor way exit list screen 112 Select to display the inter section guidance screen or the guidance screen on the motorway 113 Select to display the turn by turn arrow screen 114 The right side map can be edited No Function Page Select to chang...

Page 152: ...ravels out of the cov erage area the guidance screen changes to the whole compass mode screen Screen scroll operation Use the scroll feature to move the de sired point to the centre of the screen for looking at a point on the map that is different from the current position No Information Function Cursor mark Distance from the current position to the cursor mark Select to set as a destination When ...

Page 153: ...be adjusted in small increments when Adjust loca tion is selected on the setting map screen Also when changing the location of memory points on the editing screen P 125 and adjusting the current po sition mark manually on the Calibra tion screen P 189 8 directional arrows may appear for this purpose Map screen information Displaying map information Information such as POI icons route trace etc can...

Page 154: ...is played 1 Select Other POIs 2 Select the desired POI categories and select OK List all categories Select to display all POI categories To add more POI catego ries select More Selecting the POI icons No Information Function Page Displays up to 5 selected POI icons on the map screen Select to cancel the select ed POI icons Displays up to 6 POI icons as favourite POI categories 134 Select to displa...

Page 155: ...e desired item Near here Select to search for POIs near the current position Along my route Select to search for POIs along the route 1 Display the Map information screen P 149 2 Select Route trace z The Route trace indicator illuminates and the route trace starts 3 Check that the traveled line is dis played POIs that are within 32 km of the cur rent position will be listed from among the selected...

Page 156: ...MATION The traveled route can be stored up to 200 km Displaying information about the icon where the cursor is set When the cursor is placed over an icon on the map screen the name bar is displayed on the upper part of the screen If Info appears on the right side of the name bar detailed informa tion can be displayed No Function Select to register as a memory point To change the icon name etc P 12...

Page 157: ...ic information and Info will be displayed for a while after traffic information has been received Standard map icons Icon Name Island Park Industry Business facility Airport Military University Hospital Stadium Shopping mall Golf Traffic information Displaying traffic information A list of current traffic information can be displayed along with information on the incident s distance and position r...

Page 158: ... road On current route Select to display traf fic information for the set route z When set to on the indicator will illumi nate 5 Check that the traffic information is dis played Detail Select to display detailed traffic information 1 Select Options on the map screen 2 Select Map information 3 Select Traffic information z When set to on the indicator will illumi nate Displaying traffic information...

Page 159: ...een No Information Function The icons show traffic incident road repair traffic obstacles etc Select to display traffic information and start voice guidance for the traffic informa tion The colour of the arrow changes de pending on the traffic information re ceived The indicator is displayed as follows Traffic information has been received No icon Any traffic information has not been received ...

Page 160: ...a destination by online da tabase 163 Select to search for a destination from previ ously set destinations 163 Select to search for a destination from a regis tered entry in Address book 163 Select to search for a destination from emer gency service points 163 Select to search for a destination by intersec tion or motorway en trance exit 164 Select to search for a destination by the last displayed...

Page 161: ...en the confirm destina tion screen is displayed Search operation No Function Select to adjust the position in small er increments P 149 Select to register as a memory point Select to search for the route P 166 If a destination has already been set Go directly and Add to route will be displayed Go directly Select to delete the existing destination s and set a new one Add to route Select to add a de...

Page 162: ...o home z The navigation system performs a search for the route and the entire route map is displayed P 166 1 Display the Destination screen P 157 2 Select any of the preset destination buttons 1 5 z The navigation system performs a search for the route and the entire route map is displayed P 166 Selecting search area The selected state can be changed to set a destination from a different state by ...

Page 163: ...If the same address exists in more than one town the address list screen will be displayed Select the desired address 1 Select Street address 2 Enter a house number and select OK 3 Enter a street name and select OK 4 Select the desired street name 5 Enter a city name and select OK 6 Select the desired city name z If the same address exists in more than one town the address list screen will be disp...

Page 164: ...n will be dis played Select the desired POI Searching by point of interest There are 3 methods to search for a destination by points of interest No Function Page Select to search by name 160 Select to search by catego ry 162 Select to search by tele phone number 163 Searching by name No Function Page Select to search for POI in the desired city 161 Select to search for POI from the category list 1...

Page 165: ...em of the selected category the detailed list will be displayed List all categories Select to display all POI categories 3 Select the desired POI Searching for POI using web search 1 Select T next to Web search to se lect a search engine 2 Select the desired search engine icon z The selected search engine icon will be displayed on the top centre of the POI list screen 3 Select the search engine ic...

Page 166: ...city name and select OK Last 5 cities Select the city name from the list of the last 5 cities 3 Select the desired city name 4 Select OK when the city centre map screen is displayed 5 Follow the steps from 3 onward in Searching by category P 162 XX represents the selected search area name Searching by category No Function Select to set the search point from near the current position Select to sear...

Page 167: ...ed route Delete Select to delete the previous destination P 185 1 Display the Destination screen P 157 2 Select Address book 3 Select the desired address book entry Options Select to register or edit ad dress book entries P 123 1 Display the Destination screen P 157 2 Select Emergency 3 Select the desired emergency catego ry Searching by telephone number Searching from previous destinations INFORM...

Page 168: ...et name 4 Enter the name of the second inter secting street and select OK 5 Select the desired street name z If the 2 streets cross at more than 1 inter section in a city the list of intersections will be displayed INFORMATION The navigation system does not guide in areas where route guidance is unavail able P 193 Searching by intersection and motorway There are 2 methods to search for a destinati...

Page 169: ...djust the po sition in smaller increments P 149 z If a destination has already been set Go to and Add to route will be dis played Go to Select to delete the existing destination s and set a new one Add to route Select to add a destina tion z The navigation system performs a search for the route and the entire route map is displayed P 166 1 Display the Destination screen P 157 2 Select Coordinates ...

Page 170: ...mode WARNING Be sure to obey traffic regulations and keep road conditions in mind while driv ing If a traffic sign on the road has been changed the route guidance may not indicate such changed information INFORMATION The route for returning may not be the same as that for going The route guidance to the destination may not be the shortest route or a route without traffic congestion Route guidance ...

Page 171: ...rip Distance of the toll road Distance of the motorway Distance of the ferry trip No Function Displaying turn list A list of turn information from the cur rent position to the destination can be displayed No Information Current position Distance to the next turn Turn direction at the intersection Select to display the map of the se lected point INFORMATION However not all road names on the route m...

Page 172: ... Page Select to add destinations 175 Select to delete destina tions 116 Select to reorder destina tions 116 Select to set route prefer ences 176 Select to change route type 176 INFORMATION Even if the Motorways indicator is dimmed the route cannot avoid includ ing a motorway in some cases P 176 If the calculated route includes a trip by ferry the route guidance shows a sea route After traveling by...

Page 173: ...When arriving at the set destination the destination name will be displayed on the upper part of the screen Changing route information bar When the vehicle is on the guidance route the route information bar dis plays the current street name or the distance with the estimated travel ar rival time to the destination No Information Select to change the display be tween the estimated travel time and t...

Page 174: ... on the map screen 2 Select Route overview 3 Check that the entire route map is dis played z For details about this screen P 166 Distance and time to destination When driving on the guidance route with more than 1 destination set a list of the distance with estimated travel arrival time from the current position to each destination is displayed Route overview The entire route from the current posi...

Page 175: ...rway exit Select to display the selected map of the exit vicinity Select to scroll to farther road traffic facilities Select to scroll to closer road traffic facilities When approaching motorway exit or junction When the vehicle approaches an exit or junction the motorway guidance screen will be displayed No Information Function Next exit or street name Select to hide the motorway guid ance screen...

Page 176: ... real motorway junction view select Distance from the current position to the next junction Bar showing the remaining distance to the guidance point When approaching intersection When the vehicle approaches an inter section the intersection guidance screen will be displayed No Information Function Next street name Select to hide the intersection guid ance screen To return to the inter section guid...

Page 177: ...rn by turn arrow on the Map mode screen P 88 2 Check that the turn by turn arrow screen is displayed Turn list screen No Information Turn direction Distance between turns Next street or destination name Turn by turn arrow screen On this screen information about the next turn on the guidance route can be displayed No Information Exit number or street name Turn direction Distance to the next turn ...

Page 178: ...the road condition in mind especially when you are driving on IPD roads roads that are not completely dig itized in our database The route guid ance may not have the updated information such as the direction of a one way street INFORMATION If a voice guidance command cannot be heard select on the map screen to hear it again To adjust the voice guidance volume P 72 Voice guidance may be made early ...

Page 179: ...nto the route 1 Display the Route screen P 174 2 Select Reorder 3 Select the desired destination and se lect Move up or Move down to change the arrival order Then select OK No Function Page Select to add destinations 175 Select to delete destina tions 176 Select to reorder destina tions 175 Select to set route prefer ences 176 Select to change route type 176 Select to set detours 177 Select to sta...

Page 180: ...s as necessary 1 Display the Route screen P 174 2 Select Preferences 3 Select the desired route preferences and select OK z When set to on the indicator will illumi nate 1 Display the Route screen P 174 2 Select Route type 3 Select the desired route type and se lect OK z During driving the route guidance starts after selecting the desired route type 4 The entire route from the starting point to th...

Page 181: ...estion information received from traffic information P 153 INFORMATION This picture shows an example of how the system would guide you around a delay caused by a traffic jam This position indicates the location of a traffic jam caused by road repairs an accident etc This route indicates the detour sug gested by the system When the vehicle is on a motorway the detour distance selections are 5 15 an...

Page 182: ...as to avoid can be set as memory points The registered points can be used as the destinations P 156 Registered areas to avoid will be avoided when the system searches for a route LA026IN No Function Page Select to set home 179 Select to set preset desti nations 180 Select to set the address book 181 Select to set areas to avoid 183 Select to delete previous destinations 185 Select to set detailed ...

Page 183: ...ct OK 1 Select Delete 2 Select Yes when the confirmation screen appears Setting up home If home has been registered that infor mation can be recalled by selecting Go home on the Destination screen P 99 No Function Page Select to register home 179 Select to edit home 179 Select to delete home 179 Registering home Editing home No Function Page Select to edit the home name 183 Select to set display o...

Page 184: ...stinations If a preset destination has been regis tered that information can be recalled by using preset destinations on the Destination screen P 99 No Function Page Select to register a preset destination 180 Select to edit a preset des tination 180 Select to delete a preset destination 181 Registering preset destinations INFORMATION Up to 5 preset destinations can be regis tered Editing preset d...

Page 185: ... P 156 3 Select OK when the editing address book entry screen appears P 181 1 Select Edit 2 Select the desired address book entry Deleting preset destinations Setting up address book Points on the map can be registered No Function Page Select to register address book entries 181 Select to edit address book entries 181 Select to delete address book entries 183 Registering address book entries INFOR...

Page 186: ...nd z When Bell with direction is selected select an arrow to adjust the direction and select OK No Function Page Select to edit the address book entry name 183 Select to set display of the address book entry name on off Select to edit location infor mation 183 Select to edit the telephone number 183 Select to change the icon to be displayed on the map screen 182 A sound for some address book entri...

Page 187: ...telephone number and select OK 1 Select Delete 2 Select the item to be deleted and select Delete 3 Select Yes when the confirmation screen appears 1 Display the Navigation settings screen P 178 2 Select Areas to avoid 3 Select the desired item Deleting address book entries Setting up areas to avoid Areas to be avoided because of traffic jams construction work or other rea sons can be registered as...

Page 188: ...o Location 2 Scroll the map to the desired point P 149 and select OK Registering areas to avoid INFORMATION If a destination is entered in the area to avoid or the route calculation cannot be made without running through the area to avoid a route passing through the area to be avoided may be shown Up to 10 locations can be registered as points areas to avoid Editing areas to avoid The name locatio...

Page 189: ...elect OK 1 Select Delete 2 Select the area to be deleted and se lect Delete 3 Select Yes when the confirmation screen appears 1 Display the Navigation settings screen P 178 2 Select Delete previous dest 3 Select the previous destination to be deleted and select Delete 4 Select Yes when the confirmation screen appears Deleting areas to avoid Deleting previous destinations Previous destinations can ...

Page 190: ... Type 2 1 Press the SETUP button 2 Select Navigation 3 Select Detailed navi Settings 4 Select the items to be set Detailed navigation settings Settings are available for pop up infor mation favourite POI categories driv er support information etc LA026IN ...

Page 191: ...ct to set favourite POI categories that are used for POI selection to display on the map screen 188 Select to set the voice guid ance for the next street name on off Select to change the view ing angle of the 3D map 188 Select to set driver support information on off 189 Select to adjust the current position mark manually or to adjust miscalculation of the distance caused by tyre replacement 189 S...

Page 192: ...Select to set the default catego ries 4 Select the desired POI category List all categories Select to display all POI categories 5 Select the desired POI icon 1 Display the Detailed navi settings screen P 186 2 Select 3D map viewing angle 3 Select Up or Down to change the viewing angle Default Select to set the initial angle Driving speeds The speed that is used for the calcula tion of the estimat...

Page 193: ...ssing High accident zone etc INFORMATION When set to on the following warnings will be made First warning is made by a chime fol lowed by a voice warning when approaching within 300 meters of a point of the set item 400 meters on motor ways with the warning icon on the screen Second warning is made by a chime only when approaching within 50 meters of the point Current position Tyre change calibrat...

Page 194: ...tton 2 Select Traffic 3 Select the items to be set The tyre change calibration function will be used when replacing the tyres This function will adjust miscalculation caused by the circumference differ ence between the old and new tyres INFORMATION If this procedure is not performed when the tyres are replaced the current posi tion mark may be incorrectly displayed Traffic settings Traffic informa...

Page 195: ...d item Screen for traffic settings No Function Page The FM station currently providing traffic information is displayed Select to display the traffic information icon 191 Select to set the Avoid traffic function auto man ual 191 Select to set the usage of traffic information for the estimated arrival time on off Select to set the display of an arrow of free flowing traffic on off Select to set tra...

Page 196: ...utes when conges tion information of the guidance route has been received In this mode a screen will appear to ask if you wish to reroute Select to not reroute when conges tion information for the guidance route has been received When the navigation system calcu lates a new route the following screen will be displayed No Function Select to start route guidance using the new route Select to confirm...

Page 197: ...ppery road such as in sand gravel snow etc When driving on a long straight road When motorway and surface streets run in parallel After moving by ferry or vehicle carrier When a long route is searched during high speed driving When driving without setting the current position calibration correctly After repeating a change of direction by going forward and backward or turning on a turntable in a pa...

Page 198: ...s 1 or more of them When a route cannot be searched If the route to your destination includes gravel unpaved roads or alleys the route guidance may not be shown Your destination point might be shown on the opposite side of the street When a portion of the route has regula tions prohibiting the entry of the vehicle that vary by time season or other rea sons The road and map data stored in the navig...

Page 199: ...tion About the map data Map data for the navigation system is contained in a SD card that is inserted in the SD card slot located at the bot tom of the audio control panel Do not eject the SD card as doing so may deactivate the navigation system WARNING Do not allow children to touch the SD card If the card is accidently swallowed the card may become stuck in the throat leading to serious injury o...

Page 200: ...ng a station 208 RDS Radio Data System 209 Time shift operation DAB 209 3 Media operation CD 210 Overview 210 Playing an audio CD 212 Playing an MP3 WMA AAC disc 213 Video CD 214 Overview 214 Video CD options 215 DVD 216 Overview 216 DVD options 218 USB memory 220 Overview 220 USB audio 223 USB video 224 USB photo 224 iPod 226 Overview 226 iPod audio 228 iPod video 229 Bluetooth audio 230 Overview...

Page 201: ... seats 245 Using the radio 246 Playing an audio CD a CD TEXT disc 247 Playing MP3 WMA AAC discs 247 Playing video CD 248 Playing DVD video 251 Playing a USB memory 256 Playing iPod 258 Playing Bluetooth audio 259 Using the external devices 260 Rear seat entertainment system settings 262 If the rear seat entertainment system malfunctions 264 5 Audio visual remote controls Steering switches 265 6 Se...

Page 202: ...h as selecting a preset station and adjusting the sound bal ance are carried out on the screen Press the AUDIO button to display the audio visual screen INFORMATION This illustration is for left hand drive vehicles The button positions and shapes differ for right hand drive vehicles INFORMATION This illustration is for right hand drive vehicles The button positions and shapes differ for left hand ...

Page 203: ...m 238 Using the steering wheel audio switches 265 Audio system settings 267 INFORMATION The display and button positions will dif fer depending on the type of the system If equipped Some basics This section describes some of the ba sic features of the audio visual system Some information may not pertain to your system Your audio visual system works when the engine switch is turned to ACCESSORY or ...

Page 204: ...R VOL knob Press to turn the audio visual system on and off The sys tem turns on in the last mode used Turn this knob to adjust the volume AUDIO button Press to display screen buttons for the audio visual system Turning the system on and off z A function that enables automatic return to the previous screen from the audio visual screen can be selected P 66 ...

Page 205: ... 1 Press the AUDIO button XType 1 For Middle East Southeast Asia and Latin America XType 1 For South Africa XType 2 2 Select Source on the audio screen or press AUDIO button again 3 Select the desired source Selecting an audio source INFORMATION Dimmed screen buttons cannot be oper ated ...

Page 206: ...on the disc is automatically loaded 1 Press the button and remove the disc Reordering the audio source Disc slot Inserting a disc Ejecting a disc NOTICE Never try to disassemble or oil any part of the DVD player Do not insert any thing other than a disc into the slot INFORMATION The player is intended for use with 12 cm discs only When inserting a disc gently insert the disc with the label facing ...

Page 207: ... at a time Even if a USB hub is used to connect more than two USB devices only the first two connected devices will be rec ognized Using a 4 pole aux cable To view a video on an iPod video or VTR it is necessary to use a 4 pole AUX cable to connect the portable au dio device When connecting a portable audio de vice to the AUX port use a 4 pole AUX cable with a plug that matches the ex act layout s...

Page 208: ... a feeling of presence Tone and balance Tone How good an audio program sounds is largely determined by the mix of the treble mid and bass levels In fact dif ferent kinds of music and vocal pro grams usually sound better with different mixes of treble mid and bass Balance A good balance of the left and right ste reo channels and of the front and rear sound levels is also important Keep in mind that...

Page 209: ...es Select or to adjust mid pitched tones Select or to adjust low pitched tones Select to adjust the sound balance between the front and rear speakers Select to adjust the sound balance between the left and right speakers Audio screen adjustment Screen size settings The screen size can be selected for each type of media No Function Select to display a 4 3 screen with either side in black Select to ...

Page 210: ...r of the screen Tone Select to strengthen the tone of the screen Tone Select to weaken the tone of the screen Contrast Select to strengthen the contrast of the screen Contrast Select to weaken the contrast of the screen Brightness Select to brighten the screen Brightness Select to darken the screen INFORMATION Depending on the audio source some functions may not be available If equipped Speech com...

Page 211: ... South Africa XType 2 AM FM DAB radio Overview The radio operation screen can be reached by the following methods Press the AUDIO button to display the audio control screen Select Source and select AM FM or DAB to change the radio mode If equipped No Function Select to display the station list screen Select to display the preset station screen Select to display the audio source selection screen ...

Page 212: ...wn the sta tion list Press and hold 0 8 sec or more to seek up down available sta tions ensembles DAB channels continuously while the button is being pressed Press to turn mute on off Presets screen Turn to select preset stations ensembles DAB channels Stations screen Turn to move up down the list Also the knob can be used to enter selections on the list screens by pressing it DAB time shift scree...

Page 213: ...ction A station providing good reception is automatically selected if current recep tion worsens TA Traffic Announcement function The tuner will automatically seek a sta tion that regularly broadcasts traffic in formation and the station broadcasts when the traffic information program starts INFORMATION When TA is set to On P 268 the radio will begin seeking a TP station When the program ends the ...

Page 214: ...Latin America XFor South Africa XType 2 CD Overview The CD operation screen can be reached by the following methods XInserting a disc P 202 Press the AUDIO button to display the audio control screen Select Source and select DISC No Function Select to display the audio source se lection screen Select to select a track file Select to display a track file list ...

Page 215: ...djust volume Press to turn the audio system on off Press and hold to restart the audio system Press to eject a disc Press to select a track file Press and hold to fast forward rewind Press to play pause Turn to select a track file Turn to move up down the list Also the knob can be used to enter selections on the list screens by pressing it No Function INFORMATION If a disc contains CD DA files and...

Page 216: ...1 Select z Each time is selected the mode changes as follows random 1 disc random off Playing an audio CD Repeating The track currently being listened to can be repeated INFORMATION When is selected RPT appears on the screen Random order Tracks can be automatically and ran domly selected INFORMATION When is selected RAND appears on the screen ...

Page 217: ... 1 Select z Each time is selected the mode changes as follows random 1 folder random folder random 1 disc random off Playing an MP3 WMA AAC disc Repeating The file or folder currently being lis tened to can be repeated INFORMATION Each time is selected RPT FOLD REPEAT FLD RPT appears on the screen Random order Files or folders can be automatically and randomly selected INFORMATION Each time is sel...

Page 218: ...02 Press the AUDIO button to display the audio control screen Select Source and select DISC If equipped No Function Select to display the audio source se lection screen Select to display the sound setting screen Select to display the option screen P 215 Shows progress During playback Select to fast for ward During a pause Select to slow for ward Select to play pause Select to stop the video CD pla...

Page 219: ...e previous track While on the menu screen Select to change to the next screen While playing a disc Select to play the next track Select to display the menu screen While on the menu screen Select to display the menu number input screen Each time this screen but ton is selected the sound output changes in the order of Main Sub Main Sub Select to display the menu number input screen 216 Select to cha...

Page 220: ...he parking brake is applied While driving in DVD video mode only the DVD s audio can be heard The playback condition of some DVD discs may be determined by the DVD software producer This DVD player plays a disc as the software producer intended As such some functions may not work properly Be sure to read the instruction manual that comes with the individual DVD disc P 275 Overview The DVD operatio...

Page 221: ...t screen Select to display the menu screen Select to display the option screen P 218 Select to display the sound setting screen Select to display DVD settings screen Shows progress During playback Select to fast for ward During a pause Select to slow for ward Select to play pause Select to stop the video screen Select to rewind Select to display the menu control key Select to display full screen v...

Page 222: ...may have a significant impact on the human body or pose a driving hazard Keep this in mind when you adjust the volume INFORMATION According to the DVD disc some menu items can be selected directly For details see the manual that comes with the DVD disc provided separately If appears on the screen when a con trol is selected the operation relevant to the control is not permitted No Function DVD opt...

Page 223: ...tle 2 Each time Change is selected the language the subtitles are displayed in is changed z The languages available are restricted to those available on the DVD disc z When Hide is selected the subtitles can be hidden 1 Select Angle 2 Each time Change is selected the angle is changed z The angles available are restricted to those available on the DVD disc Searching by title Changing the audio lang...

Page 224: ...ction of the setup menu z To lock the rear seat entertainment sys tem see Operation from the front seats on page 245 Control screen XUSB audio XUSB video Setup operation from the rear seat This screen appears when a rear pas senger selects the setup menu If equipped USB memory Overview The USB memory operation screen can be reached by the following meth ods XConnecting a USB memory P 203 Press the...

Page 225: ...screen Select to display the play mode se lection screen To return to the top screen select Now playing on the list screen Select to display the sound setting screen Select to display the audio settings screen Select to set random playback Select to set repeat playback Shows progress Select to play pause Turn to adjust volume Press to turn the audio system on off Press and hold to restart the audi...

Page 226: ...le Press and hold to fast forward rewind Press to play pause Turn to select a file Turn to move up down the list Also the knob can be used to enter selections on the list screens by pressing it If equipped WARNING Do not operate the player s controls or connect the USB memory while driving NOTICE Do not leave your portable player in the car In particular high temperatures inside the vehicle may da...

Page 227: ...ect z Each time is selected the mode changes as follows random 1 folder album random folder album random all folder album random off USB audio Repeating The file track or folder album currently being listened to can be repeated INFORMATION Each time is selected RPT FOLD REPEAT FLD RPT appears on the screen Random order Files tracks or folders albums can be automatically and randomly selected INFOR...

Page 228: ...USB video To change to USB video mode select Browse on the USB audio screen then select the Videos tab and se lect the desired video file USB video options No Function Page Select to display the image quality adjustment screen 205 Select to change the screen size 205 Select to change audio set tings 267 If equipped USB photo Still images stored in a USB memory can be played ...

Page 229: ...to folder 3 Select the desired photo USB photo control screen No Function Select on off of the slide show set ting Select Fast Normal or Slow for the desired play speed Select Normal or Random for play mode Select to display full screen images Select to skip to the previous next file Displaying the desired photo from the list ...

Page 230: ...trol panel XType 1 For Middle East Southeast Asia and Latin America XType 1 For South Africa XType 2 iPod Overview The iPod operation screen can be reached by the following methods XConnecting an iPod P 203 Press the AUDIO button to display the audio control screen Select Source and select iPod DEVICE NAME ...

Page 231: ...o select a track Press and hold to fast forward rewind Press to play pause Turn to select a track Turn to move up down the list Also the knob can be used to enter selections on the list screens by pressing it No Function Video Select to display the audio source se lection screen Select to display the play mode se lection screen To return to the top screen select Now playing on the list screen Sele...

Page 232: ...its terminal INFORMATION The system can only output the sound while driving When an iPod is connected using a gen uine iPod cable the iPod starts charging its battery Depending on the iPod the video sound may not be able to be heard It may take time to display iPod cover art and the iPod may not be operated while the cover art display is in process When an iPod is connected and the audio source is...

Page 233: ...ks or albums can be automatically and randomly selected INFORMATION Each time is selected Shuffle ALBUM Shuffle ALB Shuffle appears on the screen iPod video To change to iPod video mode select Browse on the iPod audio screen then select the Videos tab and se lect the desired video file iPod video options No Function Page Select to change the screen size 205 Select to display the image quality adju...

Page 234: ...rs via wireless commu nication This audio system supports Bluetooth a wireless data system ca pable of playing portable audio music without cables If your device does not support Bluetooth the Bluetooth au dio system will not function Overview The Bluetooth audio operation screen can be reached by the following meth ods Depending on the type of portable player connected some functions may not be a...

Page 235: ...e up down the list Also the knob can be used to enter selections on the list screens by pressing it WARNING Do not operate the player s controls or connect to the Bluetooth audio system while driving Your audio unit is fitted with Bluetooth antennas People with implantable cardiac pacemakers cardiac resynchronization therapy pacemakers or implantable cardioverter defibrillators should maintain a r...

Page 236: ...e phone when Bluetooth audio is being played For operating the Bluetooth device see the instruction manual that comes with it If the Bluetooth device is disconnected due to poor reception from the Bluetooth network when the engine switch is in ACCESSORY or IGNITION ON mode the system automatically reconnects the Bluetooth device If the Bluetooth device is disconnected on purpose such as it was tur...

Page 237: ...off Control screen Random order Tracks or albums can be automatically and randomly selected INFORMATION Each time is selected RAND ALBUM RAND ALB RAND appears on the screen AUX Overview The AUX operation screen can be reached by the following methods XConnect a device to the AUX port P 203 Press the AUDIO button to display the audio control screen Select Source and select AUX ...

Page 238: ...ld to restart the audio system Press to turn mute on off WARNING Do not connect portable audio device or operate the controls while driving NOTICE Do not leave portable audio device in the vehicle The temperature inside the vehicle may become high resulting in damage to the player Do not push down on or apply unneces sary pressure to the portable audio device while it is connected as this may dama...

Page 239: ...een XType 1 For Middle East Southeast Asia and Latin America XType 1 For South Africa XType 2 VTR Overview The VTR operation screen can be reached by the following methods XConnect a device to the AUX port P 203 Press the AUDIO button to display the audio control screen Select Source and select A V ...

Page 240: ...ype 2 No Function Select to display the audio source se lection screen Select to display the audio setting screen Select to display the option screen P 237 Select to display the sound setting screen Select to display full screen video Turn to adjust volume Press to turn the audio system on off Press and hold to restart the audio system Press to turn mute on off ...

Page 241: ... 16 09 33 237 3 Media operation Audio visual system 4 1 Select Options 2 Select the desired settings to change VTR options No Function Page Select to change the screen size 205 Select to display the image quality adjustment screen 205 ...

Page 242: ...the rear passengers to enjoy audio and DVD video separately from the front audio visual system The rear seat entertainment system can be used when the engine switch is in ACCESSORY or IGNITION ON mode No Name Front audio visual system Displays Rear seat entertainment system controller Headphone volume control dials and headphone jacks A V input port VTR and HDMI port If equipped ...

Page 243: ...to the A V in put port or HDMI port rear passengers can enjoy different audio sources on each display P 260 Display cover installation method Before storing the second seats install the cover for the rear seat entertain ment system Tilting the display When the display is hard to be seen the display can be tilted WARNING Take care not to jam your hand while tilt ing the display Otherwise it may cau...

Page 244: ...n insulating sheet is set to prevent the batteries from being discharged Replacing the controller batteries INFORMATION If the batteries are discharged the following symptoms may occur The rear seat entertainment system controller will not function properly The operational range is reduced When using AA batteries Batteries can be purchased at your Toyota dealer electric appliance shop or camera st...

Page 245: ... headphones generally avail able in the market it may be difficult to catch signals properly Toyota recom mends the use of Toyota genuine wireless headphones z Contact your Toyota dealer for further details Headphone jacks Adjust the volume when you connect the headphones to the jack Loud sounds may have a significant impact on the human body No Function To use the headphones connect them to the j...

Page 246: ...to L operations can be performed on the left screen 1 Press the button z To turn off the display press the but ton again z While the display is off some remote con trol buttons can be operated 1 Press the SOURCE button to display the audio source selection screen Caution screen Turning the rear display on off Changing the display to be operated Turning on off the display Changing the source No Fun...

Page 247: ...or point to the left or right side edge of the icons list Then press the or button on the controller 1 Select z The indicator is highlighted INFORMATION The page indicators above the source icons can be selected to change the source icon page Changing the speaker output When the is turned on the rear seat entertainment system can be op erated in link with front audio visual system ...

Page 248: ... a significant impact on the human body or pose a driving hazard Keep this in mind when you adjust the volume Removed battery and other parts Keep away from children These parts are small and if swallowed by a child they can cause choking Failure to do so could result in death or seri ous injury NOTICE Cleaning the display Wipe the display with a dry soft cloth If the screen is wiped with a rough ...

Page 249: ...t Right Link with right side head restraint display Left Link with left side head restraint display Operation from the front seats The rear seat display can be operated from the front seats No Function Turns the rear screen on or off Locks the system so passengers in the rear seats cannot operate the rear entertainment system When the Speaker Output is turned on the rear seat entertain ment system...

Page 250: ...d at the front seats radio mode cannot be selected at the rear seats Type 2 only No Function Select to turn time shift mode on off If equipped No Function Press to select a preset station chan nel Press to select a station channel Press and hold to seek for a sta tion channel Press to select a station channel Press and hold to seek for a sta tion channel Time shift operation DAB No Function Press ...

Page 251: ...tion screen P 242 2 Select DISC z Even the DISC button is pressed the mode can be changed to the DISC mode Control screen Press and hold to fast forward re wind Playing an audio CD a CD TEXT disc No Function Select to set repeat playback Select to set random playback No Function No Function Press to play pause Press and hold to fast forward re wind Press to select a track Press and hold to fast fo...

Page 252: ...io source selection screen P 242 2 Select DISC z Even the DISC button is pressed the mode can be changed to the DISC mode Controller No Function Press to select a folder Press to play pause Press and hold to fast forward re wind Press to select a file Press and hold to fast forward rewind If equipped Playing video CD ...

Page 253: ...elect or to change the page No Function Press to select an Icon Press to select a DISC mode Press to input the selected icon Press to play pause Press and hold to fast forward a disc during playback and forward slowly during pause Press to stop the screen Press to switch for display option screen on off Selecting a chapter Press and hold to fast forward or re wind a chapter Press and hold to rewin...

Page 254: ...he player is paused Select to display the menu number input screen P 250 Select to display the menu screen While on the menu screen Select to display the menu number input screen While on the menu screen Select to change to the previous screen While playing a disc Select to play the previous track While on the menu screen Select to change to the next screen While playing a disc Select to play the ...

Page 255: ...eo No Function Press to select an Icon Press to select a DISC mode Press to input the selected icon Press to play pause Press and hold to fast forward a disc during playback and forward slowly during pause Press to stop the screen Press to display the menu screen Press to switch for display option screen on off Press to display the title selection screen Selecting a chapter Press and hold to fast ...

Page 256: ...mes with the DVD vid eo disc provided sepa rately Press and hold to rewind during playback Select to stop the video Select to play pause the video screen Press and hold to fast for ward during playback and play in slow motion when the player is paused Select to display the title search screen 253 Select to display the pre determined scene on the screen and start playing Select to display the au di...

Page 257: ...d z The languages available are restricted to those available on the DVD disc z When Hide is selected the subtitles can be hidden Changing the audio language 1 Select Audio 2 Each time Audio is selected the au dio language is changed z The languages available are restricted to those available on the DVD disc Changing the angle 1 Select Angle 2 Each time Angle is selected the an gle is changed z Th...

Page 258: ...ct Other and enter a language code P 255 Subtitle language 1 Select Subtitle Language 2 Select the desired language to be read on the Subtitle Language screen z If the desired language to be read cannot be found on this screen select Other and enter a language code P 255 Menu language 1 Select Menu Language 2 Select the desired language to be read on the Menu Language screen z If the desired langu...

Page 259: ...Enter the 4 digit language code 2 Select OK Setup operation from the front seat z Rear passengers can cancel this setup operation by selecting Play The player will resume normal play z Likewise a front passenger can cancel a rear passenger s selection of the setup menu The multi angle mark can be turned on or off on the screen while discs that are multi angle compatible are being played The level ...

Page 260: ...he USB control screen Playing a USB memory When a different audio source is se lected at the front seats USB mode cannot be selected at the rear seats Type 2 only USB audio No Function Select to set repeat playback Select to set random playback Select to play the USB video If equipped No Function Press to select a folder album Press to play pause Press and hold to fast forward re wind Press to sel...

Page 261: ...le track Press and hold to fast forward rewind Press to switch for display option screen on off No Function Select to turn off the buttons from the screen Press and hold to rewind during play back Select to stop the video Select to pause resume the video screen Press and hold to fast forward during playback INFORMATION If appears on the screen when a con trol is selected the operation relevant to ...

Page 262: ...nd the sys tem will return to the iPod video control screen Playing iPod When a different audio source is se lected at the front seats iPod mode cannot be selected at the rear seats Type 2 only iPod audio No Function Select to set repeat playback Select to set random playback Select to play the iPod video No Function Press to play pause Press and hold to fast forward re wind Press to select a trac...

Page 263: ...luetooth SIG Inc No Function Press to play pause Press and hold to fast forward re wind Press to select a file Press and hold to fast forward rewind INFORMATION Depending on the iPod that is connected to the system certain functions may not be available Playing Bluetooth audio When a different audio source is se lected at the front seats Bluetooth audio mode cannot be selected at the rear seats Ty...

Page 264: ...tertainment system plays videos and sound when audio vi sual equipment is connected to the port The external devices operation screen can be reached by the following meth ods Press the SOURCE button and se lect AUX A V Rear A V or Rear HDMI XConnecting a external device P 203 261 INFORMATION The volume can be adjusted using the vehicle s audio controls All other operations must be made on the audi...

Page 265: ...hone jack is not in use keep the lid closed Inserting anything other than an appropriate plug may cause electrical failure or a short circuit Using the HDMI port About the HDMI terminal the interface that is connected video and audio to system and audio video device You can enjoy the high definition video and audio by connecting the single cable to the HDMI terminal and the system The terms HDMI a...

Page 266: ...t at the same time the mode changes each time the INPUT button is pressed 1 Press the SETTING button 2 Select the tab to be set Selecting the video mode by using the controller Rear seat entertainment system settings Displaying the setting screen No Function Page Select to adjust the screen 263 Select to change the screen size 263 Select to set the LCD AI Super Resolu tion etc 264 ...

Page 267: ...lity such as the brightness and contrast levels can be adjusted Adjustable items depend on the selected input source Screen button Function Brightness Select to brighten the screen Brightness Select to darken the screen Contrast Select to strengthen the contrast of the screen Contrast Select to weaken the contrast of the screen Color G Select to strengthen the green color of the screen Color R Sel...

Page 268: ... that the iPod or USB has no playable data If a disc which is not playable is inserted No supported data will also appear on the screen For appro priate discs for the player P 275 If the malfunction is not rectified Take your vehicle to your Toyota dealer No Function Select to turn the screen off To turn the screen back on press a remote control button such as DISC and INPUT The selected screen ap...

Page 269: ...unction AM FM Radio Press Preset station up down Station list up down Press and hold 0 8 sec or more Seek up down contin uously while the switch is being pressed DAB Press Preset ensemble DAB channel up down Service list up down Press and hold 0 8 sec or more Ensemble DAB chan nel seek up down continuously while the switch is being pressed CD Press Track up down MP3 WMA AAC disc Press File up down...

Page 270: ...k up down Press and hold 0 8 sec or more Album up down Mode Operation Function All Press Volume up down Press and hold 0 8 sec or more Volume up down con tinuously Mode Operation Function If equipped Mode Operation Function AM FM Radio DAB AUX VTR Press Change audio modes Press and hold 0 8 sec or more Mute CD MP3 WMA AAC disc Video CD DVD USB iPod BT audio Press Change audio modes Press and hold ...

Page 271: ...al system 4 6 Setup 1 Press the SETUP button 2 Select Audio 3 Select the items to be set XType 1 For Middle East Southeast Asia and Latin America XType 1 For South Africa XType 2 Audio settings Detailed audio settings can be pro grammed Audio settings screen ...

Page 272: ...ast Asia and Latin America XType 1 For South Africa XType 2 No Function Page Select to set detailed FM radio settings 268 Select to set the iPod audio signal input settings 270 Select to set the video sig nal format settings 270 Select to set the cover art display on off Select to set detailed DVD settings 271 Select to set detailed DAB settings 269 Only in DVD video mode FM radio settings ...

Page 273: ...ly selected if current reception worsens Select to switch to a broadcasting station within the same local pro gram network If equipped DAB settings No Function Select on off to set L band in the tune range When Off is selected the physical channel range for tuning op erations is limited to Band III exclud ing for preset operations When On is selected the physical chan nel range for tuning operatio...

Page 274: ...267 2 Select iPod settings 3 Select Video Sound Input 4 Select a screen button for the desired setting 1 Display the audio setting screen P 267 2 Select External video settings 3 Select Video Signal Format 4 Select a screen button for the desired setting iPod settings External video settings ...

Page 275: ...een z If the desired language to be read cannot be found on this screen select Other and enter a language code P 272 Menu language 1 Select Menu Language 2 Select the desired language to be read on the Menu Language screen z If the desired language to be read cannot be found on this screen select Other and enter a language code P 272 Angle mark 1 Select Angle Mark 2 Select On or Off Parental lock ...

Page 276: ... lan guage code 1 Enter the 4 digit language code 2 Select OK Discs that are inserted while the vehi cle is in motion will automatically start playing Certain discs may not play The difference between the lowest vol ume and the highest volume can be adjusted If Other on the Audio Language screen Subtitle Language screen or Menu Language screen is selected the desired language to be heard or read c...

Page 277: ...ya 0102 Abkhazian 0809 Hindi 1401 Nauru 2011 Turkmen 0106 Afrikaans 0818 Croatian 1405 Nepali 2012 Tagalog 0113 Amharic 0821 Hungarian 1415 Norwegian 2014 Setswana 0118 Arabic 0825 Armenian 1503 Occitan 2015 Tongan 0119 Assamese 0901 Interlingua 1513 Afan Oromo 2018 Turkish 0125 Aymara 0905 Interlingue 1518 Oriya 2019 Tsonga 0126 Azerbaijani 0911 Inupiak 1601 Punjabi 2020 Tatar 0201 Bashkir 0914 I...

Page 278: ...ak Station interference When a reflected sig nal and a signal received directly from a ra dio station are very nearly the same frequency they can interfere with each other making it difficult to hear the broad cast Static AM is easily affected by external sources of electrical noise such as high tension power lines lightening or electrical motors This results in static Operating information NOTICE...

Page 279: ... z If moisture gets into the CD DVD player the discs may not be able to be played Remove the discs from the player and wait until it dries DVD logo is a trademark of DVD Format Logo Licensing Corporation z Use only discs marked as shown above The following products may not be play able on your player SACD dts CD Copy protected CD DVD audio DVD RAM CD DVD player and disc WARNING CD DVD players use ...

Page 280: ...those shown in the illustrations The use of such discs may damage the player or it may be impossible to eject the disc This system is not designed for use of Dual Discs Do not use Dual Discs because they may cause damage to the player Do not use discs with a protection ring The use of such discs may damage the player or it may be impossible to eject the disc Do not use printable discs The use of s...

Page 281: ...tic device z CD R CD RW discs that have not been subject to the finalizing process a pro cess that allows discs to be played on a conventional CD player cannot be played z It may not be possible to play CD R CD RW discs recorded on a music CD recorder or a personal computer because of disc characteristics scratches or dirt on the disc or dirt condensation etc on the lens of the unit z It may not b...

Page 282: ...be used Marks shown on dvd video discs DVD video discs This DVD player conforms to NTSC PAL color TV formats DVD video discs conforming to another format such as SECAM cannot be used Code Country All All countries 2 Middle East South Africa 3 Southeast Asia 4 Latin America Australia New Zealand 5 Africa NTSC PAL Indicates NTSC PAL format of color TV Indicates the number of audio tracks Indicates t...

Page 283: ...her scenes Level 1 DVD video discs for children can be played Level 2 7 DVD video discs for children and G rated movie can be played Level 8 All types of DVD video discs can be played Multi angle feature The same scene can be enjoyed from different angles Multi language feature The subtitle and audio language can be selected Region codes The region codes are pro vided on DVD players and DVD discs ...

Page 284: ...ightning are trademarks of Apple Inc registered in the U S and other countries The following iPod iPod nano iPod classic iPod touch and iPhone devic es can be used with this system Made for iPhone 5 1 iPhone 4S iPhone 4 iPhone 3GS iPhone 3G iPhone iPod touch 5th generation 1 iPod touch 4th generation iPod touch 3rd generation iPod touch 2nd generation iPod touch 1st generation iPod classic iPod wi...

Page 285: ...ible file format video WMV AVI MP4 M4V Compatible file format photo JPEG Image size photo Maximum 10MB Pixel size photo Maximum 10 000 000 pixels Foldersin the device Maximum 3 000 Maximum 192 Files in the device Maximum 9 999 Maximum 255 Files per folder Maximum 255 If equipped File type Frequency kHz MP3 files MPEG 1 LAYER 3 32 44 1 48 MP3 files MPEG 2 LSF LAYER 3 16 22 05 24 WMA files Ver 7 8 9...

Page 286: ... tags carry information such as track title and artist name z The emphasis function is available only when playing MP3 WMA files recorded at 32 44 1 and 48 kHz z This system can play back AAC files encoded by iTunes z The sound quality of MP3 WMA files gen erally improves with higher bit rates In order to achieve a reasonable level of sound quality discs recorded with a bit rate of at least 128 kb...

Page 287: ...e is in 8 3 format 8 character file names with a 3 character file extension File names must be com posed of one byte capital letters and num bers The _ symbol may also be included z Level 2 The file name can have up to 31 characters including the separation mark and file extension Each folder must contain fewer than 8 hierarchies z MP3 is an audio compression standard determined by a working group...

Page 288: ...the USB memory No video files found This indicates that no video files are included in the USB memory No image files found This indicates that no image files are included in the USB memory iPod iPod error This indicates a problem in the iPod or its connection No music files found This indicates that there is no music data in the iPod No video files found This indicates that no video files are incl...

Page 289: ... Type 1 Speech command system 286 Using the speech command system 286 Speech command system operation 287 Command list 291 1 Speech command system operation Type 2 Speech command system 293 Using the speech command system 293 Speech command system operation 293 Command list 297 Speech command system ...

Page 290: ...Shortcuts screen can be operated from the Main menu screen Using the speech command system Steering switch Microphone INFORMATION Wait for the confirmation beep before speaking a command Speech commands may not be recog nized if Spoken too quickly Spoken at a low or high volume The roof or windows are open Passengers are talking while speech commands are spoken The air conditioning speed is set hi...

Page 291: ...en 1 Press the talk switch 2 Saying Main menu or selecting Main menu 3 Say or select the desired function com mand 4 Say or select the desired command on the screen z Registered POIs registered names in the contacts list etc can be said in the place of the next to the commands P 291 For example Say Find nearby Restau rants Call John Smith etc Speech command system operation Operation from the shor...

Page 292: ...f only the city name was said at step 3 say the street name If the street name is not unique select the appropriate number from the displayed address list z Say the desired city name or city name and street name that belongs to the set country in the place of the Not just the city name but the city name and street name can be said at the same time If both are said at the same time and the street n...

Page 293: ...laying music INFORMATION The house number voice recognition conditions are outlined below Numerals 10 digits or less Multi digit numbers cannot be recog nized Numerals are recognized as single dig its only Speech command example Search for a track INFORMATION A USB memory or iPod must be con nected to enable track searching and playback P 220 226 When a USB memory or iPod is con nected recognition...

Page 294: ...n the contact list a candidate list will be displayed If the desired telephone number is not displayed on the top of the screen say the number of the desired telephone number from the candidate list to select a telephone num ber from the candidate list 3 Say or select Dial to call the tele phone number 1 Press the talk switch z Dial number is displayed in the Short cuts screen z When Dial number o...

Page 295: ... vary according to the navigation system installed z Commands that have O in the shortcuts menu column can be recognized from the Shortcuts screen XBasic XNavi Command list Recognizable speech commands and their actions are shown below Command Action Help Prompts voice guidance to offer examples of commands and operation methods Go Back Returns to the previous screen Command Action Shortcuts menu ...

Page 296: ...ces a call to the said telephone type of the contact from the contact list O Dial number Places a call to the said telephone number O Command Action Shortcuts menu Play artist name Plays tracks from the selected artist O Play album name Plays tracks from the selected album O Play song name Plays the selected track O Play playlist name Plays tracks from the selected playlist O ...

Page 297: ...ckly Spoken at a low or high volume The roof or windows are open Passengers are talking while speech commands are spoken The air conditioning speed is set high The air conditioning vents are turned towards the microphone In the following conditions the system may not recognize the command prop erly and using speech commands may not be possible The command is incorrect or unclear Note that certain ...

Page 298: ...can display Voice settings screen P 72 z Saying Help prompts voice guidance to offer examples of commands and operation methods INFORMATION If the navigation system does not respond or the confirmation screen does not disappear press the talk switch and try again If a speech command cannot be recog nized voice guidance will say Pardon Command not recognized will be dis played on the screen and spe...

Page 299: ...cre ated or being updated a track search cannot be performed using a speech command When the Music tab is disappeared on the shortcut menu screen it is not possible to search for a track using a speech command Speech command example Call name INFORMATION In the same manner as it is displayed on the screen Call contacts phone types after saying Call say the name or the name and type of tele phone o...

Page 300: ...n the same manner as it is displayed on the screen Dial phone number after saying Dial a number say the tele phone number z Say the telephone number one digit at a time For example if the telephone number is 2345678 Say two three four five six seven eight 3 Say Call or press the switch on the steering wheel Speech command example DIal number ...

Page 301: ...h commands and their actions are shown below Command Action Help Prompts voice guidance to offer examples of commands or operation methods Go back Returns to the previous screen Go to tab Displays the command list of the selected tab Command Action Go home Displays the route to home Cancel route Stops the route guidance Command Action Redial Places a call to the telephone number of the latest outg...

Page 302: ...e Plays tracks from the selected playlist Play artist artist name Plays tracks from the selected artist Play song song name Plays the selected track Play album album name Plays tracks from the selected album INFORMATION Commands relating to operation of the audio visual systems can only be performed when the audio systems are turned on ...

Page 303: ...LC200_Navi MM_OM60T13E_ GE 20 04 16 09 33 299 1 Speech command system operation Type 2 Speech command system 5 ...

Page 304: ...ad 310 By off hook switch 310 By voice tag for Middle East Southeast Asia and Latin America 310 Receiving on the Bluetooth phone 311 Incoming calls 311 Talking on the Bluetooth phone 312 Incoming call waiting 314 Bluetooth phone message function for South Africa 314 Receiving a message 315 Checking messages 316 Replying to a message Quick reply 316 Calling the message sender 318 2 Setup Type 1 Pho...

Page 305: ...By favourites list 344 By call history 345 By contacts list 345 By dial pad 347 By off hook switch 347 Receiving on the Bluetooth phone 347 Incoming calls 347 Talking on the Bluetooth phone 348 Incoming call waiting 349 Bluetooth phone message function 350 Receiving a message 350 Checking messages 351 Replying to a message Quick reply 352 Calling the message sender 353 2 Setup Type 2 Phone message...

Page 306: ...call To display the hands free operation screen press the button or the switch on the steering wheel Function Page Phone operation Registering connecting Bluetooth device 45 Calling on the Bluetooth phone 306 Receiving on the Bluetooth phone 311 Talking on the Bluetooth phone 312 Message function for South Africa Using the Bluetooth phone mes sage function 314 Setting up a phone Phone settings 319...

Page 307: ...sing Bluetooth devices users of any electrical medical device other than implantable cardiac pacemakers cardiac resynchronization therapy pace makers or implantable cardioverter defibrillators should consult the manu facturer of the device for information about its operation under the influence of radio waves Radio waves could have unexpected effects on the operation of such medical devices NOTICE...

Page 308: ... system for cellu lar phones it is necessary to register a cellular phone with the system P 45 Bluetooth phone condition display The condition of the Bluetooth phone appears on the upper right side of the screen P 14 Using the phone switch microphone By pressing the phone switch a call can be received or ended without tak ing your hands off the steering wheel The microphone is used when talking on...

Page 309: ...ith the other party on the phone If both parties speak at the same time the other party may not hear what has been said This is not a mal function Keep call volume down Otherwise the other party s voice may be audible out side the vehicle and voice echo may increase When talking on the phone speak clearly towards the microphone The other party may not hear you clearly when Driving on an unpaved ro...

Page 310: ...from z The phone top screen can be displayed by pressing the switch on the steering wheel About the contacts in the contact list INFORMATION When a phone s registration is deleted the above mentioned data is also deleted When selling or disposing of the vehicle A lot of personal data is registered when the hands free system is used When selling or disposing of the vehi cle initialize the data P 71...

Page 311: ... Southeast Asia and Latin America 310 By speech command system for South Africa 290 1 The operation cannot be performed while driving 2 With navigation system By favorites list Calls can be made using registered contacts which can be selected from a contact list P 329 How to make a call Page By call history Up to 30 call history items missed in coming and outgoing can be selected from the Call His...

Page 312: ...dis played Number withheld calls are also memo rized in the system International phone calls may not be made depending on the type of cellular phone you have The list should group together consecu tive entries with the same phone number and same call type For example two calls from Jhon s mobile would be dis played as follows Jhon 2 By pressing the switch on the steering wheel a call to the latest...

Page 313: ...s com plete For PBAP incompatible but OPP compatible Bluetooth phones 1 Select Contacts 2 Select the desired item XWhen Transfer is selected 3 Follow the steps in For PBAP incompatible but OPP compatible Bluetooth phones from step 3 P 325 XWhen Add is selected 3 Follow the steps in Registering a new contact to the contact list from step 2 P 326 When the contact is empty No Function Select to alway...

Page 314: ...Manual transfer operation cannot be performed while driving If your cellular phone is neither PBAP nor OPP compatible the contacts can not be transferred Depending on the type of Bluetooth phone It may be necessary to perform addi tional steps on the phone when trans ferring contact data The registered image in the contact list may not transfer depending on the type of Bluetooth phone con nected B...

Page 315: ...ring wheel to talk on the phone To refuse to receive the call Select or press the switch on the steering wheel To adjust the volume of a received call Turn the PWR VOL knob or use the volume control switch on the steering wheel The voice tag can be canceled by per forming one of the following opera tions Receiving on the Bluetooth phone Incoming calls When a call is received this screen is display...

Page 316: ...adjust your voice volume that the other party hears from their speaker 313 Select to send tones This button only appears when a number that contains a w is dialed in hands free mode 313 Select to hang up the phone INFORMATION Changing from hands free call to cellular phone call is not possible while driving When cellular phone call is changed to hands free call the hands free screen will be displa...

Page 317: ...w0123p 1 When the p pause tone is used the tone data up until the next pause tone will be automatically sent after 2 sec onds have elapsed When the w pause tone is used the tone data up until the next pause tone will be automatically sent after a user operation is performed Release tones can be used when auto mated operation of a phone based ser vice such as an answering machine or bank phone serv...

Page 318: ... The telephone top screen can be dis played by pressing the switch on the steering wheel Incoming call waiting When a call is interrupted by a third party while talking this screen is dis played INFORMATION This function may not be available depending on the type of cellular phone Bluetooth phone message function for South Africa Received messages can be forwarded from the connected Bluetooth phon...

Page 319: ...dy to be operated on the screen No Function Select to check the message Select to not open the message Select to call the message sender INFORMATION Depending on the cellular phone used for receiving messages or its registra tion status with the navigation system some information may not be displayed The pop up screen is separately avail able for incoming e mail and SMS MMS messages under the foll...

Page 320: ... messages read out To cancel this function select Stop When Automatic message readout is set to on messages will be auto matically read out P 321 Select to make a call to the sender INFORMATION Reading a text message is not available while driving Depending on the type of Bluetooth phone being connected it may be necessary to perform additional steps on the telephone Messages are displayed in the ...

Page 321: ... 2 Select corresponding to the de sired message to edit 3 Select OK when editing is complet ed INFORMATION Depending on the type of Bluetooth phone the reply function may not be available This operation cannot be performed while driving INFORMATION To reset the edited quick reply mes sages select Defaults Quick message 1 I am driving and will arrive in approximately ETA minutes This message cannot...

Page 322: ...lect the text area 4 Select corresponding to the de sired number z Identified telephone numbers contained in the message are displayed 5 Check that the Call screen is dis played Calling from the incoming message screen P 315 Calling the message sender Calls can be made to an e mail SMS MMS message sender s telephone number This operation can be performed while driving Calls can be made to a number...

Page 323: ... SETUP button 2 Select Phone Telephone 3 Select the item to be set XFor Middle East Southeast Asia and Latin America XFor South Africa Phone settings Phone settings screen No Information Page Sound settings 320 Contact settings 323 Messaging settings 321 Phone display settings 322 ...

Page 324: ...n be selected No Function Select to set the desired ringtone Select or to adjust the ring tone volume Select or to adjust the mes sage readout volume Select to set the desired incoming SMS MMS tone Select or to adjust the in coming SMS MMS tone volume Select to set the desired incoming e mail tone Select or to adjust the in coming e mail tone volume Select or to adjust the de fault volume of the o...

Page 325: ...ncoming SMS MMS display Full screen When an SMS MMS message is received the incoming SMS MMS display screen is dis played and can be operated on the screen Drop down When an SMS MMS message is received a message is displayed on the upper side of the screen Select to change the incoming e mail display Full screen When an e mail is re ceived the incoming e mail display screen is displayed and can be...

Page 326: ...l is re ceived the hands free screen is dis played and can be operated on the screen Drop down A message is dis played on the upper side of the screen and can only be operated via the steering wheel switches Select to set display of the contact history transfer completion message on off For PBAP compatible Bluetooth phones select to set automatic con tact history transfer on off When set to on the...

Page 327: ...in America XFor South Africa Contact settings No Function Page Select to transfer contacts from the connected phone to the system and to add edit delete contacts 324 Select to add or delete con tacts to the favorites list 329 Select to clear contacts from the call history 331 Select to set the adding voice tags to voice tags list set the editing voice tags or set the deleting voice tags from voice...

Page 328: ...ne certain functions may not be available Contact data is managed independently for every registered phone When one phone is connected another phone s registered data cannot be read Contacts screen No Function Page Select to transfer contacts from the connected phone 325 Select to add new contacts to the contact list 326 Select to edit contacts in the contact list 327 Select to delete contacts fro...

Page 329: ...ompatible Bluetooth phones from step 2 P 325 For PBAP incompatible but OPP compatible Bluetooth phones 1 Select Transfer Contacts 2 Select Replace contacts or Add contact Replace contacts Select to transfer the contact from the connected cellular phone and replace the current one Add contact Select to transfer the de sired contact data from the connected cel lular phone to add to the current one 3...

Page 330: ...ct New Contact 2 Enter the name and select OK 3 Enter the phone number and select OK 4 Select the phone type for the phone number 5 To add another number to this contact select Yes For PBAP compatible Bluetooth phones this function is available when Automatic Contact History Transfer is set to off P 322 Registering a new contact to the contact list New contact data can be registered Up to 4 number...

Page 331: ... a new contact to the contact list from step 2 P 326 1 Select Edit Contact 2 Select the desired contact 3 Select corresponding to the de sired name or number XFor editing the name 4 Follow the steps in Registering a new contact to the contact list from step 2 P 326 XFor editing the number 4 Follow the steps in Registering a new contact to the contact list from step 3 P 326 Editing the contact data...

Page 332: ...ica XFor South Africa E mail addresses Select to display all registered e mail addresses for the con tact 4 Follow the steps in Editing the contact data from step 3 P 327 1 Select Delete Contacts 2 Select the desired contact and select Delete 3 Select Yes when the confirmation screen appears Deleting the contact data For PBAP compatible Bluetooth phones this function is available when Automatic Co...

Page 333: ...tem to be set Displaying the Favorites screen in a different way XFrom the Contacts screen 1 Display the phone top screen P 306 2 Select Contacts 3 Select Options 4 Select Manage Favorites XFrom the Favorites screen 1 Display the phone top screen P 306 2 Select Favorites 3 Select Options INFORMATION When a Bluetooth phone is deleted the contact data will be deleted at the same time Favorites scree...

Page 334: ...lect the contact to be replaced 3 Check that a confirmation screen is displayed when the operation is com plete Registering contacts in the favor ites list in a different way XFrom the Contacts screen 1 Display the phone top screen P 306 2 Select Contacts 3 Select at the beginning of the de sired contact list name to be registered in the favorites list z When selected is changed to and the contact...

Page 335: ... vorites list z When selected is changed to and the data is deleted from the list XFrom the Contact Details screen 1 Display the phone top screen P 306 2 Select Contacts Call History or Favorites and select the desired contact to delete 3 Select Remove Favorite 4 Select Yes when the confirmation screen appears 5 Check that a confirmation screen is displayed when the operation is com plete 1 Displa...

Page 336: ...elete 4 Follow the steps in Delete Call History screen from step 4 P 331 1 Display the Contacts screen P 323 2 Select Manage Voice Tags 3 Select the desired item to set Displaying the Voice tags screen in a different way 1 Display the phone top screen P 306 2 Select Contacts 3 Select Options 4 Select Manage Voice Tags INFORMATION Multiple data can be selected and deleted at the same time Voice tag...

Page 337: ...ag 4 Select OK when voice tag registra tion is complete 1 Select Edit 2 Select the desired contact to edit 3 Follow the steps in Registering a voice tag from step 3 P 333 1 Select Delete 2 Select the desired contact and se lect Delete 3 Select Yes when the confirmation screen appears Registering a voice tag Up to 50 voice tags can be registered Editing a voice tag Deleting the voice tag INFORMATIO...

Page 338: ...tion Page Cellular phone This system The hands free sys tem or Bluetooth device does not work The connected de vice may not be a compatible Bluetooth cellular phone For a list of specific devices which opera tion has been con firmed on this system check with your Toyota dealer The Bluetooth ver sion of the connected cellular phone may be older than the specified version Use a cellular phone with B...

Page 339: ... phone Old registration infor mation remains on either this system or the cellular phone Delete the existing registration informa tion from both this system and the cellu lar phone then regis ter the cellular phone you wish to connect to this system 51 A Bluetooth con nection cannot be made Another Bluetooth device is already connected Manually connect the cellular phone you wish to use to this sy...

Page 340: ...ration infor mation remains on either this system or the cellular phone Delete the existing registration informa tion from both this system and the cellu lar phone then regis ter the cellular phone you wish to connect to this system 51 Symptom Likely cause Solution Page Cellular phone This system A call cannot be made received Your vehicle is in a No Service area Move to where No Service no longer...

Page 341: ...is system check with your Toyota dealer Automatic contact transfer function on this system is set to off Set automatic con tact transfer function on this system to on 322 Passcode has not been entered on the cellular phone Enter the passcode on the cellular phone if requested default passcode 1234 Transfer operation on the cellular phone has not completed Complete transfer operation on the cel lul...

Page 342: ...n the cellu lar phone approve message transfer on the telephone Automatic transfer function on this sys tem is set to off Set automatic trans fer function on this system to on 321 New message notifi cations are not dis played Notification of SMS MMS E mail recep tion on this system is set to off Set notification of SMS MMS E mail reception on this sys tem to on 321 Automatic message transfer funct...

Page 343: ...n taken the symptom status does not change The cellular phone is not close enough to this system Bring the cellular phone closer to this system Radio interference has occurred Turn off Wi Fi de vices or other devic es that may emit radio waves Wi Fi is a regis tered trademark of Wi Fi Alliance The cellular phone is the most likely cause of the symptom Turn the cellular phone off remove and reinsta...

Page 344: ...stem that enables cellular phones to be used without being connected by a cable or placed in a cradle The operating procedure of the tele phone is explained here WARNING While driving do not use a cellular phone or connect the Bluetooth phone Your audio unit is fitted with Bluetooth antennas People with implantable car diac pacemakers cardiac resynchroni zation therapy pacemakers or implantable ca...

Page 345: ...the communication area The cellular phone is not connected The cellular phone has a low battery When using Bluetooth audio and hands free system at the same time the following problems may occur The Bluetooth connection may be cut Noise may be heard on the Bluetooth audio playback Registering connecting a Bluetooth phone To use the hands free system for cellu lar phones it is necessary to register...

Page 346: ...party on the telephone If both parties speak at the same time the other party may not hear what has been said This is not a malfunction Keep call volume down Otherwise the other party s voice may be audible out side the vehicle and voice echo may increase When talking on the tele phone speak clearly towards the micro phone The other party may not hear you clearly when Driving on an unpaved road Ma...

Page 347: ...l telephone settings Message settings 1 Press the button About the contacts in the contact list INFORMATION When a telephone s registration is deleted the above mentioned data is also deleted When selling or disposing of the vehicle A lot of personal data is registered when the hands free system is used When selling or disposing of the vehi cle initialize the data P 71 INFORMATION Once initialized...

Page 348: ...the Favourites tab and select the desired contact 3 Select the desired number 4 Check that the Call screen is dis played How to make a call Page By favourites list 344 By call history 345 By contacts list 345 By dial pad 347 By e mail SMS MMS 353 By POI call 152 By off hook switch 347 By Toyota Link 374 By speech command system 295 The operation cannot be performed while driving By favourites list...

Page 349: ...e Call history tab INFORMATION When making a call to the same number continuously only the most recent call is listed in call history When a telephone number registered in the contact list is received the name is displayed Number withheld calls are also memo rized in the system International telephone calls may not be made depending on the type of cellular phone you have The list should group toge...

Page 350: ...XWhen Add is selected 2 Follow the steps in Registering a new contact to the contact list from step 2 P 358 When the contact is empty No Function Select to always transfer all the con tacts from a connected cellular phone automatically Select to transfer all the contacts from a connected cellular phone only once Select to cancel transferring No Function Select to transfer the contacts from the con...

Page 351: ...e steering wheel To adjust the volume of a received call Turn the PWR VOL knob or use the vol ume control switch on the steering wheel By dial pad INFORMATION Depending on the type of Bluetooth phone being connected it may be nec essary to perform additional steps on the telephone By off hook switch Calls can be made using the latest call history item Receiving on the Bluetooth phone Incoming call...

Page 352: ...dialed in hands free mode 348 Select to hang up the tele phone Select or to adjust the volume of the other par ty s voice Select to start talking with the other party 349 INFORMATION Changing from hands free call to cellular phone call is not possible while driving When cellular phone call is changed to hands free call the hands free screen will be displayed and its functions can be operated on th...

Page 353: ...the tone data up until the next pause tone will be automatically sent after 2 sec onds have elapsed When the w pause tone is used the tone data up until the next pause tone will be automatically sent after a user operation is performed Release tones can be used when auto mated operation of a telephone based service such as an answering machine or bank telephone service is desired A telephone numbe...

Page 354: ... and replying using the navigation system Depending on the type of Bluetooth phone connected received messages may not be transferred to the message inbox If the telephone does not support the message function this function cannot be used Function Page Receiving a message 350 Checking messages 351 Replying to a message quick re ply 352 Calling the message sender 353 Message settings 362 Receiving ...

Page 355: ... unread or read on the message inbox screen This function is available when Up date message read status on tele phone is set to on P 362 Select to reply the message P 352 Select to display the previous or next message Select to have messages read out To cancel this function select Stop When Automatic message readout is set to on messages will be auto matically read out P 362 Select to make a call ...

Page 356: ...nding the message select Cancel 6 Check that a confirmation screen is displayed when the operation is com plete z If an error message is displayed follow the guidance on the screen to try again Editing quick reply messages 1 Select Quick msg 2 Select corresponding to the de sired message to edit 3 Select OK when editing is complet ed Replying to a message Quick reply 15 messages have already been ...

Page 357: ...NFORMATION To reset the edited quick reply messages select Default Quick message 1 I am driving and will arrive in approximately ETA minutes This message cannot be edited and will automatically fill in ETA with the navigation calculated estimated time of arrival on the confirm message screen If there are waypoints set ETA to the next waypoint will be shown If there is no route currently set in the...

Page 358: ...ay the telephone top screen P 343 2 Select Settings Phone message settings LA026IN Phone message settings screen No Information Page Registering connecting a telephone 60 Sound settings 355 Contact call history set tings 355 Messaging settings 362 Telephone display settings 363 Displaying the phone message settings screen in a different way ...

Page 359: ...volume Select or to adjust the mes sage readout volume Select to set the desired incoming SMS MMS tone Select or to adjust the in coming SMS MMS tone volume Select to set the desired incoming e mail tone Select or to adjust the in coming e mail tone volume Select or to adjust the de fault volume of the other party s voice Select to reset all setup items INFORMATION Depending on the type of telepho...

Page 360: ... automatically transferred Select to update contacts from the connected tele phone 356 Select to sort contacts by the first name or last name field Select to add contacts to the favourites list 360 Select to delete contacts from the favourites list 361 Select to set the trans ferred contact image dis play on off Select to clear contacts from the call history Select to add new con tacts to the cont...

Page 361: ...epending on the type of cellular phone OBEX authentication may be required when transferring contact data Enter 1234 into the Bluetooth phone z To cancel this function select Cancel 4 Select Done when it appears on the screen 5 Check that a confirmation screen is displayed when the operation is com plete Updating the contacts in a different way From the Call history screen 1 Display the telephone ...

Page 362: ...stered in the contact list 3 Select Add to contacts 4 Follow the steps in Registering a new contact to the contact list from step 2 P 358 1 Select Edit contacts 2 Select the desired contact 3 Select corresponding to the de sired name or number Registering a new contact to the contact list New contact data can be registered Up to 4 numbers per person can be registered For PBAP compatible Bluetooth ...

Page 363: ...Select the Contacts Call history tab or the Favourites tab and select the desired contact 3 Select Edit contact E mail Addresses Select to display all registered e mail addresses for the con tact 4 Follow the steps in Editing the contact data from step 4 P 358 1 Select Delete contact 2 Select the desired contact and select Delete 3 Select Yes when the confirmation screen appears Deleting the conta...

Page 364: ... when the operation is com plete XWhen 15 contacts have already been registered to the favourites list 1 When 15 contacts have already been registered to the favourites list a regis tered contact needs to be replaced Select Yes when the confirmation screen appears to replace a contact 2 Select the contact to be replaced 3 Check that a confirmation screen is displayed when the operation is com plet...

Page 365: ...act 3 Select Add favourite 4 Check that a confirmation screen is displayed when the operation is com plete Deleting the contacts in the favou rites list 1 Select Remove favourite 2 Select the desired contacts and select Remove 3 Select Yes when the confirmation screen appears 4 Check that a confirmation screen is displayed when the operation is com plete XDeleting contacts in the favourites list i...

Page 366: ...lect Messaging settings 3 Select the desired item to be set Messaging settings screen No Function Select to set automatic message transfer on off Select to set automatic message readout on off Select to set the SMS MMS notifica tion popup on off Select to set the e mail notification popup on off Select to set adding the vehicle signa ture to outgoing messages on off Select to set updating message ...

Page 367: ...x tab on off When set to on messaging account names used on the cellular phone will be displayed Select to reset all setup items INFORMATION Depending on the telephone these functions may not be available Displaying the Messaging settings screen in a different way No Function Telephone display settings screen No Function Select to change the incoming call display Full screen When a call is re ceiv...

Page 368: ...ular phone with Bluetooth ver sion 1 1 or higher recommended Ver 3 0 EDR or higher 59 Symptom Likely cause Solution Page Cellular phone This system A cellular phone can not be registered An incorrect pass code was entered on the cellular phone Enter the correct passcode on the cel lular phone The registration op eration has not been completed on the cellular phone side Complete the regis tration o...

Page 369: ...itch is in ACCES SORY or IGNITION ON mode 65 Unable to dial Check your tele phone message is displayed Bluetooth function is not enabled on the cellular phone Enable the Bluetooth function on the cellular phone Old registration infor mation remains on either this system or the cellular phone Delete the existing registration informa tion from both this system and the cellu lar phone then regis ter ...

Page 370: ...eration on the telephone Phonebook data cannot be edited Automatic contact transfer function on this system is set to on Set automatic con tact transfer function on this system to off 355 Symptom Likely cause Solution Page Cellular phone This system Messages cannot be viewed Message transfer is not enabled on the cellular phone Enable message transfer on the cellu lar phone approve message transfe...

Page 371: ...n taken the symptom status does not change The cellular phone is not close enough to this system Bring the cellular phone closer to this system Radio interference has occurred Turn off Wi Fi de vices or other devic es that may emit radio waves Wi Fi is a regis tered trademark of Wi Fi Alliance The cellular phone is the most likely cause of the symptom Turn the cellular phone off remove and reinsta...

Page 372: ...LC200_Navi MM_OM60T13E_ GE 20 04 16 09 33 368 3 What to do if Type 2 ...

Page 373: ...efore using the function 372 Preparation before using Toyota Link 373 2 Toyota Link operation Type 2 Toyota Link 374 Using Toyota Link 374 Linking Toyota Link and navigation function 378 Entering keyword operation 378 3 Setup Type 2 Toyota Link settings 379 Screen for Toyota Link settings 379 Toyota Link ...

Page 374: ...nternet based information on your smartphone to be displayed on and operated from the Apps screen on your navigation and multimedia system Before Toyota Link can be used a few set up steps need to be performed P 373 1 Toyota Link is available in Australia For information on availability of the service in New Zealand refer to http www toyota co nz ...

Page 375: ...em the application server and the contents provider Applications Displays and sounds the usable contents from the contents providers via a smartphone Navigation and multimedia system Contents received via a smartphone from the contents provid er servers are displayed on the navigation and multimedia sys tem 2 For known compatible phones http www toyota com au owners 1 INFORMATION The actual servic...

Page 376: ...r before using this service Specific applications may also have a charge attached In this section the required operations to activate applications connect a smartphone to the navigation and multi media system and registration steps for Toyota Link are explained For more information please visit http www toyota com au owners 1 The actual service availability is depen dent on the data network covera...

Page 377: ...2 Download the Toyota Link application to your smartphone 3 Pair the smartphone with the navigation and multimedia system via Bluetooth User registration Before using Toyota Link you will need to set up an account Getting started is easy and takes only a few minutes Please visit http www toyota com au owners 1 Registering the Toyota Link application INFORMATION Applications can only be used when t...

Page 378: ...erated from the navigation and multimedia system Before Toyota Link can be used a few setup steps need to be performed P 373 For more in formation please visit http www toyota com au owners 1 No Function Page Select to activate an appli cation Select to update the appli cations 375 Select to reorder the appli cations 376 Displays the number of new notifications for the ap plication 1 Toyota Link i...

Page 379: ... Link is activated appli cations may need to update By updat ing an application can be kept at the latest version When updating the ap plication it is necessary to download the updated data and install it If an update is available Update can be selected No Function Select to install the update later The screen will return to the last dis played screen Installing the updat ed data later P 376 Selec...

Page 380: ...ed Install in background Select to oper ate other function while installing 4 Select OK after the installing is com plete 1 Display the Apps screen P 374 2 Select Reorder 3 Select the desired application to be moved 4 Select or to move the appli cation and select OK After the downloading is complete Update will be changed to Install INFORMATION Toyota Link function cannot be operated while install...

Page 381: ...not be connected Please visit http www toyota com au owners for more information 1 This feature is unavailable during a hands free call A hands free call is in progress After the hands free call is fin ished perform the operation To use these services an active application needs to be running on your smartphone For more information please visit the Toyota web site or contact your dealer The Toyota...

Page 382: ...tion function If the vehicle is fitted with navigation setting a destination and making a hands free call can be performed via Toyota Link For more information please visit http www toyota com au owners 1 Entering keyword operation A keyword can be entered to an appli cation by the software keyboard Entering a keyword using the software keyboard z For details on operating the keyboard P 37 1 Toyot...

Page 383: ...379 2 Select Telephone data plan pop up 3 Check the desired function to be oper ated 4 Select OK Toyota Link settings Settings are available for Toyota Link Screen for Toyota Link settings No Function Select to set the voice guidance vol ume P 379 Select to set the pop up reminder for smartphone data usage P 379 Select to reset all setup items LA026IN Voice volume settings The voice guidance volum...

Page 384: ...LC200_Navi MM_OM60T13E_ GE 20 04 16 09 33 380 3 Setup Type 2 ...

Page 385: ...LC200_Navi MM_OM60T13E_ GE 20 02 10 17 28 381 Index ...

Page 386: ...g messages 351 Receiving a message 350 Replying to a message Quick reply 352 Bluetooth phone message function For South Africa 314 Calling the message sender 318 Checking messages 316 Receiving a message 315 Replying to a message Quick reply 316 Bluetooth settings Type 1 45 Bluetooth settings Type 2 56 Buttons overview 12 C Calling on the Bluetooth phone 306 343 By call history 307 345 By contacts...

Page 387: ...gs 66 General settings screen 66 GPS Global Positioning System 139 193 Limitations of the navigation system 139 193 H Home screen 13 Status display 14 Home screen operation 36 I Information screen 18 Initial screen 32 iPod 226 iPod audio 228 iPod video 229 Overview 226 L Linking multi information display and navigation system 44 M Map database version and covered area 141 194 About the map data 14...

Page 388: ...igation settings 132 Navigation settings screen 132 Navigation system 79 O Operating information 274 CD DVD player and disc 275 Error messages 284 File information 281 iPod 280 Radio 274 Terms 283 Operation flow Guiding the route 22 26 Other settings 66 P Phone 301 Phone operation Hands free system for cellular phones Type 1 302 Phone settings 319 Messaging settings screen For South Africa 321 Pho...

Page 389: ...Incoming calls 311 347 Registering home 20 24 Registering preset destinations 25 Registering quick access 21 Registering connecting Bluetooth device 45 56 Profiles 48 59 Registering a Bluetooth audio player for the first time 46 57 Registering a Bluetooth phone for the first time 45 56 Route guidance Type 1 110 Route guidance Type 2 169 Route guidance screen 110 169 Arrow screen 114 During motorwa...

Page 390: ...tact list 306 343 Audio screen adjustment 205 Disc slot 202 Registering connecting a Bluetooth phone 304 341 Selecting an audio source 201 Sound settings 204 Speech command system 206 342 Speech command system for South Africa 305 Turning the system on and off 200 USB AUX port 203 Using a voice tag for Middle East Southeast Asia and Latin America 304 Using the phone switch microphone 304 Using the...

Page 391: ...e function 372 Preparation before using Toyota Link 373 Toyota Link settings 379 Screen for Toyota Link settings 379 Traffic information 153 Displaying traffic information 153 Displaying traffic information on the map 154 Traffic information for Southeast Asia and South Africa 95 Traffic settings 190 Auto avoid traffic 191 Screen for traffic settings 191 Show traffic info 191 Traffic settings for ...

Page 392: ...ilar purposes Except as otherwise set forth herein you agree not to otherwise reproduce copy modify decompile disassemble or reverse engineer any portion of this Data and may not transfer or distribute it in any form for any purpose except to the extent permitted by mandatory laws License Limitations on Transfer Your limited license does not allow transfer or resale of the Data except on the condi...

Page 393: ... CONTRACTS OR SAVINGS OR ANY OTHER DIRECT INDIRECT INCIDENTAL SPECIAL OR CONSEQUENTIAL DAMAGES ARISING OUT OF YOUR USE OF OR INABILITY TO USE THIS DATA ANY DEFECT IN THIS DATA OR THE BREACH OF THESE TERMS OR CONDITIONS WHETHER IN AN ACTION IN CONTRACT OR TORT OR BASED ON A WARRANTY EVEN IF HERE OR ITS LICENSORS HAVE BEEN ADVISED OF THE POSSIBILITY OF SUCH DAMAGES Some States Territories and Countr...

Page 394: ...ted States government or any other entity seeking or applying rights similar to those customarily claimed by the United States government this Data is a commercial item as that term is defined at 48 C F R FAR 2 101 is licensed in accordance with this End User License Agreement and each copy of Data delivered or otherwise furnished shall be marked and embedded as appropriate with the following Noti...

Page 395: ... conflict between any of the FAR and or DFARS that may apply to the Licensed TomTom Product the construction that provides greater limitations on the Government s rights shall control Contractor manufacturer is TomTom North America Inc 11 Lafayette Street Lebanon NH 03766 1445 Phone 603 643 0330 The Licensed TomTom Products are 2006 2016 by TomTom ALL RIGHTS RESERVED For purpose of any public disc...

Page 396: ...ll rights reserved This material is proprietary and the subject of copyright protection database right protection and other intellectual property rights owned by TomTom or its suppliers The use of this material is subject to the terms of a license agreement Any unauthorized copying or disclosure of this material will lead to criminal and civil liabilities TomTom and the TomTom logo are registered ...

Page 397: ...LC200_Navi MM_OM60T13E_ GE 20 02 10 17 42 393 Map database information and updates ...

Page 398: ...LC200_Navi MM_OM60T13E_ GE 20 02 10 17 42 394 Map database information and updates ...

Page 399: ...LC200_Navi MM_OM60T13E_ GE 20 02 10 17 42 395 Certification XFor vehicles sold in St Martin Certification ...

Page 400: ...LC200_Navi MM_OM60T13E_ GE 20 02 10 17 42 396 Certification ...

Page 401: ...LC200_Navi MM_OM60T13E_ GE 20 02 10 17 42 397 Certification XFor vehicles sold in Dominican Republic and Bolivia ...

Page 402: ...LC200_Navi MM_OM60T13E_ GE 20 02 10 17 42 398 Certification XFor vehicles sold in Jamaica ...

Page 403: ...LC200_Navi MM_OM60T13E_ GE 20 02 10 17 42 399 Certification XFor vehicles sold in Paraguay ...

Page 404: ...LC200_Navi MM_OM60T13E_ GE 20 02 10 17 42 400 Certification XFor vehicles sold in St Martin ...

Page 405: ...LC200_Navi MM_OM60T13E_ GE 20 02 10 17 42 401 Certification XFor vehicles sold in Micronesia ...

Page 406: ...LC200_Navi MM_OM60T13E_ GE 20 02 10 17 42 ...

Page 407: ...l system 127 5 Speech command system 205 6 Telephone 215 7 Connected services 253 Index 271 For more information about the following items see the Owner s Manual Air conditioning Fuel consumption Vehicle customization settings Toyota parking assist sensor Toyota parking assist monitor Multi terrain monitor 2nd section ...

Page 408: ...es The screen shots in this document and the actual screens of this system differ depending on whether the functions and or a contract existed and the map data available at the time of producing this document Please be aware that the content of this manual may be different from this sys tem in some cases such as when the system s software is updated Introduction Navigation system Owner s manual ...

Page 409: ... cut may at times be faster than the calculated routes The navigation system s database includes Point of Interest categories to allow you to easily select destinations such as restaurants and hotels If a destination is not in the database you can enter the street address or a major intersection close to it and the system will guide you there The system will provide both a visual map and audio ins...

Page 410: ...ourself and others NOTICE This is a warning against anything which may cause damage to the vehicle or its equip ment if the warning is ignored You are informed about what you must or must not do in order to avoid or reduce the risk of damage to your vehicle and its equipment Symbols used in illustrations Safety symbol The symbol of a circle with a slash through it means Do not Do not do this or Do...

Page 411: ... No Name Description Operational Outlines An outline of the operation is explained Main Operations The steps of an operation are explained Related Operations A main operation s supplementary operations are described Information Useful information for the user is described ...

Page 412: ...inoperable when driving Unavail able screen buttons are dimmed While driving listen to the voice instruc tions as much as possible and glance at the screen briefly and only when it is safe However do not totally rely on voice guid ance Use it just for reference If the sys tem cannot determine the current position correctly there is a possibility of incorrect late or non voice guidance The data in ...

Page 413: ...s and availability of emergency ser vices If unsure about the safety of an ar ea do not drive into it Under no circumstances is this system a substitute for the driver s personal judgement Use this system only in locations where it is legal to do so Some areas may have laws prohibiting the use of navigation screens next to the driver ...

Page 414: ...rk settings 34 Registering connecting Bluetooth device 34 Setting Bluetooth details 39 Connecting to internet via Bluetooth device 45 Connecting to internet via Wi Fi 47 3 Other settings 51 General settings 51 Voice settings 56 Vehicle settings 57 1 Basic operation 62 Quick reference 62 Map screen operation 64 Map screen information 69 Traffic and parking information 73 2 Destination search 77 Des...

Page 415: ...witches 183 6 Setup 185 Audio settings 185 7 Tips for operating the audio visual system 191 Operating information 191 1 Speech command system operation 206 Speech command system 206 Command list 212 1 Telephone operation hands free system for cellular phones 216 Quick reference 216 Some basics 216 Calling on the Bluetooth phone 219 Receiving on the Bluetooth phone 225 Talking on the Bluetooth phon...

Page 416: ...4 Settings required for using the service 256 Online search 257 Importing memory points and stored routes 262 Street View 264 Panoramio 266 2 Setup 268 Connected service settings 268 Alphabetical index 272 7 Connected services Index Toyota Motor Europe NV SA Avenue du Bourget 60 1140 Brussels Belgium www toyota europe com ...

Page 417: ...ew 12 Home screen 12 Status display 13 2 Quick reference Setup screen 15 Information screen 16 3 Navigation operation Registering home 17 Registering quick access 18 Operation flow guiding the route 19 Setting home as the destination 20 4 Function index Function index 21 Quick guide ...

Page 418: ...en 15 INFORMATION This illustration is for left hand drive vehicles The button positions and shapes differ for right hand drive vehicles Home screen Press the button to display the home screen The home screen can display multiple information screens such as the navi gation system screen audio system screen and fuel consumption screen simultaneously When a screen is se lected the selected screen is...

Page 419: ...of the Wi Fi and Bluetooth connection 13 Select to change the dis play items area and the home screen layout 27 Status display The condition of the Wi Fi and Bluetooth connection as well as the level of reception and the amount of cellular phone battery charge left are displayed on the status bar This status bar is always shown on all modes ...

Page 420: ...etooth phone in a place where the condition of the Bluetooth con nection is good The level of reception Poor Excellent The level of reception does not always correspond with the level displayed on the cellular phone The level of reception may not be displayed depending on the tele phone you have When the cellular phone is out of the ser vice area or in a place inaccessible by radio waves No Servic...

Page 421: ...set Bluetooth phones and Bluetooth audio devices 39 Select to set Wi Fi con nection settings 47 Select to set radio and external media settings 185 Select to access the page which enables the setting of the average speed displayed screen con tents POI categories etc 111 Select to set the tele phone sound contacts message settings etc 233 Select to set traffic infor mation and parking infor mation ...

Page 422: ... informa tion that is received the location and available spaces of a parking lot can be checked The parking lot can also be set as a destination 75 Select to display a Street View 264 Select to view information on the selected point 266 Select to display the fuel consumption screen 2 Select to view pictures in the USB memory con nected to USB port 1 148 Select to view pictures in the USB memory c...

Page 423: ...ect Destination Select Home Select Yes There are different kinds of meth ods to search for your home P 77 Select Enter Registration of home is complete XRegistering home in a different way P 100 XEditing the name location telephone number and icon P 100 XSetting home as the destination P 79 Registering home 1 2 3 4 5 6 7 ...

Page 424: ...cess screen buttons Select Yes There are different kinds of meth ods to search for quick access P 77 Select Enter Registration of quick access is com plete XRegistering quick access in a different way P 101 XEditing the name location telephone number and icon P 101 XSetting quick access as the destination P 79 Registering quick access 1 2 3 4 5 6 7 ...

Page 425: ...t Menu Select Destination There are different kinds of meth ods to search for a destination P 77 Select Enter Select Start Selecting routes other than the one recom mended P 88 Guidance to the destination is displayed on the screen and can be heard via voice guidance Operation flow guiding the route 1 2 3 4 5 6 ...

Page 426: ...ss the NAV button Select Menu Select Destination Select Home Select Enter Select Start Selecting routes other than the one recom mended P 88 Guidance to the destination is displayed on the screen and can be heard via voice guidance Setting home as the destination 1 2 3 4 5 6 ...

Page 427: ...ching for destinations Page Searching for the destination 78 Changing the search area 79 Before starting or during route guid ance Page Starting route guidance 87 Editing the route 95 Viewing the entire route map 98 Suspending route guidance 89 Adjusting route guidance volume 56 Deleting the destination 96 Memory points Page Registering memory points 102 Marking icons on the map screen 103 Informa...

Page 428: ...LC200_Navi MM_OM60T13E_ GE EE 20 03 24 14 47 22 4 Function index ...

Page 429: ...34 Registering a Bluetooth audio player for the first time 35 Profiles 37 Setting Bluetooth details 39 Bluetooth setup screen 39 Detailed Bluetooth settings screen 44 Connecting to internet via Bluetooth device 45 Setting internet connection 45 Connecting to internet via Wi Fi 47 Wi Fi settings screen 48 Wi Fi function operating hints 50 3 Other settings General settings 51 General settings screen...

Page 430: ...ged to suit individual prefer ences P 53 WARNING When the vehicle is stopped with the engine running always apply the park ing brake for safety Maintenance information This system reminds users when to re place certain parts or components and shows dealer information if regis tered on the screen When the vehicle reaches a previously set driving distance or date specified for a scheduled maintenanc...

Page 431: ...erform the above operations Touch screen gestures Operations are performed by touching the touch screen directly with your finger Operation method Outline Main use Touch Quickly touch and release once Changing and selecting various set tings Drag Touch the screen with your finger and move the screen to the desired posi tion Scrolling the lists Flick Quickly move the screen by flicking with your fi...

Page 432: ...ouch screen INFORMATION If the system does not respond to touch ing a screen button move your finger away from the screen and then touch it again Dimmed screen buttons cannot be oper ated The displayed image may become darker and moving images may be slightly distorted when the screen is cold In extremely cold conditions the map may not be displayed and the data input by a user may be deleted Also...

Page 433: ... Select 2 Check that Customize home screen is displayed Home screen operation The home screen can display multiple information screens such as the navi gation system screen audio system screen and fuel consumption screen simultaneously Customizing the home screen The display items area on the home screen and the home screen layout can be changed No Function Page Select to change the dis play items...

Page 434: ...acing will be displayed in the original item s location Entering letters and numbers list screen operation When searching by an address name etc or entering data letters and num bers can be entered via the screen Entering letters and numbers No Function Select to enter desired characters Select to erase one character Se lect and hold to continue erasing characters Select to change character and ke...

Page 435: ...d automatically if the maximum number of characters is entered or matching items can be dis played on a single list screen Changing character and keyboard type INFORMATION Depending on the conditions data is being entered it may not possible to change keyboard characters List screen Displaying the list The list screen may be displayed after entering characters INFORMATION The number of matching it...

Page 436: ... displayed use the appro priate screen button to scroll through the list Icon Function Select to skip to the next or previ ous page Select and hold or to scroll through the displayed list This indicates the displayed screen s position If appears to the right of an item name the complete name is too long to display Select to scroll to the end of the name Select to move to the begin ning of the name...

Page 437: ...t to close the displayed items and display all groups 2 Select the desired group Character screen buttons in lists Some lists contain character screen buttons ABC DEF etc which al low a direct jump to list entries that be gin with the same letter as the character screen button INFORMATION Every time the same character screen button is selected the list starting with the subsequent character is dis...

Page 438: ... of the camera display can be adjusted The screen can also be turned off and or changed to either day or night mode For information regarding audio visual screen adjustment P 133 No Function Page Select to turn the screen off To turn it on press any but ton on the audio panel Select to turn day mode on off 32 Select to adjust the screen display 33 Select to adjust the camera display Changing betwe...

Page 439: ...Screen button Function Contrast Select to strengthen the contrast of the screen Contrast Select to weaken the contrast of the screen Brightness Select to brighten the screen Brightness Select to darken the screen If equipped Linking multi information display and navigation system The following functions of the naviga tion system are linked with the multi in formation display in the instrument clus...

Page 440: ... with it z To cancel the registration select Can cel 5 Register the Bluetooth device using your Bluetooth device z A PIN code is not required for SSP Secure Simple Pairing compatible Bluetooth devices Depending on the type of Bluetooth device being con nected a message confirming registra tion may be displayed on the Bluetooth device s screen Respond and operate the Bluetooth device according to t...

Page 441: ...y again 1 Turn the Bluetooth connection setting of your audio player on z This function is not available when the Bluetooth connection setting of your audio player is set to off 2 Press the AUDIO button 3 Select Source 4 Select Bluetooth The Bluetooth word mark and logos are registered trademarks owned by the Bluetooth SIG Inc Registering a Bluetooth audio player for the first time To use the Blue...

Page 442: ...LC200_Navi MM_OM60T13E_ GE EE 20 03 24 14 47 36 2 Network settings 5 Select Connect 6 Follow the steps in Registering a Bluetooth device from step 1 P 40 ...

Page 443: ... Function Require ments Recom menda tions Bluetooth Phone HFP Hands Free Profile Hands free system Ver 1 0 Ver 1 6 OPP Object Push Profile Transferring the contacts Ver 1 1 Ver 1 2 PBAP Phone Book Access Profile Ver 1 0 Ver 1 1 MAP Message Access Profile Bluetooth phone message Ver 1 0 DUN Dial up Networking Profile Connected service Ver 1 1 PAN Personal Area Networking Ver 1 0 Bluetooth Audio Pla...

Page 444: ...ademarks and trade names are those of their respective owners INFORMATION This system is not guaranteed to operate with all Bluetooth devices If your cellular phone does not support HFP registering the Bluetooth phone or using OPP PBAP MAP DUN or PAN profiles individually will not be possible If the connected Bluetooth device version is older than recommended or incompatible the Bluetooth device f...

Page 445: ...aying the Bluetooth setup screen in a different way 1 Display the telephone top screen P 219 2 Select Connect telephone The Bluetooth word mark and logos are registered trademarks owned by the Bluetooth SIG Inc Setting Bluetooth details No Function Page Select to set up Bluetooth device 39 Select to display Bluetooth setup informa tion 44 Select to set internet con nection 45 Bluetooth setup scree...

Page 446: ...P Secure Simple Pairing compatible Bluetooth devices Depending on the type of Bluetooth device being con nected a message confirming registra tion may be displayed on the Bluetooth device s screen Respond and operate the Bluetooth device according to the confir mation message 4 Check that the following screen is dis played when registration is complete z The system waits for connection requests co...

Page 447: ...ly 2 Select the desired connection XWhen another Bluetooth device is con nected z To disconnect the Bluetooth device select Yes 3 Check that a confirmation screen is displayed when the connection is com plete z If an error message is displayed follow the guidance on the screen to try again Deleting a Bluetooth device INFORMATION When deleting a Bluetooth phone the contact data will be deleted at t...

Page 448: ...lect the desired device to be edited 2 Select Device info INFORMATION It may take time if the device connection is carried out during Bluetooth audio playback Depending on the type of Bluetooth device being connected it may be nec essary to perform additional steps on the device To turn auto connection mode on set Bluetooth power to on P 44 Leave the Bluetooth device in a loca tion where the conne...

Page 449: ...he manual that comes with the audio player z To reset the connection method select Defaults No Information The name of the Bluetooth device can be changed to a desired name P 43 Device address is unique to the de vice and cannot be changed The telephone number of the Bluetooth phone Compatibility profile of the Bluetooth device Select to set the Bluetooth audio player connection method P 43 Select...

Page 450: ...gos are registered trademarks owned by the Bluetooth SIG Inc Detailed Bluetooth settings screen The Bluetooth settings can be con firmed and changed No Information Page Select to set Bluetooth connection on off 44 Displayed system name can be changed to a desired name 45 PIN code used when the Bluetooth device was reg istered It can be changed to a desired code 45 Device address is unique to the d...

Page 451: ...word mark and logos are registered trademarks owned by the Bluetooth SIG Inc Editing the system name Editing the PIN code Connecting to internet via Bluetooth device Setting internet connection To use the internet via Bluetooth de vice it is necessary to register a Bluetooth device with the system Once the device has been registered it is possible to use the internet via Bluetooth device For detai...

Page 452: ...s screen will be displayed P 47 z The system will automatically set the details of the mobile network provider s information and perform a communication connection test z If the setting cannot be performed auto matically the Detail settings screen will be displayed P 47 10When the cellular phone has been con nected successfully Data connection successful will be displayed on the screen The online ...

Page 453: ...he items to be set Wi Fi is a registered trademark of Wi Fi Alliance If the navigation system does not have mobile network provider setting infor mation for the country or mobile net work provider that has been selected or if you select Other for either coun try or mobile network provider the De tail settings screen will be displayed Contact your mobile network provider to obtain the contract info...

Page 454: ... Fi network that is not currently dis played Adding a Wi Fi network 1 Select Add Wi Fi network 2 Enter the network name and select OK 3 Select the security type 4 Enter the password and select OK Wi Fi is a registered trademark of Wi Fi Alliance Wi Fi settings screen No Function Page Select to turn the Wi Fi function on off 48 Displays connected net work name Select to search for avail able networ...

Page 455: ...red networks Connecting quickly If a Wi Fi device is Wi Fi Protected Setup compatible it can be connect ed to more quickly Detailed Wi Fi settings No Function Select to change the listing order of your preferred networks and to de lete networks from the list P 49 Select to set automatic connection to network on off When set to on the system will automatically con nect to the preferred networks tha...

Page 456: ...istance between themselves and the Wi Fi antennas The radio waves may affect the opera tion of such devices Before using Wi Fi devices users of any electrical medical device other than implantable cardiac pacemakers car diac resynchronization therapy pace makers or implantable cardioverter defibrillators should consult the manu facturer of the device for information about its operation under the i...

Page 457: ... 20 03 24 14 47 51 Basic function 2 3 Other settings 1 Press the SETUP button 2 Select General 3 Select the items to be set General settings Settings are available for auto screen change operation sounds etc General settings screen ...

Page 458: ... to change the unit of measure for distance fuel consumption Select to delete personal data P 55 Select to update software versions For details contact your Toyota deal er Select to update Gracenote data base versions For details contact your Toyota dealer Select to display the software infor mation Notices related to third party software used in this product are en listed This includes instructio...

Page 459: ...k can be manually ad justed No Function Select to set the time forward one hour and to set the time back one hour Select to set the time forward one minute and to set the time back one minute Rounds to the nearest hour Customizing the startup and screen off images An image can be copied from a USB memory and used as the startup and screen off Images When the engine switch is in ACCES SORY or IGNIT...

Page 460: ... image files that can be transferred is displayed at the bot tom of the screen 4 Select Yes when the confirmation screen appears No Function Page Select to copy images from a USB memory 54 Select to delete images 55 Select to set an image as the startup or screen off im age 55 INFORMATION When saving image files to a USB mem ory to be transferred to this system save the images in a folder named Im...

Page 461: ...reen appears 1 Display the General settings screen P 51 2 Select Delete personal data 3 Select Delete 4 Select Yes when the confirmation screen appears z Registered or changed personal settings will be deleted or returned to their default conditions For example General settings Navigation settings Audio settings Telephone settings Connected service settings No Function Select to set an image as th...

Page 462: ...et Voice settings screen No Function Select to adjust the volume of voice guidance Select to set the voice recognition prompts on off Select to set the voice guidance dur ing audio visual and or air condition ing system use on off Select to set the voice guidance dur ing route guidance on off Select to set the beep sound of nav igation guidance Select to reset all setup items ...

Page 463: ...e 3 Select the desired item Vehicle settings Settings are available for mainte nance vehicle customization and Toyota parking assist sensor No Function Page Select to set maintenance 57 Select to set vehicle cus tomization 1 Select to set Toyota parking assist sensor 1 1 Owner s Manual Maintenance When the navigation system is turned on the Information screen displays when it is time to replace a ...

Page 464: ...ON When the vehicle needs to be serviced the screen button colour will change to orange Maintenance information setting No Function Select to enter the next maintenance date Select to enter the driving distance until the next maintenance check Select to cancel the conditions which have been entered Select to reset the conditions which have expired INFORMATION For scheduled maintenance information ...

Page 465: ...2 Enter the name and select OK Editing the location 1 Select Location 2 Scroll the map to the desired point P 68 and select OK Editing telephone number 1 Select Tel no 2 Enter the telephone number and select OK No Function Page Select to enter the name of a dealer 59 Select to enter the name of a dealer member 59 Select to set the location 59 Select to set the telephone number 59 Select to set the...

Page 466: ...g information 73 Displaying traffic and traffic prediction information 73 Parking information 75 2 Destination search Destination search screen 77 Search operation 78 Selecting the search area 79 Setting home as destination 79 Setting quick access as destination 79 Searching by address 80 Searching by POI 81 Searching by map 82 Searching by memory points 82 Searching from previous destinations 83 ...

Page 467: ... memory settings 99 Setting up home 100 Setting up quick access 101 Setting up memory points 102 Setting up area to avoid 106 Setting up route trace 108 Backup to a USB memory 109 Copying from a USB memory 110 5 Setup Navigation settings 111 Navigation settings screen 111 Traffic and parking settings 114 Traffic and parking settings screen 115 6 Tips for the navigation system GPS Global Positionin...

Page 468: ...Border guidance When a vehicle crosses a borderline the na tional flag of that country is displayed Speed limit icon 111 Displays speed limits Route information change button 90 Select to display the current street name ex pected travel time arrival time to the destina tion or the traffic information bar Route information bar 90 Displays the current street name expected travel time arrival time to...

Page 469: ...ts Press the NAV but ton and then select Menu to display the navigation menu screen No Name Page Function No Function Page Select to search for a destination 77 Select to suspend or re sume guidance 89 Select to change routes and or destinations and to view route overview 95 Select to enable changes to Home Memory points Quick access Area to avoid etc 99 Select to set the desired map configuration...

Page 470: ... has been set Map screen operation Current position display z To correct the current position manually P 113 INFORMATION While driving the current position mark is fixed on the screen and the map moves The current position is automatically set as the vehicle receives signals from the GPS Global Positioning System If the current position is not correct it is auto matically corrected after the vehic...

Page 471: ...en XHeading up screen X3D screen City map The city map is available for some ma jor cities When a map scale of 50 yd 50 m is selected the map display will change to the city map in either 2D or 3D Orientation of the map The orientation of the map can be changed between 2D north up 2D heading up and 3D heading up by se lecting the orientation symbol dis played at the top left of the screen ...

Page 472: ... 2 Select Map Configuration 3 Select the desired item z Depending on the conditions certain con figuration screen buttons cannot be selected Single map Dual map z The map on the left is the main map Switching map configurations No Function Page Select to display the single map screen 66 Select to display the dual map screen 66 Select to display the com pass mode screen 67 Select to display the tur...

Page 473: ...the direction of the destination When driv ing refer to the longitude and latitude coordinates and the compass to make sure that the vehicle is headed in the direction of the destination When the vehicle travels out of the cov erage area the guidance screen changes to the compass mode screen Screen scroll operation Use the scroll feature to move the de sired point to the centre of the screen for l...

Page 474: ...the size of the area to be avoid ed and select OK 1 Select one of the 8 directional arrows to move the cursor to the desired point Registering the cursor location as an area to avoid A specific location on the map screen can be set as an area to avoid using the scroll function INFORMATION If a destination is entered in the area to avoid or the route calculation cannot be made without running throu...

Page 475: ...ries select More Map screen information Displaying POI icons POI icons such as petrol stations and restaurants can be displayed on the map screen Their location can also be set as a destination and used for route guidance No Information Function Page Displays up to 5 selected POI icons on the map screen Select to turn the POI icons on the map screen off Displays up to 6 POI icons as favourite POI ...

Page 476: ...traveled line is dis played Stop recording the route trace 1 Select Stop route trace 2 A confirmation screen will be dis played Yes Select to keep the recorded route trace No Select to erase the recorded route trace POIs that are within 20 miles 30 km of the current position will be listed from among the selected categories Route trace Up to 124 miles 200 km of the trav eled route can be stored an...

Page 477: ...y point information XDestination information XTraffic information XParking information Displaying information about the icon where the cursor is set When the cursor is placed over an icon on the map screen the name bar is displayed on the upper part of the screen If Info appears on the right side of the name bar the detailed infor mation can be displayed ...

Page 478: ...ti nation information can be acquired by scanning the QR code with a cel lular phone Select to delete a destination Select to display detailed informa tion INFORMATION Even when traffic parking information is not currently being received traffic infor mation and Info will be displayed for a while after traffic information has been received Standard map icons Icon Information Town with 1 million pe...

Page 479: ... PKI Live Parking Informa tion using DAB TPEG TEC TPEG TEP and TPEG PKI via the internet by using Wi Fi or a cellular phone For detailed information about connec tion methods for a Wi Fi device or cel lular phone P 34 47 z Receiving information using a cellular phone In order to use this service a Bluetooth DUN PAN compatible cellu lar phone with sufficient network cover age and a SIM card with a ...

Page 480: ...rmation Traffic events near the current position or the cursor position can be viewed as a list If urgent traffic information is detected around the current position a pop up message is displayed on the screen Select Yes to display the traffic infor mation Traffic information such as traffic con gestion accidents and road closures are displayed on the map screen For setting traffic information ico...

Page 481: ...fo Select to display detailed informa tion 1 Press the INFO button 2 Select Parking information 3 Select the desired parking lot 4 Check that the parking information is displayed Displaying traffic prediction information Traffic prediction information relevant to the area around the current position or the cursor position can be viewed Parking information The location and available spaces of parki...

Page 482: ...ete the existing destina tion s and set a new one 87 Select to display the map of the parking Select to display detailed information Sorting No Function Select to sort in the order of distance from the current location Select to sort parking lots in the or der of most available spaces Select to sort in the order of name Searching for parking lot No Function A search around the current position can...

Page 483: ...vigation system can use an internet search engine to set a destination using the most up to date informa tion After setting the search engine to be used for Online search the screen button name will change to the search en gine s logo 257 Select to change the search area 79 Select to search for a destination by the last displayed map 82 Select to search for a destination by memory points 82 Select...

Page 484: ...here are different kinds of methods to search for a destination P 77 5 The destination map is displayed P 87 Select to search for a destination by telephone number 85 Select to search for a destination by point of in terest near cursor 85 Select to set a destination by home 79 Select to set a destination by quick access 79 No Function Page Search operation ...

Page 485: ... 1 Display the Destination screen P 78 2 Select any of the quick access screen buttons 1 5 Selecting the search area INFORMATION Included countries may be different by map version or sales countries For map database information and updates P 123 Setting home as destination To use this function it is necessary to register a home address P 100 Setting quick access as destination To use this function...

Page 486: ...ect OK Option Select to select a town in a dif ferent way P 81 3 Select the desired town name Select to display a map of the central area of the desired town Searching by address No Function Page Select to enter the search area 79 Select to enter the town name 80 Select to enter the street name 81 Select to enter the house number Select to reset the town street name and house number Select to sear...

Page 487: ...n more than 1 town a screen requesting the town name to be entered or selected will be dis played Enter name Select to enter a town name to narrow down the listed items 1 Display the Destination screen P 78 2 Select POI 3 Enter the name of the POI and select OK 4 Select the desired POI Category Select to narrow down the category Town Select to narrow down a town z When entering the name of a speci...

Page 488: ... way P 81 3 Select the desired town name 1 Display the Destination screen P 78 2 Select Map 3 Scroll the map to the desired point P 68 and select Enter 1 Display the Destination screen P 78 2 Select Memory 3 Select the desired memory point Stored routes Select to select a stored route established and downloaded from the Toyota portal site P 83 Searching by map By selecting Map the last displayed l...

Page 489: ...previous destinations 1 Select Delete 2 Select the previous destination to be deleted and select Delete 3 Select Yes when the confirmation screen appears 1 Display the Destination screen P 78 2 Select Intersection 3 Enter the name of the first intersecting street and select OK 4 Select the desired street name 5 Enter the name of the second inter secting street and select OK 6 Select the desired st...

Page 490: ...s 1 Display the Destination screen P 78 2 Select Coordinates 3 Enter the latitude and longitude and select OK Used to enter coor dinates in DMS format Used to enter coordinates in DEG format INFORMATION If the same 2 streets cross at more than 1 intersection the screen changes and displays the menu to select the town name where the streets intersect Searching by motorway entrance exit Searching by...

Page 491: ...lowing methods Searching by telephone number INFORMATION To set a memory point as a destination using the telephone number the number must already be registered with the memory point P 102 Searching by POI near cursor The destination can be set by selecting the search point and the POI category It is possible to display the names of POIs located within approximately 20 miles 30 km from the selecte...

Page 492: ...sition is set as the search point On this route Select to search for POIs along the route When set to on the indica tor will illuminate When Enter town centre is select ed 1 Select Enter town centre 2 Enter the town name 3 Select the desired town name 1 Display the Destination screen P 78 2 Select UK Postal code or NL Post al code 3 Enter the postal code and select OK 4 Select the desired code Sea...

Page 493: ...g may not be the same as that for going The route guidance to the destination may not be the shortest route or a route without traffic congestion Route guidance may not be available if there is no road data for the specified location When setting the destination on a map with a scale more than 1 mile 1 km the map scale changes to 0 5 mile 500 m automatically If this occurs set the des tination aga...

Page 494: ...a detailed ad dress appears on the point INFORMATION Even if the motorway indicator is dimmed the route cannot avoid includ ing a motorway in some cases If the calculated route includes a trip by ferry the route guidance shows a sea route After traveling by ferry the current position may be incorrect Upon recep tion of GPS signals it is automatically corrected No Function Page Starting route guida...

Page 495: ...ance 1 Select Resume guidance No Function Select to display the recommended route Select to display the fuel efficient route Select to display the route that is the shortest distance to the set destina tion Select to display the information about the 3 routes No Information Time necessary for the entire trip Distance of the entire trip Distance of the toll road Distance of the motorway Distance of...

Page 496: ...nce route the route is searched again For some areas the roads have not been completely digitized in our data base For this reason the route guid ance may select a road that should not be traveled on When arriving at the set destination the destination name will be displayed on the top of the screen Selecting Off clears the display Changing route information The current street name travel arrival ...

Page 497: ...esti nation information on another page Displays the distance to the destina tion Displays the estimated arrival time Displays the estimated travel time INFORMATION When the vehicle is on the guidance route the distance measured along the route is displayed Travel time and arrival time are calculated based on the set vehicle speed information P 112 However when the vehicle is not on the guidance r...

Page 498: ...cident etc During motorway driving During motorway driving this screen displays the distance and time to the junction exit or POIs in the vicinity of the motorway exit No Icon Information Function Displays the exit number junction name or POIs that are close to a mo torway exit Distance and time from the current position to the road traffic facilities Select to display the nearest road traffic fac...

Page 499: ... to the guidance point INFORMATION If Automatic zoom is set to on these screens are not displayed P 111 When approaching intersection When the vehicle approaches an inter section the intersection guidance screen will be displayed No Information Function Next street name Lane guidance Select to hide the intersection guid ance screen To return to the inter section guidance screen select Distance to ...

Page 500: ...y the system s voice guidance will provide various messages WARNING Be sure to obey the traffic regulations and keep the road condition in mind especially when you are driving on IPD roads roads that are not completely dig itized in our database The route guid ance may not have the updated information such as the direction of a one way street INFORMATION If a voice guidance command cannot be heard...

Page 501: ... Select Add 3 Search for an additional destination in the same way as a destination search P 77 4 Select Add destination here to in sert the new destination into the route Editing route No Function Page Select to set search condi tions 96 Select to set detours 96 Select to set road prefer ences 97 Select to add destinations 95 Select to delete destina tions 96 Select to reorder destina tions 96 Se...

Page 502: ... destination has been set the system will recalculate the route s to the set destination s as necessary 1 Display the Route screen P 95 2 Select Search condition 3 Select the desired type and select OK 1 Display the Route screen P 95 2 Select Detour 3 Select the desired detour distance Reordering destinations When more than 1 destination has been set the arrival order of the desti nations can be c...

Page 503: ...d on the traffic congestion information received from traffic information P 73 INFORMATION This picture shows an example of how the system would guide you around a delay caused by a traffic jam This position indicates the location of a traffic jam caused by road repairs an accident etc This route indicates the detour sug gested by the system When the vehicle is on a motorway the detour distance se...

Page 504: ...ired to reach the destination 98 Select to change the route 95 Select to start guidance The turn list on the guidance route can be viewed No Information Current position Distance to the next turn Turn direction at the intersection Select to display the map of the se lected point INFORMATION However not all road names in the route may appear on the list If a road changes its name without requiring ...

Page 505: ...map screen can be registered The registered points can be used on the Destination screen P 77 Registered areas to avoid will be avoided when the system searches for a route No Function Page Select to set home 100 Select to set the memory points 102 Select to set quick access 101 Select to set areas to avoid 106 Select to set route traces 108 Select to copy from a USB memory 110 Select to backup to...

Page 506: ...ation screen appears Setting up home If a home has been registered that in formation can be recalled by selecting Home on the Destination screen P 79 No Function Page Select to register home 100 Select to edit home 100 Select to delete home 100 Registering home Editing home No Function Page Select to change the icon to be displayed on the map screen 103 Select to edit the home name 104 Select to d...

Page 507: ... quick access has been registered that information can be recalled by us ing the quick access screen buttons on the Destination screen P 79 No Function Page Select to register quick ac cess 101 Select to edit quick access 101 Select to delete quick ac cess 102 Registering quick access INFORMATION Up to 5 preset destinations can be regis tered Editing quick access No Function Page Select to change ...

Page 508: ...3 Select OK when the editing memory point screen appears P 103 Deleting quick access Setting up memory points Points or areas on the map screen can be registered No Function Page Select to register memory points 102 Select to edit memory points 103 Select to delete memory points 104 Select to edit or delete stored routes 105 Select to register external points 262 Registering memory points INFORMAT...

Page 509: ...ell with direction is selected select an arrow to adjust the direction and select OK Editing memory points The icon name location telephone number and or group of a registered memory point can be edited No Function Page Select to change the icon to be displayed on the map screen 103 Select to edit the memory point name 104 Select to display the mem ory point name on the map screen When set to on t...

Page 510: ...a new group 1 Select New group 2 Enter the group name and select OK XTo edit group name 1 Select the group to be edited 2 Select Edit name 3 Enter the group name and select OK XTo delete group 1 Select Delete group 2 Select the group to be deleted and se lect delete 3 Select Yes when the confirmation screen appears 1 Select Delete 2 Select the memory point to be deleted and select Delete 3 Select ...

Page 511: ...s 1 Select Delete 2 Select the destination to be deleted and select Delete 3 Select Yes when the confirmation screen appears 1 Select Stored routes 2 Select Delete 3 Select the stored route to be deleted and select Delete Editing stored routes Destinations of stored routes can be changed and deleted Also the arrival order of destinations can be changed Importing stored routes P 262 No Function Pag...

Page 512: ... Select Edit 2 Select the area Setting up area to avoid Areas to be avoided because of traffic jams construction work or other rea sons can be registered as Area to avoid No Function Page Select to register areas to avoid 106 Select to edit areas to avoid 106 Select to delete areas to avoid 107 Registering area to avoid INFORMATION If a destination is entered in the area to avoid or the route calc...

Page 513: ...er or to change the size of the area to be avoid ed and select OK 1 Select Delete 2 Select the area to be deleted and se lect Delete 3 Select Yes when the confirmation screen appears No Function Page Select to turn the area to avoid function on off When set to on the indica tor will illuminate Select to edit the name of the area to avoid 107 Select to display the name of the area to avoid on the m...

Page 514: ...Select Yes when the confirmation screen appears Setting up route trace Route traces P 70 can be edited or deleted No Function Page Select to edit route traces 108 Select to delete route trac es 108 Editing route traces The route trace name can be edited and start and end points can be con firmed No Function Select to edit route trace names P 108 Select to display registered route traces on the map...

Page 515: ... cancel this function select Cancel 7 Check that a confirmation screen is displayed when the operation is com plete Backup to a USB memory Memory points registered in the navi gation system can be copied to a USB memory A password must first be set in order to back up data P 110 z Exporting memory point data is for your back up use only and distribution or usage in other system is strictly prohib ...

Page 516: ...n set it will be requested not only to back up data but also when copying memory points from a USB memory to the navigation system INFORMATION If you have forgotten the password It is necessary to initialize personal data using Delete personal data P 55 Contact your Toyota dealer Copying from a USB memory Memory points that have been backed up can be downloaded to the naviga tion system using a US...

Page 517: ...igation settings screen No Function Page Detailed connected service settings can be changed 268 Select to set the average vehicle speed 112 Select to set displayed POI icon categories 112 Select to set display of 3D landmarks on off Select to set speed limit in formation on off Select to set the automatic zooming function on off When the vehicle ap proaches a guidance point ...

Page 518: ...o be adjusted 113 Coverage areas and legal information can be dis played 123 Select to set map slide touch on off If On is se lected operations can be performed by dragging and flicking with your finger P 67 Select to reset all setup items Average speed The speed that is used for the calcula tion of the estimated travel time and estimated arrival time can be set No Function Page INFORMATION The di...

Page 519: ...he desired item Position Direction calibration 1 Select Position Direction 2 Scroll the map to the desired point P 68 and select OK Current position Tyre change calibration The current position mark can be ad justed manually Miscalculation of the distance caused by tyre replacement can also be adjusted z For additional information on the accu racy of a current position P 121 When driving the curre...

Page 520: ...ct Info 3 Select Traffic or Parking The tyre change calibration function will be used when replacing the tyres This function will adjust miscalculation caused by the circumference differ ence between the old and new tyres INFORMATION If this procedure is not performed when the tyres are replaced the current posi tion mark may be incorrectly displayed Traffic and parking settings Settings are avail...

Page 521: ...t to set a detoured route search on off When traffic jams etc are pre dicted Select to set selection of traffic stations auto manu al 117 The selected station is dis played Select to receive TPEG traffic information 117 Select to enable the roam ing function of TPEG traffic information 118 Traffic information can be received automatically or set to receive RDS TMC traffic information only 118 Sele...

Page 522: ... 73 Avoid traffic events No Function Select to automatically change routes when traffic information of the guidance route has been received Select to select manually whether or not to change routes when traffic in formation of the guidance route has been received In this mode a screen will appear to ask if you wish to reroute P 116 Select to not reroute when traffic in formation for the guidance r...

Page 523: ...red trademark of Wi Fi Alliance 2 The Bluetooth word mark and logos are registered trademarks owned by the Bluetooth SIG Inc 3 Select the desired item RDS TMC station If Manual is selected traffic stations must be searched for before being memorized Setting TPEG traffic information update frequency TPEG traffic information can be re ceived via Wi Fi or a Bluetooth de vice This information can be s...

Page 524: ...rma tion Select to update the parking lot in formation Select to update the traffic and park ing lot information Enabling TPEG traffic information roaming The roaming function of TPEG traffic information received via a Bluetooth device can be enabled for roaming sit uations when outside the geographi cal coverage area of your mobile network provider This information can be set to update automatica...

Page 525: ...Inc No Function Select to automatically select a traf fic information source When both RDS TMC and TPEG are available TPEG traffic information will be se lected automatically Select to receive only RDS TMC traffic information Setting parking lot information update frequency Parking lot information can be received via Wi Fi or a Bluetooth device This information can be set to update auto matically ...

Page 526: ...desired item Enabling parking lot information roaming The roaming function of parking lot in formation received via a Bluetooth device can be enabled for roaming sit uations when outside the geographi cal coverage area of your mobile network provider This information can be set to update automatically or manually No Function Select to update automatically Select to update manually P 118 Select to ...

Page 527: ...ildings trucks or even the placement of objects on the instrument panel may ob struct the GPS signals The GPS satellites may not send signals due to repairs or improvements being made to them Even when the navigation system is re ceiving clear GPS signals the vehicle po sition may not be shown accurately or inappropriate route guidance may occur in some cases GPS Global Positioning System Limitati...

Page 528: ...tersection for which there is no route guidance When passing through an intersection for which there is no route guidance During auto reroute the route guidance may not be available for the next turn to the right or left During high speed driving it may take a long time for auto reroute to operate In auto reroute a detour route may be shown After auto reroute the route may not be changed If an unn...

Page 529: ... data 4 Check that the map data screen is dis played Map database version and covered area Map data Coverage areas and legal information can be displayed No Function Map version Select to display legal information Select to display map data coverage areas INFORMATION Map data updates are available for a fee Contact your Toyota dealer for fur ther information ...

Page 530: ... the audio control panel Do not eject the SD card as doing so may deactivate the navigation system WARNING Do not allow children to touch the SD card If the card is accidently swallowed the card may become stuck in the throat leading to serious injury or even death NOTICE Do not edit or delete the map data on the SD card as doing so may deactivate the navigation system INFORMATION microSDHC Logo i...

Page 531: ...LC200_Navi MM_OM60T13E_ GE EE 20 03 24 14 47 125 6 Tips for the navigation system Navigation system 3 ...

Page 532: ... station 136 Manual tuning 136 RDS Radio Data System 138 Time shift operation DAB 138 3 Media operation CD 139 Overview 139 Playing an audio CD 140 Playing an MP3 WMA AAC disc 141 DVD 142 Overview 142 DVD options 143 Setup operation from the rear seat 145 USB memory 145 Overview 145 USB audio 147 USB video 148 USB photo 148 iPod 150 Overview 150 iPod audio 152 iPod video 153 Bluetooth audio 153 Ov...

Page 533: ... Playing an audio CD a CD TEXT disc 168 Playing MP3 WMA AAC discs 169 Playing DVD video 169 Playing a USB memory 174 Playing iPod 176 Playing Bluetooth audio 178 Using the external devices 178 Rear seat entertainment system settings 180 If the rear seat entertainment system malfunctions 182 5 Audio visual remote controls Steering switches 183 6 Setup Audio settings 185 Audio settings screen 185 7 ...

Page 534: ...135 Playing an audio CD or MP3 WMA AAC disc 139 Playing a DVD 142 Playing a USB memory 145 Playing an iPod 150 Playing a Bluetooth device 153 Using the AUX port 157 Playing the VTR 158 Using the rear seat entertainment system 160 Using the steering wheel audio switches 183 Audio system settings 185 INFORMATION The illustration is for left hand drive vehi cles The button positions and shapes will d...

Page 535: ...cs This section describes some of the ba sic features of the audio visual system Some information may not pertain to your system Your audio visual system works when the engine switch is turned to ACCES SORY or IGNITION ON mode NOTICE To prevent the battery from being dis charged do not leave the audio visual system on longer than necessary when the engine is not running Turning the system on and o...

Page 536: ...utton again 3 Select the desired source 1 Select Source 2 Select Reorder 3 Select the desired audio source then or to reorder 1 Insert a disc into the disc slot z After insertion the disc is automatically loaded Selecting an audio source INFORMATION Dimmed screen buttons cannot be oper ated Reordering the audio source Disc slot Inserting a disc ...

Page 537: ...to disassemble or oil any part of the DVD player Do not insert any thing other than a disc into the slot INFORMATION The player is intended for use with 12 cm 4 7 in discs only When inserting a disc gently insert the disc with the label facing up USB AUX port INFORMATION If a USB hub is plugged in two devices can be connected at a time Even if a USB hub is used to connect more than two USB devices...

Page 538: ...s used audio and or video may not be output properly Connected device portable audio device etc Left audio Right audio Ground Video Sound settings DSP control No Function The system adjusts to the optimum volume and tone quality according to vehicle speed to compensate for in creased vehicle noise This function can create a feeling of presence Tone and balance Tone How good an audio program sounds...

Page 539: ...d item to be adjusted No Function Select or to adjust high pitched tones Select or to adjust mid pitched tones Select or to adjust low pitched tones Select to adjust the sound balance between the front and rear speakers Select to adjust the sound balance between the left and right speakers Audio screen adjustment Screen size settings The screen size can be selected for each type of media No Functi...

Page 540: ...reen button Function Colour R Select to strengthen the red colour of the screen Colour G Select to strengthen the green colour of the screen Tone Select to strengthen the tone of the screen Tone Select to weaken the tone of the screen Contrast Select to strengthen the contrast of the screen Contrast Select to weaken the contrast of the screen Brightness Select to brighten the screen Brightness Sel...

Page 541: ...n Select to display the manual tuning screen Select to display the station list screen Select to display the preset station screen Select to display the audio source se lection screen Select to display the audio setting screen Select to tune to preset stations en sembles Select to display the time shift opera tion screen Tune Scroll knob Presets screen Turn to select preset stations ensembles Stat...

Page 542: ...or more to seek up down available stations ensembles continuously while the button is being pressed Power Volume knob Turn to adjust volume Press to turn the audio system on off Press and hold to restart the audio system Press to turn mute on off INFORMATION The radio automatically changes to ste reo reception when a stereo broadcast is received If the signal becomes weak the radio reduces the amo...

Page 543: ...sual system 4 2 Tune the desired station XDAB 1 Select Manual 2 Tune the desired ensemble or service No Function Select to seek up down for a station Select to step up down frequencies If equipped No Function Select to set the desired ensemble Select to set the desired service ...

Page 544: ...rrent recep tion worsens TA Traffic Announcement function The tuner will automatically seek a sta tion that regularly broadcasts traffic in formation and the station broadcasts when the traffic information program starts INFORMATION When TA is set to On P 186 the radio will begin seeking a TP station When the program ends the initial oper ation resumes The volume level when receiving the traffic a...

Page 545: ...e se lection screen Select to select a track file Displays cover art Select to display a track file list Audio CD Select to display a track list MP3 WMA AAC disc Select to dis play a folder list To return to the top screen select Now playing on the list screen Select to display the audio setting screen Select to set random playback Select to set repeat playback Shows progress Select to play pause ...

Page 546: ...Press and hold to restart the audio system Press to play pause Press to eject a disc INFORMATION If a disc contains CD DA files and MP3 WMA AAC files only the CD DA files can be played back If a CD TEXT disc is inserted the title of the disc and track will be displayed Up to 32 characters can be displayed Playing an audio CD Repeating The track currently being listened to can be repeated No Functi...

Page 547: ...e repeat off 1 Select z Each time is selected the mode changes as follows random 1 folder random folder random 1 disc random off Playing an MP3 WMA AAC disc Repeating The file or folder currently being lis tened to can be repeated INFORMATION Each time is selected RPT FLD RPT appears on the screen Random order Files or folders can be automatically and randomly selected INFORMATION Each time is sel...

Page 548: ...y the DVD software producer This DVD player plays a disc as the software producer intended As such some functions may not work properly Be sure to read the instruction manual that comes with the individual DVD disc P 193 Overview The DVD operation screen can be reached by the following methods XInserting a disc P 130 Press the AUDIO button to display the audio control screen Select Source and sele...

Page 549: ...ystem Press to play pause Press to eject a disc WARNING Conversational speech on some DVDs is recorded at a low volume to empha size the impact of sound effects If you adjust the volume assuming that the conversations represent the maximum volume level that the DVD will play you may be startled by louder sound effects or when you change to a different audio source The louder sounds may have a sign...

Page 550: ...displayed in is changed z The languages available are restricted to those available on the DVD disc z When Hide is selected the subtitles can be hidden No Function Page Select to display the title search screen 144 Select to display the prede termined scene on the screen and start playing Select to display the audio selection screen 144 Select to display the subtitle selection screen 144 Select to...

Page 551: ...a front passenger s selection of the setup menu z To lock the rear seat entertainment sys tem see Operation from the front seats on page 166 Control screen XUSB audio XUSB video Changing the angle The angle can be selected for discs that are multi angle compatible when the angle mark appears on the screen Setup operation from the rear seat This screen appears when a rear pas senger selects the set...

Page 552: ...lso the knob can be used to enter selections on the list screens by pressing it Press to select a track file Press and hold to fast forward rewind Power Volume knob Turn to adjust volume Press to turn the audio system on off Press and hold to restart the audio system Press to play pause No Function Video Select to display the audio source se lection screen Select to display the play mode se lectio...

Page 553: ...ide the vehicle may damage the por table player Do not push down on or apply unneces sary pressure to the portable player while it is connected as this may dam age the portable player or its terminal Do not insert foreign objects into the port as this may damage the portable player or its terminal INFORMATION The system can only output the sound while driving Audio files and image files can be pla...

Page 554: ...ndom order Files tracks or folders albums can be automatically and randomly selected INFORMATION Each time is selected RAND FLD RAND appears on the screen USB video To change to USB video mode select Browse on the USB audio screen then select the Videos tab and se lect the desired video file USB video options No Function Page Select to display the image quality adjustment screen 134 Select to chan...

Page 555: ...hoto folder 3 Select the desired photo USB photo control screen No Function Select on off of the slide show set ting Select Fast Normal or Slow for the desired play speed Select Normal or Random for play mode Select to display full screen images Select to skip to the previous next file Displaying the desired photo from the list ...

Page 556: ... source se lection screen Select to select a track Displays cover art Select to display a track list To return to the top screen select Now playing on the list screen Select to display the play mode se lection screen To return to the top screen select Now playing on the list screen Select to display the audio settings screen Select to set random playback Select to set repeat playback Shows progres...

Page 557: ...ll knob Turn to select a file Turn to move up down the list Also the knob can be used to enter selections on the list screens by pressing it Press to select a file Press and hold to fast forward rewind No Function Audio Power Volume knob Turn to adjust volume Press to turn the audio system on off Press and hold to restart the audio system Press to play pause WARNING Do not operate the player s con...

Page 558: ...ion can be changed to On or Off P 188 It may take time to display iPod cover art and the iPod may not be operated while the cover art display is in process When an iPod is connected and the audio source is changed to iPod mode the iPod will resume playing from the same point it was last used Depending on the iPod that is connected to the system certain functions may not be available For viewing vi...

Page 559: ...etooth audio The Bluetooth audio system enables users to enjoy listening to music that is played on a portable player on the ve hicle speakers via wireless communi cation This audio system supports Bluetooth a wireless data system ca pable of playing portable audio music without cables If your device does not support Bluetooth the Bluetooth au dio system will not function Overview The Bluetooth au...

Page 560: ...ce condi tion Select to display the playlist screen To return to the top screen select Now playing on the list screen Select to set random playback Select to set repeat playback Shows progress Select to play Select to pause Tune Scroll knob Turn to select a track Turn to move up down the list Also the knob can be used to enter selections on the list screens by pressing it Press to select a track P...

Page 561: ...n particular high temperatures inside the vehicle may damage the por table player INFORMATION Depending on the Bluetooth device that is connected to the system the music may start playing when selecting while it is paused Conversely the music may pause when selecting while it is playing In the following conditions the system may not function The Bluetooth device is turned off The Bluetooth device ...

Page 562: ...ack repeat album repeat off 1 Select z Each time is selected the mode changes as follows album random all track random off Connecting a Bluetooth device To use the Bluetooth audio system it is necessary to register a Bluetooth device with the system Listening to Bluetooth audio Repeating The track or album currently being lis tened to can be repeated INFORMATION Each time is selected RPT ALB RPT a...

Page 563: ...P 131 Press the AUDIO button to display the audio control screen Select Source and select AUX No Function Select to display the audio source se lection screen Select to display the audio setting screen Power Volume knob Turn to adjust volume Press to turn the audio system on off Press and hold to restart the audio system Press to turn mute on off WARNING Do not connect portable audio device or ope...

Page 564: ...pply unneces sary pressure to the portable audio device while it is connected as this may damage the portable audio device or its terminal Do not insert foreign objects into the port as this may damage the portable audio device or its terminal VTR Overview The VTR operation screen can be reached by the following methods XConnect a device to the AUX port P 131 Press the AUDIO button to display the ...

Page 565: ...se lection screen Select to display the audio setting screen Select to display the option screen P 159 Select to display full screen video Power Volume knob Turn to adjust volume Press to turn the audio system on off Press and hold to restart the audio system Press to turn mute on off VTR options No Function Page Select to change the screen size 133 Select to display the image quality adjustment s...

Page 566: ...r the rear passengers to enjoy audio and DVD video separately from the front audio visual system The rear seat entertainment system can be used when the engine switch is in ACCESSORY or IGNITION ON mode No Name Front audio visual system Displays Rear seat entertainment system controller Headphone volume control dials and headphone jacks A V input port VTR and HDMI port If equipped ...

Page 567: ...d to the A V in put port or HDMI port rear passengers can enjoy different audio sources on each display P 178 Display cover installation method Before storing the second seats install the cover for the rear seat entertain ment system Tilting the display When the display is hard to be seen the display can be tilted WARNING Take care not to jam your hand while tilt ing the display Otherwise it may c...

Page 568: ...An insulating sheet is set to prevent the batteries from being discharged Replacing the controller batteries INFORMATION If the batteries are discharged the following symptoms may occur The rear seat entertainment system controller will not function properly The operational range is reduced When using AA batteries Batteries can be purchased at your Toyota dealer electric appliance shop or camera s...

Page 569: ...properly Toyota recom mends the use of Toyota genuine wireless headphones z Contact your Toyota dealer for further details z A caution screen appears for a few sec onds when the engine switch is in ACCESSORY or IGNITION ON mode 1 Press the button Headphone jacks Adjust the volume when you connect the headphones to the jack Loud sounds may have a significant impact on the human body No Function To ...

Page 570: ... 1 Press the button z To turn off the display press the but ton again z While the display is off some remote con trol buttons can be operated 1 Press the SOURCE button to display the audio source selection screen 2 Select the desired source Changing the display to be operated Turning on off the display Changing the source No Function Press to display the audio source se lection screen Press to sel...

Page 571: ... accidents and electric shock Do not disassemble or modify the remote control When the remote control is not used Stow the remote control Injuries may result in the event of sudden braking sudden swerving or an accident Conversational speech on some DVDs is recorded at a low volume to empha size the impact of sound effects If you adjust the volume assuming that the conversations represent the maxi...

Page 572: ...on trol against hard objects Do not sit on or place heavy objects on the remote control For normal operation after replacing the battery observe the following precau tions to prevent accidents Always work with dry hands Moisture may cause the battery to rust Do not touch or move any other com ponents inside the remote control Do not bend either of the battery ter minals Operation from the front se...

Page 573: ...t 2 Select Right or Left Right Link with right side head restraint display Left Link with left side head restraint display 1 Display the audio source selection screen P 164 2 Select AM FM or DAB Control screen XAM FM XDAB Controller Changing the speaker output If equipped Using the radio No Function Select to turn time shift mode on off ...

Page 574: ...station channel Press and hold to seek for a sta tion channel Press to select a station channel Press and hold to seek for a sta tion channel Time shift operation DAB No Function Press and hold to fast forward rewind Press to jump forward backward by 10 seconds Press and hold to fast forward rewind Press and hold to fast forward rewind If equipped Playing an audio CD a CD TEXT disc No Function Sel...

Page 575: ...ode Control screen Controller 1 Display the audio source selection screen P 164 2 Select DISC z Even the DISC button is pressed the mode can be changed to the DISC mode Controller Playing MP3 WMA AAC discs No Function Select to set repeat playback Select to set random playback No Function Press to select a folder Press to play pause Press and hold to fast forward rewind Press to select a file Pres...

Page 576: ... select an Icon Press to select a DISC mode Press to input the selected icon Press to play pause Press and hold to fast forward a disc during playback and forward slowly during pause Press to stop the screen Press to display the menu screen Press to switch for display option screen on off Press to display the title selection screen Selecting a chapter Press and hold to fast forward or re wind a ch...

Page 577: ...ect to turn off the but tons from the screen Select to display the menu screen for DVD vid eo For the operation see the manual that comes with the DVD vid eo disc provided sepa rately Press and hold to rewind during playback Select to stop the video Select to play pause the video screen Press and hold to fast for ward during playback and play in slow motion when the player is paused Select to disp...

Page 578: ... angles available are restricted to those available on the DVD disc 1 Display the option screen P 170 2 Select Setup 3 Select the items to be set 4 After the initial setting has been changed select OK z This screen will close and the system will return to the DVD video screen z When Default is selected all menus are initialized The angle can be selected for discs that are multi angle compatible wh...

Page 579: ...red language to be read cannot be found on this screen select Other and enter a language code P 174 Angle mark 1 Select Angle Mark 2 Select On or Off Parental lock 1 Select Parental Lock on the Setup Menu 1 screen 2 Enter the 4 digit personal code on the Enter Key Code screen and then se lect OK z If the wrong numbers are entered select to delete the numbers 3 Select a parental level 1 8 on the Se...

Page 580: ... cancel a rear passenger s selection of the setup menu 1 Connect a USB memory P 131 2 Display the audio source selection screen P 164 3 Select USB Control screen If Other on the Audio Language screen Subtitle Language screen or Menu Language screen is selected the desired language to be heard or read can be selected by entering a lan guage code P 190 This screen appears when a front pas senger sel...

Page 581: ...control screen Controller No Function Press to select a folder album Press to play pause Press and hold to fast forward rewind Press to select a file track Press and hold to fast forward rewind USB video No Function Select to display the USB audio con trolscreen No Function Press to play pause Press and hold to fast forward rewind Press to select a file track Press and hold to fast forward rewind ...

Page 582: ...o turn off the buttons from the screen Press and hold to rewind during play back Select to stop the video Select to pause resume the video screen Press and hold to fast forward during playback INFORMATION If appears on the screen when a con trol is selected the operation relevant to the control is not permitted Depending on the USB memory that is connected to the system certain func tions may not ...

Page 583: ...o control screen Controller No Function Press to play pause Press and hold to fast forward rewind Press to select a track Press and hold to fast forward rewind iPod video No Function Select to display the iPod audio con trol screen No Function Press to play pause Press and hold to fast forward rewind Press to select a file Press and hold to fast forward rewind INFORMATION Depending on the iPod tha...

Page 584: ... portable player that is connected to the system certain functions may not be available Using the external devices The rear seat entertainment system plays videos and sound when audio visual equipment is connected to the port The external devices operation screen can be reached by the following meth ods Press the SOURCE button and se lect AUX A V Rear A V or Rear HDMI XConnecting a external device...

Page 585: ...r A V input port NOTICE When the A V input port and or head phone jack is not in use keep the lid closed Inserting anything other than an appropriate plug may cause electrical failure or a short circuit Using the HDMI port About the HDMI terminal the interface that is connected video and audio to system and audio video device You can enjoy the high definition video and audio by connecting the sing...

Page 586: ...reen size 181 Select to set the LCD AI Super Resolu tion etc 181 The screen image quality such as the brightness and contrast levels can be adjusted Adjustable items depend on the selected input source Screen button Function Brightness Select to brighten the screen Brightness Select to darken the screen Contrast Select to strengthen the contrast of the screen Contrast Select to weaken the contrast...

Page 587: ...ode individually No Function Select to turn the screen off To turn the screen back on press a remote control button such as DISC and INPUT The selected screen appears Select to turn on off the LCD AI The LCD AI automatically deter mines the tone of the video image and sets the contrast to an optimum level displaying a sharp image Select to turn on off the Super Res olution The Super Resolution is ...

Page 588: ...e There is a problem inside the system Eject the disc The inside of the player unit may be too hot due to a very high ambient tempera ture Eject the disc and allow the player to cool down If No supported data appears on the screen It indicates that the iPod or USB has no playable data If a disc which is not playable is inserted No supported data will also appear on the screen For appro priate disc...

Page 589: ... Station list up down Stations screen Seek up down Manu al tuning screen Press and hold 0 8 sec or more Seek up down contin uously while the switch is being pressed Manual tun ing screen DAB Press Preset ensemble up down Presets screen Service list up down Stations screen Ensemble seek up down Manual tuning screen Press and hold 0 8 sec or more Ensemble seek up down continuously while the switch i...

Page 590: ...T audio Press Track up down Press and hold 0 8 sec or more Album up down Mode Operation Function All Press Volume up down Press and hold 0 8 sec or more Volume up down con tinuously Mode Operation Function If equipped Mode Operation Function AM FM Radio DAB AUX VTR Press Change audio modes Press and hold 0 8 sec or more Mute CD MP3 WMA AAC disc DVD USB iPod BT audio Press Change audio modes Press ...

Page 591: ... pro grammed Audio settings screen No Function Page Select to set detailed sound settings 132 Select to set detailed FM radio settings 186 Select to set detailed DAB settings 186 Select to set the iPod audio signal input settings 187 Select to set the video sig nal format settings 187 Select to set detailed cover art settings 188 Select to set detailed DVD settings 188 Only in DVD video mode ...

Page 592: ...matically selected if current re ception worsens Select to switch to a broadcasting station within the same local pro gram network Select on off to set the FM Radio text feature If equipped DAB settings No Function Select on off to set L band in the tune range When Off is selected the physical channel range for tun ing operations is limited to Band III excluding for preset operations When On is se...

Page 593: ...ing screen P 185 2 Select iPod settings 3 Select Video sound input 4 Select a screen button for the desired setting 1 Display the audio setting screen P 185 2 Select External video settings 3 Select Video signal format 4 Select a screen button for the desired setting iPod settings External video settings ...

Page 594: ...age to be heard on the Audio language screen z If the desired language to be heard cannot be found on this screen select Other and enter a language code P 189 Cover art settings No Function Select on off to set the cover art dis play in DISC mode Select on off to set the cover art dis play in USB mode Select on off to set the priority of the Gracenote database in USB mode Select on off to set the ...

Page 595: ...evel 1 8 on the Se lect restriction level screen Auto start 1 Select Auto start 2 Select On or Off Sound dynamic range 1 Select Sound dynamic range 2 Select MAX STD or MIN Enter audio subtitle menu lan guage code 1 Enter the 4 digit language code 2 Select OK The subtitle language can be changed The language on the DVD video menu can be changed The multi angle mark can be turned on or off on the sc...

Page 596: ...khazian 0809 Hindi 1401 Nauru 2011 Turkmen 0106 Afrikaans 0818 Croatian 1405 Nepali 2012 Tagalog 0113 Amharic 0821 Hungarian 1415 Norwegian 2014 Setswana 0118 Arabic 0825 Armenian 1503 Occitan 2015 Tongan 0119 Assamese 0901 Interlingua 1513 Afan Oromo 2018 Turkish 0125 Aymara 0905 Interlingue 1518 Oriya 2019 Tsonga 0126 Azerbaijani 0911 Inupiak 1601 Punjabi 2020 Tatar 0201 Bashkir 0914 Indonesian ...

Page 597: ... you are listening to However this does not indicate a malfunction Radio Usually a problem with radio reception does not mean there is a problem with the radio it is just the normal result of conditions outside the vehicle For example nearby buildings and ter rain can interfere with FM reception Power lines or telephone wires can in terfere with AM signals And of course radio signals have a limite...

Page 598: ...the bass level may reduce static and fluttering Station swapping If the FM signal being listened to is interrupted or weakened and there is another strong station nearby on the FM band the radio may tune in the second station until the original signal can be picked up again Fading AM broadcasts are reflected by the upper atmosphere especially at night These reflected signals can interfere with tho...

Page 599: ... player skip z If moisture gets into the DVD player the discs may not be able to be played Remove the discs from the player and wait until it dries DVD logo is a trademark of DVD Format Logo Licensing Corporation z Use only discs marked as shown above The following products may not be play able on your player SACD dts CD Copy protected CD DVD audio Video CD DVD RAM DVD player and disc WARNING DVD ...

Page 600: ...s those shown in the illustrations The use of such discs may damage the player or it may be impossible to eject the disc This system is not designed for use of Dual Discs Do not use Dual Discs because they may cause damage to the player Do not use discs with a protection ring The use of such discs may damage the player or it may be impossible to eject the disc Do not use printable discs The use of...

Page 601: ...tatic device z CD R CD RW discs that have not been subject to the finalizing process a pro cess that allows discs to be played on a conventional CD player cannot be played z It may not be possible to play CD R CD RW discs recorded on a music CD recorder or a personal computer because of disc characteristics scratches or dirt on the disc or dirt condensation etc on the lens of the unit z It may not...

Page 602: ...re are cases when it cannot be used Marks shown on DVD video discs DVD video discs This DVD player conforms to NTSC PAL colour TV formats DVD video discs conforming to another format such as SECAM cannot be used Code Country All All countries 2 Except for Russia 5 Russia Ukraine NTSC PAL Indicates NTSC PAL format of colour TV Indicates the number of audio tracks Indicates the number of language su...

Page 603: ... other scenes Level 1 DVD video discs for children can be played Level 2 7 DVD video discs for children and G rated movie can be played Level 8 All types of DVD video discs can be played Multi angle feature The same scene can be enjoyed from different angles Multi language feature The subtitle and audio language can be selected Region codes The region codes are pro vided on DVD players and DVD dis...

Page 604: ... iPod nano iPod touch and Lightning are trademarks of Apple Inc registered in the U S and other countries The following iPod iPod nano iPod classic iPod touch and iPhone devic es can be used with this system Made for iPhone 5 iPhone 4S iPhone 4 iPhone 3GS iPhone 3G iPhone iPod touch 5th generation iPod touch 4th generation iPod touch 3rd generation iPod touch 2nd generation iPod touch 1st generati...

Page 605: ...ge class Item USB DISC Compatible file format audio MP3 WMA AAC Compatible file format video WMV AVI MP4 M4V Compatible file format photo JPEG Image size photo Maximum 10MB Pixel size photo Maximum 10 000 000 pixels Folders in the de vice Maximum 3 000 Maximum 192 Files in the device Maximum 9 999 Maximum 255 Files per folder Maximum 255 File type Frequency kHz MP3 files MPEG 1 LAYER 3 32 44 1 48 ...

Page 606: ...revent noise and playback errors use the appropriate file extension z This system can play only the first session when using multi session compatible CDs z MP3 files are compatible with the ID3 Tag Ver 1 0 Ver 1 1 Ver 2 2 and Ver 2 3 for mats This system cannot display disc title track title and artist name in other for mats z WMA AAC files can contain a WMA AAC tag that is used in the same way as...

Page 607: ...r ward or reverse operations are used z It is not possible to check folders that do not include MP3 WMA AAC files z MP3 WMA AAC files in folders up to 8 lev els deep can be played However the start of playback may be delayed when using discs containing numerous levels of folders For this reason we recommend creating discs with no more than 2 levels of folders z The play order of the compact disc w...

Page 608: ... z WMA files can contain a WMA tag that is used in the same way as an ID3 tag WMA tags carry information such as track title and artist name z This is the international standard for the formatting of CD ROM folders and files For the ISO 9660 format there are 2 lev els of regulations z Level 1 The file name is in 8 3 format 8 character file names with a 3 character file extension File names must be...

Page 609: ... formats for WMA files are Ver 7 8 and 9 z Trademark Acknowledgement Windows Media is either a registered trademark or trademark of Microsoft Corporation in the United States and or other countries This product includes technology owned by Microsoft Corporation and cannot be used or distributed without a license from Microsoft Licensing Inc z AAC is short for Advanced Audio Coding and refers to an...

Page 610: ...in the USB memory No video files found This indicates that no video files are included in the USB memory No image files found This indicates that no image files are included in the USB memory iPod iPod error This indicates a problem in the iPod or its connec tion No music files found This indicates that there is no music data in the iPod No video files found This indicates that no video files are ...

Page 611: ... MM_OM60T13E_ GE EE 20 03 24 14 47 205 5 1 Speech command system operation Speech command system 206 Using the speech command system 206 Speech command system operation 207 Command list 212 Speech command system ...

Page 612: ...screen can be operated from the Main menu screen Using the speech command system Steering switch Microphone INFORMATION Wait for the confirmation beep before speaking a command Speech commands may not be recog nized if Spoken too quickly Spoken at a low or high volume The roof or windows are open Passengers are talking while speech commands are spoken The air conditioning speed is set high The air...

Page 613: ...me commonly used commands are dis played on the screen 3 Say or select the command displayed on the screen 1 Press the talk switch 2 Saying Main menu or selecting Main menu 3 Say or select the desired function com mand Speech command system operation Operation from the shortcuts z Voice guidance for the speech com mand system can be skipped by press ing the talk switch z Saying Help or selecting p...

Page 614: ...s will be displayed and route guidance to the home address will begin INFORMATION If the navigation system does not respond or the confirmation screen does not disappear press the talk switch and try again If a speech command cannot be recog nized voice guidance will say Pardon and speech command reception will restart If a speech command cannot be recog nized 2 consecutive times the speech comman...

Page 615: ...he street name is not unique select the appropriate number from the displayed address list z Say the desired city name or city name and street name that belongs to the set country in the place of the Not just the city name but the city name and street name can be said at the same time If both are said at the same time and the street name is not unique select the appropriate number from the display...

Page 616: ...he screen to say the city name is displayed and the screen will change to the coun try input screen The house number voice recognition conditions are outlined below Numerals 10 digits or less Multi digit numbers cannot be recog nized Numerals are recognized as single dig its only Speech command example Search for a track INFORMATION A USB memory or iPod must be con nected to enable track searching...

Page 617: ...screen say the number of the desired telephone number from the candidate list to select a telephone num ber from the candidate list 3 Say or select Dial to call the tele phone number 1 Press the talk switch z Dial number is displayed in the Short cuts screen z When Dial number on the Shortcuts screen is dimmed the telephone number voice recognition cannot be used Check the Bluetooth phone connecti...

Page 618: ...led z Commands that have O in the shortcuts menu column can be recognized from the Shortcuts screen XBasic XNavi For example Restaurant Hospital etc Command list Recognizable speech commands and their actions are shown below z Voice recognition language can be changed P 51 Command Action Help Prompts voice guidance to offer examples of commands and operation methods Go back Returns to the previous...

Page 619: ...laces a call to the said telephone type of the contact from the contact list O Dial number Places a call to the said telephone number O Command Action Shortcuts menu Play artist name Plays tracks from the selected artist O Play album name Plays tracks from the selected album O Play song name Plays the selected track O Play playlist name Plays tracks from the selected playlist O ...

Page 620: ...LC200_Navi MM_OM60T13E_ GE EE 20 03 24 14 47 214 1 Speech command system operation ...

Page 621: ...24 Receiving on the Bluetooth phone 225 Incoming calls 225 Talking on the Bluetooth phone 226 Incoming call waiting 227 Bluetooth phone message function 228 Receiving a message 229 Checking messages 229 Replying to a message Quick reply 230 Calling the message sender 231 2 Setup Telephone settings 233 Telephone settings screen 233 Sound settings screen 233 Messaging settings screen 234 Telephone d...

Page 622: ...t being connected by a cable or placed in a cradle The operating procedure of the tele phone is explained here WARNING Use a cellular phone or connect the Bluetooth phone only when safe and legal to do so Your audio unit is fitted with Bluetooth antennas People with implantable car diac pacemakers cardiac resynchroni zation therapy pacemakers or implantable cardioverter defibrillators should maint...

Page 623: ...the communication area The cellular phone is not connected The cellular phone has a low battery When using Bluetooth audio and hands free system at the same time the following problems may occur The Bluetooth connection may be cut Noise may be heard on the Bluetooth audio playback Registering connecting a Bluetooth phone To use the hands free system for cellu lar phones it is necessary to register...

Page 624: ...h commands are used Talk alternately with the other party on the telephone If both parties speak at the same time the other party may not hear what has been said This is not a malfunction Keep call volume down Otherwise the other party s voice may be audible out side the vehicle and voice echo may increase When talking on the tele phone speak clearly towards the micro phone The other party may not...

Page 625: ...on When selling or disposing of the vehicle A lot of personal data is registered when the hands free system is used When selling or disposing of the vehi cle initialize the data P 55 INFORMATION Once initialized the data and settings will be erased Pay much attention when initializing the data Calling on the Bluetooth phone After a Bluetooth phone has been registered a call can be made using the h...

Page 626: ... screen P 219 2 Select Favourites 3 Select the desired contact Toyota assistance P 224 4 Select the desired number 5 Check that the Call screen is dis played How to make a call Page By favourites list 220 By call history 221 By contacts list 222 By dial pad 223 By e mail SMS MMS 231 By POI call 71 SOS 224 By off hook switch 224 By speech command system 210 By favourites list Calls can be made usin...

Page 627: ...Calls that were missed Calls that were received Calls that were sent The icons of call type are displayed Missed call Incoming call Outgoing call INFORMATION When making a call to the same number continuously only the most recent call is listed in call history When a telephone number registered in the contact list is received the name is displayed Number withheld calls are also memo rized in the s...

Page 628: ...peration is com plete XWhen Automatic contact history trans fer is set to off P 235 1 Select Contacts 2 Select the desired item 3 Check that a confirmation screen is displayed when the operation is com plete By contacts list Calls can be made by using contact data which is transferred from a regis tered cellular phone P 238 Up to 2500 contacts maximum of 4 telephone numbers and e mail ad dresses p...

Page 629: ... steering wheel 4 Check that the Call screen is dis played No Function Select to transfer the contacts from the connected cellular phone Select to add a new contact manual ly Select to cancel transferring INFORMATION Manual transfer operation cannot be performed while driving If your cellular phone is neither PBAP nor OPP compatible the contacts can not be transferred Depending on the type of Blue...

Page 630: ...yed on the screen 1 Display the telephone top screen P 219 2 Select Favourites 3 Select Toyota assistance By off hook switch Calls can be made using the latest call history item SOS 112 emergency call support This feature is used to make a 112 emergency call This function is not available when the hands free system is not connected The call has to be placed from a coun try where 112 is available I...

Page 631: ...e Power Volume knob or use the volume control switch on the steering wheel Receiving on the Bluetooth phone Incoming calls When a call is received this screen is displayed with a sound INFORMATION During international telephone calls the other party s name or number may not be displayed correctly depending on the type of cellular phone you have The incoming call display mode can be set P 235 The r...

Page 632: ...our voice to the other party Select to adjust your voice volume that the other party hears from their speaker 227 Select to send tones This button only appears when a number that contains a w is dialed in hands free mode 226 Select to hang up the tele phone INFORMATION When cellular phone call is changed to hands free call the hands free screen will be displayed and its functions can be operated o...

Page 633: ...ne data up until the next pause tone will be automatically sent after 2 sec onds have elapsed When the w pause tone is used the tone data up until the next pause tone will be automatically sent after a user operation is performed Release tones can be used when auto mated operation of a telephone based service such as an answering machine or bank telephone service is desired A telephone number with...

Page 634: ...ne message function Received messages can be forwarded from the connected Bluetooth phone enabling checking and replying using the navigation system Depending on the type of Bluetooth phone connected received messages may not be transferred to the message inbox If the telephone does not support the message function this function cannot be used Function Page Receiving a message 229 Checking message...

Page 635: ...n may not be displayed The pop up screen is separately avail able for incoming e mail and SMS MMS messages under the following condi tions E mail Incoming E mail display is set to Full screen P 234 E mail notification popup is set to on P 234 SMS MMS Incoming SMS MMS display is set to Full screen P 234 SMS MMS notification popup is set to on P 234 Checking messages No Function Select Mark unread o...

Page 636: ...screen to try again Editing quick reply messages 1 Select Quick message INFORMATION Depending on the type of Bluetooth phone being connected it may be necessary to perform additional steps on the telephone Messages are displayed in the appropriate connected Bluetooth phone s registered mail address folder Select the tab of the desired folder to be displayed Only received messages on the connected ...

Page 637: ...er 4 Check that the Call screen is dis played INFORMATION To reset the edited quick reply messages select Defaults Quick message 1 I am driving and will arrive in approximately ETA minutes This message cannot be edited and will automatically fill in ETA with the navigation calculated estimated time of arrival on the confirm message screen If there are waypoints set ETA to the next waypoint will be...

Page 638: ... 4 Select corresponding to the de sired number z Identified telephone numbers contained in the message are displayed 5 Check that the Call screen is dis played Calling from the incoming message screen P 229 Calls can be made to a number identi fied in a message s text area INFORMATION A series of numbers may be recognized as a telephone number Additionally some telephone numbers may not be recogni...

Page 639: ...play the Telephone settings screen P 233 2 Select Sound settings Telephone settings Telephone settings screen No Information Page Sound settings 233 Contact settings 238 Messaging settings 234 Telephone display settings 235 Toyota assistance setting 236 Sound settings screen The call and ringtone volume can be adjusted A ringtone can be selected ...

Page 640: ...ing tone volume Select or to adjust the mes sage readout volume Select to set the desired incoming SMS MMS tone Select or to adjust the in coming SMS MMS tone volume Select to set the desired incoming e mail tone Select or to adjust the in coming e mail tone volume Select or to adjust the de fault volume of the other party s voice Select to reset all setup items INFORMATION Depending on the type o...

Page 641: ...telephone on off Select to change the incoming SMS MMS display Full screen When an SMS MMS message is received the incoming SMS MMS display screen is dis played and can be operated on the screen Drop down When an SMS MMS message is received a message is displayed on the upper side of the screen Select to change the incoming e mail display Full screen When an e mail is re ceived the incoming e mail...

Page 642: ...ree screen is dis played and can be operated on the screen Drop down A message is dis played on the upper side of the screen and can only be operated via the steering wheel switches Select to set display of the contact history transfer completion message on off For PBAP compatible Bluetooth phones select to set automatic con tact history transfer on off When set to on the telephone s contact data ...

Page 643: ...stance XIf a country has not been registered 4 Select a country 5 Select Yes when the confirmation screen appears XIf a country has already been registered 4 Select the registered country s screen button 5 Select another country to replace the existing country 6 Select Yes when the confirmation screen appears Registering a country in a different way ...

Page 644: ...the connected tele phone to the system and to add edit delete contacts 239 Select to add or delete con tacts to the favourites list 244 Select to clear contacts from the call history 246 INFORMATION Depending on the type of telephone certain functions may not be available Contact data is managed independently for every registered telephone When one telephone is connected another telephone s regist...

Page 645: ...r PBAP compatible Bluetooth phones 1 Select Transfer contacts z Contacts are transferred automatically XWhen Automatic contact history trans fer is set to on P 235 Contacts screen No Function Page Select to transfer contacts from the connected tele phone 239 Select to add new contacts to the contact list 241 Select to edit contacts in the contact list 242 Select to delete contacts from the contact...

Page 646: ...r PBAP incom patible but OPP compatible Bluetooth phones from step 2 P 240 For PBAP incompatible but OPP compatible Bluetooth phones 1 Select Transfer contacts 2 Select Replace contacts or Add contact Replace contacts Select to transfer the contact from the connected cellular phone and replace the current one Add contact Select to transfer the de sired contact data from the connected cel lular pho...

Page 647: ...t the telephone type for the tele phone number 5 To add another number to this contact select Yes Registering a new contact in a dif ferent way From the Call history screen 1 Display the telephone top screen P 219 2 Select Call history and select a con tact not yet registered in the contact list For PBAP compatible Bluetooth phones this function is available when Automatic contact history transfer...

Page 648: ...number 4 Follow the steps in Registering a new contact to the contact list from step 3 P 241 Editing the contact in a different way From the Contact details screen 1 Display the telephone top screen P 219 2 Select Contacts Call history or Favourites and select the desired contact 3 Select Edit contact E mail addresses Select to display all registered e mail addresses for the con tact 4 Follow the ...

Page 649: ...ne top screen P 219 2 Select Contacts Call history or Favourites and select the desired contact 3 Select Delete contact 4 Select Yes when the confirmation screen appears Deleting the contact data For PBAP compatible Bluetooth phones this function is available when Automatic contact history transfer is set to off P 235 INFORMATION Multiple data can be selected and deleted at the same time INFORMATI...

Page 650: ...re already stored as a favourite 3 Check that a confirmation screen is displayed when the operation is com plete XWhen 14 contacts have already been registered to the favourites list 1 When 14 contacts have already been registered to the favourites list a regis tered contact needs to be replaced Select Yes when the confirmation screen appears to replace a contact 2 Select the contact to be replace...

Page 651: ...s or Call history and select the desired contact 3 Select Add favourite 4 Check that a confirmation screen is displayed when the operation is com plete 1 Select Remove 2 Select the desired contact and select Remove 3 Select Yes when the confirmation screen appears 4 Check that a confirmation screen is displayed when the operation is com plete Deleting contacts in the favourites list in a different...

Page 652: ... Select the desired history 4 Select the desired contact and select Delete 5 Select Yes when the confirmation screen appears 6 Check that a confirmation screen is displayed when the operation is com plete Deleting call history in a different way 1 Display the telephone top screen P 219 2 Select Call history and select the desired tab 3 Select Delete 4 Follow the steps in Delete call histo ry scree...

Page 653: ...ooth ver sion of the connected cellular phone may be older than the specified version Use a cellular phone with Bluetooth ver sion 2 0 or higher recommended Ver 3 0 EDR or higher 37 Symptom Likely cause Solution Page Cellular phone This system A cellular phone can not be registered An incorrect pass code was entered on the cellular phone Enter the correct passcode on the cel lular phone The regist...

Page 654: ...switch is in ACCES SORY or IGNITION ON mode 44 Check your tele phone message is displayed Bluetooth function is not enabled on the cellular phone Enable the Bluetooth function on the cellular phone Old registration infor mation remains on either this system or the cellular phone Delete the existing registration informa tion from both this system and the cellu lar phone then regis ter the cellular ...

Page 655: ...is system check with your Toyota dealer Automatic contact transfer function on this system is set to off Set automatic con tact transfer function on this system to on 235 Passcode has not been entered on the cellular phone Enter the passcode on the cellular phone if requested default passcode 1234 Transfer operation on the cellular phone has not completed Complete transfer operation on the cel lul...

Page 656: ...u lar phone approve message transfer on the telephone Automatic transfer function on this sys tem is set to off Set automatic trans fer function on this system to on 234 New message notifi cations are not dis played Notification of SMS MMS E mail recep tion on this system is set to off Set notification of SMS MMS E mail reception on this sys tem to on 234 Automatic message transfer function is not...

Page 657: ...n taken the symptom status does not change The cellular phone is not close enough to this system Bring the cellular phone closer to this system Radio interference has occurred Turn off Wi Fi de vices or other devic es that may emit radio waves Wi Fi is a regis tered trademark of Wi Fi Alliance The cellular phone is the most likely cause of the symptom Turn the cellular phone off remove and reinsta...

Page 658: ...LC200_Navi MM_OM60T13E_ GE EE 20 03 24 14 47 252 3 What to do if ...

Page 659: ...e search 257 Online search 257 Viewing POI details 261 Importing memory points and stored routes 262 Registering an external point as a memory point and routes from the internet 262 Procedure for downloading memory points and routes from a USB memory 263 Street View 264 Panoramio 266 2 Setup Connected service settings 268 Connected service settings screen 268 Not all connected services may be avai...

Page 660: ... system can be set as a destination z Importing memory points and routes Establishments that were searched using a personal computer can be set as a destination and can be registered as memory points z Street View The Street View of the desired location can be viewed z Panoramio User s pictures comments and other information can be viewed on a map No Name Operation Navigation Enter a keyword Toyot...

Page 661: ...r personal comput er and Toyota portal site Access Toyota portal site and search POIs and routes Toyota portal site The POIs and routes are saved at Toyota portal site USB memory The POIs and routes are saved to the USB memory Navigation Via the internet the POIs are downloaded to the navigation system Via the USB memory the POIs and routes are downloaded to the navigation system For details about...

Page 662: ...r to use this service a Bluetooth DUN PAN compatible cellular phone with sufficient network coverage and a SIM card with a contract that allows access to the internet are required z When using the connected services depending on your telephone subscrip tion some related fees might apply z When a cellular phone is used in a roam ing situation when outside the geo graphical coverage area of mobile n...

Page 663: ...ct Menu 3 Select Destination Connecting to internet The system must be connected to the internet to use this service z Via a Bluetooth device P 34 z Via Wi Fi P 47 Online search Online search New establishments or establishments that are not registered in the navigation system can be set as a destination In order to perform an online search the system must already be connected to the internet P 25...

Page 664: ...address selecting a previously searched desti nation the last displayed map or one of the current destinations 260 No Function Displays search results Up to 20 search results are down loaded at a time Unsupported characters will not be displayed on the list Highlighted advertisements may be displayed at the top of the search result list Select to display the previous or next screen If there are no...

Page 665: ...etailed information 261 Select to set as a destina tion If a destination has al ready been set Add to and Replace will be displayed Add to Select to add a destination Replace Select to delete the existing destina tion s and set a new one 87 Select to display the Street View 264 INFORMATION After establishments acquired using Online search have been set as a des tination once they can be saved as a...

Page 666: ...lect Where 2 Select the desired item to search for a point Selecting a search area No Function Select to set a location by address or location Select to set a location by a previ ously selected destination P 83 Select to set a location by using the current position Select to set a location by using the last displayed map Select to set a location by using a current destination Select to change page...

Page 667: ...ails No Function Page Select to view the POI s de tails If supported by your search provider the feed back function will be dis played 261 Select a desired picture to display it in full screen if pictures are available Evaluating the information Your rating of the selected POI can be submitted If the information is incor rect you can notify the search provider by selecting the appropriate button N...

Page 668: ...s at Toyota portal site they can be downloaded via the internet b After saving the POIs and routes at Toyota portal site download them to a USB memory The POIs and routes can then be downloaded via the USB memory When downloading POIs and routes to the navigation system both proce dures are performed in the vehicle For details about POI and route searches on Toyota portal site and downloading POIs...

Page 669: ... routes to be copied and select Start 4 Check that a progress bar is being dis played while the data copy is in progress z To cancel this function select Cancel 5 Check that a confirmation screen is displayed when the operation is com plete INFORMATION Setting Automatic memory point down load to Yes will automatically down load external points P 268 If a screen related to a memory point is changed...

Page 670: ...Memory points acquired from Toyota portal site can only be registered with the navigation system registered at the time of acquirement In some cases memory points and routes may not be able to be imported If this occurs Unable to read memory point data Device ID error will be dis played If memory points and routes which have the same name are already stored in the navigation system the system may ...

Page 671: ...View location by address or location Select to set a Street View location by a previously selected destination P 83 Select to set a Street View location by using the current position Select to set a Street View location by using the last displayed map Select to set a Street View location by using a current destination Select to change pages INFORMATION The Street View function can also be selected...

Page 672: ...ct Panoramio Users pictures on a map comments and other information can be viewed In order to perform Panoramio the system must already be connected to the internet P 257 No Function Select to set a location by address P 80 Select to set a location by using the current position Select to set a location by using the last displayed map Select to set a location by using a current destination Select t...

Page 673: ...ll screen Select to magnify or reduce the map scale Select to display the previous 6 pic tures Select to update the thumbnails screen Up to 6 pictures are dis played Select to download up to another 6 pictures when there are more than 6 pictures available No Function Select to view user comments Select to set as a destination P 87 If a destination has already been set Add to and Re place will be d...

Page 674: ...68 2 Setup 1 Press the SETUP button 2 Select Navigation 3 Select Connected service 4 Select the items to be set 5 Select Save Connected service settings The following detailed connected ser vice settings can be set Connected service settings screen ...

Page 675: ...o Yes When connecting in a roaming area the display of the roaming warning can be set on or off by selecting Yes or No When connecting to Toyota por tal site the required portal user name and password can be re membered by selecting Yes or No When Yes is selected the user name and password do not need to be entered when ac cessing Toyota portal site The desired search engine can be selected P 269 ...

Page 676: ...elect OK 4 Enter the valid password and select OK z In order for the new user name and pass word to be applied to the navigation sys tem the system needs to connect to Toyota portal site 1 Display the Connected service set tings screen P 268 2 Select Delete username and pass word 3 Select Yes when the confirmation screen appears Changing user name and password Deleting user name and password ...

Page 677: ...LC200_Navi MM_OM60T13E_ GE EE 20 03 24 14 47 271 Index ...

Page 678: ...e sender 231 Checking messages 229 Receiving a message 229 Replying to a message Quick reply 230 Buttons overview 12 C Calling on the Bluetooth phone 219 By call history 221 By contacts list 222 By dial pad 223 By favourites list 220 By off hook switch 224 SOS 224 CD 139 Overview 139 Playing an audio CD 140 Playing an MP3 WMA AAC disc 141 Command list 212 Connected service settings 268 Connected s...

Page 679: ...peration 28 Entering letters and numbers 28 List screen 29 F Function index 21 G General settings 51 General settings screen 51 GPS Global Positioning System 121 Limitations of the navigation system 121 H Home screen 12 Status display 13 Home screen operation 27 I Importing memory points and stored routes 262 Procedure for downloading memory points and routes from a USB memory 263 Registering an e...

Page 680: ... 66 Media operation 139 My memory 99 My memory settings 99 Backup to a USB memory 109 Copying from a USB memory 110 Setting up area to avoid 106 Setting up home 100 Setting up memory points 102 Setting up quick access 101 Setting up route trace 108 N Navigation operation 17 Navigation settings 111 Navigation settings screen 111 Navigation system 61 Network settings 34 O Online search 257 Viewing P...

Page 681: ...g the radio 167 Rear seat entertainment system operation 160 Receiving on the Bluetooth phone 225 Incoming calls 225 Registering home 17 Registering quick access 18 Registering connecting Bluetooth device 34 Profiles 37 Registering a Bluetooth audio player for the first time 35 Registering a Bluetooth phone for the first time 34 Route guidance 90 Route guidance screen 90 Arrow screen 94 During mot...

Page 682: ...and system 206 Speech command system operation 206 Starting route guidance 87 Suspending guidance 89 Steering switches 183 Street View 264 T Talking on the Bluetooth phone 226 Incoming call waiting 227 Telephone 215 Telephone operation Hands free system for cellular phones 216 Telephone settings 233 Messaging settings screen 234 Sound settings screen 233 Telephone display settings screen 235 Telep...

Page 683: ...C200_Navi MM_OM60T13E_ GE EE 20 03 24 14 47 277 Alphabetical index V Vehicle settings 57 Maintenance 57 Voice settings 56 Voice settings screen 56 VTR 158 Overview 158 VTR options 159 W What to do if 247 ...

Page 684: ...otherwise set forth herein you agree not to otherwise reproduce copy modify decompile disassemble or reverse engineer any portion of this Data and may not transfer or distribute it in any form for any purpose except to the extent permitted by mandatory laws License Limitations on Transfer Your limited license does not allow transfer or resale of the Data except on the condition that you may transf...

Page 685: ...E CONTRACTS OR SAVINGS OR ANY OTHER DIRECT INDIRECT INCIDENTAL SPECIAL OR CONSEQUENTIAL DAMAGES ARISING OUT OF YOUR USE OF OR INABILITY TO USE THIS DATA ANY DEFECT IN THIS DATA OR THE BREACH OF THESE TERMS OR CONDITIONS WHETHER IN AN ACTION IN CONTRACT OR TORT OR BASED ON A WARRANTY EVEN IF HERE OR ITS LICENSORS HAVE BEEN ADVISED OF THE POSSIBILITY OF SUCH DAMAGES Some States Territories and Count...

Page 686: ...nited States government or any other entity seeking or applying rights similar to those customarily claimed by the United States government this Data is a commercial item as that term is defined at 48 C F R FAR 2 101 is licensed in accordance with this End User License Agreement and each copy of Data delivered or otherwise furnished shall be marked and embedded as appropriate with the following No...

Page 687: ...LC200_Navi MM_OM60T13E_ GE EE 20 03 24 14 47 281 Certification XFor vehicles sold in Ukraine XFor vehicles sold in Republic of Mauritius Certification ...

Page 688: ...LC200_Navi MM_OM60T13E_ GE EE 20 03 24 14 47 282 Certification ...

Page 689: ...LC200_Navi MM_OM60T13E_ GE EE 20 03 24 14 47 283 Certification ...

Page 690: ......

Reviews: