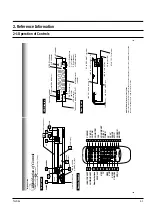
Reference Information
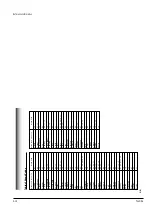
2-4
Toshiba
15
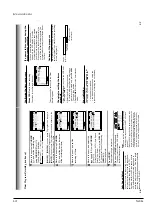
PREPARATION
8
Press
ENTER
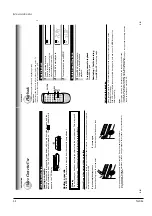
to start the
“AUT
O
” clock
set feature.
After the VCR is turned of
f, it automatically
updates the clock using the data broadcast
by the local
TV stations.
9
Select the options using
CURSOR
( )
or
( )
. Change the data using
CURSOR (
▲
)
or
(
▼
).
1)
Set
“SUMMER TIME
(Daylight-Saving T
ime)
”.
DST start: Daylight-saving time begins on
the first Sunday in
April. Because the
clock automatically changes from 2:00
AM
to 3:00
AM (forward one hour).
DST end: Daylight-saving time ends on
the last Sunday in October
.
The VCR
clock automatically changes from 2:00
AM
to 1:00
AM (back one hour).
remember that any part of a scheduled
T
imer Recording that falls between these
two times will not be recorded.
AUT
O:
the VCR is using the clock data
Broadcast by the local
TV stations.
IN
:
Y
ou want to use the DST
function, and
you are leaving in the area that apply
Daylight-saving time.
O
U
T
:
Y
ou are not leaving in the area that
apply Daylight-saving time and you do not
want to use DST function.
2) Set
“TIME ZONE
”.
If you select
“AUT
O
” for your time zone,
the VCR sets the clock using the first
Coordinated Universal
T
ime information it
finds. If the time is not correct, select
another time zone or use the
“MANU
”
option.
3)
Set
“CLOCK DA
T
A
CH
”.
If you don't know the clock data channel,
select
“AUT
O
”.
The VCR will scan
automatically to tune the channel carrying
the clock data.
If
AUT
O CLOCK SET
is unsuccessful, set the
time and date through the
“MANU
” clock
set menu selection.
10
Press
PROG.
.
Now the clock starts.
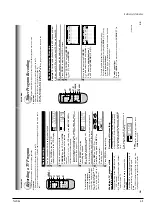
Setting the Clock
Example:
T
o
set the clock to 2:30 p.m. on
August 25 (summer time) 2000.
1
Press
PROG.
.
The MENU screen appears on the
TV
.
2
Select
“PRESET
” using
CURSOR ( )
or
( )
, and press
ENTER
.
3
Press
ENTER
to select
“CLOCK SET
”.
4
Select
“AUT
O
” or
“MANU
” using
CURSOR (
▲
) or
(
▼
).
AUT
O
:
The VCR automatically sets or
adjusts the clock.
If you select
“AUT
O
” mode, proceed to step
8
.
MANU
:
Y
ou can set the clock manually
.
If you select
“MANU
” mode, proceed to next
step.
5
V
ary the digits to set the hour
.
CURSOR
▲
:
T
o
increase.
CURSOR
▼
:
T
o
decrease.
6
Move to the next using
CURSOR ( )
(T
o move back, press
CURSOR ( )
.)
7
Repeat step
5
and
6
to set the minutes,
month, day
, and the year (by the last
two digits).
Proceed to step
10
to start the clock.
E
n
D : PROG
SET UP
PRESET
PROGRAM
ENTER
CLOCK SET
CH MEMORY
▼
▼
▼
▼
▼
▼
E
n
D : PROG
SET UP
PRESET
PROGRAM
ENTER
CLOCK SET
SUMMER TIME
TIME ZO
n
E CH
AUT
O
AUT
O
AUT
O
PRESS E
n
TER
T
O
ST
AR
T SETTI
n
G
E
n
D : PROG
SET UP
PRESET
PROGRAM
ENTER
CLOCK SET
SUMMER TIME
TIME ZO
n
E CH
AUT
O
AUT
O
AUT
O
AUT
O
2
SCA
nn
I
n
G
n
O
W
*
The clock is
revised by
broadcasting
signal at 8:00
A.M
every morning.
14
E
n
D : PROG
SET UP
PRESET
PROGRAM
TAPE LE
n
GTH
120 160 180
SAP SET
on off
COU
n
TER MEM
on off
LA
n
GUAGE E
n
G FRA ESP
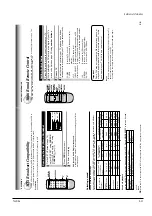
Optional settings on the SET UP screen
Other optional settings can be made. Press
ENTER
while
“SET UP
” is selected on the MENU screen.
The screen turns to the SET UP screen.
T
o
exit, press
PROG.
twice.
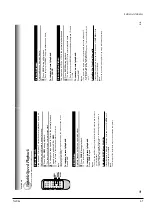
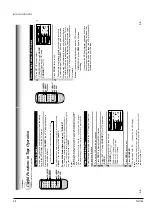
Setting the Language
1
Press
POWER
to turn on the VCR.
2
Press
PROG.
.
The following screen appears on the
TV
.
Page 22
PREP
ARA
TION
Initial Settings Using On-screen Display
The language selection and clock setting must be set first when VCR is first plugged in or after it
encounters a power failure.
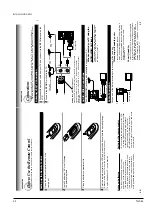
Preparation
•
Turn on the TV, and select the video channel (3 or 4), or the video input mode if you made the Audio/Video
connection (page 11).
•
Press
VCR
to set the remote control operating the VCR.
Page 28
3
Select the language using
CURSOR
(
▲
) or (
▼
) , and press
PROG.
.
The screen turns to the MENU screen.
Page 23
4
Press
PROG.
to return to the normal
TV screen.
ME
n
U
SET UP
PRESET
E
n
D : PROG
ENTER
PROGRAM
E
n
D : PROG
SET UP
PRESET
PROGRAM
English
Fran
ç
ais
Espa
ñ
ol
PO
WER
VCR
PR
OG
CURSOR
To change the language, move down here and set to the desired one.
Summary of Contents for W603C
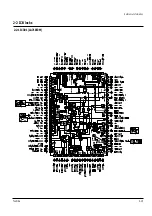
Page 20: ...Reference Information Toshiba 2 13 2 2 1 IC301 LA71072M 2 2 IC Blocks ...
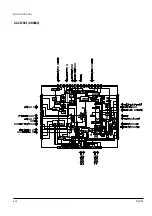
Page 21: ...Reference Information 2 14 Toshiba 2 2 2 IC501 AN3662 ...
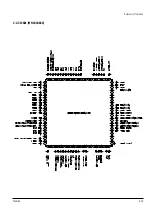
Page 22: ...Reference Information Toshiba 2 15 2 2 3 IC601 MN101D02X ...
Page 23: ...Reference Information 2 16 Toshiba MEMO ...
Page 25: ...Product Specifications 3 2 Toshiba MEMO ...
Page 56: ...Alignment and Adjustment Toshiba 5 11 Fig 5 21 Main PCB Top View VR501 Location for VR501 ...
Page 57: ...5 12 Toshiba Alignment and Adjustment MEMO ...
Page 59: ...Exploded View 6 2 Toshiba 6 1 Packing Assembly A702 A701 A702 Y101 Y102 UT01 ...
Page 63: ...Exploded View 6 6 Toshiba MEMO ...
Page 73: ...Replacement Parts List 7 10 Toshiba MEMO ...
Page 74: ...Toshiba 8 1 8 Block Diagram ...
Page 75: ...Block Diagram 8 2 Toshiba MEMO ...
Page 76: ...Toshiba 9 1 9 PCB Diagrams 9 2 9 3 9 3 9 3 9 1 Main 9 2 VFD 9 3 Jack 9 4 Key ...
Page 77: ...PCB Diagrams 9 2 Toshiba 9 1 Main ...
Page 78: ...PCB Diagrams Toshiba 9 3 9 2 VFD 9 3 Jack 9 4 Key ...
Page 79: ...PCB Diagrams 9 4 Toshiba MEMO ...
Page 82: ...Schematic Diagrams Toshiba 10 3 10 1 S M P S Power ...
Page 83: ...Schematic Diagrams 10 4 Toshiba IC601 VFD 10 2 Logic ...
Page 85: ...Schematic Diagrams 10 6 Toshiba 10 3 A V ...
Page 87: ...Schematic Diagrams 10 8 Toshiba 10 4 Hi Fi MTS ...
Page 89: ...Schematic Diagrams 10 10 Toshiba 10 5 TM Block Input Ouput ...
Page 90: ...Schematic Diagrams Toshiba 10 11 10 6 VFD ...
Page 91: ...Schematic Diagrams 10 12 Toshiba 10 7 Remote Control ...


