


FILE NO. SVM-07008
– 87 –
No.
Part name
Procedures
Remarks
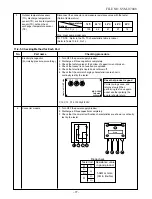
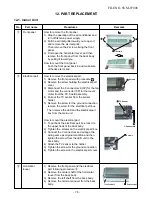
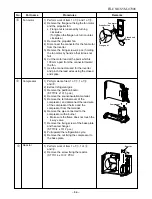
1. Detachment
1) Perform work of item 1 of
1
and 1 of
2
.
Requirement:
Perform the work on a corrugated
cardboard, cloth, etc. to prevent
scratches to the product.
2) Remove the front cabinet, and place it
down so that the fan guard side faces
downwards.
3) Remove the hooking claws by pushing a
minus screwdriver according to the arrow
mark in the right figure, and remove the
fan guard.
2. Attachment
1) Insert the claws of the fan guard in the
hole of the front cabinet. Push the hooking
claws (8 positions) by your hand and fix
the claws.
Requirement:
This completes all the attaching
work. Check that all the hooking
claws are fixed to the specified
positions.
†
Fan guard
Minus screwdriver
Hooking claw
Summary of Contents for RAS-10N3ACV Series
Page 16: ...FILE NO SVM 07008 15 4 2 Outdoor Unit C L C L ...
Page 17: ... 16 FILE NO SVM 07008 5 WIRING DIAGRAM 5 1 Indoor Unit ...
Page 18: ...FILE NO SVM 07008 17 5 2 Outdoor Unit ...
Page 83: ...FILE NO SVM 07008 82 P C board layout Solder side ...
Page 94: ...FILE NO SVM 03008 87 TOSHIBA CARRIER CORPORATION ...


