background image

4.USING N/W-FAX DRIVER (NETWORK FAX)

98    Sending Network Faxes

4

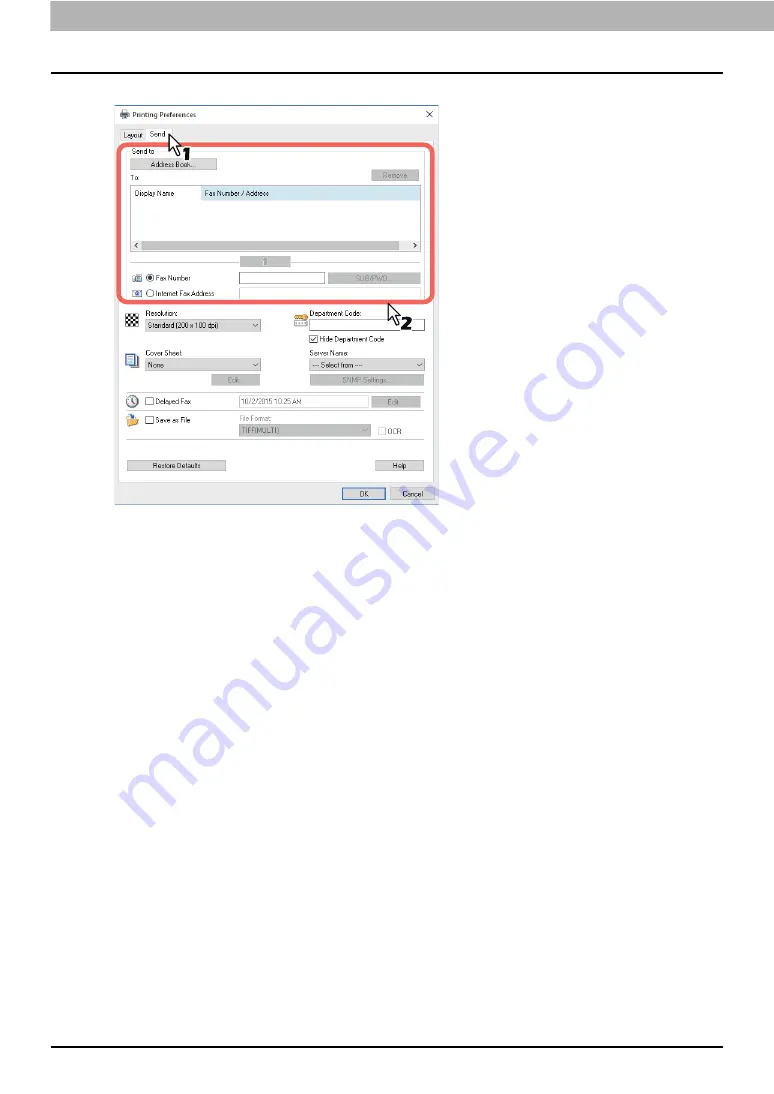
Click the [Send] tab and specify the recipients.

To specify recipients, enter them with the keyboard or select them from the address book.

 P.101 “Specifying Recipients of Network Faxes”

On the [Send] tab, you can set the resolution of a fax cover sheet, etc. as well as specifying the 
recipients.

 P.114 “Setting up the [Send] tab”

On the [Layout] tab, you can set the size and the orientation of the paper.

 P.113 “Setting up the [Layout] tab”

5

Confirm the recipients and click [OK].

The transmission settings are determined and the N/W-Fax driver properties dialog box is closed.

Summary of Contents for GD-1370

Page 1: ...MULTIFUNCTIONAL DIGITAL COLOR SYSTEMS MULTIFUNCTIONAL DIGITAL SYSTEMS Fax Guide GD 1370 ...

Page 2: ... 2016 TOSHIBA TEC CORPORATION All rights reserved Under the copyright laws this manual cannot be reproduced in any form without prior written permission of TTEC ...

Page 3: ...direction Example A4 size original on the original glass Paper or originals of A3 B4 LD or LG can only be placed in a landscape direction therefore R is not added to these sizes Indicates a potentially hazardous situation which if not avoided could result in death serious injury or serious damage or fire in the equipment or surrounding objects Indicates a potentially hazardous situation which if n...

Page 4: ...paper in the A B format If you use paper in the LT format the display or the order of buttons in the illustrations may differ from that of your equipment Abbreviations in this manual In this manual Dual Scan Document Feeder DSDF and Reversing Automatic Document Feeder RADF are collectively referred to as Automatic Document Feeder ADF In this manual Dual Scan Document Feeder is referred to as DSDF ...

Page 5: ...ovided with this product It is designed to be connected to a compatible modular jack that is also compliant See installation instructions for details The REN is used to determine the number of devices that may be connected to a telephone line Excessive RENs on a telephone line may result in the devices not ringing in response to an incoming call In most but not all areas the sum of RENs should not...

Page 6: ...he appropriate Terminal Equipment Technical Requirements document s The Department does not guarantee the equipment will operate to the user s satisfaction Before installing this equipment users should ensure that it is permissible to be connected to the facilities of the local telecommunications company The equipment must also be installed using an acceptable method of connection The customer sho...

Page 7: ...de débrancher un appareil à la suite de réparations ou de modifications effectuees par l utilisateur ou à cause de mauvais fonctionnement Pour sa propre protection l utilisateur doit s assurer que tous les fils de mise à la terre de la source d énergie électrique des lignes téléphoniques et des canalisations d eau métalliques s il y en a sont raccordés ensemble Cette précaution est particulièremen...

Page 8: ... respond to incoming ringing when connected to the extension socket This device is equipped with pulse dialling while the Telecom standard is DTMF tone dialling There is no guarantee that Telecom lines will always continue to support pulse dialling Use of pulse dialling when this equipment is connected to the same line as other equipment may give rise to bell tinkle or noise and may also cause a f...

Page 9: ...the use of this product in restricted working environments may be an electromagnetic interference with other devices or machines in the nearby surrounding area This can result into malfunction including data loss data error pertaining to this product or the other devices machines involved in the electromagnetic interference Furthermore for general safety reasons the use of this product in environm...

Page 10: ...oduct from operating or functioning correctly which arises from or is attributable to either acts omissions events or accidents beyond the reasonable control of TOSHIBA TEC CORPORATION including without limitation acts of God war riot civil commotion malicious or deliberate damage fire flood or storm natural calamity earthquakes abnormal voltage or other disasters additions modifications disassemb...

Page 11: ...y using a phone line Network Fax function The Network Fax features can simplify and facilitate your office facsimile needs and enables you to send fax or Internet Fax digital documents directly from your computer Installing the highly intuitive network N W Fax driver software enables you to send fax or Internet Fax digital documents from your computer to one or more recipients ...

Page 12: ...12 General Precautions ...

Page 13: ...on 47 Receiving a Fax 49 Originals and paper 49 Reception mode 52 Checking Communication Status 54 Checking reserved transmissions 54 Checking communication log 55 Canceling the Transmission 57 Canceling memory transmission job 57 Pausing transmission 59 Canceling reserved transmissions 59 Chapter 3 USING THE FAX UNIT USEFUL FUNCTIONS Prioritizing Transmissions Priority Reserve 62 Communicating to...

Page 14: ...res 96 Sending Network Faxes 97 When password entry is required 99 When LDAP authentication is enabled 100 Specifying Recipients of Network Faxes 101 Entering recipients from the keyboard 101 Selecting recipients from the address book 103 Selecting recipients from the address book Search option 105 Removing recipients 111 Setting up the N W Fax Driver 112 Making the initial settings of the N W Fax...

Page 15: ...nternet faxes 140 Chapter 6 PRINTING LISTS AND REPORTS TRANSMISSION JOURNAL 142 RECEPTION JOURNAL 144 RESERVATION LIST 146 MAILBOX RELAY BOX REPORT 147 MEMORY TRANSMISSION REPORT 148 TRANSMISSION REPORT 149 MULTI TRANSMISSION REPORT 150 MULTI POLLING REPORT 151 RELAY TX ORIG TERMINAL REPORT 152 RELAY TX RELAY STATION REPORT 153 RELAY TX END TERMINAL REPORT 154 RELAY STATION REPORT 155 MAILBOX RECE...

Page 16: ...16 CONTENTS ...

Page 17: ...EFORE USING FAX This chapter describes the basics of the FAX Unit you should learn before you start using it Description of Each Component 18 Control panel 18 Touch panel 18 Options 20 Connecting Cables 21 ...

Page 18: ...are displayed 4 Clear All Dest button P 44 This is to clear all the displayed recipients in the destination indication area 5 Alert message indication area Messages are shown here to inform you of various alerts such as the replacement time of toner cartridges and waste toner boxes or the existence of a received Secure Receive fax job 6 Original size setting button P 33 This is to set the original...

Page 19: ... address book is available For details about the shared address book refer to the TopAccess Guide 17 Recipient selection method switch tab P 39 This is to switch the selection method of the recipients 18 On hook transmission Off hook transmission button P 47 This is to perform on hook transmission or off hook transmission when an external telephone is connected 19 Help button This is to view the e...

Page 20: ...s This section describes the options related to the fax function FAX Unit This unit enables the use of the fax function Two fax units can be installed in one piece of equipment at a maximum Install two fax units if you want to send receive faxes using 2 lines ...

Page 21: ...STUDIO7506AC Series e STUDIO8508A Series 1 LINE Connect a telephone line 2 LINE2 Connect a telephone line when multiple fax units are installed 3 TEL Connect an external telephone Do not connect the MFP and the external telephone to a telephone connector in parallel Use the external telephone without an answerphone or with the function off to be connected with the TEL 2 1 3 2 1 3 ...

Page 22: ...1 BEFORE USING FAX 22 Connecting Cables ...

Page 23: ...ns 33 Specifying the recipient 39 Displaying the preview 45 On hook transmission Off hook transmission 47 Receiving a Fax 49 Originals and paper 49 Reception mode 52 Checking Communication Status 54 Checking reserved transmissions 54 Checking communication log 55 Canceling the Transmission 57 Canceling memory transmission job 57 Pausing transmission 59 Canceling reserved transmissions 59 ...

Page 24: ... press on it with force If the original is any of the following sizes it is automatically rotated and sent as described below A4 to A4 R A5 R to A5 B5 R to B5 LT to LT R ST R to ST You need to select the original size by yourself when placing the following originals whose sizes cannot be detected correctly Highly transparent originals e g overhead transparencies tracing paper Totally dark original...

Page 25: ...e original glass This section describes how to set an original on the original glass Originals are sent in the order they are placed on the original glass Do not place any heavy objects 4 kg 9 lb or over on the original glass and do not press on it with force Breaking the glass could injure you 1 Raise the original cover or ADF and place the original with its face down Raise it at least 60 degrees...

Page 26: ...Terminal ID For details about the registration method of the Terminal ID refer to the MFP Management Guide 3 Lower the original cover or ADF slowly Placing the original s on the ADF This section describes how to set the original s on the ADF When the originals are placed on the RADF the uppermost page is the first to be scanned and sent 1 After aligning the originals place them with their face up ...

Page 27: ...ient is carried out so that the pre entered sender information is printed in position B in the figure The pre entered sender information shows what is registered in the Terminal ID For details about the registration method of the Terminal ID refer to the MFP Management Guide Placing 2 sided originals To set 2 sided originals of the LT A4 size change their direction depending on their bound positio...

Page 28: ...ition P 33 Setting the transmission conditions Notes for using the ADF Do not use the following types of original as they may cause a paper misfeed or damage to the equipment 1 Originals that are folded or curled 2 Originals with carbon copies 3 Originals that have been taped pasted or cut out 4 Originals with multiple holes punched e g loose leaf paper 5 Originals that have been clipped or staple...

Page 29: ...used but need extra care 1 Originals that you cannot slide with your fingers or whose surface is specially treated They should be fanned well before loading since they may not be able to be separated from each other at feeding 2 Originals that are folded or curled They should be smoothed out before being loaded 1 3 4 2 6 11 7 9 10 5 8 1 2 ...

Page 30: ...USING THE FAX UNIT USEFUL FUNCTIONS 1 Place the original s Check the original size and scanning range etc Place the original s in the correct direction on the original glass or ADF P 24 Placing an original 2 Press Fax on the Home screen The fax screen is displayed If you leave the screen unattended for the period of the auto clear setting time 45 sec by default the screen returns to the default on...

Page 31: ...to memory Once a connection has been made this equipment automatically starts sending the scanned document In the direct transmission mode the fax number is dialed immediately and the scanned document will be sent Transmission conditions can be set in the transmission condition setting screen If memory becomes full during scanning in the memory transmission mode that original will not be stored in...

Page 32: ...e next original place it on the original glass and then press the START button on the control panel Once all the originals are scanned press Job Finish If you place an original on the ADF and press Continue during scanning the confirmation screen for the next original can be displayed after the scanning is completed If you leave the screen unattended for a period of the auto clearance setting time...

Page 33: ...iginal size 1 Press in the Fax menu 2 Select the original size and press OK Original Size Set the scan size of the original Auto The size of the original is automatically determined before the original is scanned Different Width Select this function to load the originals with different width into the ADF Specified size The original is scanned at the preset size regardless of its actual size If the...

Page 34: ...an original with ultra fine illustrations Fine This is suitable for an original with small size text and fine illustrations Standard This is suitable for an original with regular size text If the recipient s fax machine is not capable of receiving originals at the same resolution the resolution is automatically converted before being sent to the recipient The higher the resolution is the longer it...

Page 35: ...me value as the one which can be set on the Fax menu For details see the following page P 35 Setting other transmission conditions Original Mode Set the scanning mode based on the type of the original Text Photo This is suitable for an original with a mixture of text and photos Text This is suitable for an original with text and line drawings Photo This is suitable for an original with photos Expo...

Page 36: ... fax transmission mode Memory Tx Send the original after the scanned data are saved in the memory Up to 100 transmissions of up to 1000 pages per 1 transmission can be reserved Direct Tx Send the original directly as it is being scanned Once a page has been scanned and sent the next page is scanned and sent Therefore it takes longer to scan and send all pages However you can confirm on the fly tha...

Page 37: ...cation Password for SUB PWD Password Password for SEP Internet Fax This is not used for sending a standard fax Subject The subject of the Internet Fax Body The body of the Internet Fax Both the sender and the receiver must have the ECM function to make ECM communication available When affected by noise during communication communication time is slightly longer than usual Even when the ECM communic...

Page 38: ...l is displayed Press Option The screen above is displayed when the original placed on the original glass If you place an original on the ADF and press Continue during scanning the confirmation screen for the next original is displayed after the scanning is completed If you press Stop displayed on the screen during scanning it will be halted and the confirmation screen for the next original can be ...

Page 39: ...memory transmission mode you can send the same document to multiple recipients up to 400 recipients at once When Multi is pressed after the fax number has been entered it will be added to the recipient list displayed on the left hand side of the screen Repeat this operation until you specify all recipients You can also specify up to a total of 400 recipients fax numbers by combining with other ent...

Page 40: ...irm the selected recipient or delete an unnecessary recipient press it in the recipient list displayed on the left hand side of the screen P 44 Confirming Deleting the recipients To refine your search only for items including specified characters press P 41 Searching from the address book or LDAP server When you set your favorite or index items in the address book in the registration the correspon...

Page 41: ... and press To display the recipient search menu press while the address list is displayed To display the group search menu press while the group list is displayed 2 Enter the keyword in the category which you want to use for searching Press Search You can search for the desired recipient s fax number by specifying multiple keywords You can search for contacts even if you enter the partial strings ...

Page 42: ... with the corporate name registered in the address book Dept Use this when you want to search with the department registered in the address book Keyword Use this when you want to search with the characters written in the Keyword which are registered in the address book Fax No Use this when you want to search with the fax number registered in the address book E mail Use this when you want to search...

Page 43: ...g the group in the address book In the address book you can specify the group to which you want to send a fax 1 Press the tab to select the group to send a fax to To cancel the selected group press it again To confirm the fax number or the E mail addresses registered in the group press Contents To delete an unnecessary recipient press it in the recipient list displayed on the left hand side of the...

Page 44: ...ed recipient appear Details of the members included in the group cannot be confirmed with this operation Press Contents when the group is selected P 43 Specifying the group in the address book Press Clear All Dest to delete all recipients displayed in the list 2 Confirm the recipients on the screen displayed Press Clear to delete the recipients or groups from the recipient list 3 When Clear is pre...

Page 45: ... on hook transmission or off hook transmission you cannot use the preview function 1 Press Preview on the fax menu To use the preview function press Preview before pressing Send 2 Specify the recipient and set the transmission conditions Press Send For details about how to specify the recipient and set the transmission conditions see the following pages P 33 Setting the transmission conditions P 3...

Page 46: ...e original glass or in the ADF and then press START button When a page to confirm is selected it is enlarged and the preview operation such as the enlargement reduction of the display or the deletion replacement insertion of a page becomes possible To delete the page being previewed press Delete Page To replace the page being previewed with another page press Replace Page To insert another scan be...

Page 47: ...ginal 2 Press Fax on the Home screen 3 Set the transmission conditions P 33 Setting the transmission conditions 4 Press Monitor Make sure that you hear the dial tone from the built in speaker To cancel the operation press Monitor again When you specify the recipients by searching them perform the next procedure in advance In this case specify the recipients and then press Dial 5 Specify the recipi...

Page 48: ...onditions P 33 Setting the transmission conditions 4 Pick up the handset of the external telephone When you specify the recipients by searching them perform the next procedure in advance Press Dial after specifying the recipients 5 Use the external telephone to dial the fax number P 39 Specifying the recipient When you use the external telephone to dial the machine dials each number you enter If y...

Page 49: ...Drawers can be set for fax use only For details of the operation refer to the Paper Preparation Guide Default setting for Rx printing To print the received fax the paper with the same width as the original is used Depending on the length of the original Rx reduction printing or Discard printing both of them are set to ON by default are applied For details about the setting Rx printing refer to the...

Page 50: ...responding paper size is not available in most cases the scanned original is printed on paper of a larger size However the sender s fax machine may reduce the scanned original to fit the paper size available in the recipient s fax machine this equipment Ex LD to LT The paper priority varies according to the Rx reduction printing and Discard printing settings For details contact your service techni...

Page 51: ... reduce the scanned original to fit the paper size available in the recipient s fax machine this equipment Ex A3 to A4 The paper priority varies according to the Rx reduction printing and Discard printing settings For details contact your service technician A3 A4 A5 A5 R A4 R A4 R A4 R A4 A4 R B4 A3 B4 B5 A4 R A4 B5 B5 R A3 A3 B5 B4 A3 1 2 3 4 5 6 7 8 FOLIO FOLIO FOLIO B4 FOLIO B4 A3 B4 B4 A4 A3 A...

Page 52: ...rom a Recipient Polling Communication P 66 Using the Mailbox Function Auto reception Faxes are automatically received during an incoming call Users do not have to do anything when receiving a fax When multiple fax units are installed the reception mode of the 2nd line is limited to Auto reception Manual reception Faxes are manually received by using an external telephone when you have an incoming ...

Page 53: ...ears press Receive on the touch panel or the START button on the control panel Replace the handset of the external telephone Memory reception The received fax data are stored in the memory the faxes are automatically printed as soon as the equipment becomes ready As the memory reception function is always enabled you do not need to make any setting ...

Page 54: ... Status column the status of each job is indicated as follows Line1 Sending on the 1st line Line2 Sending on the 2nd line Network Reserved for sending via Internet Fax Delayed Reserved with the time to send specified Wait Communication is in the standby queue Invalid Under standby due to an invalid department code Network Fax Confirm the department code and delete any unnecessary reserved transmis...

Page 55: ...ERATION Checking Communication Status 55 USING THE FAX UNIT BASIC OPERATION Checking communication log You can check the log of fax transmissions and receptions 1 Press Job Status 2 Select the Log tab and then press Send or Receive ...

Page 56: ...ission or reception failed For details about the error codes refer to the Software Troubleshooting Guide The Send and Receive logs can be downloaded to a USB storage device For details refer to the MFP Management Guide Registering recipients fax numbers to the address book To register recipient s fax numbers in the address book from the send receive log screen select a record in the send or receiv...

Page 57: ...to cancel the memory transmission when an original is placed on the original glass 1 When scanning is completed the confirmation screen for the next original is displayed Press Job Cancel If you leave the screen unattended for a period of the auto clearance setting time 45 sec by default after the confirmation screen for the next original is displayed a copy of the scanned originals is sent 2 The ...

Page 58: ... screen while the originals are being scanned Scanning is paused 2 The confirmation screen for the next original is displayed Press Job Cancel If you press Job Finish the scanned originals are sent If you leave the screen for the next original unattended for the period of the auto clear setting time 45 sec by default after it appears the scanned originals are sent 3 The confirmation screen is disp...

Page 59: ...issions and cancel the reserved transmissions that are in the queue or in progress 1 Press Job Status and then press Fax The list of the reserved transmissions is displayed This step is the same as that for checking the reserved transmission P 54 Checking reserved transmissions 2 Select the reserved transmission you want to delete and then press Delete More than one job can be selected In the Stat...

Page 60: ...2 USING THE FAX UNIT BASIC OPERATION 60 Canceling the Transmission ...

Page 61: ...iginals mailbox transmission 70 Creating modifying and deleting a mailbox mailbox transmission 73 Dialing numbers by Chaining Multiple Sets of Numbers Chain Dial Communication 79 Sending Faxes at Specified Dates and Times Delayed Transmission Reservation 80 Resending Unsent Data Recovery Transmission 82 E mailing Data Received Via the Mailbox Onramp Gateway 83 Sending Data Received by E mails Via ...

Page 62: ...fault setting when transmission is completed 1 Place the original s P 24 Placing an original 2 Press Fax on the Home screen 3 Set the transmission conditions P 33 Setting the transmission conditions 4 Press Option Advanced Priority Reserve 5 Press OK 6 Specify the recipient s fax number P 39 Specifying the recipient In the priority transmission mode you cannot specify multiple recipients fax numbe...

Page 63: ...ception Storing data of originals in the memory polling transmission Upon request of a recipient s fax machine this equipment sends an original document stored into the memory to the recipient By setting a recipient s fax number to an original stored into the memory you can permit specific recipients to receive the original using the polling transmission 1 Place the original s P 24 Placing an orig...

Page 64: ...emory by canceling the polling transmission P 54 Checking reserved transmissions Requesting to send data of originals polling reception This equipment requests the sender s fax machine to send the data of the originals 1 Press Fax on the Home screen 2 Press Option Advanced Polling 3 Press OK 4 Specify the sender s fax number P 39 Specifying the recipient This equipment supports two types of recept...

Page 65: ...SING THE FAX UNIT USEFUL FUNCTIONS 5 Press Send P 30 Sending a Fax With the delayed transmission reservation you can perform the polling reception on a specific date and time To do that set the date and time before pressing Send P 80 Sending Faxes at Specified Dates and Times Delayed Transmission Reservation ...

Page 66: ...ored in the mailbox Relay station mailbox Using this mailbox an original sent from a fax machine is relayed to pre registered multiple recipients To inform a user of the result of the relay a report called RELAY TX END TERMINAL REPORT can be sent to a specific recipient A copy of the original can be printed out regularly or when an error occurs Example of how to use the relay station mailbox If yo...

Page 67: ... mailbox in the equipment To register the originals to confidential or bulletin board mailbox the confidential or bulletin board mailbox must be created in advance P 73 Creating modifying and deleting a mailbox mailbox transmission 1 Place the original s P 24 Placing an original 2 Press Fax on the Home screen 3 Set the transmission conditions P 33 Setting the transmission conditions 4 Press Option...

Page 68: ...ecessary to key in a password since it is not verified 7 Press the START button on the control panel When you cancel the registration press Stop displayed on the screen and then press Job Cancel Printing originals You can print the originals registered in the confidential or bulletin board mailbox in the equipment 1 Press Fax on the Home screen 2 Press Option Advanced ITU Mailbox 3 In the Box Type...

Page 69: ...ou have selected the bulletin board mailbox it is not necessary to key in a password since it is not verified 5 Press the START button on the control panel Deleting originals You can delete the originals registered in the confidential or bulletin board mailbox in the equipment 1 Press Fax on the Home screen 2 Press Option Advanced ITU Mailbox 3 In the Box Type group press Confidential or Bulletin ...

Page 70: ...letion is displayed Press Yes Sending and retrieving originals mailbox transmission This section describes the operations to the mailboxes in the recipient s fax machine Sending originals You can send originals to the confidential bulletin board relay station mailbox in the recipient s fax machine 1 Place the original s P 24 Placing an original 2 Press Fax on the Home screen 3 Set the transmission...

Page 71: ...lletin Bd or Relay In the Mode group press Transmit and then OK 6 Key in the box number and then press OK If a password has been set to the selected mailbox key in the password in the same way as the box number The box number and the password you specified here are sent to the recipient s fax machine as SUD box number and SID password of the command compatible with the ITU T standards ...

Page 72: ...on Retrieving originals You can retrieve originals from the confidential or bulletin board mailbox in the recipient s fax machine 1 Press Fax on the Home screen 2 Press Option Advanced ITU Mailbox 3 In the Box Type group press Confidential or Bulletin Bd In the Mode group press Polling and then OK 4 Key in the box number and then press OK If a password has been set to the selected mailbox key in t...

Page 73: ...s fax number P 39 Specifying the recipient 6 Press Send P 30 Sending a Fax Creating modifying and deleting a mailbox mailbox transmission This section describes how to manage the mailbox in the equipment In the list you can view the status of the mailbox registered to the equipment P 147 MAILBOX RELAY BOX REPORT Creating the confidential or bulletin board mailbox You can create the confidential or...

Page 74: ...n the Box Type group press Confidential or Bulletin Bd In the Mode group press Box Setup and then OK 4 Key in the box number a maximum of 20 digits and then press OK If you want to set a password a maximum of 20 digits key in the password in the same way as the box number ...

Page 75: ...r modify the relay station mailbox 1 Press Fax on the Home screen 2 Press Option Advanced ITU Mailbox 3 In the Box Type group press Relay In the Mode group press Box Setup or Modify and then OK 4 Key in the box number a maximum of 20 digits and then press OK If you want to set a password a maximum of 20 digits key in the password in the same way as the box number ...

Page 76: ...cannot be done with direct dialing 6 The confirmation screen for sending a relay transmission report is displayed If you want to send the report select Yes If not select No By default the relay transmission end terminal report is sent when a communication error occurs On the Admin menu you can make setting so that the report can be sent automatically For details of the operation refer to the MFP M...

Page 77: ...displayed If you want to print it out whenever a copy of the original is delivered press Always If you want to print it out only when an error occurs press the On Error Deleting a mailbox You can delete the confidential bulletin board relay station mailbox registered in the equipment The confidential and bulletin board mailbox in which the original is registered cannot be deleted To delete the mai...

Page 78: ...ss Confidential Bulletin Bd or Relay In the Mode group press Box Delete and then OK 4 Key in the box number and then press OK If a password has been set to the selected mailbox key in the password in the same way as the box number 5 The confirmation screen for the deletion is displayed Press Yes ...

Page 79: ...lly such as region code area code and fax numbers 1 Place the original s P 24 Placing an original 2 Press Fax on the Home screen 3 Set the transmission conditions P 33 Setting the transmission conditions 4 Press Option Advanced Chain Dial Comm 5 Repeat this operation until the desired number is formed P 39 Specifying the recipient You can form the dialing number which is up to 128 digits in length...

Page 80: ... send a fax to a country which has a time difference 1 Place the original s P 24 Placing an original 2 Press Fax on the Home screen 3 Set the transmission conditions P 33 Setting the transmission conditions 4 Press Option Advanced Delayed Tx Reserver 5 Key in the date hour and minute and then press OK The acceptable range of reservation is up to one month later Press and to move the cursor Specify...

Page 81: ...THE FAX UNIT USEFUL FUNCTIONS 7 Press Send P 30 Sending a Fax Canceling delayed transmission reservation You can cancel the delayed transmission reservation and send a fax in a normal manner On the reserved transmission confirmation screen select the transmissions job and then press Send P 54 Checking reserved transmissions ...

Page 82: ...is function or a period of time for the data to be retained can be set on the Admin menu For the details of the current setting ask your administrator 1 Press Fax on the Home screen 2 Set the transmission conditions P 33 Setting the transmission conditions 3 Press Option Advanced Recovery Tx 4 Select the transmission job and then press Send You can change the fax number which is specified with the...

Page 83: ...transmission For details of how to create modify delete a relay station mailbox see the following section P 73 Creating modifying and deleting a mailbox mailbox transmission To use the onramp gateway you need to set an E mail address and Internet Fax to the equipment For details of the operation refer to the TopAccess Guide ITU T Compatible G3 Fax machine Internet Intranet e STUDIO Relay Box Inter...

Page 84: ...g to a subaddress FAX xxxxxxxx T33S yyyy FQDN The fax number of the final recipient is specified in xxxxxxxx and the subaddress in yyyy e g In case that the fax number is 1234567890 the subaddress is 1234 and the domain name of this equipment FQDN is host1 toshibatec ifax com the fax should be sent to FAX 1234567890 T33S 1234 host1 toshibatec ifax com Setting up the SMTP server SMTP is a server pr...

Page 85: ... to back up the files in the shared folder to protect them from unexpected data loss events If the forced encryption function for PDF security is enabled this function is not available For the details of the security settings refer to the MFP Management Guide The PDF security may not be available depending on the equipment 1 Place the original s P 24 Placing an original 2 Press Fax on the Home scr...

Page 86: ...ns from MFP Local Remote 1 and Remote 2 5 Make the settings for the files to be saved File Name The file name can consist of a maximum of 128 characters However the trailing characters in a file name maximum 74 may be deleted depending on the type of letters used File Format PDF Press this button to store your scan as a PDF file TIFF Press this button to store your scan as a TIFF file The OCR func...

Page 87: ... format is selected it is applied to only the data saved in a shared folder When a file is saved in the shared folder of the hard disk in the MFP it is saved in the TXFAX folder under the FILE_SHARE folder When PDF SINGLE TIFF SINGLE or XPS SINGLE is selected another folder with the same file name is automatically created in the TXFAX folder in which the file is saved It is necessary to install th...

Page 88: ...2 file destinations from MFP Local Remote 1 and Remote 2 FTP FTPS When you finish the entry press OK Server Name Enter the IP address of FTP server For example if the data should be transferred to an FTP folder ftp 10 10 70 101 user01 scan key in 10 10 70 101 Network Path Enter a network path to an FTP folder where the data are to be stored For example if the data should be transferred to an FTP f...

Page 89: ...ngs for Server Name and Command Port are not required NetwareIPX NetwareIP When you finish the entry press OK Server Name When you select NetwareIPX enter either the server name of NetWare server or Tree Context if NDS is usable When you select NetwareIP enter the IP address of NetWare server Network Path Enter a network path to a NetWare server folder where the data are to be stored For example i...

Page 90: ... in the Super Sleep mode 1 Press Print on the Home screen The print screen is displayed If you leave the screen unattended for the auto clear setting time 45 sec by default the screen returns to the default one automatically 2 Select Secure Rx Line 1 or Secure Rx Line 2 If the equipment is running in the High Security mode Secure Rx Line 1 and Secure Rx Line 2 are not displayed 3 Select the desire...

Page 91: ...3 USING THE FAX UNIT USEFUL FUNCTIONS Printing Secure Receive fax jobs 91 USING THE FAX UNIT USEFUL FUNCTIONS 4 Enter the password for printing a received Secure Receive fax Press OK to start printing ...

Page 92: ...wing lists can be printed manually For details of the operation refer to the MFP Management Guide ADDRESS BOOK INFORMATION List of recipients registered in the address book GROUP NUMBER INFORMATION List of recipients registered in the address book as a group FUNCTION LIST List of the user settings Journal transmission journal reception journal You can print a list of transmissions and receptions T...

Page 93: ...IT USEFUL FUNCTIONS 3 Press Journal If Journal is pressed with the transmission reception records selected the journal of the selected file is printed Reservation list You can print a list of the reserved transmissions 1 Press Job Status 2 Press the Fax and then press Reservation List ...

Page 94: ...smission is completed the report is printed You have an option to add a reduced image of the transmitted document MULTI POLLING REPORT When a multi polling Rx is completed the report is printed RELAY TX ORIG TERMINAL REPORT When the document transmission from an originator terminal to a relay station is completed during the mailbox transmissions the report is printed You have an option to add a re...

Page 95: ...rom the address book Search option 105 Removing recipients 111 Setting up the N W Fax Driver 112 Making the initial settings of the N W Fax driver options 112 Setting print options for each print job 112 Setting up the N W Fax Driver Options 113 Setting up the Layout tab 113 Setting up the Send tab 114 Setting up the Cover Sheet 117 Setting up the SNMP 119 Setting up the Device Settings tab 121 Cu...

Page 96: ...signated printer that makes using the N W Fax driver quick and simple You can select the fax properties Fax properties are the attributes you can set to define sender and recipient information for processing fax jobs such as dialing options sender information fax resolution and page layout Other features include an easy to use fax scheduler that allows you to set up a date and time to transmit you...

Page 97: ... Setting up the N W Fax Driver 1 Start the application software and prepare the document to be sent 2 Select Print from the File menu in the application software The procedure for displaying the Print dialog box may differ from the above depending on the application software 3 Select TOSHIBA e STUDIO Fax for the printer and click Preferences The dialog box of the N W Fax driver properties appears ...

Page 98: ...ifying Recipients of Network Faxes On the Send tab you can set the resolution of a fax cover sheet etc as well as specifying the recipients P 114 Setting up the Send tab On the Layout tab you can set the size and the orientation of the paper P 113 Setting up the Layout tab 5 Confirm the recipients and click OK The transmission settings are determined and the N W Fax driver properties dialog box is...

Page 99: ...o the TopAccess Guide When password entry is required When the Enter the user credentials manually option is enabled on this equipment you are prompted to enter your user name and password before sending a fax When the dialog box appears enter your user name and password and then click OK Up to 128 characters can be entered in the User Name box Up to 64 characters in the Password box The user name...

Page 100: ... on the Send tab before sending a fax If you attempt to send a fax without specifying an LDAP server the Specify LDAP Server dialog box will appear to ask you to do so In this case specify the desired LDAP server in the Server Name box and click OK to send the fax If you want to change the settings of an LDAP authentication carry it out on the Device Settings tab P 121 Setting up the Device Settin...

Page 101: ...he N W Fax driver or a header page is set to be printed on the recipient s device all the recipient information may be printed If you want to secure the recipient information avoid sending a fax to multiple recipients at the same time To use the address book you need to register recipients in the address book of AddressBook Viewer in advance Entering recipients from the keyboard You can enter a re...

Page 102: ...ables the document to be transferred from the recipient s device to that of the sub address as the communication is in compliance with ITU T standard However in order to use this function the recipient s device must be a model in compliance with the ITU T standard 2 Click The recipients selected for To are listed To send faxes to several recipients repeat steps 1 and 2 to add the necessary fax num...

Page 103: ...X Specifying Recipients of Network Faxes 103 USING N W FAX DRIVER NETWORK FAX Selecting recipients from the address book Select recipients from the address book in the AddressBook Viewer 1 Click Address Book The AddressBook Viewer runs ...

Page 104: ...address is registered cannot be displayed in the Selected Fax You can select a recipient by the following operations Selecting a contact by dragging and dropping Drag a contact in the contact list and drop it to the Selected Fax or Selected Email Selecting a contact by double clicking on it Double click on a contact in the contact list To change the setting of the recipient to be selected upon dou...

Page 105: ...ressBook Viewer is closed and the recipients selected for To are listed When the fax transmission is completed the recipients are automatically removed from the To list Selecting recipients from the address book Search option You can find and select a recipient from the address book in the AddressBook Viewer 1 Click Address Book The AddressBook Viewer runs ...

Page 106: ...ork Faxes 2 Select Find from the Edit menu The Find Contact dialog box appears 3 Select an address book in Data Source To change the setting of the default address book in the Data Source box select View Default Configuration Data Source and then choose an address book ...

Page 107: ...n the above conditions proceed to step 6 If you want to set more detailed search conditions proceed to step 5 and set them in the Detail Setting tab However note that even if you enter the search conditions in both the Person and Detail Setting tabs you cannot perform searching in this combination at one time In the Person tab you do not have to fill in all the boxes and the string does not need t...

Page 108: ...eld Select Select an item to be searched Condition of search string Select a condition in the left hand box and then enter a search string in the right hand box The search condition is displayed in the Condition list To set more than one search condition repeat this operation as many times as needed To delete the search conditions select one and click Remove ...

Page 109: ...n the selected address book When the search is complete the contacts matching the search conditions are listed To stop searching click Stop Even if you enter the search conditions in both the Person and Detail Setting tabs only the search conditions in the tab currently displayed is used You cannot perform searching in the combined conditions on both tabs ...

Page 110: ...s registered cannot be displayed in the Selected Fax You can select a recipient by the following operations Selecting a contact by double clicking on it Double click on a contact in the list of the search results To change the setting of the recipient to be selected upon double clicking select Default Configuration Type Selection in the View menu and then one of Fax Email and Both Selecting a cont...

Page 111: ...AddressBook Viewer is closed and the recipients selected for To are displayed on the list When the fax transmission is completed the recipients are automatically removed from the To list Removing recipients You can remove a recipient from the To list in the N W Fax driver properties 1 Select a recipient and click Remove The selected recipient is removed ...

Page 112: ...ver 2008 click Start and select Control Panel Hardware and Sound and then Printers When using Windows 8 1 or Windows Server 2012 right click in the lower left of the screen then click Control Panel Devices and Printers 2 Right click TOSHIBA e STUDIO Fax and then select Printing preferences or Printer properties from a shortcut menu When using Windows Vista Windows Server 2008 select TOSHIBA e STUD...

Page 113: ...yout tab P 114 Setting up the Send tab P 117 Setting up the Cover Sheet P 119 Setting up the SNMP P 121 Setting up the Device Settings tab P 123 Customization Language tab P 124 Setting up LDAP servers Setting up the Layout tab On the Layout tab you can set the size and the orientation of the paper 1 Orientation Set the printing orientation of the document Portrait Data are printed vertically to t...

Page 114: ...ou can select the paper size of the document Setting up the Send tab In the Send tab you can specify the recipients and how the fax will be sent 1 Address Book Click to launch the AddressBook Viewer You can select recipients from the address book P 103 Selecting recipients from the address book 5 3 8 14 16 17 1 2 4 6 7 9 10 12 13 15 11 18 19 ...

Page 115: ... x 400 dpi Select this to send a document in Ultra Fine mode 400 x 400 dpi 8 Department Code Enter a department code of 1 to 63 characters if required When the department code is enabled on the MFP you must enter it to send a fax If you do not enter a department code when it is enabled on the MFP the Invalid Department Code Print Job is set to Store to invalid job list in TopAccess the job will be...

Page 116: ... box and specify date and time the job will be transmitted The job sent to the MFP will be stored in the Fax queue until the specified date and time P 126 Delayed transmission reservation 15 Save as File Select this to save up to 10 GB of documents in the file_share folder in the MFP as well as send the document as a fax and Internet Fax P 125 Saving a fax as a file When the cover sheet is set the...

Page 117: ...tion or Message only the first one page is displayed in the preview 2 Fonts Select the font to be used for the cover sheet Select the section for which the font is used and then click Edit to select the type style and size of the font Header Set the font to be used for the header of the cover sheet Title Set the font to be used for the title such as Reference Number Recipients Information Sender I...

Page 118: ...mpany Check this to have the recipient company name appear on the cover sheet Department Name Check this to have the recipient department name appear on the cover sheet Fax Number Check this to have the recipient fax number or Email address appear on the cover sheet 7 Sender Information Check this to have the sender s information appear on the cover sheet You can enter the information in up to 500...

Page 119: ...Be sure to have the correct SNMP version set for your MFP and select from the following options V1 V2 Select this option to enable SNMP V1 and V2 V3 Select this option to enable SNMP V3 V1 V2 V3 for Discovery Settings dialog box only Select this option to enable SNMP V1 V2 and V3 2 SNMP V1 V2 Community Name If a community name other than private default is set for the SNMP community name for your ...

Page 120: ...on when you want to use a user ID file Click Browse and specify the user ID file User Name Password Select this option when you want to use the user name and password When this option is selected enter or select the following items User Name Authentication Protocol Authentication Password Privacy Protocol Privacy Password If you select to enable SNMP V3 consult your network administrator for preli...

Page 121: ...od which is to be used Set it to correspond to that of your MFP Off Select this not to perform user authentication MFP Local Authentication Select this to perform MFP Local Authentication Windows Domain Authentication Select this to perform Windows Domain Authentication LDAP Authentication Select this to perform LDAP Authentication If the user authentication and project code are enabled in the equ...

Page 122: ... Set it to correspond to that of your MFP Enabled Select this to enable the fax function Disabled Select this to disable the fax function 6 Internet Fax Function Select whether or not the Internet Fax function is enabled Set it to correspond to that of your MFP Enabled Select this to enable the Internet Fax function Disabled Select this to disable the Internet Fax function 7 Customization The Cust...

Page 123: ...States Finnish Finland German Germany Italian Italy Spanish Spain Traditional Sort French France Norwegian Bokmal Norway Russian Russia Chinese Traditional Taiwan Turkish Turkey Japanese Japan Polish Poland Swedish Sweden Portuguese Brazil Auto is selected by default When Auto is selected the most appropriate printer driver language is automatically set according to the regional and language setti...

Page 124: ...r the desired LDAP server in this box if needed Up to 64 characters excluding can be entered for the Server Name box 3 Add Click this button to register the LDAP server in the Server Name List which has been entered in the Server Name box 4 Server Name List The registered LDAP servers are displayed in this list Up to 16 LDAP servers can be registered 5 Delete Click this button to delete an LDAP se...

Page 125: ... well as sending the document to fax numbers and Email addresses 1 Display the Send tab and select the Save as File check box 2 Select the file format in the File Format box 3 Specify the other options to send a document and click OK 4 Click OK or Print to send a document to the MFP The document is saved in the TXFAX folder in the file_share folder in the MFP The saved file contains the cover shee...

Page 126: ...ime 1 Display the Send tab and select the Delayed Fax check box 2 Click Edit The Scheduled Time dialog box appears 3 Select the date and time and click OK You can click the arrow in the Date box to display a calendar that allows you to select a date Enter the time to start the fax transmission You can use the up and down arrows 4 Specify the other options to send a document and click OK 5 Click OK...

Page 127: ...e default printer and an attempt is made to send a fax with a cover sheet added from Microsoft Excel using a N W Fax driver with an IPP port an XL error may occur and fax transmission may be impossible This error does not occur in application software other than Microsoft Excel If this error occurs perform one of the following and start sending a fax again Use 30 letters or less for the N W Fax dr...

Page 128: ...et in the Header Text box You can enter up to 63 characters for the header text 3 If you want a reference number identifying the document to appear on the cover sheet select the Reference Number check box and then enter the reference number in the text box You can enter up to 20 characters for the reference number ...

Page 129: ...ame Check this to have the department name of the recipient appear on the cover sheet Fax Number Check this to have the fax number or Email address of the recipient appear on the cover sheet Recipient information is obtained from the address book If the recipient is added manually this information does not appear on the cover sheet except for the fax number or Email address The recipient informati...

Page 130: ...40 characters for the subject 7 If you want a message to appear on the cover sheet select the Message check box and then enter the message in the text box You can enter up to 500 characters for the message 8 If you want to change the font of the characters on the cover sheet select the corresponding section in the Font for box and then click Edit The Font dialog box appears If you do not change th...

Page 131: ...ize and Script boxes and then click OK The Font dialog box is closed and the font settings are determined for the selected section If you want to change the font of other sections repeat the procedure from step 8 10If you want to attach an image file on the footer click Browse of Image File The Open dialog box appears If you do not attach an image file proceed to step 13 ...

Page 132: ...d the selected image file is attached Attach the image file in a bitmap format bmp within 1 MB 12Select the position of the image file Select this to align the image to the left Select this to align the image to the center Select this to align the image to the right 13Specify the other options to send a document and click OK 14Click Print to send a document to the MFP ...

Page 133: ...res 134 Precautions for Internet Fax Transmissions 136 Sending Internet Faxes 137 Sending Internet faxes 137 Setting advanced functions 139 Saving data sent in a file along with internet fax transmission 139 Receiving Internet Faxes 140 Available file formats 140 Receiving Internet faxes 140 ...

Page 134: ...nternet Fax equipment or the client computers When an Internet Fax is received it is automatically output just like a traditional fax Internet faxing requires the network settings configured by the network administrator Consult your network administrator for help With Internet Fax you can perform various transmissions as illustrated below Internet Fax Equipment to Internet Fax Equipment The equipm...

Page 135: ...ment as well When the equipment sends a copy of a document using Internet Fax the client computer receives the copy as TIFF FX Profile S images The MFP can print out only text files and image files in TIFF format from the client computer you cannot send files other than text or TIFF images to the MFP For available formats see the following section P 140 Available file formats E mail transmission L...

Page 136: ...copy of the document reaches your E mail server The security level of Internet transmissions is low We recommend traditional faxing when sending confidential documents Due to heavy line traffic Internet transmissions may take a while to arrive The configuration of the E mail server may prevent successful transmission if the data size of the sent document exceeds set limits When you send an Interne...

Page 137: ...ous paper widths press Different Width P 33 Setting the original size Resolution Select the resolution for scanning the original P 34 Setting the resolution For the setting items related to the internet fax which should be set as other transmission conditions see the following section P 35 Setting other transmission conditions Exposure Select the appropriate exposure for scanning the original Pres...

Page 138: ...ays applied even if you select U Fine in Resolution Internet faxing sends copies of A4 LT or LG size originals in the same size as the originals Originals larger than A4 LT or LG are reduced to A4 or LT whereas originals smaller than these sizes are sent as A4 or LT without being enlarged When either Text Photo or Photo is selected in Original Mode the transmission may take a while The administrat...

Page 139: ...currently reserved transmissions P 63 Communicating to a Request from a Recipient Polling Communication Saving data sent in a file along with internet fax transmission When sending an Internet fax you can also save the sent data in the equipment s shared folder and or a network folder Remote 1 or 2 To save the data in a network folder the administrator needs to set the equipment configuration For ...

Page 140: ... refer to the TopAccess Guide Receiving Internet faxes The equipment accesses the E mail server at specified intervals to check whether any E mail has been delivered New E mail is automatically received and printed out unless you check manually Receiving Internet Faxes automatically The administrator can set up the equipment configuration on TopAccess to automatically receive Internet faxes from t...

Page 141: ...NAL 144 RESERVATION LIST 146 MAILBOX RELAY BOX REPORT 147 MEMORY TRANSMISSION REPORT 148 TRANSMISSION REPORT 149 MULTI TRANSMISSION REPORT 150 MULTI POLLING REPORT 151 RELAY TX ORIG TERMINAL REPORT 152 RELAY TX RELAY STATION REPORT 153 RELAY TX END TERMINAL REPORT 154 RELAY STATION REPORT 155 MAILBOX RECEPTION REPORT 156 ...

Page 142: ...tion TO Communicated destination telephone number or name registered in the address book If the mark is indicated the 2nd fax number registered in the address book has been used DEPT Department code If the department control is not performed this field will become blank MODE Communication mode 2 digits and transmission method 3 digits or special communication mode 2 digits If the mark is indicated...

Page 143: ...Encoding systems 0 2 400 8 x 3 85 MH 1 4 800 8 x 7 7 MR 2 7 200 8 x 15 4 MMR 3 9 600 JBIG 4 12 000 5 14 400 16 x 15 4 6 V 34 7 8 300 dpi B 600 dpi D 150 dpi Display Special communication mode P Polling communication SB Mailbox communication S R R Relay mailbox communication SF F Forward mailbox communication ML Internet Fax communication I N W fax communication O Offramp Gateway communication ...

Page 144: ... FROM Communicated destination telephone number or name registered in the address book If the mark is indicated the 2nd fax number registered in the address book has been used DEPT Department code If the department control is not performed this field will become blank MODE Communication mode 2 digits and transmission method 3 digits or special communication mode 2 digits If the mark is indicated t...

Page 145: ...coding systems 0 2 400 8 x 3 85 MH 1 4 800 8 x 7 7 MR 2 7 200 8 x 15 4 MMR 3 9 600 JBIG 4 12 000 5 14 400 16 x 15 4 6 V 34 7 8 300 dpi B 600 dpi D 150 dpi Display Special communication mode P Polling communication SB Mailbox communication S R R Relay mailbox communication SF F Forward mailbox communication ML Internet Fax communication I N W fax communication O Offramp Gateway communication ...

Page 146: ... Reserved jobs which are made from a client computer FILE NO File number for communication DATE TIME Start date and time for communication FUNCTION Type of transmission reception PGS Number of pages for communication TO Communicated destination telephone number or name registered in the address book If the mark is indicated the recipient has been specified with the direct entry method If a G mark ...

Page 147: ...job FORWARD INBOUND FAX TSI History of forwarded jobs and inbound fax jobs TSI BOX NO Box number of the communication destination BOX TYPE Type of communication PGS Number of pages for communication FILE NO File number for communication DATE TIME Start date and time for communication FROM Originator of jobs END STATION ID code of the end station This field indicates an E mail address by a 4 digit ...

Page 148: ...cated the 2nd fax number registered in the address book has been used If the mark is indicated the recipient has been specified with the direct entry method DOCUMENT PAGES Number of original pages to be transmitted START TIME Start date and time for communication END TIME End date and time for communication PAGES SENT Number of pages for communication STATUS Communication result and error code OK ...

Page 149: ...onds form PGS Number of original pages transmitted TO Communicated destination telephone number or name registered in the address book If the mark is indicated the 2nd fax number registered in the address book has been used DEPT Department code If the department control is not performed this field will become blank MODE Communication mode 2 digits and transmission method 3 digits or special commun...

Page 150: ...ication END TIME End date and time for communication SUCCESSFUL Recipient whose communication was completed successfully UNSUCCESSFUL Recipient whose communication was completed abnormally ADDRESS BOOK Communicated destination name registered in the address book If the mark is indicated the 2nd fax number registered in the address book has been used FAX NUMBER Registered name of communicated desti...

Page 151: ...on date and time for communication START TIME Start date and time for communication END TIME End date and time for communication SUCCESSFUL Recipient whose communication was completed successfully UNSUCCESSFUL Recipient whose communication was completed abnormally ADDRESS BOOK Communicated destination name registered in the address book FAX NUMBER Registered name of communicated destination teleph...

Page 152: ...mmunication TO Communicated destination telephone number or name registered in the address book If the mark is indicated the recipient has been specified with the direct entry method RELAY BOX Box number of the communication destination DOCUMENT PAGES Number of original pages to be transmitted START TIME Start date and time for communication END TIME End date and time for communication PAGES SENT ...

Page 153: ...nsmitted FROM Telephone number of the originator START TIME Start date and time for communication END TIME End date and time for communication RELAY BOX Box number of the communication destination SUCCESSFUL Recipient whose communication was completed successfully UNSUCCESSFUL Recipient whose communication was completed abnormally GROUP NUMBER Group number of the communicated destination ADDRESS B...

Page 154: ...Telephone number of the originator START TIME Start date and time for communication END TIME End date and time for communication RELAY BOX Box number of the communication destination SUCCESSFUL Recipient whose communication was completed successfully UNSUCCESSFUL Recipient whose communication was completed abnormally GROUP NUMBER Group number of the communicated destination ADDRESS BOOK Communicat...

Page 155: ...rnal FAX NO 1 Sender s fax number line 1 FAX NO 2 Sender s fax number line 2 NAME Registered terminal ID FILE NO File number for communication DATE Reception date and time for communication RELAY BOX Box number of the communication destination DOCUMENT PAGES Number of original pages to be transmitted FROM Telephone number of the originator ...

Page 156: ...x number line 1 FAX NO 2 Sender s fax number line 2 NAME Registered terminal ID FILE NO File number for communication DATE Reception date and time for communication BOX NUMBER Box number of the communication destination BOX TYPE Type of communication DOCUMENT PAGES Number of original pages to be transmitted FROM Telephone number of the originator ...

Page 157: ...7 SPECIFICATIONS This chapter describes specifications of GD 1370 Specifications of GD 1370 158 ...

Page 158: ... R FOLIO LD LG LT LT R ST R COMP Recording Paper Size A B format A3 A4 A4 R A5 R B4 B5 B5 R FOLIO LD LG LT LT R ST R COMP Compatibility Communication Modes ECM Super G3 Communication Resolution Horizontal 8 dots mm 16 dots mm 300 dots inch Vertical 3 85 lines mm 7 7 lines mm 15 4 lines mm 300 dots inch Transmission Rate 33 600 31 200 28 800 26 400 24 000 21 600 19 200 16 800 14 400 12 000 9 600 7 ...

Page 159: ...r 115 Features Internet Fax 134 File Format 116 125 File formats 140 Fonts 117 Footer 117 FTP 88 FTPS 88 H Header Text 118 Help 116 Hide Department Code 115 I initial setting 112 Internet Fax 37 54 84 precautions 136 receiving 140 sending 137 Internet Fax Address 115 Internet Fax Function 122 ITU T 37 66 J Job Status 18 L Layout tab 113 Line Select 37 M Mailbox Communication 37 Mailbox Transmissio...

Page 160: ...ying the recipient in the address book 40 Recipient s Information 118 Redial function 32 Reference Number 118 Relay station mailbox 66 Remove 115 Removing recipients 111 Reserved transmissions 54 Resolution 34 115 137 Restore Defaults 116 118 120 S Save as File 116 125 Send tab 114 Sender Information 118 Sending Network Faxes 97 Server Name 116 124 Server Name List 124 SMB 89 SMTP server 84 SNMP S...

Page 161: ...Printed in Malaysia GD 1370 OME150067A0 ...

Page 162: ...JAPAN MULTIFUNCTIONAL DIGITAL COLOR SYSTEMS MULTIFUNCTIONAL DIGITAL SYSTEMS Fax Guide GD 1370 2016 TOSHIBA TEC CORPORATION All rights reserved Patent http www toshibatec co jp en patent 6LK55362100 R150620Q8101 TTEC Ver01 F1 Issued in Apr 2016 ...

Reviews: