background image

64

Function setup

Profiles

Press MENU.

The Main Menu appears.

Press   or   to highlight the Profiles
Menu 
icon.

Press   to highlight Edit Family or Edit
User (1–3)
.

Press    then   to highlight Preferences.
Press SELECT.

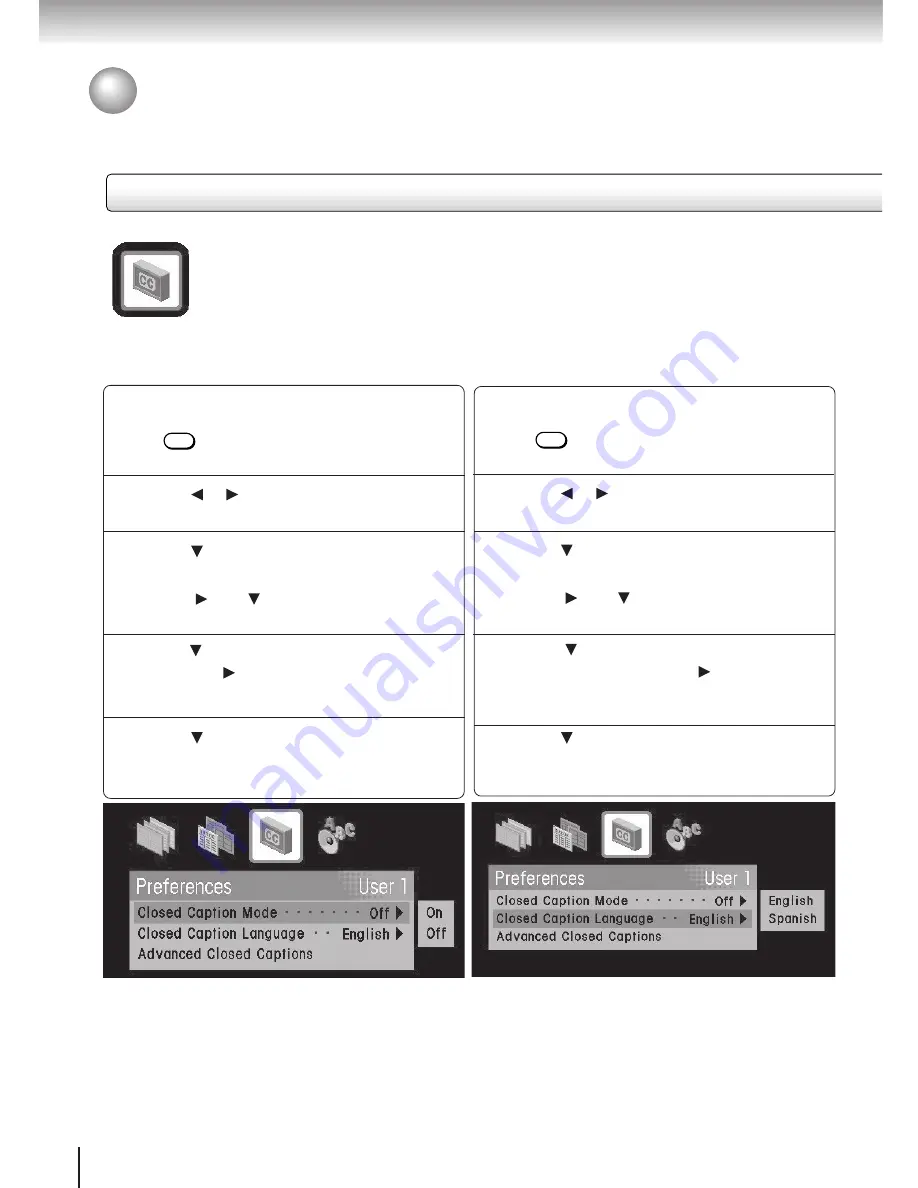
Press   to highlight Closed Caption Mode,
then press 


to display the mode sub-menu

.

Press   to highlight On or Off.

Preferences sub-menus (continued)

Customizing Profile Settings (continued)

Press MENU.

The Main Menu appears.

Press   or   to highlight the Profiles
Menu
 icon.

Press   to highlight Edit Family or Edit
User (1-3
).

Press    then   to highlight Preferences.
Press SELECT.

Press    to navigate to Closed Caption
Language
, then press 


to display the

language sub-menu

.

Press   to highlight English or Spanish.

2

1

4

5

3

Closed Caption
This menu contains menu options for
controlling Closed Captions.

2

4

5

3

1

Closed Caption Mode
This option turns closed captions on or off.

Closed Caption Language
This option allows you to select whether the
closed captions will be displayed in English or
Spanish (if available).

MENU

MENU

Summary of Contents for DST-3100

Page 1: ...53 Introduction Connections Installation ADVANCED PROGRAM GUIDE Menu System Profile Setup 67 Purchases 2003 Toshiba Corporation 79077213 PM0004882011 75 Scheduling 79 Additional Features 89 Support DIRECTV HIGH DEFINITION RECEIVER HDTV TUNER DST 3100 GUIDE MENU SELECT POWER 47 Search ...

Page 2: ...proved by Toshiba or parties authorized by Toshiba could void the user s authority to operate the equipment The lightning flash with arrowhead symbol within an equilat eral triangle is intended to alert the user to the presence of uninsulated dangerous voltage within the product s enclo sure that may be of sufficient magnitude to constitute a risk of electric shock to persons The exclamation point...

Page 3: ...3 Introduction In the spaces provided below record the Model No and Serial No located on the rear panel of your receiver Retain this information for future reference Model No Serial No ...

Page 4: ...ow all instructions 5 Do not use this apparatus near water 6 Clean only with a dry cloth 7 Do not block any ventilation openings Install in accordance with the manufacturer s instructions 8 Do not install near any heat sources such as radiators heat registers stoves or other apparatus including amplifiers that produce heat ...

Page 5: ...s combination to avoid injury from tip over S3125A 13 Unplug the apparatus during lightning storms or when unused for long periods of time 14 Refer all servicing to qualified service personnel Servicing is required when the apparatus has been damaged in any way such as power supply cord or plug is damaged liquid has been spilled or objects have fallen into the apparatus or the apparatus has been e...

Page 6: ...commission public service commission or corporation commission for information If your home has specially wired alarm equipment connected to the telephone line ensure the installation of your DST 3100 does not disable your alarm equipment If you have questions about what will disable alarm equipment consult your telephone company or a qualified installer Electrical Safety Advisory You should consi...

Page 7: ...ipment may be required in some markets Check with your retailer or visit DIRECTV com for information on availability of local channels from DIRECTV in your area For access to High Definition programming a triple LNB Multi Satellite dish antenna High Definition capable DIRECTV Receiver and High Definition television are required Satellite dish antenna is sold separately DIRECTV the Cyclone Design l...

Page 8: ...m Guide Advanced Grid Guide 37 Basic Grid Guide 37 Surf Guide 38 Banner Guide 38 General Guide Features 40 Purchase Menu 40 Menu System Menu Tree 44 Search Menu Main Search Window 48 Search Titles 49 Search Credits 50 Search Categories 51 Profile Setup Customizing Profile Settings 54 Edit User Profiles Selection 54 Edit Guide Channels 56 Favorite Channels Setup 57 Channel Block 58 Rating Limits 59...

Page 9: ...d the program guide and menus The up and down arrow keys also change channels when menus are not displayed GUIDE Press to display the on screen guide which lists all available programs MENU Press to display the menu system This will grant access to all user settings and allow for system locks to be implemented While in the menu system press the menu button on the front panel to exit Note the chann...

Page 10: ...ification of Controls continued INPUT RESOLUTION ACTION USER FAV Dash JUMP HOME SAT TV1 TV2 Switch MENU HELP Navigation MUTE INFO STYLE GUIDE Channel up and down Page up and down Numbered buttons SELECT EXIT POWER BACK Volume up and down ...

Page 11: ...remote control Do not use different types of batteries together or mix old and new batteries If you do not use the remote control for a long period of time remove the batteries to avoid possible damage from battery corrosion If the remote control does not function correctly or if the operating range becomes reduced replace all batteries with new ones If battery leakage occurs wipe the battery liqu...

Page 12: ... e t e r u t u F 4 9 1 1 9 1 1 4 0 E G c i r t c e l E l a r e n e G 4 4 0 3 4 0 0 4 0 5 1 0 9 0 0 8 0 0 3 0 0 6 1 2 5 1 2 4 1 2 1 0 2 8 9 1 5 9 1 0 3 1 a x x e n e G 3 1 1 r a t s d l o G 8 8 0 3 7 0 6 4 0 5 4 0 6 2 0 3 2 0 5 0 0 2 1 2 3 9 1 a d a n a r G 1 1 2 5 9 1 d n a r G 5 9 1 e t n e i d a r G 1 1 2 g i d n u r G 7 4 0 k r a m l l a H 5 9 1 n o d r a K n o m r a H 1 6 0 i r a n i H 4 3 0 i...

Page 13: ... 9 0 3 0 2 5 9 1 7 1 1 4 0 1 3 0 1 u s t i m i e S 5 9 1 p r a h S 8 0 1 7 0 1 6 0 1 5 0 1 1 9 0 5 8 0 6 2 0 9 2 1 8 2 1 s n e m e i S 1 9 0 e r u t a n g i S 8 1 0 r e v l i S 3 7 0 x o v a l o S 2 1 1 y n o S 0 9 1 2 2 1 9 1 1 9 0 1 8 7 0 0 0 0 n g i s e d n u o S 5 9 1 1 9 1 1 4 0 6 3 0 5 2 0 n o c i r t c e p S 0 2 1 0 2 0 w e i v e r a u q S 4 9 1 S S S 2 1 2 1 9 1 3 7 0 1 4 0 5 0 0 a r p u S...

Page 14: ......

Page 15: ...s Connecting to an Antenna Connecting to an HDTV equipped with DVI Connecting to a Standard Definition TV Connecting to a VCR Connecting to an amplifier equipped with a digital audio input Connecting to a standard amplifier ...

Page 16: ...pes of cables that may be used to connect your receiver Cable Types Coaxial antenna cable Standard stereo A V cables typically color coded red and white for audio S video cable Component video cables typically color coded red green blue DVI D digital single link cable ...

Page 17: ...tenna or cable service DIRECTV Satellite Dish Antenna Terrestrial Antenna Cable Service To your Satellite DishAntenna ToyourTerrestrial Antenna or Cable Service ANT 2 TV OUT ANT 1 SAT COLOR STREAM HD VIDEO OUT S VIDEO OUT DIGITAL AUDIO DVI HDCP A U D I O L R Y PB PR PHONE JACK Service Only O U T ...

Page 18: ... picture signals The DVI HDCP connection will not display 480i picture signals Refer to the owner s manual of the connected TV as well When you connect the receiver to your TV be sure to turn off the power and unplug both units from the wall outlet before making any connections If your television set has one audio input connect the left and right audio outputs of the receiver to a Y cable adapter ...

Page 19: ...p Connecting to a HDTV with Component Video Notes Refer to the owner s manual of the connected TV as well When you connect the receiver to your TV be sure to turn off the power and unplug both units from the wall outlet before making any connections If your television set has one audio input connect the left and right audio outputs of the receiver to a Y cable adapter not supplied and then connect...

Page 20: ...TV be sure to turn off the power and unplug both units from the wall outlet before making any connections If your television set has one audio input connect the left and right audio outputs of the receiver to a Y cable adapter not supplied and then connect to your TV Connect the receiver directly to your TV ANT 2 TV OUT ANT 1 SAT COLOR STREAM HD VIDEO S VIDEO DIGITAL AUDIO DVI HDCP A U D I O L R Y...

Page 21: ...21 Connections Connecting to Optional Equipment Connecting to a VCR ANT 2 TV OUT ANT 1 SAT COLOR STREAM HD VIDEO S VIDEO DIGITAL AUDIO DVI HDCP A U D I O L R Y PB PR PHONE JACK ToyourTV VCR ...

Page 22: ...nal Equipment continued Connecting to an amplifier equipped with a Dolby Digital decoder ANT 2 TV OUT ANT 1 SAT COLOR STREAM HD VIDEO S VIDEO DIGITAL AUDIO DVI HDCP A U D I O L R Y PB PR PHONE JACK DOLBY DIGITAL AMPLIFIER optional cable ...

Page 23: ...23 Connections Connecting to a standard amplifier ANT 2 TV OUT ANT 1 SAT COLOR STREAM HD VIDEO S VIDEO DIGITAL AUDIO DVI HDCP A U D I O L R Y PB PR PHONE JACK AMPLIFIER ...

Page 24: ......

Page 25: ...Installation Installation Type Dish and Antenna Cable Setup Dish Only Setup Antenna Cable Only Setup Installation Complete Types of Programming Quit Installation ...

Page 26: ...ght the appropriate system configuration and then press the SELECT key Refer to the following pages for the installation steps necessary for your system configuration Satellite DIRECTV and Antenna Cable Satellite DIRECTV Only Local Antenna Cable Only Installation This section describes the installation process Preparations Install a DIRECTV Satellite Dish Antenna Terrestrial Antenna or Cable Servi...

Page 27: ...st digit field and use the numbered keys on your remote control to enter your ZIP Code or Latitude and Longitude 1 2 3Press to highlight Save and then press SELECT The Signal Strength screen displays a numerical strength 0 to 100 and a meter accompanied by an audible tone to indicate signal strength A strong signal is indicated by a high number large amount of the meter being occupied and a high p...

Page 28: ...itonal terrestrial program information should appear in the Guide Follow steps 2 3 above Press or to highlight Cable Provider Area and then press SELECT The Cable Provider specifies what cable program information should appear in the on screen program guide Follow steps 2 3 above 3 2 Notes If you do not have cable service connected to the DST 3100 it is not necessary to complete step 5 Local Guide...

Page 29: ...ate to the appropriate fields Press or to select the type of inputs you connected to the DST 3100 Press or to highlight the Save and then press SELECT 1 2 3 Terrestrial Channel Screen Now that you have configured the inputs the Terrestrial Channels screen allows you to select the available channels for your input source Press or to highlight the desired channel boxes on the left side of the screen...

Page 30: ...te This means that your receiver will get its time and date settings from the satellite signal If you need to change these settings follow the steps below Press or to highlight the Source field and then press or to select Manual Press or highlight the Time Zone field and then press or to select your time zone Press to highlight the Daylight Saving field and then press or to select ON or OFF Press ...

Page 31: ...and use the numbered buttons on your remote control to enter your ZIP Code or Latitude and Longitude 1 2 3Press to highlight Save and then press SELECT Signal Strength Screen The Signal Strength screen displays a numerical strength 0 to 100 and a meter accompanied by an audible tone to indicate signal strength A strong signal is indicated by a high number large amount of the meter being occupied a...

Page 32: ...lite signal To change these settings follow the steps below Press or to highlight the Source field and then press or to select Manual Press or highlight the Time Zone field and then press or to select your time zone Press to highlight the Daylight Saving field and then press or to select ON or OFF Press to highlight the Save button and then press SELECT 1 2 3 4 ...

Page 33: ...ntenna input they are coming from ANT1 or ANT2 4 3 Notes If you have not configured any inputs the message below will be displayed To configure the inputs select Inputs on the Terrestrial Channels screen 1 Now that you have configured the inputs the Terrestrial Channels screen allows you to select the available channels for your input source Press or to highlight the desired channel boxes on the l...

Page 34: ...then press or to select your time zone Press to highlight the Daylight Savings field and then press or to select ON or OFF Press to highlight the Date field and use the numbered buttons on the remote control to enter the date in MM DD YY format Press to highlight the Time field and use the numbered buttons on the remote control to enter the current time in HH MM format Press to highlight the Save ...

Page 35: ...al channel numbers Digital ATSC channels Single or double digit channel number followed by hyphen and sub channel number program name and description if channel is supported in local ZIP code area Analog NTSC channels Network logo or call letters traditional single or double digit channel numbers program name and description if channel is supported in local ZIP code area With a terrestrial antenna...

Page 36: ......

Page 37: ...ADVANCED PROGRAM GUIDE Customizing the guides of your receiver Program Guide Advanced Grid Guide Basic Grid Guide Surf Guide Banner Guide General Guide Features Purchase Screen ...

Page 38: ...mote control s navigation arrows to navigate the guides Press ACTION or to scroll through the guide entries one page at a time Press INFO while a title is highlighted to display the Program Details screen Advanced Grid Guide The Advanced Grid Guide displays two hours of programming information and four lines of channel information When your desired program is highlighted press SELECT to tune to th...

Page 39: ...ws on the remote control while watching television will display the Banner Guide if no other pop ups are opened Keys available in the different ADVANCED PROGRAM GUIDE styles GUIDE Cycles through the different guide styles ACTION INFO Cycles through the different banner styles off short detailed and Navigate inside the guide ACTION or Scrolls through the guide entries one page at a time CHANNEL or ...

Page 40: ... replaces channel logo in banner System is locked System is unlocked System is temporarily unlocked The PPV purchase is available for the entire day Program Informational Icons Video is High Definition format Audio is Dolby Digital Taping is permitted Taping is not permitted Video aspect ratio is 16 9 Video aspect ratio is 4 3 Video aspect ratio is 4 3 and has been Letterboxed black bars on top an...

Page 41: ...lable Closed Captions available but disabled New message s Second Audio Program Tune Highlight Tune and press SELECT to tune to the program If the program details is for a show in the future a Schedule option will be displayed instead of the Tune option and by selecting Schedule you will be reminded to watch the program when the show occurs in the future Showings Highlight Showings and press SELEC...

Page 42: ...he future Tune This will tune to the channel If the program was already purchased or is free then audio and video will be seen If the program has not been purchased or is not free then the screen at the top of the page will be displayed Purchase Screen There are two ways to access the Window which will enable the purchasing of a Pay Per View PPV program The first such method is to tune to a PPV ch...

Page 43: ...Menu System The Menu System puts you in control of the receiver Overview ...

Page 44: ...y Title Search by Credit Profiles Current Profile All User1 User3 EditFamily Edit User1 EditUser3 Guide Channels FavoriteChannels ChannelBlock Rating Limit Preferences MenuTheme Default Guide ClosedCaptionMode AudioLanguage Lock Profile User 1 3 Only Profile Name User 1 3 Only Lock Profile Advanced Grid Guide Banner Guide SurfGuide Basic Grid Guide Sports News Movies Advanced Translucency ClosedCa...

Page 45: ...eManual Installation Satellite Dish Setup SignalStrength Local Markets Terrestrial Input Configuration ChannelAdd Delete SignalMeter TimeandDate Upgrade SoftwareUpgrade Conditional Access Menu New Access Card SystemStatus A V Preferences Caller ID Messages First Setup PIN Lock or PIN Unlock Remote Control System Information System Test ...

Page 46: ...46 MenuSystem ...

Page 47: ...Search Menu The DST 3100 offers a multitude of search options available to you Search Window Search by Title Search by Credits Search by Categories ...

Page 48: ...r set a schedule reminder to watch the program in the future Search Options There are three main categories to use in your program search Press MENU The Main Menu appears Press or to navigate to the Search icon Press to highlight the search that you would like to perform Press then to highlight the Menu item listed below for the setting you want to change and then press SELECT Search Credits Movie...

Page 49: ...ur favorite one The search results are continuously updated after each letter or number is selected The results are displayed in alphabetical order by the programs title and any title that has the series of letters and numbers that you selected will be displayed After you have made all of your selections Press to scroll through the list of remaing program titles Highlight the program you want Pres...

Page 50: ...t the program you want to watch Press SELECT this will either tune to the channel or schedule the desired program if it is not current airing 4 5 6 3 In the Search Credits screen you can search by first or last name for your favorite stars or directors Like the Search Titles window the search results are continuously updated after each letter or number is selected The results are displayed in alph...

Page 51: ...m you want Press SELECT this will display all the times and all the channels that this program is scheduled to air Select the desired program you want to watch Press SELECT this will either tune to the channel or schedule the desired program if it is not current airing Once in the Search window continue to press to highlight the letter or number you want to add to the search Press SELECT 9 8 6 In ...

Page 52: ......

Page 53: ...Profile Setup You can create a customized profile so that many system settings are just the way you like them Customizing Profile Settings ...

Page 54: ...eiver Press MENU The Main Menu appears Press or to navigate to the Profiles Menu icon Press to highlight Edit Family or Edit User 1 3 Press then to highlight the Menu item listed below for the setting you want to change and then press SELECT Edit Guide Channels Favorite Channels Setup Channel Block Rating Limits Lock Unlock Profile not available for Family Profile Preferences Menu Theme Translucen...

Page 55: ...elect a color scheme for your profile s Menu System Select the level of translucency for your profile sMenuSystem Select the default guide that will be displayed for your profile when GUIDE is pressed Select a preferred language for program audio Setclosedcaptionoptions Setting Details 52 53 54 55 57 58 58 59 59 60 Page Notes The default profile is Family To change the default profile select the D...

Page 56: ...When the system is locked you will need the password to modify settings After you have made all of your selections highlight Save and press SELECT Press EXIT The on screen display disappears 4 5 6 To add all channels highlight Select All and press SELECT To clear all selected channels highlight Clear All and press SELECT 3 The Edit Guide Channels screen allows you to limit the hundreds of availabl...

Page 57: ... Save first your selections will not be saved Remember When the system is locked you will need the password to modify settings After you have made all your selections highlight Save and press SELECT Press EXIT The on screen display disappears 4 5 6 3 Once changes to the Edit Favorite Channels have been saved and you have exited all the menus a favorite channel selector screen is available The 16 c...

Page 58: ...s The Channel Block is in effect only when the DST 3100 receiver is locked If you EXIT or Cancel out of the screen without saving your selections will not be saved Remember When the system is locked you will need the password to modify settings After you have made all your selections highlight the Save button and press SELECT Press EXIT The on screen display disappears 4 5 6 To allow all channels ...

Page 59: ... you EXIT or Cancel out of the screen without saving your selections will not be saved Remember When the system is locked the password will be needed to modify the settings After you have made all your selections highlight Save and press SELECT Press EXIT The on screen display disappears 4 5 6 To help set appropriate ratings for children and youth the Edit Rating screen contains Children and Youth...

Page 60: ...uage L some sexual situations S or moderate violence V Designed to be viewed by all ages Little or no sexual dialogue D no strong language L or sexual situations S and little or no violence V Designed to be viewed by children 7 years and older Mild fantasy violence FV or comedic violence that may frighten younger children Designed to be viewed by a young audience including children from ages 2 6 N...

Page 61: ...word Highlight and select OK to proceed or Cancel to cancel the locking process 2 1 4 5 3 Locking Procedure Lock UnlockProfile 6 Press MENU The Main Menu appears Press or to highlight Profiles Menu icon Press to highlight Edit Family or Edit User 1 3 Press then to highlight Unlock Press SELECT Use the remote control s numbered buttons to enter your four digit password Highlight and select OK to pr...

Page 62: ...ces Press SELECT Press to highlight Menu Theme then press to display the themes sub menu Press to highlight the desired theme color Preferencessub menus Customizing Profile Settings continued 2 1 4 5 3 The Preferences option takes you to another level of the Menu System that will give you further control over personal profile settings Menu Theme This menu enables you to select a color scheme for t...

Page 63: ... guide for your profile The default guide appears when you press GUIDE on the remote control 1 Audio Language This menu allows you to set the audio language you will hear while watching a program If the program offers different languages Press MENU The Main Menu appears Press or to highlight the Profiles Menu icon Press to highlight Edit Family or Edit User 1 3 Press then to highlight Preferences ...

Page 64: ...ain Menu appears Press or to highlight the Profiles Menu icon Press to highlight Edit Family or Edit User 1 3 Press then to highlight Preferences Press SELECT Press to navigate to Closed Caption Language then press to display the language sub menu Press to highlight English or Spanish 2 1 4 5 3 Closed Caption This menu contains menu options for controlling Closed Captions 2 4 5 3 1 Closed Caption ...

Page 65: ...ppears Press or to navigate to the Profiles Menu icon Press to highlight Edit Family or Edit User 1 3 Press then to highlight Preferences Press SELECT Press to highlight Advanced Closed Captions then press SELECT The Advanced Closed Captions screen appears 2 1 4 5 3 Advanced Closed Captions This option gives you control over the look and feel of the closed caption text for digital terrestrial chan...

Page 66: ......

Page 67: ...Scheduling Scheduling an Event Editing a Scheduled Event View Events List Event Reminders ...

Page 68: ...ed Press to highlight a desired future event Press SELECT If there is not a conflict the event will be scheduled and a clock icon will appear in the Guide next to the event Scheduling an Event Scheduling events is a great feature that allows you to be reminded when a program you want to watch is on There are several different ways to schedule an event Ways To Schedule an Event From the Guide no ev...

Page 69: ...ppear confirming the scheduled event Press or to navigate to the OK button and press SELECT From Search no event conflict 2 1 From Search event conflict 3 4 Perform a search see Search section of this manual for detailed instructions Press or to navigate to the desired event Press SELECT The Showtimes screen appears Press to navigate to the desired future event time Press SELECT If there is a conf...

Page 70: ...te to the fields and enter the appropriate event information To save the new event navigate to Add and press SELECT Manually from the Main Menu 2 1 3 MENU 5 4 Scheduling an Event continued The Frequency field can be used to schedule the event on a recurring basis When entering the channel number you can use either or to scroll through the channels or use the numbered buttons on your remote control...

Page 71: ...hange Press SELECT The Schedule Edit screen appears Press to navigate to the fields and enter the appropriate event information To save the new event highlight Save and press SELECT 6 5 Pay Per View events and mandatory updates cannot be deleted The Frequency field can be used to schedule the event on a recurring basis When entering the channel number you can use either or to scroll through the ch...

Page 72: ... and press SELECT The View Event List screen appears 2 1 3 MENU SELECT If four or fewer events are scheduled use or to scroll the list If more than four events are scheduled use or to scroll the page A small arrow at the top or bottom of the event list indicates that there are additional events scheduled The View Event List option displays four scheduled events at one time ...

Page 73: ...es you the following options Tune Later Closes the reminder and tunes to the event when it starts Tune Now Tunes to the event now Abort Closes the reminder does not remind you again and cancels the event If you do not select any of the above options the system will tune to the event at the end of the two minutes If your receiver is off when the event is due the receiver will turn on and tune to th...

Page 74: ......

Page 75: ...Purchase History Pay Per View PPV access enables you to purchase special limited broadcast programs Future Purchases Past Purchases Spending Limit ...

Page 76: ... or to highlight Yes to cancel the event or No to keep the event Purchases Menu Use the Purchases Menu to control your Pay Per View options FuturePurchases 2 1 6 3 The Future Purchases option displays advance purchase Pay Per View events For each purchase the event channel title start date and time and cost are listed If there are more events than can fit on the screen navigate into the list and u...

Page 77: ... set the maximum purchase price on a per event basis The maximum allowed for a single event is 655 Press MENU The Main Menu appears Press or to highlight the Purchases Menu icon Press to highlight Spending Limit and press SELECT Use the numbered buttons on your remote control to enter a dollar anmount Press or to highlight Save and press SELECT 2 3 1 5 4 MENU ...

Page 78: ......

Page 79: ...Additional Features Password Management Audio Video Caller ID Messages Help Remote Control RF Settings ...

Page 80: ...ocking Procedure 6 MENU With the system locked the following features are enforced Rating Limits Channel Block Profiles Locked Spending Limit Press MENU The Main Menu appears Press or to highlight the Setup Menu icon Press to highlight PIN Unlock Use the remote control s numbered buttons to enter the four digit system password Highlight and select OK to proceed or Cancel to cancel the unlocking pr...

Page 81: ...creen Ratio Wide 16 9 Standard 4 3 Video Format Side Panels Cropped Full Letter Box Video Resolution Hybrid 1080i 720p 480p 480i To use the default settings navigate to Defualt and press SELECT All available settings are listed below Note that the defaults are bold Press MENU and navigate to Setup Audio Video Preferences to access this screen ...

Page 82: ...g some loss of the image around the edges of the screen Pan scan feature is implemented here LETTERBOX Image is compressed and undistorted Screen Ratio Wide 16 9 FULL Same as incoming native image CROPPED Image is expanded causing some loss of the image around the edges of the screen Pan scan feature is implemented here SIDE PANELS Image is compressed and undistorted Black or gray bars appear on t...

Page 83: ...tting Use S VIDEO OUT VIDEO OUT or TV OUT 480p Video Output Use DVI HDCP or COLOR STREAM output cables Set the video resolution based on the capabilities of your televison To cycle through the available resolutions press ACTION then press INPUT RESOLUTION repeatedly Notes on Output Video Resolution The default video resolution is set to Hybrid Using the remote control to cycle through the video re...

Page 84: ...n Press to highlight Call History Press SELECT Press or to navigate into the Call History list Press or to navigate through the list of received calls 2 1 4 5 3 Call History List MENU Press MENU The Main Menu appears Press or to highlight the Setup Menu icon Press to highlight Call History Press SELECT Press or to navigate to the Notification field Press or to highlight Enable or Disable Press to ...

Page 85: ...to navigate into the list of Messages Press or to navigate through the list and highlight a message you would like to read and then press SELECT The message will open see sample screen at right 2 1 4 5 3 Viewing Message MENU After you have read the message you can either delete it or close and save it to the messages list Press or to highlight either Close or Delete Press SELECT 6 Note A message i...

Page 86: ...cs If there is more text than can be viewed on one screen press to highlight More and press SELECT When you are finished highlight OK and press SELECT Online Manual Help HelpButton HELP The Online Manual allows you to access detailed on screen help Press MENU The Main Menu appears Press or to highlight the Setup Menu icon Press to highlight Online Manual Press SELECT 2 1 4 5 3 To access the Online...

Page 87: ...o it Use the RF Remote screen to set this code You also must program the same RF code into the remote control that you select in the RF Remote screen If you ever have interference issues with the remote control try changing this setting MENU Set the SAT TV1 TV2 switch on the left side of the remote control to SAT While holding down MUTE press the numbered buttons to enter the RF code 0 4 you selec...

Page 88: ......

Page 89: ...Support System Status Before Calling Service Specifications Limited Warranty ...

Page 90: ...er Serial Number Tuner List Tuner Name Input Name Capability Copyright Information DIRECTV Software Version Version Number Settings Daylight Saving Phone Prefix Access Card Number Features List Features of your receiver Press MENU The Main Menu appears Press or to highlight the Setup Menu icon Press to highlight Installation Press SELECT Press or to highlight the System Status Menu icon Press to h...

Page 91: ...oblems with your DST 3100 receiver If this System Test should fail please contact Customer Service Press MENU The Main Menu appears Press or to highlight the Setup Menu icon Press to highlight Installation Press SELECT Press or to highlight the System Status Menu icon Press to highlight System Test Press SELECT 2 1 4 3 To Perform a System Test MENU ...

Page 92: ...e m u l o v e h T y l t c e r r o c d e t c e n n o c t o n e r a s e l b a c o i d u a e h T l o r t n o c e t o m e r e h t n o E T U M s s e r P l e v e l e m u l o v e h t t s u j d A s n o i t c e n n o c e l b a c o i d u a e h t k c e h C d n u o s o n e r u t c i p o N t c e r r o c n i e r a s n o i t c e n n o c r u o Y s n o i t c e n n o c T A S V T T N A e h t k c e h C d r o c r e w ...

Page 93: ... S t n e n o p m o C r o t c u d n o c 3 o i d u A I V D e n o h p e l e T F R l a i x a o C 6 l o r t n o C e t o m e R F R R I 6 1 1 0 9 T C s e i r e t t a B A A A 4 d r a C t r a m S 1 Supplied Accessories o e r e t S g o l a n A 3 C A l a t i g i D y b l o D M C P D S V T C E R I D D H V T C E R I D 3 4 o i t a R t c e p s A 9 6 1 o i t a R t c e p s A Audio Video 49 6W P C D H I V D 1 p 0 8 ...

Page 94: ... You must retain your bill of sale or provide other proof of purchase 2 All warranty servicing of the product must be made by a TACP THI Authorized Service Station 3 These warranties are effective only if the product is purchased and operated in the U S A WHAT YOUR WARRANTY DOES NOT COVER Any High Definition Digital Receiver accessory not included with the DST 3100 Receiver Original or subsequent ...

Page 95: ...nsibility If you have questions concerning your DIRECTV billing or programming please call DIRECTV at 1 800 347 3288 How state law relates to your warranty ALL WARRANTIES IMPLIED BY STATE LAW INCLUDING THE IMPLIED WARRANTIES OF MERCHANTABILITY AND FITNESS FOR A PARTICULAR PURPOSE ARE EXPRESSLY LIMITED TO THE DURATION OF THE LIMITED WARRANTIES SET FORTH ABOVE WITH THE EXCEPTION OF ANY WARRANTIES IM...

Page 96: ...Printed in USA ...

Reviews: