background image

71

Editing

Other

s

Intr

oduction

Function setup

Recording

Pla
ybac

k

JPEG files compatibility

Discs whose compatibility with this recorder has been
confirmed by TOSHIBA are as follows.

CANON QuickCD
FUJICOLOR CD
Kodak Picture CD
NORITSU QSS CD

JPEG disc compatibility with this recorder is limited as
follows:

• Playable discs:

CD-ROM, CD-R
CD-RW is not recommendable.

• CD physical format:

Mode 1, Mode 2 XA Form 1

• File system:

ISO9660 Level 1, 2 or Joliet

• File name:

A file name should be in alphabet and
numerals only, and must incorporate “JPG”
extension.
e.g.“********.JPG”

• Total number of folders:

Less than 256

• Total number of files:

Less than 1000

Some files may not display their own entire image
depending on the size.

Some discs may not permit this operation. Especially,
the following conditions of included files will increase
the disc’s disability.
1. Pixels over 5000 x 5000 in height and/or width
2. File format except Exif

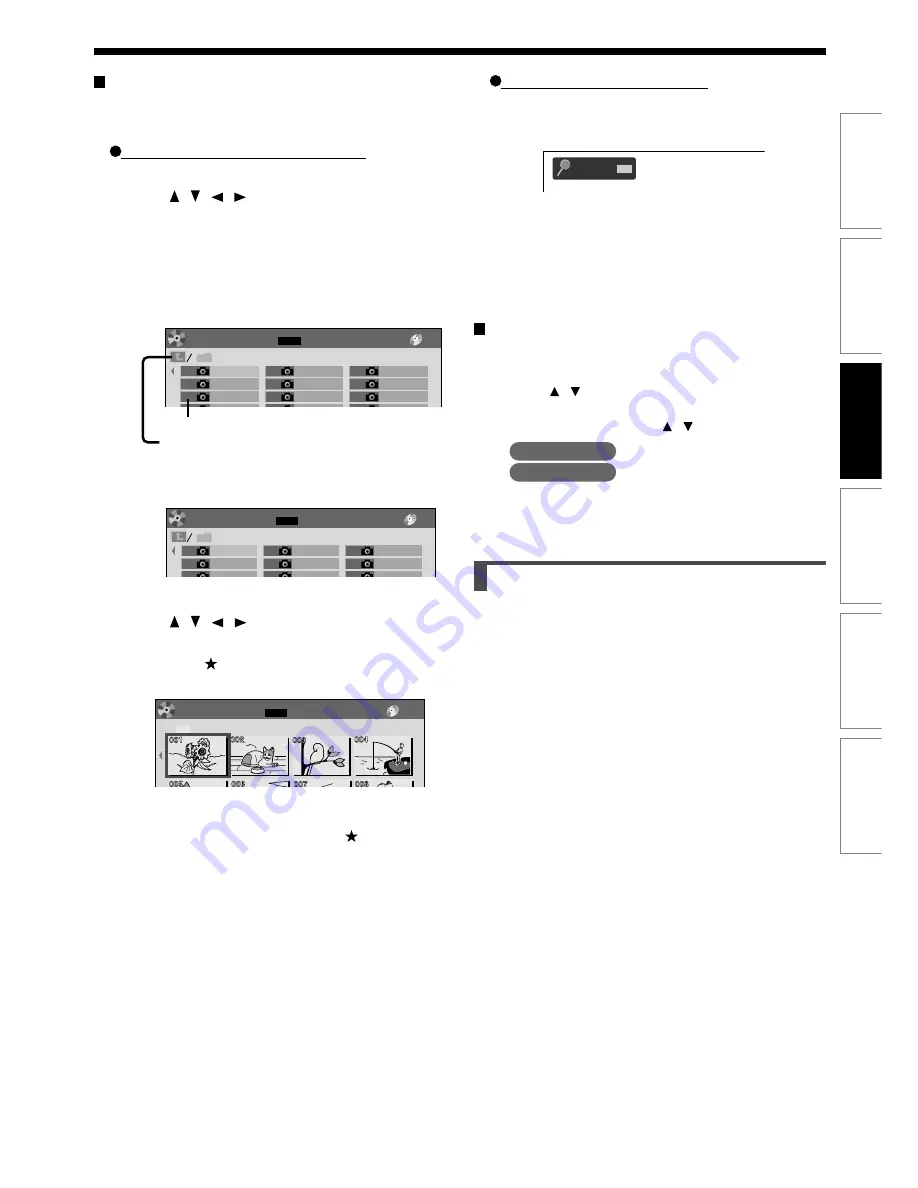
 Direct input of a photo number

1) During playback or stop, press SEARCH.

An input window appears.

2) Input a photo number using the number buttons

or ADJUST.

3) Press SELECT/ENTER.

The selected photo appears in full screen.

To change the playback order

1) During playback (slide show) or stop, press

QUICK MENU.

2) Press   /   to select an item, then press

SELECT/ENTER.

To shift the cursor, press   /   buttons.

Reverse

: To reverse the order.

Repeat

 : To repeat the current folder.

3) Press SELECT/ENTER.

Playback in the selected mode starts.

001

Photo

Search

e.g.

Picture List

Page

CD

001

DH100001

004

DH100004

007

DH100003

010

DH100006

DH100009

016

DH100012

019

DH100015

022

DH100018

002

DH100002

Auto

005

DH100001

008

DH100004

011

DH100007

014

DH100010

017

DH100013

020

DH100016

023

DH100019

003

DH100001

006

DH100002

009

DH100005

012

DH100008

015

DH100011

018

DH100014

021

DH100017

024

DH100020

1 / 3

013

CONTENT

MENU

File number

If you select this icon and press SELECT/ENTER 
button, upper folders appear. 

e.g.

Page

CD

/ / 

JPEG

1 / 8

Pictures

CONTENT

MENU

e.g.

Page

CD

001

DH100001

004

DH100004

007

DH100003

002

DH100002

All

005

DH100001

008

DH100004

003

DH100001

006

DH100002

009

DH100005

1 / 3

Picture List

CONTENT

MENU

e.g.

Viewing a specified photo (single view)

Full screen still view.
2 ways are available:

 On “CONTENT MENU Picture List”

1) Press EASY NAVI.

2) Press   /   /   /   to select “Play Contents”,

then press SELECT/ENTER.

CONTENT MENU Picture List appears.

Depending on the disc, the recorder creates either
temporary folder, “Auto” or “All”.

“Auto”: For CD of which compatibility confirmed by

TOSHIBA. Only playable files are listed.

“All”:

For CD other than above. All files are listed.

• Some CDs may not comply with the above.

3) Press   /   /   /   to select a folder or photo.

Pressing FWD or REV button turns the pages.

If you press 

 button, the list changes to thumbnail

view (CONTENT MENU Pictures).

Pressing ANGLE button rotates the picture. The
rotation of pictures is kept until the CD is ejected.

To return to the previous list, press 

 button again.

4) Press SELECT/ENTER.

If you select a folder at step 3), repeat steps 3) and
4) until your favorite file appears.

The selected photo appears in full screen.

Notes

• CONTENT MENU Picture List cannot show all the files in a

disc, but only ones regarded as objects of regular play of
the disc.

• The larger the file size is, the longer the thumbnail takes

time to appear.

• Letters of a file/folder name overflowing the given space

are not displayed.

Summary of Contents for D-KR4

Page 1: ...ATIONS GUIDE Read INSTALLATION GUIDE first TOSHIBA DVD VIDEO RECORDER D R4SU D R4SC D KR4SU Printed in China Printed on 70 Recycled Paper DIGITAL VIDEO DVD VIDEO RECORDER 2005 Toshiba Corporation D R4SU D R4SC D KR4SU P000416410 PM0020461012 H D R4SU_Ope US H001 146 05 3 4 3 37 PM 1 ...

Page 2: ...urrently being recorded Chase Play 58 Playing at various speeds 59 Playing in fast reverse or fast forward 59 Skipping to the next previous chapter or track 60 Playing in slow motion 60 Playing frame by frame 61 Viewing still pictures Playing a disc that contains still pictures 61 Locating by entering the number 62 Locating by entering the number of a desired section 62 Locating a specific point b...

Page 3: ...0 Picture Audio settings 113 Display settings 115 Operational settings 116 DVD recorder operation 117 Management settings 119 Others Before calling service personnel 122 Error codes on the display window 124 Recording duration 125 Language code list 126 Specification 127 Limited United States Warranty 128 CANADIAN WARRANTY INFORMATION 130 ...

Page 4: ...duction Introduction Caution for safety Read SAFETY PRECAUTIONS IMPORTANT SAFETY INSTRUCTIONS and all other sections of the INSTALLATION GUIDE that came with this product prior to reading this OPERATIONS GUIDE ...

Page 5: ...e disc Recording Restrictions and Copyright Copy protected contents of DVD Video discs VIDEO CDs or audio CDs on the market cannot be copied on this recorder Contents without copy protection should be copied or edited only in accordance with applicable copyright laws which may restrict copying or editing Contents that permit single copying copy once contents can be recorded onto DVD RAM discs with...

Page 6: ...lobal standard DVD VR Video Recording format and are optimized for recording of TV programs You can rewrite repeatedly without deterioration of an image quality erase unnecessary parts divide a chapter or specify playback area by frame Its cartridge is suitable for a longer term storage and family use and its large capacity of 9 4 GB allows more recording space DVD R discs when creating your own o...

Page 7: ...ly in regions other than Region 1 disc playback will not be allowed by the recorder Disc Mark Specification Remarks CD R CD RW VIDEO CD 12cm 43 4 in Color system NTSC Version 1 1 and 2 0 Audio CD 12cm 43 4 in CD DA audio CD format Depending on the disc status playback may not be possible 12cm 43 4 in Toshiba is not liable for any damage or loss caused directly or indirectly by the malfunction of t...

Page 8: ...d highly detailed data make sure the disc is clean DVD RAM discs with cartridges are easier to handle in this regard Do not open the cartridge shutter The disc may not play or may not be recorded or edited once it becomes dirty There are two types of DVD RAM cartridges removable TYPE 2 4 and not removable TYPE 1 It is recommended you do not remove the disc even when you can Refer to the instructio...

Page 9: ...marks and the meanings Operation has been confirmed with recommended discs and tested disc but some other discs may not be usable On DVD R discs Standards DVD R for General Ver 2 0 discs can be used for recording and playback Discs compatible with 2X speed recording labeled Ver 2 1 2X etc and discs compatible with 4X speed recording labeled Ver 2 1 4X etc can also be used Select discs labeled for ...

Page 10: ...ase may cause warping DVD video disc Title 1 Title 2 Chapter 2 Chapter 1 Chapter 2 Chapter 3 Chapter 1 Track 1 Track 2 Track 3 Track 4 Track 5 VIDEO CD audio CD Structure of disc contents Normally DVD video discs are divided into titles and the titles are subdivided into chapters VIDEO CDs audio CDs are divided into tracks Title Divided contents of a DVD video disc Roughly corresponds to a story t...

Page 11: ...ecorded contents to use the disc repeatedly Initialize the disc Yes Yes If the disc has been executed DVD Video finalizing process first cancel the process then delete contents Yes If the disc has been executed DVD Video finalizing process first cancel the process then delete contents Yes Yes After you execute DVD Video finalizing process on a recorded disc you cannot name a title or create a thum...

Page 12: ...n page 37 55 Stops playback or recording y CH buttons page 20 34 Selects the channel Front panel The above illustration displays the front panel with the cover open See the following page on how to open or close the cover u TIMESLIP button page 57 58 Selects the time slip mode i REC button page 35 Starts recording o OPEN CLOSE button page 20 21 Opens and closes the disc tray 0 Disc tray page 20 Lo...

Page 13: ...ver on the front panel Put your finger on the left edge of the cover and pull it down to open Note Do not place a heavy object on the cover while it is open Doing so may damage the recorder 4 INPUT 2 jacks page 38 Use this when recording from other input source such as a VCR or a camcorder ...

Page 14: ...LLATION GUIDE Connects to an antenna or cable signal y VHF UHF RF OUT TO TV output socket page 20 in INSTALLATION GUIDE Connects the supplied coaxial cable to a TV q Power cord page 21 in INSTALLATION GUIDE w DIGITAL AUDIO OUT BITSTREAM PCM OPTICAL jack page 26 in INSTALLATION GUIDE Use this to connect the recorder to an audio receiver equipped with an optical digital audio input jack e OUTPUT jac...

Page 15: ...15 Recording Playback Editing Function setup Others Introduction u INPUT1 jacks page 38 Use this to connect the recorder to output jacks of external devices such as another player or camcorder ...

Page 16: ...TEND SETUP VOL CH TIMESLIP INPUT SELECT MUTE MENU TV DVD EASY NAVI INSTANT REPLAY INSTANT SKIP TOP MENU QUICK MENU SKIP REV STOP SKIP FWD FWD PLAY REV REC SEARCH T ADJUST CHP DIVIDE CLEAR ZOOM PROGRESSIVE 1 2 3 4 5 6 10 7 8 9 0 SELECT ENTER 1 2 3 4 5 6 7 8 9 10 11 12 14 15 16 17 18 19 20 21 13 22 40 41 39 38 35 36 42 37 34 31 32 33 30 29 23 24 26 27 28 25 ...

Page 17: ... 51 106 QUICK MENU button page 24 77 SKIP REV button page 60 REV button page 59 PLAY button page 55 REC button page 35 SEARCH button page 62 ADJUST buttons page 41 61 Number buttons page 34 62 ON STANDBY button 2 page 20 21 DIMMER button page 19 PROGRESSIVE button page 25 in INSTALLATION GUIDE FREEZE button page 74 AUDIO SAP button page 67 ZOOM button page 66 EXTEND button page 44 46 SETUP button ...

Page 18: ...Remaining space indicator Illuminates when an available recording time is displayed o Title indicator Illuminates when a title number is displayed 0 Operational status indicator Indicates the operational status of the recorder Illuminates when recording Illuminates when playing Illuminates when recording and playback are in progress at the same time 1 CHP Chapter indicator Illuminates when a chapt...

Page 19: ...ay Every time you press the FL SELECT button the display changes between the channel title number and time The display may not change depending on the disc or recording conditions 4 Disc indicator Indicates the category of a loaded disc RAM DVD RAM disc RW DVD RW disc R DVD R disc 5 Picture quality mode indicator page 117 The current picture quality mode lights up 6 PROGRESSIVE indicator Illuminat...

Page 20: ...gh this recorder After turning the power on the recorder will output TV channel signals to the connected TV also in the stop mode You can select a desired channel by pressing the CH button or the number buttons Loading e g Loading a disc Check disc compatibility beforehand page 6 7 and use a proper playable disc Caution Keep your fingers well clear of the disc tray Neglecting this may cause seriou...

Page 21: ...med the loaded disc may become recording disabled In such a case executing an initialization of the disc using the formatting function of the recorder may refresh it However all contents stored on the disc will be completely erased by this initialization process This recorder may indicate alert messages with some DVD RAM discs right after insertion If such a disc is used for playback or recording ...

Page 22: ...itle playback is completed Instant skip Instant replay Chapter division Accompanied with the followings DVD RAM DVD RW DVD R Title number title name and chapter number chapter name DVD VIDEO Title number and chapter number VCD CD Track number Note You can add the current status of the settings to this display See page 75 x1 2 Title End Chapter Divide x1 Loading Open Un loading Close Start up Shutd...

Page 23: ...icture to the full of the screen You can change playback speed See page 59 3 To stop press STOP A current channel broadcast appears TV xxxch accompanies Pressing the REC button starts recording On recording see page 26 Continued SELECT ENTER PLAY STOP EASY NAVI 005 2005 04 03 07 00am TV 18 TV 12ch Original 00 54 30 00 10 15 DVD RAM Play Time Time Slip TS TV Viewing Delete Title Edit title name Fin...

Page 24: ...s vary depending on operational status 2 Press to select an item then press SELECT ENTER To exit Quick Menu Press QUICK MENU again Alternatively Select Exit with then press SELECT ENTER Quick Menu Title information Restart title Auto Power Off Remain Exit Bit rate Special playback mode Time bar e g To exit the EASY NAVI Press EASY NAVI again Note For a disc other than the specified one the finder ...

Page 25: ...W DVD RW disc DVD R DVD R disc DVD VIDEO DVD video disc VCD VIDEO CD CD Audio CD For CD containing JPEG or MP3 WMA files see page 70 72 Most instructions are based on remote control operation unless otherwise noted You can use the buttons on the remote control and those on the main unit as well when they have the same function If copy protection signal is detected during recording on this recorder...

Page 26: ... This recorder records on a DVD RAM disc if it complies with DVD RAM standard Version 2 0 2 1 or 2 2 However you may not record on some DVD RAM discs that have complicated contents often to protect the recorded data When you select a DVD RAM discs that has already been recorded check that the disc is suitable for recording or the remaining time of the disc is displayed It is recommended to use a n...

Page 27: ... writing managing information Operations other than changing channels cannot be done until this icon disappears The time for executing this process differs depending on the recording time or capacity of the disc Note that all recording content may be deleted if the unit is disconnected from a wall outlet or a power failure occurs during recording If a power failure occurs within five minutes prior...

Page 28: ... Press button to eliminate the window Before recording Continued Recording Be sure to read this section prior to using a DVD RAM RW disc on this recorder for the first time For DVD R initializing is not necessary Initializing a DVD RAM RW disc Logical format A disc should be initialized in the following cases The recorder may display a message to request you to do so e g When you use a DVD RAM RW ...

Page 29: ...isc which is not formatted correctly The disc which has errors during writing because of dirt on the disc and cannot be further recorded or cannot initialize normally You need to start physical formatting from the first step again when you use a failed disc Physical formatting does not work if the disc contains a lot of voids beyond the limitation of this recorder If an error occurs in physical fo...

Page 30: ...ed limit of characters displayable on CONTENT MENU The character being selected appears e g Operation guidance of the remote control To enter the character normally use buttons on the remote About the other buttons to be used are shown on the operation guide Enters a number Erases all the characters Caps Lock Saves the changes and returns to the previous screen Cancels the changes and returns to t...

Page 31: ...aracter before the cursor Select BkSp by pressing buttons then press SELECT ENTER button 1 Press button to select an input mode 2 Press buttons to select a character then press SELECT ENTER button The selected character is input on the cursor 3 Repeat steps 1 and 2 to enter characters 4 When finished press button to save the characters The characters you entered appears Notes You can enter up to 6...

Page 32: ...n repetition record delete the contents Playing discs recorded on this recorder with other DVD players Some DVD players may not play these discs Available disc DVD R disc Ver 2 0 DVD RW disc Ver 1 1 1 2 Once you record on a DVD R disc You cannot delete or rewrite the contents in DVD Video mode Video mode Finalizing a DVD R RW disc You can see the contents recorded on a DVD R RW disc with other DVD...

Page 33: ...ect ratio to 16 9 Chapter dividing DVD Video CHP create This is the setting to divide a title into some chapters It is convenient to skip scenes Off Chapter dividing is not available 5 min 10 min 15 min 20 min Select an interval for chapter dividing Note When the number of chapters reaches a limit chapters are not divided anymore The limit number of chapters is dependent on conditions of a DVD R R...

Page 34: ... the INPUT2 jacks on the front panel page 38 2 Press the number buttons to select a channel to record CH button is also available To record a program from a connected tuner select the channel on the tuner 3 Press QUICK MENU to display Quick Menu If you want to use the default setting for AV record quality skip to step 7 e g Preparation Load a DVD RAM R RW disc into the recorder Load a disc which h...

Page 35: ...record quality then press SELECT ENTER e g 5 Press ADJUST to select the setting number e g See page 42 for details on Mode 6 Press SELECT ENTER The menu disappears 7 Press REC Recording starts AV record quality Custom setting 5 4 3 2 1 D M1 D M1 D M1 D M1 D M1 X P L P E P S P M P 9 2 4 6 3 0 2 2 1 4 Mode Setting Rate Audio quality Total Recording Time approx 122min with 4 7 GB unused Setting 2 DVD...

Page 36: ...und is recorded on both the left and right channels When DVD compatible mode is set to Main or SAP the unit records the same sounds on both the left and right channels when receiving monaural sound When receiving the multi channel sound the selected sound Main or SAP is recorded on both the left and right channels Depending on the disc contents pressing REC button may take a longer time to start r...

Page 37: ...imer program of recording The programmed end time must be set for 5 minutes later than the current time To play a title recorded on a DVD RAM disc while recording another on the same disc Recorded Title Play DVD RAM During recording you can play a title recorded on the same disc 1 While recording on a DVD RAM disc press EASY NAVI 2 Press to select Play Contents then press SELECT ENTER 3 Press to s...

Page 38: ...ted Notes If a source of high quality sound track such as DVD audio is recorded with this recorder the sound quality becomes regular audio CD quality Refer to the instructions of the connected equipment When you record an external source onto a DVD R RW disc set the connected equipment to output sound you want to record if selectable such as multiplex broadcasting as the recorder records sounds of...

Page 39: ... from equipment connected to the INPUT 2 jacks on the front panel 2 Start playback of the source content on the connected equipment 3 Press REC of this recorder to start recording 4 When recording is completed press STOP OPEN CLOSE ANGLE DISPLAY FL SELECT DIMMER SUBTITLE AUDIO SAP FREEZE REMAIN REC MODE EXTEND SETUP VOL CH TIMESLIP INPUT SELECT MUTE MENU TV DVD EASY NAVI INSTANT REPLAY INSTANT SKI...

Page 40: ...such as pausing resuming fast forwarding CUE and fast reversing REVIEW etc may produce noises which may be detected as copy protection signals Therefore first start playback on the source equipment to confirm that the desired source can be played properly and then start recording on this recorder Do not operate the source equipment during recording After completing the desired scene stop the recor...

Page 41: ...JUST CHP DIVIDE CLEAR ZOOM PROGRESSIVE 1 2 3 4 5 6 10 7 8 9 0 SELECT ENTER EASY NAVI ADJUST SELECT ENTER 1 Press EASY NAVI EASY NAVI Main Menu appears 2 Press to select Timer Recording then press SELECT ENTER REC MENU appears e g 3 Press SELECT ENTER CH is ready for setting e g 4 Select an item by pressing then press ADJUST to set the item e g Refer to the setting items on the next page You can al...

Page 42: ...er see the notes on page 34 in the INSTALLATION GUIDE The digital recording technology for consumer products of Dolby Laboratories is used for D M1 Dolby Digital 192 kbps is set for D M1 Notes See page 48 for details on Video If you record with setting the bit rate to MP 3 0 Mbps LP 2 2 Mbps or EP 1 4 Mbps the recorded pictures may not be played properly if change the playback speed There will be ...

Page 43: ... or sub sound of multiplex broadcasts respectively and does not record the other Therefore select Main or SAP only when you record onto a DVD R RW disc When recording onto a DVD R RW disc set DVD compatible mode page 33 to the desired recording sound for each timer program Setting the details for every timer program You can specify detail items for each of your timer program 1 Press QUICK MENU at ...

Page 44: ...ELECT ENTER 6 Press EASY NAVI to exit Note While the recorder is preparing for or executing a programmed recording you cannot add a timer program which will start within 5 minutes and 15 seconds from the current time Deleting a timer program 1 Press EASY NAVI EASY NAVI Main Menu appears 2 Press to select Timer Recording then press SELECT ENTER REC MENU appears 3 Press to select a timer program you...

Page 45: ...u 30 pm 10 00 pm EP 10 2 2 D M1 DVD 42 4 16 Fr 30 am 11 30 am LP 8 4 6 D M1 DVD 4 4 16 Fr 30 pm 9 30 pm SP Audio Video Media End Result Date Start DVD HDD Elapsed Available Selected current DVD Notes The nearest 8 programs are calculated at a time While the recorder is preparing for or executing a programmed recording any program modification cannot be registered Only programs which will start aft...

Page 46: ...u press the button it is delayed 10 minutes up to 60 minutes Notes Pressing a button except EXTEND in the above procedure will set the currently selected delay You cannot delay the end time of a programmed recording which will end within 1 minute from the current time Even if you delay the end time of a programmed recording the recording will stop when the disc is exhausted Programing a recording ...

Page 47: ...d press SELECT ENTER 3 Read the message and press to select Yes then press SELECT ENTER Notes When you display a title to delete on the finder of EASY NAVI Main Menu you can delete it by selecting Delete Title then press SELECT ENTER button Operate according to the message Deleting a title a chapter decreases the numbers of the succeeding titles chapters A chapter of about 5 seconds or shorter may...

Page 48: ... a result the picture quality is decreased more noticeable with dynamically moving images For example square noises block noise may occur in a scene with fast action or a scene with light and shadows such as a water surface This recorder has 6 settings e g SP records about 2 hours and LP about 4 hours onto a blank 4 7 GB DVD RAM disc page 125 It is recommended to consider the SP mode as a standard...

Page 49: ...use TV Playing a TV program currently being recorded Chase Play Playing at various speeds Locating by entering the number Selecting the camera angle Selecting subtitles Zooming a picture Selecting the sound Viewing JPEG files Playing MP3 WMA files Pausing a TV broadcast Freeze function Checking the current status and settings Functions in the Quick Menu ...

Page 50: ...e playback display a menu or use the freeze function and leave it still for about 15 minutes the recorder switches the output picture source to a TV broadcast or connected equipment A still picture may be displayed after all titles are played In this case the screen protection activates after about 10 seconds Notes Do not move the recorder during playback It may damage the disc Occasionally the pi...

Page 51: ...ECT ENTER SELECT ENTER 1 Press EASY NAVI EASY NAVI Main Menu appears 2 Press to select Play Contents then press SELECT ENTER CONTENT MENU Title List appears 3 Press to select a title chapter You can view succeeding or prior pages by pressing REV or FWD button To select a chapter select a title and press button Chapter List appears By pressing button again you can return to Title List 4 Press SELEC...

Page 52: ... Title playback page 116 to Title resume The recorder will memorize the location you last stopped at in each title so you can resume playback there For example if there are 6 titles you can start each of them as if you had stored 6 video tapes in the recorder To return to the beginning of the title During playback press QUICK MENU button then press buttons to select Restart title then press SELECT...

Page 53: ...Quick Menu Edit title name Edit chapter name Del chapter name Record date time Lock Genre Exit Del chapter name First press FWD or REV button to display the chapter you want then select this item Record date time The recording date is highlighted so that you can correct the digits Lock Set the protection for the currently selected title The protection icon appears page 47 Genre The submenu appears...

Page 54: ...ter a new name for the disc To change the disc number press ADJUST button Notes You cannot change the disc name of a blank DVD R disc After recording change the disc name You may not be able to change the disc name of a DVD R disc if the disc is in a certain condition such as a minimal remaining space Disc information Disc Type Record Time h m Remain Time h m Edit Disc Number Edit Disc Name DVD RA...

Page 55: ... This occurs because the recorder is reading the data of a disc To stop playback Press STOP To pause playback still playback Press To resume normal playback press PLAY button or button Note Sound is muted during still mode Note DVD video disc provides high resolution pictures and a lot of information Because of this you may notice some fine picture noises on TV screen which you have never seen wit...

Page 56: ...t a scene Most of the top menus automatically appear in certain scenes and also are displayed on demand Actual operation of the top menu depends on the disc This section explains a general example of how to operate a top menu Also refer to the instructions of the disc itself 1 Press TOP MENU 2 Press to select the title you want If the titles in the top menu are assigned a number you can directly l...

Page 57: ...sume normal playback press PLAY button You can play in fast forward to within 10 seconds prior to the current broadcast 3 Press TIMESLIP to exit this mode The recorder stops storing the broadcast on a DVD RAM disc A message appears and asks you whether you will save the stored data or erase it Press buttons to select then press SELECT ENTER button When the recording mode is set to XP the recorder ...

Page 58: ...se frame by frame play First press button then press ADJUST button To resume normal playback press the PLAY button You can play in fast forward to within 10 seconds prior to the current broadcast 4 Press TIMESLIP to exit The current broadcast returns Notes Time slip recording playback stops when the DVD RAM disc is filled up You can play up to a location where the recorder stopped the recording Th...

Page 59: ...pending on the disc or data condition picture and sound in fast forward playback at speed may be disturbed To resume normal playback Press PLAY To skip the contents in pre determined increments During playback press INSTANT SKIP Each time you press the button you can skip by the specified time You can select the interval per press of the button See Instant skip interval page 116 Time bar display F...

Page 60: ... can locate chapters only in the current title if DVD title stop page 112 is set to On To access chapters in other titles set to Off However in this instance even though you press the SKIP REV button to go back to the previous title playback starts not from the last chapter of the title but from the first chapter Playing in slow motion 1 Press during playback 2 Press FWD or REV FWD Forward slow mo...

Page 61: ...smooth playback Picture may advance more than 1 frame at a time Depending on the scene some frames may not be played When playing a VIDEO CD reverse frame by frame playback is not available Viewing still pictures Playing a disc that contains still pictures 1 Press PLAY The first still picture on a disc is displayed Some DVD video discs may allow you to change the pictures using PLAY SELECT ENTER o...

Page 62: ...To clear the display press SEARCH button several times depending on a disc This method of locating a title is available only on a disc that contains title numbers If a title is erased the numbers of the following titles decrease respectively When you record a new title Original on a DVD RAM disc it is added prior to current titles Playlist and each following title Playlist reference number will ad...

Page 63: ...ss the button until the following display appears e g 2 Press the number buttons and to enter the desired time location on the disc e g To enter 1 hour 25 minutes and 30 seconds 0 1 2 5 3 0 hour minute second 3 Press SELECT ENTER Playback starts from the selected location Notes Some discs may not respond to this process Some scenes may not be accessed precisely as you specified This method for acc...

Page 64: ... after about 3 seconds if no further selections are made OPEN CLOSE ANGLE DISPLAY FL SELECT DIMMER SUBTITLE AUDIO SAP FREEZE REMAIN REC MODE EXTEND SETUP VOL CH TIMESLIP INPUT SELECT MUTE MENU TV DVD INSTANT REPLAY INSTANT SKIP TOP MENU QUICK MENU SKIP REV STOP SKIP FWD FWD PLAY REV REC SEARCH T ADJUST CHP DIVIDE ZOOM PROGRESSIVE SELECT ENTER EASY NAVI Notes You can also change the camera angle du...

Page 65: ...pear The display turns off after about 3 seconds if you do not make a selection OPEN CLOSE ANGLE DISPLAY FL SELECT DIMMER SUBTITLE AUDIO SAP FREEZE REMAIN REC MODE EXTEND SETUP VOL CH TIMESLIP INPUT SELECT MUTE MENU TV DVD INSTANT REPLAY INSTANT SKIP TOP MENU QUICK MENU SKIP REV STOP SKIP FWD FWD PLAY REV REC SEARCH T ADJUST CHP DIVIDE CLEAR ZOOM PROGRESSIVE 1 2 3 4 5 6 10 7 8 9 0 SELECT ENTER EAS...

Page 66: ...d The zoom feature is canceled when the disc menu is operated The magnification level varies depending on the picture size you select page 40 INSTALLATION GUIDE The zoom feature is not available while displaying a GUI The zoom feature is canceled when you stop playback or start playback To cancel the zoom Press ZOOM OPEN CLOSE ANGLE DISPLAY FL SELECT DIMMER SUBTITLE AUDIO SAP FREEZE REMAIN REC MOD...

Page 67: ...sc or the type of TV broadcast DVD RAM TV channel signals Stereo sound Stereo left channel and right channel Stereo L left channel Stereo R right channel Back to Stereo SAP sound Main SAP Main SAP Back to Main DVD RW DVD VIDEO DVD R Language name sound recording system No of channels e g VCD Stereo Stereo L Stereo R Back to Stereo The display turns off if you do not operate for more than 3 seconds...

Page 68: ...Stereo Stereo L R Stereo Mono Mono Mono Stereo On Stereo SAP L R SAP Dual Mono Mono SAP Mono SAP Dual Mono Stereo L R Stereo Mono Mono Mono Stereo Main Off Stereo SAP L R Stereo Mono SAP Mono Mono Stereo Stereo L R Stereo Mono Mono Mono Stereo On Stereo SAP L R L R Stereo Mono SAP Mono Mono Stereo Stereo L R Stereo Mono Mono Mono Stereo SAP Off Stereo SAP L R Stereo Mono SAP Mono Mono Stereo Stere...

Page 69: ...it 48 kHz 16 bit 44 1 kHz 16 bit 44 1 kHz 16 bit Bitstream 48 kHz 16 bit 48 kHz 16 bit 48 kHz 16 bit Analog L R jacks 48 kHz 20 bit 48 kHz 16 bit 48 kHz 20 bit 48 kHz 24 bit 48 kHz 16 bit 48 kHz 20 bit 48 kHz 24 bit 48 kHz 16 bit 44 1 kHz 16 bit 44 1 kHz 16 bit Noise 48 kHz 20 bit 48 kHz 16 bit 48 kHz 16 bit Analog L R jacks 48 kHz 20 bit 48 kHz 16 bit 48 kHz 20 bit 48 kHz 24 bit 96 kHz 16 bit 96 ...

Page 70: ...heir own entire images depending on the size Operation to JPEG file will be disabled at about 5 minutes before a programmed recording starts OPEN CLOSE ANGLE DISPLAY FL SELECT DIMMER SUBTITLE AUDIO SAP FREEZE REMAIN REC MODE EXTEND SETUP VOL CH TIMESLIP INPUT SELECT MUTE MENU TV DVD TOP MENU ZOOM PROGRESSIVE SELECT ENTER EASY NAVI To rotate a picture Press ANGLE repeatedly Each time you press the ...

Page 71: ...0018 002 DH100002 Auto 005 DH100001 008 DH100004 011 DH100007 014 DH100010 017 DH100013 020 DH100016 023 DH100019 003 DH100001 006 DH100002 009 DH100005 012 DH100008 015 DH100011 018 DH100014 021 DH100017 024 DH100020 1 3 013 CONTENT MENU File number If you select this icon and press SELECT ENTER button upper folders appear e g Page CD JPEG 1 8 Pictures CONTENT MENU e g Page CD 001 DH100001 004 DH...

Page 72: ...T MENU Audio List 1 Press EASY NAVI 2 Press to select Play Contents then press SELECT ENTER CONTENT MENU Audio List appears To stop playback Press STOP If you press PLAY button after pressing STOP button playback will start from the the beginning of the track To pause playback Press To resume press button again or press PLAY button To skip tracks During playback press SKIP FWD or SKIP REV repeated...

Page 73: ...to download copyrighted content including music files in any format including the MP3 and WMA formats prior to the downloading thereof Toshiba has no right to grant and does not grant permission to download any copyrighted content Microsoft Windows Media and the Windows Logo are trademarks or registered trademarks of Microsoft Corporation in both the United States and other countries 3 Press to se...

Page 74: ...hrough this recorder press FREEZE The TV broadcast pauses just as a still picture e g When Screen protector is set to On the freeze function will be cancelled about 15 minutes later OPEN CLOSE ANGLE DISPLAY FL SELECT DIMMER SUBTITLE AUDIO SAP FREEZE REMAIN REC MODE EXTEND SETUP VOL CH TIMESLIP INPUT SELECT MUTE MENU TV DVD TOP MENU ZOOM PROGRESSIVE EASY NAVI FREEZE Playback Start To cancel the fre...

Page 75: ...TOP MENU QUICK MENU SKIP REV STOP SKIP FWD FWD PLAY REV REC SEARCH T ADJUST CHP DIVIDE CLEAR ZOOM PROGRESSIVE 1 2 3 4 5 6 10 7 8 9 0 SELECT ENTER EASY NAVI Virtual surround Picture Quality Audio Quality Audio Audio Output Subtitle Off SP 1 Stereo R Original Bitstream Off 002 3 00 22 01 00 00 07 0005 Stereo Title repeat Title Chapter D M1 DVD RAM Checking the current status and settings You can con...

Page 76: ...time if it comes within 30 minutes Elapsed time Locator Shows the current location QUICK MENU REMAIN REC MODE EXTEND SETUP VOL CH TIMESLIP INPUT SELECT MUTE MENU TV DVD INSTANT REPLAY INSTANT SKIP TOP MENU QUICK MENU SKIP REV STOP SKIP FWD FWD PLAY REV REC SEARCH T ADJUST CHP DIVIDE CLEAR ZOOM 1 2 3 4 5 6 10 7 8 9 0 SELECT ENTER EASY NAVI 01 30 00 00 00 00 00 30 00 00 00 00 00 55 00 00F Location 0...

Page 77: ...at playback begins between point A and B Title repeat To repeat the same title Chapter repeat To repeat the same chapter Track repeat VCD CD To repeat the same track Disc repeat DVD RW DVD R To repeat the entire disc Cancel repeat in Repeat playback mode To resume normal playback Playback of a DVD RAM disc stops Notes Some discs may not permit repeat operation You cannot use the repeat playback fu...

Page 78: ...umber first input 0 e g 0 0 3 To cancel the numbers press CLEAR button To input a chapter number press buttons to shift the cursor 01 T CT 11 T CT 21 T CT 02 T CT 12 T CT 22 T CT 03 T CT 13 T CT 23 T CT 04 T CT 14 T CT 24 T CT 05 T CT 15 T CT 25 T CT 06 T CT 16 T CT 26 T CT 07 T CT 17 T CT 27 T CT 08 T CT 18 T CT 28 T CT 09 T CT 19 T CT 29 T CT 10 T CT 20 T CT 30 T CT 2 Press to select the next bo...

Page 79: ...en press SELECT ENTER Bit rate Note To turn off the bit rate display select this item again To check information on a title DVD RAM DVD RW DVD R 1 During playback press QUICK MENU 2 Press to select Title information then press SELECT ENTER Title information To exit the Quick Menu DVD RAM DVD RW DVD VIDEO VCD CD DVD R Press QUICK MENU again or Press to select Exit then press SELECT ENTER Exit ...

Page 80: ...80 ...

Page 81: ...iting You can create your own movie from your assembled scenes Before editing Creating chapters Playlist editing Creating thumbnails High speed dubbing Deleting selected Items DVD Video finalizing process ...

Page 82: ...dure Record a TV program An original title is created automatically Chapter Editing Create chapters by dividing an original title Playlist Editing Collect necessary chapters A playlist has a fictitious title that is different from an original title Dubbing Copy the playlist Copy the playlist and it becomes an original title ...

Page 83: ...lete unnecessary chapters to regain space for another recording Playlist editing Collect your favorite chapters to make them as one title Playlist If an original title is deleted a playlist will be also deleted because playlists are fictitious titles e g Making a playlist by collecting scenes of cats from title 1 The world of cats and dogs Title 1 Title 2 Title 3 Title 4 Title 5 Title 6 Playlist E...

Page 84: ...E button The point divides the chapter into two You can create multiple chapters by repeating the above operation Notes Chapters cannot be created in the following modes Dubbing Fast reverse Fast forward Slow motion You cannot divide a title of a DVD R RW disc into chapters It is possible to create chapters in a DVD R RW disc by selecting an option that inserts chapter marks automatically during r...

Page 85: ...er Divide Title 004 Chapter 0001 DVD RAM VR Fishing Guide SELECT ENTER SELECT ENTER Original 2004 06 08 07 00 am TV 4 Title List Page 1 2 0 53 45 Original 2005 03 08 11 00 pm TV 6 0 29 50 Original 2005 04 11 07 00 am TV 8 0 54 30 Original 2005 04 12 09 00 pm TV 10 0 51 28 Original 2004 06 12 09 00 pm TV 3 0 52 40 Original 2005 04 12 11 00 pm TV 4 0 30 08 001 CONTENT MENU DVD RAM VR Quick Menu Titl...

Page 86: ...pter division is created at the selected location and the first scene of the new chapter is registered as a chapter thumbnail e g OPEN CLOSE ANGLE DISPLAY FL SELECT DIMMER SUBTITLE AUDIO SAP FREEZE REMAIN REC MODE EXTEND SETUP VOL CH TIMESLIP INPUT SELECT MUTE MENU TV DVD INSTANT REPLAY INSTANT SKIP TOP MENU QUICK MENU SKIP REV STOP SKIP FWD FWD PLAY REV REC SEARCH T ADJUST CHP DIVIDE CLEAR ZOOM P...

Page 87: ...unctions Playlist Editing Del Selected Items DVD Video Finalizing Source DV Recording Chapter Editing Chapter Editing Chapter Editing Main Menu DVD RAM VR 10 Repeat steps 7 to 9 Locations of chapter division are indicated by the markers on the time bar To erase a chapter division see Merging chapters page 88 11 When all chapter divisions have been made press The recorder displays a message and sta...

Page 88: ...ing a chapter 1 From EDIT MENU Chapter Editing select a chapter which you want to name 2 Press QUICK MENU 3 Press to select Edit chapter name then press SELECT ENTER A keyboard appears Enter a name following the on screen icon guides Notes There is a limit to the number of chapters which can be named If exceeded a message appears You can also access the keyboard to enter a chapter name by selectin...

Page 89: ...ELECT ENTER EASY NAVI SELECT ENTER Original 2004 06 08 07 00 am TV 4 Title List Page 1 2 0 53 45 Original 2005 03 08 11 00 pm TV 6 0 29 50 Original 2005 04 11 07 00 am TV 8 0 54 30 Original 2005 04 12 09 00 pm TV 10 0 51 28 Original 2004 06 12 09 00 pm TV 3 0 52 40 Original 2005 04 12 11 00 pm TV 4 0 30 08 HDD MENU CONTENT DVD RAM VR Quick Menu Title information Create thumbnail High speed dubbing...

Page 90: ... SETUP VOL CH TIMESLIP INPUT SELECT MUTE MENU TV DVD INSTANT REPLAY INSTANT SKIP TOP MENU QUICK MENU SKIP REV STOP SKIP FWD FWD PLAY REV REC SEARCH T ADJUST CHP DIVIDE CLEAR ZOOM PROGRESSIVE 1 2 3 4 5 6 10 7 8 9 0 SELECT ENTER EASY NAVI A A A B B Source Title Object Title Original PlayList Start Title Entire time EDIT MENU Playlist Editing DVD RAM VR SELECT ENTER SELECT ENTER Cursor A A A B B Sour...

Page 91: ...tween the chapter boundary and the actual playback picture A title or chapter which is being edited cannot be selected as an item You cannot add a title of still pictures or a title or a chapter which contains both still and moving pictures to a playlist By copying dubbing a Playlist a title Original of the same contents is created You cannot program a Playlist of contents recorded on a DVD R RW d...

Page 92: ... to select Playlist re editing and then press SELECT ENTER EDIT MENU Playlist editing appears Follow the procedure from steps 6 on page 90 add or delete parts as necessary Note You cannot edit a title Playlist of still pictures or a title Playlist which contains both still and moving pictures Using a part in a Playlist also in another Playlist 1 In play or stop mode of a Playlist title press EASY ...

Page 93: ...hange To go to the next or previous page press FWD or REV button To select a chapter select a title and press button Chapter List appears By pressing button again you can return to Title List 4 Press QUICK MENU Quick Menu appears Original 001 2005 03 08 07 00 am TV 4 Title List Page 1 2 0 53 45 Original 2005 03 08 11 00 pm TV 6 0 29 50 Original 2005 04 11 07 00 am TV 8 0 54 30 Original 2005 04 12 ...

Page 94: ... MENU TV DVD INSTANT REPLAY INSTANT SKIP TOP MENU QUICK MENU SKIP REV STOP SKIP FWD FWD PLAY REV REC SEARCH T ADJUST CHP DIVIDE CLEAR ZOOM PROGRESSIVE 1 2 3 4 5 6 10 7 8 9 0 SELECT ENTER EASY NAVI Creating thumbnails Continued Editing 00 29 50 2005 03 08 11 00pm Ch 6 00 00 00 0 29 50 B 00 00 00 03F Original Location Create Thumbnail Select desired thumbnail image via remote To set press enter Titl...

Page 95: ...ecording Playback Notes You cannot create thumbnails of chapters in a title that contains a still picture If you create a chapter thumbnail and then record or edit the disc on other devices the chapter thumbnail may return to the top of the chapter ...

Page 96: ...me than actual playing time of the title or chapter Follow this procedure when you convert a playlist into an original title QUICK MENU SELECT ENTER OPEN CLOSE ANGLE DISPLAY FL SELECT DIMMER SUBTITLE AUDIO SAP FREEZE REMAIN REC MODE EXTEND SETUP VOL CH TIMESLIP INPUT SELECT MUTE MENU TV DVD INSTANT REPLAY INSTANT SKIP TOP MENU QUICK MENU SKIP REV STOP SKIP FWD FWD PLAY REV REC SEARCH T ADJUST CHP ...

Page 97: ...ter becomes a title by being copied Copying is interrupted when a program recording is about to start This function is available only for copying contents on a DVD RAM disc to the same disc If copying is not allowed due to some conditions such as lack of disc space etc a message will appear Follow the procedure indicated there Depending on the contents some reference information or appendix data m...

Page 98: ...T ENTER EASY NAVI 1 Press EASY NAVI EASY NAVI Main Menu appears 2 Press to select Edit Menu then press SELECT ENTER EDIT MENU Main Menu appears 3 Press to select Del Selected Items e g 4 Press SELECT ENTER EDIT MENU Del Selected Items appears e g Thumbnails of the parts in the disc are displayed in the upper area A A A B B Del Selected Items Title Object Original Start EDIT MENU DVD RAM VR 3 2 1 3...

Page 99: ...RW disc deleting can restore the disc space only by deleting the last recorded title Deleting cannot be canceled once started Be careful when executing the deletion process If you select a title for the part to be removed you cannot select chapters in that title Chapters in DVD R RW discs cannot be selected to delete 5 Following steps 6 to 8 on page 90 91 assemble the items to delete 6 Press repea...

Page 100: ... g OPEN CLOSE ANGLE DISPLAY FL SELECT DIMMER SUBTITLE AUDIO SAP FREEZE REMAIN REC MODE EXTEND SETUP VOL CH TIMESLIP INPUT SELECT MUTE MENU TV DVD INSTANT REPLAY INSTANT SKIP TOP MENU QUICK MENU SKIP REV STOP SKIP FWD FWD PLAY REV REC SEARCH T ADJUST CHP DIVIDE CLEAR ZOOM PROGRESSIVE 1 2 3 4 5 6 10 7 8 9 0 SELECT ENTER EASY NAVI SELECT ENTER SELECT ENTER DVD RW DVD R Title Finalize Menu Title Title...

Page 101: ...our 24 min Total title number Total time Disc Name F1 GP Vol 2 EDIT MENU Return Next DO NOT MR SATO PLEASE JOIN US TO CREATE MANUALS LEAVE HERE DO NOT LEAVE HERE DO NOT LEAVE HERE DO NOT LEAVE HERE DO NOT LEAVE HERE DO NOT LEAVE HERE DO NOT LEAVE HERE DO NOT LEAVE HERE DO NOT LEAVE HERE DO NOT LEAVE HERE DO NOT LEAVE HERE DO NOT LEAVE HERE DO NOT LEAVE HERE DO NOT LEAVE HERE DO NOT LEAVE HERE DO N...

Page 102: ...lize Chapter Menu Select press SELECT ENTER and select Yes by then press SELECT ENTER A message appears to ask you if you want the power to turn off automatically or not when the process is completed 11Press to select Yes or No then press SELECT ENTER A message disappears and the finalize process starts The progress is displayed on the screen and in the front panel display on the recorder OPEN CLO...

Page 103: ... On DVD RW discs it is possible to cancel the DVD Video finalizing process or to initialize for a new use To cancel the finalize process DVD RW You can cancel the DVD Video finalizing process executed to a DVD RW disc so that the disc can be recordable again 1 During stop press QUICK MENU Quick menu appears 2 Press to select Disc management then press SELECT ENTER 3 Press to select Cancel finaliza...

Page 104: ......

Page 105: ...Function Setup You can change the default settings to customize performance to your preference Customizing the function settings ...

Page 106: ...IVE 1 2 3 4 5 6 10 7 8 9 0 SELECT ENTER EASY NAVI 1 During stop press SETUP The following setup display appears 2 Press to select the icon of a group that contains a desired item then press SELECT ENTER For details on each setting see the next page e g When Display settings is selected 3 Press to select a desired item then press SELECT ENTER 4 Refer to the explanations on pages beginning from 110 ...

Page 107: ...113 113 114 114 114 114 Details To select a preferred language for disc menus To select a preferred language for the sound track To select a preferred language for subtitles To turn on or off a function that makes faint sounds easier to hear even if you lower the volume during late hour playback To turn on or off the vocal output during DVD KARAOKE disc playback To turn the parental lock function ...

Page 108: ...s To select a picture size according to the aspect ratio of your TV To turn the screen saver on or off To select where you turn on or off closed caption To switch the codes that operate the recorder To set the width to skip when INSTANT SKIP button is pressed once To set the width to go back when INSTANT REPLAY button is pressed once To select the position of the thumbnail image counting from the ...

Page 109: ...ng mode for manual programme recording To make further setting when you cannot adjust the image quality with Custom Picture Setting of the Picture Audio Settings To select the black level of recorded pictures To set the aspect ratio for DVD R RW recording To set the audio for DVD R RW recording To set whether or not chapters are to be automatically created at a specified interval for DVD R RW reco...

Page 110: ...ge choice After pressing SELECT ENTER button follow steps 1 4 below 1 Obtain the language code of the preferred language from the Language code list page 126 2 Select the first character by pressing or ADJUST 3 Press to shift Select the second character by pressing or ADJUST 4 Press SELECT ENTER Note Some DVD video discs may not include your preset language In this case the recorder automatically ...

Page 111: ... KARAOKE disc recorded in Dolby Digital Multi Channel format If you want to enjoy the KARAOKE function connect an amplifier or other such device to this recorder DVD parental lock DVD VIDEO DVD video discs equipped with the Parental Lock function have a predetermined limitation level The limitation level or limitation method may differ depending on the disc For example the whole contents of a disc...

Page 112: ... select level 7 discs exceeding level 8 are locked and cannot be played back When US is selected its limitation level corresponds to the following settings Level 7 NC 17 Level 3 PG Level 6 R Level 1 G Level 4 PG13 To change the limitation level of the Parental Lock function Follow step 1 3 above To change the password 1 Press STOP 4 times after selecting On and Off in order and then press SELECT E...

Page 113: ...Progressive conversion DVD RAM DVD RW DVD VIDEO VCD DVD R There are two types of source content in pictures recorded in DVD video discs film content pictures recorded from films at 24 frames per second and video content video signals recorded at 30 frames per second Make this selection according to the type of content being viewed Auto Select this position normally The DVD player automatically det...

Page 114: ...tinued Function Setup Analog 2ch Select this when a TV or other audio device is connected to this recorder via the ANALOG output connectors PCM Select this when a 2ch digital stereo amplifier is connected to this recorder When you play back a disc recorded in Dolby Digital MPEG1 or MPEG2 format the sound is converted to the PCM 2ch format and output DTS and DTS Digital Out are trademarks or Digita...

Page 115: ...r if freezes may return to the normal by leaving it for about 15 minutes or longer Off Deactivates the Screen Protector function On Activates the Screen Protector function Note Toshiba does not guarantee that this function protects the TV screen by all means Closed caption To select where you turn on or off closed caption Off To disable closed caption TV Closed caption data is decoded on the conne...

Page 116: ...tle thumbnail 0 sec 3 sec 10 sec 35 sec 1 min 5 min Note Thumbnails can also be changed to other scenes See page 93 Title playback DVD RAM Sets the resume play per title Title resume Remembers the point where you stop playback Allows you to resume the playback from that point Serial playback You can play back titles Original Playlist stored in the DVD RAM continuously Because there is no division ...

Page 117: ...ting in the Picture Audio settings page 113 of this recorder Important This setting changes the video signal to record and the recorded signal is not returned to the original state even when this setting is changed after recording When duplicating from VHS tape if you can check the video recording state beforehand we recommend first playing back for a while and checking the overall brightness tend...

Page 118: ...d record sound of the main channel only in stereo Select Main or SAP for a DVD R RW recording Main Records sound of the main channel only in stereo SAP Records sound of the SAP channel only in stereo Notes When AV record quality is set to MP and set this mode to Main or SAP the picture quality may become lower than when you set this mode to Off You can change the setting from Quick Menu DVD Video ...

Page 119: ...want to change then press SELECT ENTER A list of genres appears You can turn the pages using the button 2 Press to select a genre then press SELECT ENTER A list of genre names appears 3 Press to select a genre name then press SELECT ENTER The selected genre name replaces the previous one of the position you selected at step 1 4 Repeat steps 1 to 3 to register genre names 5 When genre names are reg...

Page 120: ......

Page 121: ...Others Before calling service personnel Error codes on the display window Recording duration Language code list Specification ...

Page 122: ...ise appears Picture noise may appear in the following cases It is not a malfunction There is picture noise in the original recording Weather reception conditions may cause noise The AV recording mode with the low data rate such as LP or EP is selected The image data processing of this recorder cannot follow dynamic movement on the screen High video data rate A physical error has occured on the DVD...

Page 123: ...VD selector to the equipment to operate Clock The clock blinks Complete the initial setting again page 30 INSTALLATION GUIDE The clock does not keep time Set the time and date manually page 33 INSTALLATION GUIDE Set Summer time or Time zone correctly page 34 INSTALLATION GUIDE Recording Data cannot be recorded on a DVD RAM disc The disc is protected from deleting data Set the write protect tab to ...

Page 124: ...ERR 2F Overflow of the menu size detected ERR 30 Exceeded maximum number of menus detected ERR 31 Recovery writing executed from compatibiliy of drive and disc ERR 32 ERR 33 Incompatibility of disc format detected ERR 34 Disc protected ERR 35 Disc protected or system control data error detected ERR 36 Exceeded volume in disc budget calculation detected ERR 37 Recording failed Title not saved ERR 3...

Page 125: ...ted above are applicable to DVD RAM discs that have been initialized Actual recording duration may vary depending on the disc used If you subtract the actual recording duration from the duration listed in this table the calculated time period does not represent the remaining time The consumption of space may vary depending on the picture and sound conditions of the recorded content Use the remaini...

Page 126: ... RN RO RU RW SA SD SG SH SI SK SL SM SN SO SQ SR SS ST SU SV SW TA TE TG TH TI TK TL TN TO TR TS TT TW UK UR UZ VI VO WO XH YO ZU Guarani Gujarati Hausa Hindi Croatian Hungarian Armenian Interlingua Interlingue Inupiak Indonesian Icelandic Hebrew Yiddish Javanese Georgian Kazakh Greenlandic Cambodian Kannada Kashmiri Kurdish Kirghiz Latin Lingala Laotian Lithuanian Latvian Lettish Malagasy Maori M...

Page 127: ...ar Mini DIN4 Pin x 1 system COMPONENT output Y PB PR Y output green 1 0Vp p 75Ω Sync signal negative Pin jack x 1 system PB PR output blue red 0 7Vp p 75Ω Pin jack x 1 system each AUDIO input 2 0V rms 22kΩ or above pin jack L R x 2 systems 1 at rear 1 in front AUDIO output 2 0V rms 2 2kΩ or below pin jack L R x 2 systems 2 at rear DIGITAL AUDIO OUTPUT BITSTREAM PCM OPTICAL terminal Optical connect...

Page 128: ...and used for commercial purposes have a limited warranty for all parts and labor which warranty begins on the date of original retail purchase and ends on the date that is ninety 90 days thereafter Owner s Manual and Product Registration Card Read this owner s manual thoroughly before operating this DAV Product Complete and mail the enclosed product registration card or register your DAV Product o...

Page 129: ...F THE U S A AS HEREBY LIMITED THE FOREGOING WARRANTY IS EXCLUSIVE AND IN LIEU OF ALL OTHER WARRANTIES GUARANTEES AGREEMENTS AND SIMILAR OBLIGATIONS OF TACP WITH RESPECT TO THE REPAIR OR REPLACEMENT OF ANY PARTS IN NO EVENT SHALL TACP BE LIABLE FOR CONSEQUENTIAL OR INCIDENTAL DAMAGES INCLUDING BUT NOT LIMITED TO LOST PROFITS BUSINESS INTERRUPTION OR MODIFICATION OR ERASURE OF RECORDED DATA CAUSED B...

Page 130: ...130 ...

Page 131: ...131 Recording Playback Others Introduction Editing Function setup Memo ...

Reviews: