background image

124

Changing the Paper Size of the Cassette

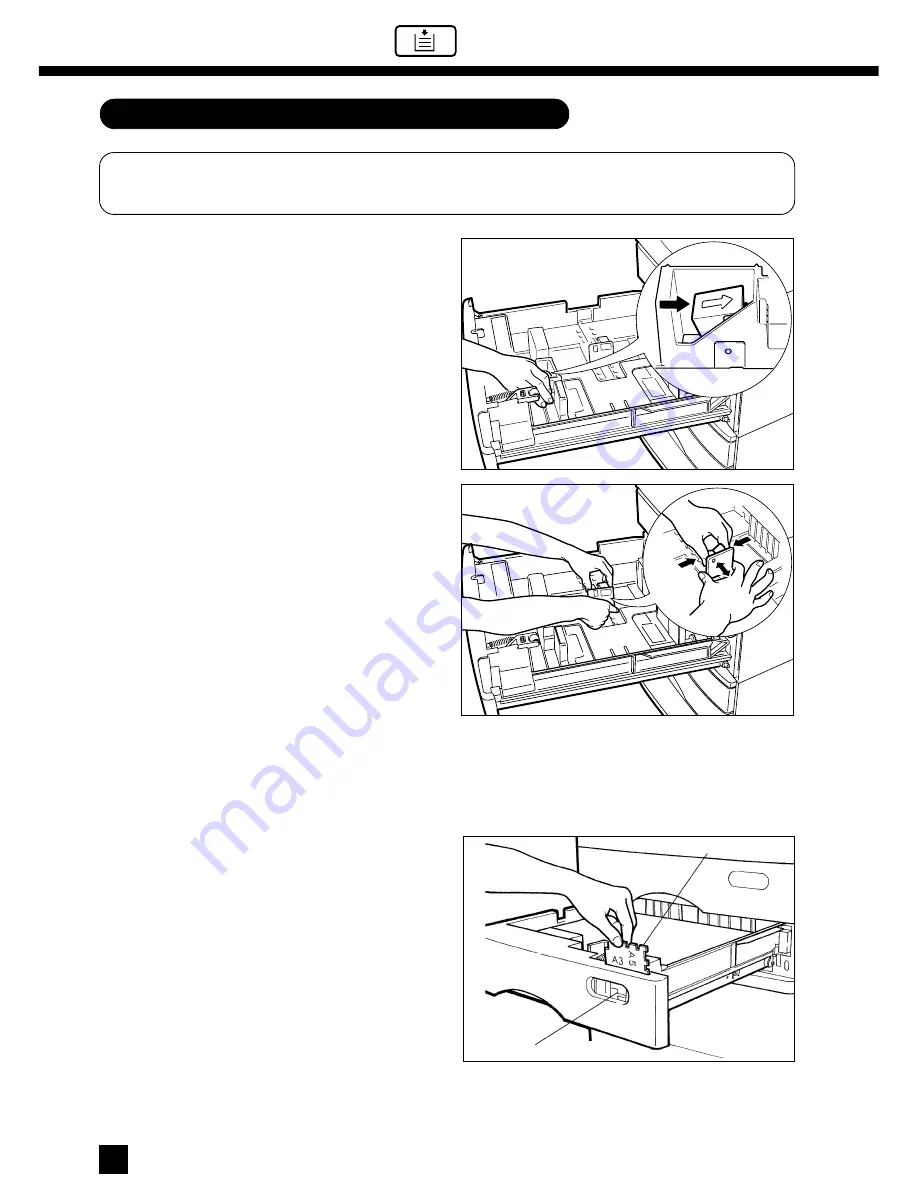
The paper size of the cassette can be changed to any of A3, B4, A4-R, Folio, B5, B5-R and
A5-R. Use the following procedure.

11111

44444

Place paper in the cassette.

For placing paper in the cassette, refer to
Step  2  in 

“Adding  Paper  to  the  Front

Cassette”

 on page 120.

Pull out the cassette slowly and fully.

Move the side guides so that the space
between them is slightly wider than the
desired paper size.

To move the side guides, push the lever
(arrow 

) to unlock.

Set the back guide to the desired paper
size (shown on the cassette surface).

To move the back guide, push on its sides
(arrows 

) to unlock and slide it with both

of your hands.

22222

33333

55555

Remove and reset the size mark plate so
that the desired paper size appears.

Push in the cassette slowly and fully.

66666

Size mark plate

Paper size indicator

2. ADD PAPER 

 SYMBOL (Cont.)

Summary of Contents for 4560

Page 1: ...4560 Networking Documents DIGITAL PLAIN PAPER COPIER OPERATOR S MANUAL FOR COPYING FUNCTION ...

Page 2: ...romthecopier dischargethestaticelectricity from your body by touching a metal part of the copier This product is carrying the CE Mark in accordance with the related European Directives Responsible for CE marking is TOSHIBA TEC GERMANY IMAGING SYSTEMS GmbH Carl Schurz Str 7 41460 Neuss Germany e mail customerservice toshibatec tgis com ...

Page 3: ... Edge Erase and Dual Page copying capabilities Cover Sheet mode in which the front and or back covers are automatically attached to each set of copies Sheet Insertion mode in which special sheets are automatically inserted into a set of copies at specified pages as you like Weekly Timer which automatically turns on and off the copier at the specified times of each working day Auto Start which auto...

Page 4: ...CTION AND ENLARGEMENT COPYING 38 Using Automatic Magnification Selection AMS 38 Specifying the Original Size and the Copy Size 40 Using the Zoom Keys 41 8 INTERRUPTCOPYING 42 9 SELECTING THE EXPOSURE MODE 44 Copying in Automatic Exposure 44 Copying in Manual Exposure 44 10 COPYING IN THE PHOTO MODE 45 11 USING THE FUNCTION CLEAR KEY 46 SPECIALFUNCTIONS 47 1 DUAL PAGECOPYING 48 2 2 in 1 MODE COPYIN...

Page 5: ... SHEET INSERTION COPYING 95 8 USING THE MODE MEMORY KEYS 97 9 COPYING WITH UNIVERSAL SIZE COPY PAPER 99 10 THICK PAPER COPYING 101 11 BYPASS AUTO STARTING 102 USING THE OPTIONAL SORTERS 103 1 DESCRIPTION OF THE SORTERS 104 2 NON SORTCOPYING 106 3 SORT OR STAPLE COPYING 108 4 GROUPCOPYING 115 WHEN THE GRAPHIC SYMBOLS FLASH 117 1 OPENING AND CLOSING THE UPPER UNIT 118 2 ADD PAPER SYMBOL 120 3 REPLAC...

Page 6: ... OF THE AUTOMATIC DOCUMENT FEEDER Standard 173 4 SPECIFICATIONS OF THE AUTOMATIC DUPLEXING UNIT Standard 173 5 SPECIFICATIONS OF THE LARGE CAPACITY FEEDERS Optional 174 6 SPECIFICATIONS OF THE PAPER FEEDING PEDESTALS Optional 174 7 SPECIFICATIONS OF THE SORTERS Optional 175 PREVENTATIVE MAINTENANCE TABLE OF CONTENTS Cont ...

Page 7: ...ded wall outlet 3 In areas where a 2 pin plug is used the machine must be grounded for safety Never ground it to a gas pipe a water pipe or any other object not suitable for grounding Select a suitable place for installation Avoid excessive heat dust vibration and direct sunlight Also provide proper ventilation as the copier emits a slight amount of ozone To insure optimal operation allow clearanc...

Page 8: ... interlock switches Interlock switches are provided to ensure that the copier will not operate with covers opened Be sure to turn OFF the power switch When you leave your office at night If a power failure occurs Caution When turning OFF the power switch be sure to do so after the machine cycling has come to a complete stop If any paper has misfed in the machine be sure to remove it before turning...

Page 9: ...ave the upper unit of the machine open otherwise the drum may be exposed to light heat flames or chemicals possibly resulting in degraded copy quality Pleasebesuretoreturnusedorunneededdrumstoyoursalesorservicerepresentative WARNING MACHINE MUST BE SECURED TO PAPER FEED PEDESTAL OR STAND BRACKET MUST BE ATTACHED TO STAND OR MACHINE IF USED ON A TABLE NON TOSHIBA STANDS MAY NOT BE CAPABLE OF ACCOMP...

Page 10: ...8 ...

Page 11: ...DESCRIPTION OF THE COPIER 9 DESCRIPTION OF THE COPIER ...

Page 12: ...unit ADU Paper feed pedestal optional Copy receiving tray Automatic Document feeder ADF Cassette Cassette Cassette Cassette optional Original glass Key copy counter slot Bypass guide Large capacity feeder LCF optional Feed side cover pedestal Paper size indicator Original scale Power switch Available paper indicator ...

Page 13: ... COPIER 11 DESCRIPTION OF THE COPIER Upper charger cleaning knob Lower charger cleaning knob Toner cartridge Toner bag Jam removal knob Upper unit Fuser unit Fuser unit knob Exit side cover Drum Upper unit release lever ...

Page 14: ...ing a multicopy run press this key During interrupt copying copies can be made only one by one To return to the previous multicopying run press this key again MESSAGE Display page 14 17 The status of the machine operation proce dure and various instructions to the user are shown in pictorials and text INFO Key Use the key to display the appropriate opera tion procedure and to answer the questions ...

Page 15: ... the desired copy size the copier will auto matically detect the size of the original and calculate the correct reproduction ratio CLEAR STOP Key page 21 23 Use this key to correct the copy quantity entered or stop a multicopy run During multicopying pressing this key once will stop the copy run and pressing it twice will clear the copy quantity to 1 PHOTO Key page 45 To make clear copies of photo...

Page 16: ...tion menus one after another Each function item displayed is shown in the form of a touch key You can select or specify the function by touching the key lightly with your finger Touching one of the function items will show the next display The function items shown below can be specified on the Message Display panel ...

Page 17: ...NIVERSAL Page 99 AUTO START Page 102 THICK PAPER Page 101 KEY COPY COUNTER symbol Page 87 This symbol flashes when the optinal key copy counter is not inserted ihn the copier Insert it to make copies ORIGINAL DIRECTION symbol Either of these symbols is lit according to the direction of the paper in the selected cassette When placing originals on the glass or on the original feed tray do so accordi...

Page 18: ...16 4 DESCRIPTION OF THE GRAPHIC DISPLAY The graphic display shows the status of the machine When one of the graphic symbols flashes take the appropriate action referring to the page shown ...

Page 19: ...ed toner page 125 CHECK ORIGINAL symbol Thissymbolflasheswhenanoriginalmisfeeds insidetheoptionalautomaticdocumentfeeder page 142 REPLACE TONER CARTRIDGE symbol This symbol flashes when the toner supply in the cartridge runs out page 127 BYPASS MISFEED symbol This symbol flashes when a sheet of paper is not fed into the copier in bypass copying Remove and reset the sheets on the bypass guide page ...

Page 20: ... Paper Feed Pedestal Two types of optional paper feed pedestals are available KD 1003A and KD 2009A They have one and two front loading cassettes respectively Each cassette holds 600 sheets of paper Large Capacity Feeder MP 1501 With this unit installed you will have an additional paper source which can hold up to 1 500 sheets of paper 64 80 g m2 Key Copy Counter 7 digit Copies made are recorded a...

Page 21: ...19 HOW TO MAKE COPIES HOW TO MAKE COPIES HOW TO MAKE COPIES The sorter large capacity feeder and paper feed pedestal may be shown in the illustrations and display panels These devices are all optional ...

Page 22: ...made at any time 3 3 3 3 3 Themessage Waitwarmingup isshown on the message display 2 2 2 2 2 The status displayed at this time is called the default status and the following is shown on the control panel Copy quantity 1 Reproduction ratio 100 Copy density Automatic exposure Size selection Automatic paper selection Cassette selection Large capacity feeder Automatic document feeder Stack feed Sorter...

Page 23: ...inal s on the glass or on the original feed tray see page 22 or 28 Select the desired copy modes see the appropriate pages 1 1 1 1 1 2 2 2 2 2 Press the PRINT key The message AUTO START appears and when the copier becomes ready it will automatically start copying in the selected copying modes Note You can change the copying modes even after pressing the PRINT key To cancel the Auto Start mode pres...

Page 24: ...ize 100 copies on regular size paper i e A3 B4 Folio A4 A4 R B5 B5 R A5 R CheckthattheAutomaticPaperSelection mode is shown If the key lamp is off press the key to turn on its lamp 1 1 1 1 1 Place the original on the glass Lifting the automatic document feeder place the original face down on the glass and align it with the original scale on the left 2 2 2 2 2 The size of the original is immediatel...

Page 25: ...re making one copy of each original 4 4 4 4 4 Select the exposure Normally the AUTO EXPOSURE mode is selected providing the optimum exposure automatically according to the darkness of the original Note When you want to select the desired exposure use manual exposure see page 44 If an incorrect quantity is set press the CLEAR STOP key and key in the correct number If you press the FUNCTION CLEAR ke...

Page 26: ...ing set the desired number of copies if you do not press the PRINT key within about 45 seconds all the modes you have set will automatically be cleared and the copier will return to the standard copy mode Note The copier may not be able to detect the size of the following types of original in the APS mode Transparent originals such as OHP film Originals with black areas For copying these types of ...

Page 27: ...BOUT SHEET ORIGINALS Use originals with a paper weight in the range of 64 g m2 to 80 g m2 Do not use the following types of originals as they tend to misfeed or become damaged in the document feeder 1 1 1 1 1 2 2 2 2 2 1 Wrinkled or folded originals 2 Clipped or stapled originals 3 Carbon paper 4 Torn originals including those with holes in them 5 Taped originals Folded or curled originals should ...

Page 28: ... 1 1 1 Press the ADF key on the PROGRAM panel The DOCUMENT FEEDER panel appears 2 2 2 2 2 Press the ADF key to select the stack feed mode Normally the ADF key is highlighted indicating it is already selected The display will return to the PROGRAM panel then a few seconds later it will change to the BASIC panel 3 3 3 3 3 ...

Page 29: ... the AUTO EXPOSURE is selected For manual selection of exposure refer to page 44 Up to 999 copies can be set using the digital keys There is no need for this if you are only making one copy of each original If an incorrect quantity is set press the CLEAR STOP key and key in the correct number COPY A4 A3 B4 A5 UNIVERSAL ORIGINAL APS AMS 2 3 1 5 6 4 8 9 7 C 0 INFO F C 100 200 50 CO A4 A3 B4 A5 UNIVE...

Page 30: ... be set at a time A3 B4 and Folio sized originals 64 80g m2 should be 25 or less When copying in the staple mode using an optional staple sorter be careful as the number of originals that can be set is different from the numbers mentioned above see page 109 To set larger originals pull out the extension holder 5 5 5 5 5 Press the PRINT key The originals will be fed starting with the lowermost one ...

Page 31: ...ht 1 1 1 1 1 Press the SADF key to select the auto feed mode The SADF key is highlighted indicating it is selected The display will return to the PROGRAM panel then a few seconds later it will change to the BASIC panel 3 3 3 3 3 2 2 2 2 2 Press the ADF key on the PROGRAM panel The DOCUMENT FEEDER panel on the right appears ...

Page 32: ... is selected 100 copying For reduction or enlargement refer to page 38 4 4 4 4 4 Normally AUTO EXPOSURE is selected For manual selection of exposure refer to page 44 Up to 999 copies can be set using the digital keys There is no need for this if you are only making one copy of each original COPY A4 A3 B4 A5 UNIVERSAL ORIGINAL APS AMS 2 3 1 5 6 4 8 9 7 C 0 INFO F C 100 200 50 If an incorrect quanti...

Page 33: ... being pulled in automatically let go of the original If you start with the last page of the originals copies will exit in the correct page order 6 6 6 6 6 Align the side guides on the original feed tray to the size of the original Set the side guides a little wider than the actual original width To set larger originals A3 or B4 pull out the extension holder ...

Page 34: ...argement mode see REDUCTION AND ENLARGEMENT COPYING on page 38 Select the copy size Press the desired COPY SIZE key or use the CASSETTE key on the Message Display panel to select it You can also press the cassette on the display to select it The lamp goes out 1 1 1 1 1 Place the original Lifting the document feeder place the original face down on the glass and align it with the original scale on t...

Page 35: ...largement refer to page 38 Select the exposure as required Normally AUTO EXPOSURE is selected For manual selection of exposure refer to page 44 Key in the desired number of copies There is no need for this if you are only making one copy of each original Press the PRINT key 3 3 3 3 3 4 4 4 4 4 5 5 5 5 5 6 6 6 6 6 ...

Page 36: ...ial types of paper such as OHP film transparency Copying Procedure Place the original s on the document feeder or on the glass Set the original face down on the glass or face up on the document feeder For setting originals refer to page 22 or 28 Open the bypass guide 1 1 1 1 1 2 2 2 2 2 For setting A3 B4 A4 or A4 R sized paper pull out the paper holder Paper holder ...

Page 37: ...serted sheet by sheet A5 R size is the minimum size that can be fed in this mode 3 3 3 3 3 Set A3 B4 A4 or A4 R sized sheets of paper on the extended paper holder The following message will appear Ready for bypass feeding 4 4 4 4 4 5 5 5 5 5 Select the desired copy quantity exposure reproduction ratio etc as required Press the PRINT key If the BYPASS MISFEED symbol flashes on the graphic display r...

Page 38: ...ts of copy paper on the bypass guide For setting sheets of paper on the bypass guide see page 34 This message will appear Ready for bypass feeding 1 1 1 1 1 Set the copy size PresstheCOPY SIZE keymatching the size of the paper set on the bypass guide 2 2 2 2 2 IfA4 Rpaperisused presstheA4COPY SIZE key twice The A4 R lamp comes on COPY A4 A3 B4 A5 UNIVERSAL ORIGINAL APS AMS 2 3 1 5 6 4 8 9 7 C 0 IN...

Page 39: ... ratio as required 3 3 3 3 3 Key in the desired number or copies 4 4 4 4 4 Place the original on the document feeder or on the glass Set the original face down on the glass or face up on the original feed tray For setting originals refer to page 22 or 28 5 5 5 5 5 Press the PRINT key 6 6 6 6 6 Note When the paper supply on the bypass guide is finished the selected COPY SIZE lamp goes out ...

Page 40: ...e of paper Specifying the original and copy sizes When both the original and copy sizes are specified the copier automatically calculates the appropriate reproduction ratio Using the ZOOM keys The ZOOM keys and allow selection of the desired reproduction ratio in the range of 50 200 at increments of 1 Press the Automatic Magnification Selection key The lamp comes on 1 1 1 1 1 Select the copy size ...

Page 41: ...er again Note Bypass copying in the AMS mode You can make copies in the AMS mode by feeding paper from the sheet bypass as follows Set sheets of paper on the sheet bypass see page 34 press the matching COPY SIZE key then select the AMSmode Ifthepaperisplacedlengthwise A4 R or B5 R press the COPY SIZE key a second time 4 4 4 4 4 Selecttheexposure copyquantity etc as required Press the PRINT key Cop...

Page 42: ...ginal s Place the original face down on the glass and align it to the original scale on the left 1 1 1 1 1 3 3 3 3 3 Close the automatic document feeder slowly Donotpushdownhardonitwhencopying a thick original such as a book etc 4 4 4 4 4 Press the desired COPY SIZE key If the desired size of paper is not in any of the cassettes installed the following message will appear Set correct size cassette...

Page 43: ...io using the ZOOM keys For enlargement use the key For reduction use the key Any reproduction ratio can be selected at increments of 1 between 50 and 200 Each time you press either ZOOM key the reproduction ratio will change continuously Pressing the or key and the key simultaneously will bring the copier to 200 or 50 instantly Pressing the key will return the copier to actual size 100 copying Pre...

Page 44: ...y quantity 1 If the automatic document feeder is being used the originals remaining on the original feed tray are forced out 1 1 1 1 1 Select the desired copy size exposure reproduction ratio etc as required A copy will exit and this message will appear Press INTERRUPT to resume job 1 Multiple copies can be made by pressing the PRINT key once for each copy desired Set the new original on the glass...

Page 45: ...l s Reset the first original on the glass Or according to the message displayed return the one or two originals to the original feed tray and reset the originals if the automatic document feeder was used Put last 1 original in doc feeder input tray or Put last 2 originals in doc feeder input tray Press the PRINT key The remaining number of copies of the previous multicopy run will be made automati...

Page 46: ...URE lamp is lit If it is not press the AUTO EXPOSURE key to make its lamp light Set the original and press the PRINT key The machine will automatically detect the density of the original and make copies in the optimum exposure 1 1 1 1 1 2 2 2 2 2 Press the LIGHT or DARK key to go into manual exposure To lighten your copies press the LIGHT key Each time you press it the lit lamp moves one step to t...

Page 47: ...ntrast In the photo mode they will be copied clearly Place the original Set it face down on the glass 1 1 1 1 1 Press the LIGHT or DARK key to adjust the exposure if necessary You cannot use automatic exposure in the photo mode Select the desired copy size reproduc tion ratio copy quantity etc as required Press the PRINT key 3 3 3 3 3 4 4 4 4 4 5 5 5 5 5 Press the PHOTO key to make its lamp come o...

Page 48: ...e Automatic paper selection APS Copy size A4 Stack feed mode Non sort mode if an optional sorter is installed Using the FUNCTION CLEAR key Press the FUNCTION CLEAR key The display panel returns to the default status Note The copier will return to the default status after 45 seconds even if the FUNCTION CLEAR key is not pressed 1 1 1 1 1 Note When you have finished copying in a non default mode the...

Page 49: ...47 SPECIAL FUNCTIONS SPECIAL FUNCTIONS SPECIAL FUNCTIONS ...

Page 50: ...staple copying is not possible Example of Dual Page Copying 1 1 1 1 1 Press the EDIT key to enter the EDIT menu Press the DUAL PAGE key to select dual page copying Select A4 or B5 copy size Place the original on the glass Centre the book original on the yellow line with its front cover on your left side Select the desired exposure copy quantity etc as required If you are feeding paper from the she...

Page 51: ...amp on this is the default mode two A4 or B5 sized originals will be copied onto a single sheet of A4 or B5 sized paper APS 2 in 1 mode When the APS lamp is turned on two A4 or B5 sized originals will be copied onto a single sheet of A3 or B4 sized paper Reproduction ratio selectable 2 in 1 mode When both APS and AMS lamps are turned off two originals will be copied onto a single sheet of A4 or B5...

Page 52: ...ginals 64 80 g m2 can be set Copying Procedure 1 1 1 1 1 Select the 2 in 1 function in the EDIT menu Press the EDIT key to enter the EDIT menu and press the 2 IN 1 key to select the 2 in 1 function When making a duplex copy press the 2 IN 1 DUPLEX key 2 2 2 2 2 Enter the number of originals Use the digital keys to enter the number of your originals or press the Original Count key 3 3 3 3 3 2 2 in ...

Page 53: ...roduction ratio using the ORIGINAL SIZE andCOPY SIZE keys ortheZOOM keys REFERENCE To have copies arranged in the correct page order in 2 in 1 copying it is necessary toletthecopierknowthenumberoforiginals in one of the following ways When making the copier count the number of originals Press the Original Count key When the operator counts the number of originals Key in the number of the originals...

Page 54: ...ong all edges of the copy The normal width of the blank border is 5 mm but you can select it between 5 to 20 mm Example of Edge Erase Copying Press the EDIT key to enter the EDIT menu Press the EDGE ERASE key to select the edge erase function The EDGE ERASE MARGIN panel on the right appears The default margin is 5 mm If you accept the default go over to step 3 on the next page 1 1 1 1 1 2 2 2 2 2 ...

Page 55: ...the original feed tray they should be set face up with their bottom edges facing toward you The edge erase margin can be changed from 5 to 20 mm To increase the margin press 20 mm To reduce the margin press 5 mm After selecting the desired margin press the SET key The selected margin will return to the default of 5 mm about 45 seconds after copying is finished Bottom edge To change the edge erase ...

Page 56: ...he copy size If A4 R paper is used press the A4 COPY SIZE key twice Note If you press the PRINT key with the document feeder left open the copier will automatically go into the edge erase mode If you do not want edge erasing deselect it as follows a Press the EDIT key to display the EDIT menu on the right EDGE ERASE is already selected b Press the EDGE ERASE key to deselect the EDGE ERASE mode The...

Page 57: ...unction is convenient when you want to leave a blank space for punching holes or stapling The normal width of the binding space is 7 mm but you can select the desired space between 0 and 30 mm If you select BOOK dual page copying is automatically set Examples of Image Shift Copying Original Copy Original Copy Binding space on the left side Binding space on the right side Copy Copy Book type origin...

Page 58: ...mally the binding space of the copy is the standard amount of 7 mm To change the binding space a Using the 0 mm or 30 mm key select the desired binding space and press the SET key b When combining image shifting with duplexcopying selectLEFTSPACE for the front side and RIGHT SPACE for the back side of the copy 1 1 1 1 1 2 2 2 2 2 3 3 3 3 3 Note When you want to make your copies image shifted in th...

Page 59: ...over on the left side Place the original on the glass It should be set with its bottom edge facing toward you You can also set sheets of originals on the original feed tray 5 5 5 5 5 6 6 6 6 6 Select the desired copy size exposure reproduction ratio copy quantity etc as required Press the PRINT key Yellow indicator line Bottom edge ...

Page 60: ...nals on the glass For duplex copying from originals that cannot be handled by the automatic document feeder Using the dual page function For duplex copying from the facing pages of a book or two sheet originals A4 size placed on the glass Example of Duplexed Copies from Single Sided Originals 5 DUPLEXED COPIES FROM SINGLE SIDED ORIGINALS Single sided original Single sided original Duplexed copy ...

Page 61: ...al feed tray and align the side guides to the originals Up to 50 originals 64 80 g m2 can be set at a time When originals are to be placed horizontally A3 Folio or A4 R invert the odd numbered and even numbered originals relative to each other as shown before setting them To set larger originals A3 B4 or Folio size pull out the extension holder ...

Page 62: ...willappear seethemiddle figure EVEN or ODD number of originals Note IftheSTACK symbolisflashing removethepaperremainingintheautomatic duplexer If the messages To remove paper from duplexer Press INFO and Remove paper from duplexer appear press INFO and the sheets of paper will automatically exit 2 2 2 2 2 3 3 3 3 3 Press the Original Count EVEN or ODD key in response to the message If you press th...

Page 63: ...ress the DUPLEX key on the BASIC panel Select the 1 2 mode SINGLE TO DUPLEX EVEN and ODD keys will appear 1 1 1 1 1 2 2 2 2 2 Press the ODD key if the originals are odd numbered and the EVEN key if they are even numbered 3 3 3 3 3 4 4 4 4 4 Select the copy size copy density reproduction ratio copy quantity etc as required Normally the automatic paper selection APS mode is selected The maximum numb...

Page 64: ...d horizontally the second side original should be placed horizontally but in the opposite direction Place the next original second side When the first side original was placed vertically the second side original should be placed in the same direction Press the PRINT key Duplexed copies will exit Repeat steps 5 8 until all the originals are copied 8 8 8 8 8 7 7 7 7 7 6 6 6 6 6 9 9 9 9 9 5 DUPLEXED ...

Page 65: ...te This mode is possible only for A4 1 1 1 1 1 Press the EDIT key on the BASIC panel to enter the EDIT menu and press the DUAL PAGE key 2 2 2 2 2 Press the DUPLEX key on the BASIC panel Select the 1 2 mode SINGLE TO DUPLEX Press the EVEN key The screen returns to the BASIC panel ...

Page 66: ... the SET key Press the PRINT key Duplexed copies will exit Repeat steps 3 5 until all your originals will finish being copied 5 5 5 5 5 6 6 6 6 6 COPY A4 A3 B4 A5 UNIVERSAL ORIGINAL APS AMS 2 3 1 5 6 4 8 9 7 C 0 INFO F C 100 200 50 5 DUPLEXED COPIES FROM SINGLE SIDED ORIGINALS Cont Yellow indicator line If you are feeding paper from the sheet bypass press the COPY SIZE key for A4 Other sizes of pa...

Page 67: ...irst side of the original is copied it is automatically reversed and its second side is copied Up to 50 originals 64 80 g m2 can be set at a time Example of Duplexed Copies from Two Sided Originals Example of Single Sided Copies from Two Sided Originals 6 DUPLEXED or SINGLE SIDED COPIES FROM TWO SIDED ORIGINALS Single sided copies Duplexed copy ...

Page 68: ...c paper selection APS mode is selected The copy quantity should not be more than50ifyouaremakingduplexedcopies 3 3 3 3 3 Select the 2 2 mode DUPLEX TO DU PLEX 6 DUPLEXED or SINGLE SIDED COPIES FROM TWO SIDED ORIGINALS Cont COPY A4 A3 B4 A5 UNIVERSAL ORIGINAL APS AMS 2 3 1 5 6 4 8 9 7 C 0 INFO F C 100 200 50 2 2 2 2 2 For making single sided copies from two sided originals select the 2 1 mode DUPLE...

Page 69: ...single sided copies will be made Place the originals Set the originals face up on the original feed tray and align the side guides to the originals Up to 50 originals 64 80 g m2 can be set at a time To set larger originals A3 B4 or Folio size pull out the extension holder 5 5 5 5 5 ...

Page 70: ...thod A the copies made will be arranged in the same page order as the book In method B the facing pages of the book are copied on both sides of a sheet of paper For copying in this method refer to page 58 Method A Method B Refer to page 58 for the copying procedure Single sided copy Duplexed copy Single sided copy Duplexed copy ...

Page 71: ...t Left Copying is started from a left page of the book and ends on a left page Right Left Copying is started from a right page of the book and ends on a left page Right Right Copying is started from a right page of the book and ends on a right page 3 3 3 3 3 Set the original on the glass The book should be centred on the yellow indicator line with its front cover on the left side If you are feedin...

Page 72: ...temporarily be stacked inside the machine Set the next original Turn over one leaf of the book and set it in the same way as previously Press the PRINT key This message will appear To exit final page Press INFO DonotpresstheINFOkeybeforecopying has finished Repeat steps 7 and 8 until you finish copying the book Finally press the INFO key The copy of the last page will exit with its reverse side bl...

Page 73: ... Trimming Masking Copying Specifying an Area on the Original Set the original to specify an area s To specify an area using the editing sheet optional Open the transparent cover editing sheet insert the original face up and its bottom facing toward you fully in the editing sheet and align the original with the matching size marks on the left side To specify an area by setting the original on the g...

Page 74: ...72 Specifying an Area Using the Editing Sheet Specifying an Area on the Glass 8 TRIMMING MASKING COPYING Cont ...

Page 75: ...ont scale to the upper edge of the specified area e g 39 Set the above values using the digital keys and the INFO key as described in the Copying Procedure below 2 2 2 2 2 3 3 3 3 3 Set the original on the glass Removetheoriginalfromtheeditingsheet optional place it face down with its top edge facing toward you and align it with the matching size marks If you placed the original on the glass for r...

Page 76: ...correct an incorrect entry When you have noticed the error before pressingtheNEXTkey presstheCLEAR STOP key and then enter the cor rect number If you have noticed the error after having pressed the NEXT key first press the PREV key and then enter the correct number 4 4 4 4 4 Key in the value of X2 e g 43 and press the NEXT key 5 5 5 5 5 8 TRIMMING MASKING COPYING Cont ...

Page 77: ...antity etc as required Press the PRINT key Trimmed or masked copies will exit 10 10 10 10 10 11 11 11 11 11 Key in the value of Y2 e g 39 When you want to specify a second area press the NEXT key and go back to step 4 Up to four areas can be specified To finish specifying areas press the SET key 8 8 8 8 8 7 7 7 7 7 The message on the right appears but the original has already been set in step 1 Pr...

Page 78: ... the sheet bypass can conveniently be used Besides the automatic document feeder must be used for this purpose The use of the optional sorter MG 2009 2010 2012 2015 will greatly enhance this feature Note If you select COVER SHEET or SHEET INSERTION page 80 mode and set sheets of special paper on the sheet bypass the copier will always feed paper from the sheet bypass even if a cassette has been de...

Page 79: ...R B5 B5 R and A5 R 64 80 g m2 can be set at a time A3 B4 and Folio sized originals should be 25 or less 1 1 1 1 1 3 1 2 3 2 1 Blank top cover Blank back cover 3 1 2 3 2 1 Copied top cover Blank back cover Place special sheets of paper in the designated cover sheet cassette For placing paper in the cassette see page 120 Set the special sheets of paper facing down in the cassette If the appropriate ...

Page 80: ... Message Display panel Press the SET key If sheets of special paper are set on the sheet bypass the copier always feeds paper from it instead of the cassette selected 3 3 3 3 3 Press the EDIT key to enter the EDIT menu Press the NEXT key Press the COVER SHEET key 9 COVER SHEET COPYING Cont Special sheets 5 5 5 5 5 Select the desired COVER SHEET mode Adding a blank top cover Adding a copied top cov...

Page 81: ...opies Select the desired reproduction ratio ex posure etc as required 6 6 6 6 6 Press the PRINT key Copying starts and the special cover sheets are automatically added to each set of copies To clear the cover sheet cassette to its original size refer to Resetting to the Previous Size on page 96 Note In TOP COPIED or TOP COPIED BACK BLANK copying only the top sides of cover sheets will be copied ev...

Page 82: ...he sheet bypass can conveniently be used Besides the automatic document feeder must be used for this purpose The use of the optional sorter MG 2009 2010 2012 2015 will greatly enhance this feature Note If you select SHEET INSERTION or COVER SHEET page 76 mode and set sheets of special paper on the sheet bypass the copier will always feed paper from the sheet bypass even if a cassette has been desi...

Page 83: ...lio sized originals should be 25 or less Place special sheets of paper in the designated sheet insertion cassette For placing paper in the cassette see page 120 If the appropriate cassette is not designated for sheet insertion copying do so by referring to page 95 You can use the sheet bypass instead of a sheet insertion cassette to feed special sheets of paper Up to 50 sheets 64 80 g m2 can be se...

Page 84: ...press the SET key Up to 15 pages can be specified If you want to finish specifying the sheet insertion page press the SET key 7 7 7 7 7 Press the EDIT key to enter the EDIT menu Press the NEXT key Press the SHEET INSERTION key 3 3 3 3 3 BLANK COPIED 10 SHEET INSERTION COPYING Cont Press the desired cassette for sheet insertion on the Message Display panel Up to two cassettes can be selected for sh...

Page 85: ...tio ex posure etc as required 9 9 9 9 9 Press the SORTER key to enter the SORTER menu Press the SORT or STAPLE key For the details of the sorter refer to page 104 When the STAPLE mode is selected the special sheet insertion paper must be the same size as the copy paper 10 10 10 10 10 12 12 12 12 12 8 8 8 8 8 Set the final page of the originals If you press the Original Count key the document feede...

Page 86: ...84 ...

Page 87: ...85 OTHER SPECIAL FUNCTIONS PROGRAM OTHER SPECIAL FUNCTIONS PROGRAM OTHER SPECIAL FUNCTIONS PROGRAM ...

Page 88: ...00 codes can be used Note If you want to use the job access codes ask your sales or service representative to set them Check that this message is shown Enter job access code _ _ _ _ Key in a 4 digit job access code It appears on the message display and the message will then change to READY 1 1 1 1 1 2 2 2 2 2 Now you can make copies in any desired copying mode About45secondsaftercopyingisfinished ...

Page 89: ...py counters can be used Note For using the key copy counter ask your sales or service representative Check that this message is shown Insert key copy counter 1 1 1 1 1 Insert the key copy counter Hold the counter so that the surface with an arrow faces upward with the arrow pointed toward the machine Then insert it slowly until it comes to a stop The message display changes to READY You can now ma...

Page 90: ... key to clear it and then press the WEEKLY TIMER key again The ON OFF times for the day will be displayed 1 1 1 1 1 When the weekly timer is set it will automatically switches the copier ON in the morning and OFF in the evening at the set times For setting the weekly timer see page 91 Refer to the following procedure for checking the set times for the day 2 2 2 2 2 ...

Page 91: ...RAM Making Copies after Auto Shutoff Check that the TIMER lamp is on 1 1 1 1 1 2 2 2 2 2 Press the PRINT key or ENERGY SAVE key The copier starts warming up 3 3 3 3 3 When READY appears you can make copies After warming up the copier will automatically become ready ...

Page 92: ...tch Since the ON OFF times of the weekly timer are retained they can be resumed at any time Note Suspending Auto ON OFF Switching can be done only when the copier is READY Press the PROGRAM key to enter the PROGRAM menu Press the NEXT key Select the WEEKLY TIMER key 1 1 1 1 1 After confirming that the WEEKLY TIMER key is displayed in shade press the WEEKLY TIMER key to clear the weekly timer 2 2 2...

Page 93: ...ified times to meet the schedule of your office Note To allow the weekly timer to work properly the power switch of the copier should be always left ON Setting Procedure Press the PROGRAM key to enter the PROGRAM menu Press the NEXT key on the PROGRAM panel Press the WEEKLY TIMER key 1 1 1 1 1 Set the ON OFF times for each weekday us ing and keys You can also enter the times with the digital keys ...

Page 94: ... Press the PROGRAM key to enter the PROGRAM menu Press the NEXT key and then the DATE TIME key The DATE TIME panel appears 1 1 1 1 1 Key in the last two numbers of the year and press Example 1998 9 8 Key in the month 1 12 and press Example April 4 Key in the date 1 31 and press Example 1 3 3 3 3 3 4 4 4 4 4 2 2 2 2 2 T53000n1 T53000n2 T53000n3 ...

Page 95: ... 10 10 a m 1 0 Key in the minute 0 59 Example 10 10 a m 1 0 9 9 9 9 9 5 5 5 5 5 6 6 6 6 6 7 7 7 7 7 Press the SET key The date time setting mode is cleared and the date and the time entered appear in the centre section of the message display The day of the week is not shown 8 8 8 8 8 Check that all the settings are correct If you have noticed an error first press key and then enter the correct num...

Page 96: ...s the PROGRAM key 1 1 1 1 1 Press the LCD CONTRAST key on the PROGRAM panel 2 2 2 2 2 Press the SET key to set the selected brightness The display automatically changes to the PROGRAM panel then returns to the initial BASIC panel The selected brightness remains until a new brightness is entered 3 3 3 3 3 4 4 4 4 4 Select the desired brightness of the display panel Press the key to make the panel d...

Page 97: ...CASSETTE key to select the cassette which you want to change 1 1 1 1 1 Press the CASSETTE SIZE key 3 3 3 3 3 If you want to change it to a Cover Sheet cassette presstheCOVERkey thenpress the SET key If you want to change the cassette to a Sheet Insertion cassette press the INSERT key then press the SET key Press the PROGRAM key to enter the PROGRAM menu Press the NEXT key 2 2 2 2 2 4 4 4 4 4 7 SET...

Page 98: ...lows 5 5 5 5 5 Press the CASSETTE key to select the cassette to be changed When COVER is selected press the COVER key and check that the cassette is reset to the previous paper size When INSERT is selected press the INSERT key and check that the cassette is reset to the previous paper size Press the SET key then the BASIC key to enter the BASIC menu 1 1 1 1 1 3 3 3 3 3 Press the PROGRAM key to ent...

Page 99: ...ample Reproduction ratio 85 Number of copies 30 Copy density Automatic exposure Copy size A4 R Check that each mode is correctly set Press the PROGRAM key to enter the PROGRAM menu Press the MODE MEMORY key 1 1 1 1 1 2 2 2 2 2 Press the SET key to select the storing function 3 3 3 3 3 Press MEMORY 1 or 2 3 or 4 key Then press the SET key The copy modes are stored in MEMORY 1 or2 3or4 whichbecomesh...

Page 100: ... MODE MEMORY key 1 1 1 1 1 Press the RECALL key to select the recall function 2 2 2 2 2 Press MEMORY 1 or 2 3 or 4 key corresponding to the modes you want to recall 3 3 3 3 3 Press the PRINT key and copies will be made in the copy modes stored 4 4 4 4 4 8 USING THE MODE MEMORY KEYS Cont ...

Page 101: ...en follow the copying procedure in BYPASS COPYING on page 34 If you set the size mark plate UNIV UNIV appears on the selected cassette of the panel Refer to page 124 2 2 2 2 2 4 4 4 4 4 5 5 5 5 5 Select the desired paper size The display changes to the PROGRAM panel then a few seconds later it returns to the BASIC panel Place the original s and set paper of the selected size on the bypass guide Fo...

Page 102: ...OGRAM key to display the PROGRAM menu Press the UNIVERSAL key on the panel The paper size selection panel is displayed 2 2 2 2 2 When Non Standard Sized Paper is Used 3 3 3 3 3 Press the NON STANDARD key 4 4 4 4 4 Key in the value of X e g 297 horizontal dimension and press the NEXT key To correct an incorrect entry Press the X mmkey or the NEXT key again Then key in the correct value and press th...

Page 103: ...PAPER key The THICK PAPER mode is selected and shown shaded 3 3 3 3 3 Make copies in the bypass mode For bypass copying see page 34 After copying has finished the FUNCTION CLEAR key lamp flashes if you press the FUNCTION CLEAR key or if a period of 45 seconds elapses this lamp will go out and the THICK PAPER mode will automatically be cleared returning to the default state Notes 1 The first copy t...

Page 104: ...ght Press the AUTO START key The AUTO START mode is selected and shown shaded Make copies in the bypass mode Align the side guides to the size of the original then insert the originals one by one The copying will automatically start You can make any number of copies one by one For bypass copying see page 34 After copying has finished the FUNCTION CLEAR key lamp flashes if you press the FUNCTION CL...

Page 105: ...103 USING THE OPTIONAL SORTERS USING THE OPTIONAL SORTERS USING THE OPTIONAL SORTERS ...

Page 106: ... When the bin unit of the optional sorter MG 2009 this model only is left in a raised position after sort or group copying one of the following actions will cause the bin unit to move down to its home position automatically Turning on the power switch Pressing the FUNCTION CLEAR key Pressing the SORTER key Changing the copy quantity entered Caution Do not touch the bin unit of the sorter while it ...

Page 107: ...feed stapling If it is pressed while stapling is in operation stapling is stopped The key also flashes when a staple jam occurs Add Cartridge Indicator It comes on when the stapler runs out of staples Note It also lights if the remaining number of staples is 40 or less after stapling is done Front Removal Key Press this key when you want to remove copies toward the front Only A4 and B5 sized copie...

Page 108: ...s The maximum copy quantity that can be set is shown in the Total column of the table below 2 2 2 2 2 3 3 3 3 3 Model Paper size Non sort bin 1 bin 2 final bin Total MG 2015 A4 B5 A5 R 250 30 30 850 A3 B4 Folio 250 25 25 750 MG 2012 A4 A4 R B5 B5 R A5 R 30 30 600 A3 B4 Folio 25 25 500 MG 2010 A4 B5 250 30 30 850 A3 B4 Folio 250 25 25 750 A4 R B5 R A5 R 250 250 MG 2009 A4 B5 30 30 600 A3 B4 Folio 2...

Page 109: ...ise they will be distributed into sort bins Note Ifyousetmorecopiesthanthenumber in the Total column of the table on page 108 the copier will automatically stop after having made that number of copies and show this message Remove paper from sorter bins Then take out the copies from the sorter and press the PRINT key to continue 5 5 5 5 5 4 4 4 4 4 USING THE OPTIONAL SORTERS MG 2015 MG 2012 MG 2010...

Page 110: ...d Example Making 5 sets of copies from 5 page originals Sort or Automatic Stapling To select the SORT mode press the SORT key Press the SORTER key on the BASIC panel to enter the SORTER menu To select the STAPLE mode press the STAPLE key 1 1 1 1 1 5 sets of copies arranged in the same order as the originals ...

Page 111: ...r of the original In this case however copies are not stapled automatically see page 111 for manual stapling Stapling will be done in the position corresponding to the upper left corner of the originals However in the 2 in 1 mode stapling will be done in the position corresponding to the lower right corner For the multistapling function of the MG 2015 see the table on page 112 To set larger origin...

Page 112: ...al and press the PRINT key Repeat step 6 until all the originals finish being copied Refer to the table in step 2 on page 109 for the maximum number of originals that can be copied When the MG 2010 MG 2012 is used pressing the STAPLE key on the sorter will cause the copies in each bin to be stapled automatically While stapling is in progress if you press the STAPLE key again stapling will stop Pre...

Page 113: ...ng is possible If the maximum number of copies that can be stapled is exceeded this key does not come on 9 9 9 9 9 Manual Stapling When the MG 2010 MG 2012 is used Align the edges of the copies and insert them into the 1 bin The copies should be inserted fully inside and moved to the right and to the front until being stopped The STAPLE key lamp of the sorter will come on The maximum number of cop...

Page 114: ... that can be stapled is 50 for all sizes 1 1 1 1 1 2 2 2 2 2 Select the stapling style by pressing the STAPLE POSITION key page 107 or 112 Paper sizes that can be stapled For corner stapling A3 B4 A4 B5 A4 R For double stapling A3 B4 A4 B5 Note Single stapling cannot be used in manual stapling B5 R and A5 R sized paper cannot be stapled 3 3 3 3 3 Press the STAPLING START STOP key The copies are st...

Page 115: ...on the BASIC panel To select the Staple mode press the STAPLE key To select the Sort mode press the SORT key Set the originals on the original feed tray The maximum number of originals is 25 Set the desired number of copies The maximum number of sets of copies that can be made is 40 Select the paper size copy density reproduction ratio etc as required Press the PRINT key If the originals set are o...

Page 116: ...g copies and add them to the incomplete sets of copies If you selected STAPLE press the FUNCTION CLEAR key and make the needed number of copies of the remaining originals Add these copies to the incomplete sets of copies and staple themmanually Seepage111formanual stapling 20 sets of copies will be made After 20 sets of copies finish being made message Return the originals to doc feeder input tray...

Page 117: ... SORTER key to enter the SORTER menu Select the GROUP key Place the originals When setting originals on the original feed tray place them face up and align the side guides to the originals Up to 20 originals all sizes can be set at a time 1 1 1 1 1 2 2 2 2 2 4 4 4 4 4 3 3 3 3 3 5 originals 5 5 5 5 5 5 4 3 2 1 2 2 2 2 2 1 1 1 1 1 ...

Page 118: ...Repeat step 6 until all the originals finish being copied Upto20originals allsizes canbecopied in a single run 7 7 7 7 7 6 6 6 6 6 5 5 5 5 5 When setting originals on the glass set the original face down 4 GROUP COPYING Cont If you key in more than the maximum allowable number the message Sorter limit 30 or 25 copies willappear makingthecopierinoperable Key in a smaller number Selectthedesiredexpo...

Page 119: ...117 WHEN THE GRAPHIC SYMBOLS FLASH WHEN THE GRAPHIC SYMBOLS FLASH ...

Page 120: ...unit of the copier Then do so as described below Open the front cover Placing your hands on both its corners pull it toward you 1 1 1 1 1 Unlock the upper unit Pushing down on the upper unit with your left hand arrow pull the release lever A arrow to unlock the upper unit 2 2 2 2 2 3 3 3 3 3 Open the upper unit Placing your hand on the upper unit open it slowly and fully ...

Page 121: ...ose the upper unit Place your hand on the upper unit and push it down slowly until a click is heard Be careful not to get your fingers caught WHEN THE GRAPHIC SYMBOLS FLASH 5 5 5 5 5 Close the front cover Reverse the procedure in step 1 to close it ...

Page 122: ... slowly until it comes to a stop 1 1 1 1 1 Note Check that there is a slight gap about 0 5 mm left between the paper and each of the side guides as shown the total gap should not exceed 1 mm If the gap is not suitable paper misfeeding may possibly occur Holding the whole ream of paper as shown place it in the cassette Upto600sheetsofpaper recommended by Toshiba can be set Do not add paper above th...

Page 123: ...121 WHEN THE GRAPHIC SYMBOLS FLASH 3 3 3 3 3 Push in the cassette straight and slowly until it comes to a stop Make sure that the cassette is pushed in fully WHEN THE GRAPHIC SYMBOLS FLASH ...

Page 124: ...size paper can be placed Do not add paper above the limit line on the right Do not use creased folded wrinkled or damp sheets of paper Note If you want to add paper because the paper supply has become low press the TRAY DOWN key before opening the cover The elevator tray will automatically move down and stop 2 2 2 2 2 Close the cover of the large capacity feeder The elevator tray will automaticall...

Page 125: ...paper can be placed Do not add paper above the limit line on the right Do not use creased folded wrinkled or damp sheets of paper Note If you want to add paper because the paper supply has become low press the TRAY DOWN key before opening the cover The elevator tray will automatically move down and stop 2 2 2 2 2 Close the cover of the large capacity feeder The elevator tray will automatically mov...

Page 126: ... fully Move the side guides so that the space between them is slightly wider than the desired paper size To move the side guides push the lever arrow to unlock Set the back guide to the desired paper size shown on the cassette surface To move the back guide push on its sides arrows to unlock and slide it with both of your hands 2 2 2 2 2 3 3 3 3 3 5 5 5 5 5 Remove and reset the size mark plate so ...

Page 127: ...ibed below Replacing Procedure 1 1 1 1 1 Open the front cover and the upper unit See page 118 for opening the upper unit Close the used toner bag The cap is provided on the used toner bag To remove the cap turn it in the direction of arrow 2 2 2 2 2 Remove the used toner bag from the machine Take out the toner bag in the direction of the arrow The used toner bag should be disposed of properly Plea...

Page 128: ...126 Close the upper unit slowly and fully See page 119 for closing the upper unit Close the front cover 5 5 5 5 5 6 6 6 6 6 Set the new toner bag in the machine 4 4 4 4 4 3 REPLACE TONER BAG SYMBOL Cont ...

Page 129: ...essage appears ADD TONER PRESS HELP Replace the toner cartridge as described below 4 REPLACE TONER CARTRIDGE SYMBOL Note It is recommended that only toner cartridges made or designated by Toshiba be used for the 4560 in order to optimize copy quality Replacing Procedure 1 1 1 1 1 Open the front cover GraspingtheholderCofthetonercartridge slide it out slowly 2 2 2 2 2 ...

Page 130: ...he toner cartridge The empty toner cartridge should be disposed of properly Please return it to your service technician Shake the new toner cartridge to the right and left 5 6 times to loosen the toner inside Pull out the seal from the cartridge 6 6 6 6 6 5 6 times Seal 4 REPLACETONER CARTRIDGE SYMBOL Cont ...

Page 131: ...LASH Raisethetonercartridgeuprightusingthe holder C and push the cartridge fully back into the machine 8 8 8 8 8 Installthenewcartridgeintothemachine 7 7 7 7 7 Close the front cover 9 9 9 9 9 WHEN THE GRAPHIC SYMBOLS FLASH Holder C ...

Page 132: ...where paper has misfed Remove the misfed paper as described below Misfeeding in Cassette Auto Duplexer Feeding 1 1 1 1 1 2 2 2 2 2 Open the front cover and the upper unit See page 118 for opening the upper unit Remove the misfed paper 3 3 3 3 3 When the misfed paper is pinched by the rollers Turn the jam removal knob D in the direction of the arrow to remove the paper Jam removal knob D Roller Dru...

Page 133: ...f paper is pinched by the upper roller remove the paper by turning the jam removal knob D in the direction of the arrow as shown on page 130 step 3 Closethesidecoverorthelarge capacity feeder slowly Close the upper unit slowly See page 119 for closing the upper unit Close the front cover 5 5 5 5 5 6 6 6 6 6 7 7 7 7 7 Side cover Roller WHEN THE GRAPHIC SYMBOLS FLASH If the optional large capacity f...

Page 134: ...Cassette Auto Duplexer Feeding on page 130 Check the entire paper path Remove any misfed paper Close the upper unit and the front cover See page 119 for closing the upper unit 3 3 3 3 3 Misfeeding around the Fuser Unit Exit guide Caution Be careful as the fuser unit may be hot 5 5 5 5 5 4 4 4 4 4 Exit guide If the misfed paper is not found using the lever lift the exit guide while pulling it towar...

Page 135: ...ver unit on the exit side and remove any misfed paper Cover unit If a sorter is attached first pull it away from the copier Close the exit side cover until it is pulled by the magnet with a click Close the upper unit see page 119 and reinstall the copy tray If a sorter is attached push it back to its original position Pull out the auto duplexer slowly and fully 3 3 3 3 3 4 4 4 4 4 WHEN THE GRAPHIC...

Page 136: ... misfed paper Be careful not to allow the guide plate to drop 7 7 7 7 7 6 6 6 6 6 5 5 5 5 5 8 8 8 8 8 Holding the handle of the lower guide plate lift it slowly and fully Make sure that the guide plate is latched to prevent it from dropping To open the lower guide plate press the lever to release the lock 5 CLEAR PAPER SYMBOL Cont ...

Page 137: ...e lower guide plate Holding its handle with your right hand lift the lever up arrow to unlatch the guide plate and lower it slowly Push in the auto duplexer slowly and fully Lower the upper guide plate slowly Lever Remove any misfed paper 12 12 12 12 12 WHEN THE GRAPHIC SYMBOLS FLASH ...

Page 138: ...f the copier If the optional large capacity feeder MP 1501 or MP 4001 is attached open or move it away from the copier by referring to page 138 141 2 2 2 2 2 Open the side cover of the pedestal Side cover Removeanymisfedpaperfromthecopier 3 3 3 3 3 4 4 4 4 4 Remove any misfed paper from the pedestal Side cover ...

Page 139: ...eneath it Close both the upper and lower side covers If the misfed paper is not found Pullouttheselectedcassetteandremove any misfed paper Push in the cassette fully 5 5 5 5 5 If there is any lift the flap and remove the misfed paper 6 6 6 6 6 Small window Flap WHEN THE GRAPHIC SYMBOLS FLASH ...

Page 140: ...acity feeder Holding its handle as shown lift it to unlockandopenthefeederslowlymoving it away from the copier arrow 1 1 1 1 1 2 2 2 2 2 Remove any misfed sheets of paper from the feeder as shown 4 4 4 4 4 Open the large capacity feeder cover slowly 3 3 3 3 3 Close the large capacity feeder slowly and fully ...

Page 141: ...owly Note If the CLEAR PAPER status cannot be corrected or if the optional large capacity feeder is not attached check for misfedpaperbyreferringto Misfeeding in Pedestal Cassette Feeding optional onpage136 or MisfeedinginCassette Auto Duplexer Feeding on page 130 6 6 6 6 6 WHEN THE GRAPHIC SYMBOLS FLASH ...

Page 142: ...acity feeder Holding its handle as shown pull it to unlock and move the feeder slowly away from the copier arrow 1 1 1 1 1 2 2 2 2 2 Remove any misfed sheets of paper from the feeder as shown 4 4 4 4 4 Open the large capacity feeder cover slowly 3 3 3 3 3 Move the large capacity feeder back slowly and fully ...

Page 143: ...n Pedestal Cassette Feeding optional onpage136 or MisfeedinginCassette Auto Duplexer Feeding on page 130 6 6 6 6 6 Misfeeding in the Bypass Guide Removeallthesheetsinthebypassguide Align the edges of the sheets and set them again on the bypass guide The BYPASS MISFEED symbol should go out making bypass copying possible When the misfed paper is pinched by the rollers inside and cannot be removed Re...

Page 144: ...original If an original is left on the glass remove it Remove the misfed original Be careful not to damage the original 2 2 2 2 2 3 3 3 3 3 Feed side cover When an original misfeed occurs in the automatic document feeder the CHECK ORIGINAL symbol flashes and this message appears ORIGINAL MISFEED IN DOC FEEDER Remove the misfed original carefully as described below ...

Page 145: ...misfed original Close the exit cover If the misfed original cannot be removed open the document feeder and take out the original Closetheautomaticdocumentfeederand feed side cover Reset all originals you have removed under the originals remaining in the original feed tray and begin copying 5 5 5 5 5 6 6 6 6 6 Exit cover WHEN THE GRAPHIC SYMBOLS FLASH ...

Page 146: ...ins and remove any misfed paper 1 1 1 1 1 Open the upper unit and remove any misfed paper from inside the copier See page 118 for opening the upper unit For removing misfed paper refer to Misfeeding around the Fuser Unit on page 132 2 2 2 2 2 Pull the sorter away from the copier for easier access Exit guide Fuser unit knob B 3 3 3 3 3 Close the upper unit and the front cover See page 119 for closi...

Page 147: ...rter MG 2010 Optional 1 1 1 1 1 2 2 2 2 2 3 3 3 3 3 4 4 4 4 4 Check the sorter bins and remove any misfed paper Pull the sorter slowly away from the copier Pull open the transport guide Remove any misfed paper from inside the sorter WHEN THE GRAPHIC SYMBOLS FLASH ...

Page 148: ...r See page 118 for opening the upper unit For removing misfed paper refer to Misfeeding around the Fuser Unit on page 132 5 5 5 5 5 6 6 6 6 6 Close the upper unit and the front cover See page 119 for closing the upper unit Push the sorter slowly back to the copier 7 7 7 7 7 Exit guide Fuser unit knob B ...

Page 149: ... page 119 for closing the upper unit Push the sorter fully back against the copier Open the upper unit and remove any misfed paper from inside the copier See page 118 for opening the upper unit For removing misfed paper refer to Misfeeding around the Fuser Unit on page 132 2 2 2 2 2 Exit guide Pull the sorter away from the copier for easier access Fuser unit knob B WHEN THE GRAPHIC SYMBOLS FLASH ...

Page 150: ...ou cannot find the misfed paper or if it is in a difficult to remove position turn the green paper removal knob anticlockwise until the misfed paper comes out enough to be removed Close the sorter s front door Open the sorter s front door Open the upper transport guide and re move the misfed paper 1 1 1 1 1 2 2 2 2 2 When paper has misfed inside the sorter 4 4 4 4 4 ...

Page 151: ...find any misfed paper in the sorter at all follow the procedure below Pull the sorter slowly away from the copier Removeanymisfedpaperfromthecopier side Push the sorter slowly back to the copier 5 5 5 5 5 6 6 6 6 6 7 7 7 7 7 WHEN THE GRAPHIC SYMBOLS FLASH ...

Page 152: ...anel Press the DOWN bin shifting key to make the bin where the paper has misfed move down to the position where the wide gap bin was located 1 1 1 1 1 2 2 2 2 2 Remove the misfed paper from outside the bin 3 3 3 3 3 When the paper has misfed in any bin below the wide gap bin Open the cover of the sorter s control panel Press the UP bin shifting key to make the bin where the paper has misfed move u...

Page 153: ...emove the cap from the new staple cartridge Cap 8 REPLACING STAPLE CARTRIDGES When the MG 2010 MG 2012 or MG 2015 is used The STAPLE symbol flashes on the sorter when the stapler of the sorter has run out of staples and this message appears on the Message Display panel Set staple cartridge Replace the staple cartridge as described below Refer to page 104 for the STAPLE symbol position When the MG ...

Page 154: ...6 5 5 5 5 5 Make sure that the stapling unit operates correctlybystaplingafewsheetsofpaper referring to Manual Stapling on page 111 If the stapling unit does not operate correctly reset the staple cartridge Note Do not remove the staple cartridge except when you replace it with a new one Close the stapling unit cover ...

Page 155: ...to unlock the stapler unit 1 1 1 1 1 2 2 2 2 2 When the MG 2012 is used Push down the upper lever and take out the empty staple case 4 4 4 4 4 Set a new staple case in the stapler unit until you hear a click Donotremovethesealholdingthestaples beforesettingthestaplecaseinthestapler unit 5 5 5 5 5 WHEN THE GRAPHIC SYMBOLS FLASH ...

Page 156: ...154 8 REPLACING STAPLE CARTRIDGES Cont Set the stapler unit 7 7 7 7 7 Pull out the seal which is holding the staples straight 6 6 6 6 6 Close the sorter s front door 8 8 8 8 8 ...

Page 157: ...2015 is used Open the sorter s front door Grasping the handle pull out the stapler unit 1 1 1 1 1 Remove the empty staple cartridge 3 3 3 3 3 Push the green button and take out the empty staple case 4 4 4 4 4 2 2 2 2 2 WHEN THE GRAPHIC SYMBOLS FLASH ...

Page 158: ...sta ples before setting them in the cartridge 5 5 5 5 5 Pull out the seal which is holding the staples straight 6 6 6 6 6 Set the staple cartridge 7 7 7 7 7 Push the staple unit fully inside slowly Close the sorter s front door 8 8 8 8 8 9 9 9 9 9 8 REPLACING STAPLE CARTRIDGES Cont ...

Page 159: ...w and take it out slowly toward you arrow 1 1 1 1 1 2 2 2 2 2 Wing nut 9 REMOVING JAMMED STAPLES When the MG 2010 MG 2012 or MG 2015 is used The STAPLE symbol flashes on the sorter when a staple has jammed in the stapler and this message appears on the Message Display panel Examine stapler Remove the jammed staples as described below Refer to page 104 for the STAPLE symbol position When the MG 201...

Page 160: ... lever with the other hand and hold it there 3 3 3 3 3 Lever 4 4 4 4 4 Pulloutthesliderfullytowardyou arrow Push the slider fully in Make sure that the lever has moved up to latch the slider If not pull the lever up by hand 6 6 6 6 6 5 5 5 5 5 Remove the jammed staples Lever Slider Slider ...

Page 161: ... the wing nut Close the stapling unit cover 7 7 7 7 7 9 9 9 9 9 8 8 8 8 8 Remove all the copies from the sorter and turn on the power switch Referring to page 111 Manual Stapling staple a few sheets of paper manually to checkthatstaplingisperformedcorrectly WHEN THE GRAPHIC SYMBOLS FLASH ...

Page 162: ... STAPLES Cont When the MG 2012 is used Take out the stapler unit 3 3 3 3 3 Push down the lever of the stapler unit 4 4 4 4 4 2 2 2 2 2 1 1 1 1 1 Open the sorter s front door Push up the blue lever to unlock the stapler unit ...

Page 163: ... Remove all the jammed staples 5 5 5 5 5 Put the lever of the stapler unit back to its initial position 6 6 6 6 6 Push the stapler unit fully inside slowly Close the sorter s front door 7 7 7 7 7 8 8 8 8 8 WHEN THE GRAPHIC SYMBOLS FLASH ...

Page 164: ...3 3 Unlock the stopper and open the stapler cover While unlocking the stopper with your index finger push the metal handle up slowly with your thumb to open the stapler cover 4 4 4 4 4 Open the sorter s front door Grasping the handle pull out the stapler unit 2 2 2 2 2 1 1 1 1 1 When the MG 2015 is used ...

Page 165: ...LASH Remove all the jammed staples 5 5 5 5 5 Push the metal handle down to close the stapler cover 6 6 6 6 6 Push the stapler unit fully inside slowly Close the sorter s front door 7 7 7 7 7 8 8 8 8 8 WHEN THE GRAPHIC SYMBOLS FLASH ...

Page 166: ... safety circuit assuming that something abnormal has happened causes the operation of the copier to stop and shows the telephone number of your service technician on the panel This can possibly occur when the temperature is low but is not a malfunction If it does occur turn the power switch off and then on again Repeat this procedure twice and if the problem still persists turn off the power switc...

Page 167: ...165 MAINTENANCE MAINTENANCE ...

Page 168: ...his occurs the chargers need cleaning as described below Cleaning the chargers Open the front cover To clean the upper charger hold the charger cleaning knob Next pull it out fully to the front and then push it back to the inside slowly and fully Repeat this 3 or 4 times 1 1 1 1 1 2 2 2 2 2 Clean the lower charger in the same way as for the upper charger Repeat this 3 or 4 times 3 3 3 3 3 Note Che...

Page 169: ...t of the automatic document feeder with a dry cloth or alcohol when they become dirty They should be cleaned preferably once a week Cleaning the outside doors and covers When the outside doors and covers of the copier become dirty clean them using a cloth which should be soaked with a suitable neutral detergent and then squeezed tightly After doing this wipe off the detergent completely with a dry...

Page 170: ...y Is the upper unit firmly latched Push down the upper unit until it latches with a click Yes Yes No Is the original transport belt or the glass dirty Yes No Are the chargers dirty Is the exposure set properly When Copies are Dirty Has the copy image become clear Clean the glass and the original transport belt with a dry cloth or alcohol Clean the chargers Press the AUTO MATIC EXPOSURE key or set ...

Page 171: ...et at the automatic exposure mode Are the chargers dirty Clean the chargers Use the manual exposure mode When No Image is Copied Yes No Have copies been properly made No No Set the originals face up Set the original face down Is the original set face down on the glass Are the originals set face up on the original feed tray of the document feeder MAINTENANCE ...

Page 172: ...170 ...

Page 173: ...171 SPECIFICATIONS ACCESSORIES OPTIONS SPECIFICATIONS ACCESSORIES OPTIONS ...

Page 174: ...tic feeding from optional large capacity feeders MP 1501 and MP 4001 or optional paper feeding pedestals KD 1003A or KD 2009A Manual feeding through a sheet bypass 50 sheets Automatic feeding 64 g m2 80 g m2 Manual feeding 64 g m2 130 g m2 Toner Supply Automatic toner density monitoring dispensing Exposure Control Automatic plus manual selection from 9 exposure steps Dimensions W601 x D676 x H660 ...

Page 175: ...FICATIONS OFTHE AUTOMATIC DUPLEXING UNIT Standard 3 SPECIFICATIONS OFTHE AUTOMATIC DOCUMENT FEEDER Standard Model Name MR 3006A Number of Originals Up to 50 originals A4 80 g m2 can be set at a time Feeding Speed Approx 45 originals minute A4 Acceptable Original Size Minimum A5 R Maximum A3 Paper weight 64 g m2 80 g m2 Reversing Capability Yes Power Source Supplied from the copier Dimensions W597 ...

Page 176: ...ght Approx 30 kg Approx 35 kg Specifications are subject to change without notice 5 SPECIFICATIONS OF THE LARGE CAPACITY FEEDERS Optional Model Name MP 1501 MP 4001 Type Hanging type Floor type Power Source Supplied from the copier Supplied from the copier Maximum Capacity 1500 sheets of paper 4000 sheets of paper A4 size 64 80 g m2 A4 size 64 80 g m2 Dimensions W 317 x D 460 x H 288 mm W 300 x D ...

Page 177: ... kg Specifications are subject to change without notice Model Name MG 2010 MG 2015 Type Console Console Number of Bins 20 1 receiving tray 20 1 receiving tray Bin Capacity Non sort 850 A4 B5 850 A4 B5 A5 R mode 750 A3 B4 Folio A4 R B5 R 750 A3 B4 Folio A4 R B5 R 250 A5 R Sort mode 50 A4 B5 50 A4 A4 R B5 B5 R A5 R 25 A3 B4 Folio A4 R B5 R 25 A3 B4 Folio Group mode 30 A4 B5 30 A4 B5 A5 R 25 A3 B4 Fo...

Page 178: ...176 ...

Page 179: ...enance message TIME FOR PERIODIC MAINTENANCE on the message display this message will notify you that preventative maintenance has become necessary when pre programmed by your dealer technician To ensure that the aforementioned quality standards are maintained we strongly recommend that only Original Toshiba supplies and parts are used in your copier How to affix the PM labels The labels have to b...

Page 180: ...estudio16_20_25_cop_Ver5__UK pdf estudio16 20 25 cop_Ver5_ Manual UK Toshiba Tec Germany Imaging Systems GmbH Carl Schurz Str 7 41460 Neuss Telefon 49 0 2131 1245 0 Fax 49 0 2131 1245 402 www toshiba europe com ...

Reviews: