Toshiba 40L555 Series Owner'S Manual Download Page 29

29

 Digital on-screen information and 
Programme Guide

When viewing in 

digital

 mode, the on-screen 

information and programme guide provide access 
to programme details for all available channels.
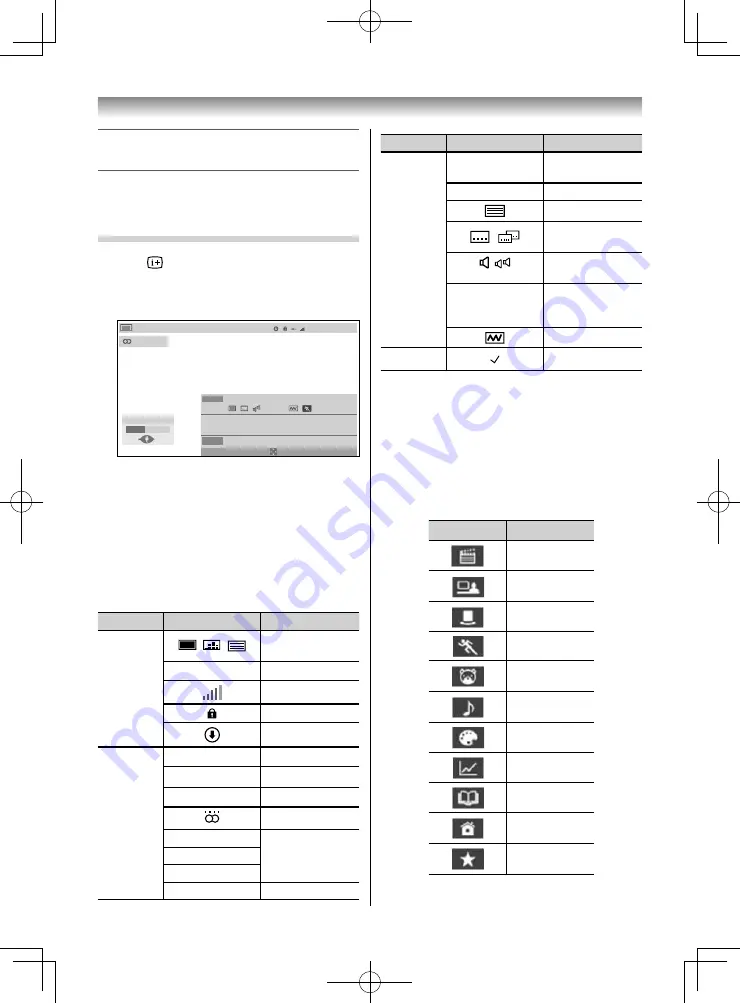
 Information

Press 

, the information screen will appear 

giving details of the channel and programme 
currently being viewed.

Display Example

Scroll

888

ABCD  EFG

Now

MLB Young’s two-run triple leads AL over NL

15 min left

8:00- 9:00

6:00- 8:00

7:00 Fri, 25 Apr 2015

Next

HD

AD 18

16:9

AD English

World News and Sports

Low

High

Power Saving Level

Press 

 or 

 to select the “

Now

” or “

Next

” 

information guide.

 To display More Information

Press 

QUICK

 to open the 

Quick Menu

.

Press 

 or 

 to select 

More Information

 and 

press 

OK

.

On-screen Information icons

Icon

Description

Service 
info

Service type 
(TV, Radio, Text)

8

Skip

Signal strength

Locked status

Update*

Audio info

e

Mono

d

Stereo

J

Dual mono

Surround

Dolby Digital

Audio Coding

Dolby Digital Plus

HE-AAC

AD

Audio Description

Using the TV’s features

Icon

Description

Event info

HD, SD

Video format 
(HD, SD)

16:9, 4:3

Video Aspect

Teletext

Subtitle
(Single, Multi)

Audio track
(Single, Multi)

4 – 18

(G, PG, PG13, NC16, 

M18, R21)

Parental rating

Encrypted

Timer info

Reminder 

*  Also displayed when 

Later

 is selected on the 

Dynamic Scan

 confi rmation screen.

Genre icons

One of the following Genre icons is displayed, 
depending on the type of programme being 
broadcast.

• 

The Genre icon displayed is based on information 
received with the broadcast.

Icon

Genre name

Movie

News

Entertainment

Sports

Children's

Music

Arts

Factual

Education

Lifestyle

Special

405055L5550Series̲EEEV̲En.indd   29

405055L5550Series̲EEEV̲En.indd   29

27/05/18   13:14:58

27/05/18   13:14:58

Summary of Contents for 40L555 Series

Page 1: ... provided below Refer to them whenever you call upon your TOSHIBA dealer regarding this product Model number Serial number 40L555 Series 50L555 Series 55L555 Series TOSHIBA GULF FZE TOSHIBA EL ARABY VISUAL APPLIANCES MARKETING COMPANY VX1A00321800 TD TE 405055L5550Series EEEV En indd 1 405055L5550Series EEEV En indd 1 27 05 18 13 14 53 27 05 18 13 14 53 ...

Page 2: ...s of your new TV Instructions in this manual are based on using the remote control You also can use the controls on the TV if they have the same name as those referred to on the remote control Please read all safety and operating instructions in this manual carefully and keep this manual for future reference LED TV means LCD Panel with LED Backlight Selecting the PC HDMI 1 Audio mode 39 Setting th...

Page 3: ...the front of the LCD Panel face down on a flat cushioned surface such as a quilt or blanket Leave the bottom of the unit protruding over the edge of the surface and assemble as indicated NOTE Extreme care should always be used when attaching the pedestal stand to avoid damage to the LCD panel M5 4 for 40L555 Series 50L555 Series for 55L555 Series 405055L5550Series EEEV En indd 3 405055L5550Series ...

Page 4: ...0 240V AC 50 60Hz Never use the TV outside the specified voltage range It may cause a fire or an electric shock About the fuse In a three pin earthing type the fuse fitted in this plug is approved by ASTA or BSI to BS1362 It should only be replaced by a correctly rated and approved type and the fuse cover must be refitted About the use Make sure to insert the plugs firmly when plugging the AC powe...

Page 5: ...the power supply line as minute current is consumed even when the Power switch is turned off The Mains plug or an appliance coupler is used as the disconnect device therefore the disconnect device shall remain readily operable Introduction Gettingstarted 5 Never pull on the power cord when removing the plug from the wall outlet Always hold the plug firmly when removing it If the power cord is yank...

Page 6: ...een 3 About afterimage If a still picture is displayed an afterimage may remain on the screen however it will disappear This is not a sign of malfunction 4 Some pixels of the screen do not light up The LCD display panel is manufactured using an extremely high level of precision technology however sometimes some pixels of the screen may be missing picture elements or have luminous spots This is not...

Page 7: ...ities of the battery to the marks inside the battery compartment Introduction Gettingstarted TV remote control Remove the battery cover Insert two R03 AAA batteries matching the polarities of the battery to the marks inside the battery compartment Cautions Dispose of batteries in a designated disposal area Batteries must not be exposed to excessive heat such as sunshine fire or the like Attention ...

Page 8: ...Connect a USB HDD to the USB 1 port if it needs power supply You can connect a keyboard or mouse to the USB port If you are using a wireless mouse only you cannot enter text Use also a keyboard NOTE Do not connect a USB device when the TV is performing operations other than reception setup software update etc 6 o HDMI 2 3 input terminals High Definition Multimedia Interface input receives digital ...

Page 9: ... 13 15 18 10 21 23 22 19 16 12 9 5 6 8 20 11 14 1 Power on Standby 2 Input source selection 3 To select the Intelligent Scene Optimiser mode 4 To select ATV or DTV 5 Subtitle on off 6 Stereo Bilingual selection 7 Number buttons 0 9 8 Switch the Audio Description On Off 9 To access the analogue or digital Channel List 10 Volume These buttons adjust the volume level 11 To display on screen informati...

Page 10: ...key to move the screen pointer in the tilted direction Pointing key Select Confirm Press the pointing key to confirm the selection Hold and move Press hold and then tilt the pointing key to hold and move the selected item Connecting the AC power cord to yourTV for 40L555 Series 50L555 Series AC power code supplied 1 Push the AC power cord plug firmly into the AC IN connector on the back of the TV ...

Page 11: ...the time zone date and time Select and change the items if necessary Set the owner Select to skip this step Set this later on if necessary When the Android setup is complete the Country setup screen appears Proceed to the TV initial setup NOTE If you press the 1 button on the Easy remote control to start the operation the Home screen appears and the setup ends Unknown The actual screen may differ ...

Page 12: ...lb To use the TV under the bluish lighting environment please select Fluorescent Light To use the TV under the orangish lighting environment please select Light Bulb 9 Press OK to display the Auto Tuning setup menu Auto Tuning Tuning Mode Start Scan DTV and ATV Scan Type Auto Signal Booster Quick Scan On 10Select Start Scan and press OK to start the automatic search The television will start to se...

Page 13: ...f the following Select the and confirm Unknown The actual screen may differ in appearance NOTE If BACK on the TV remote control is pressed twice the TV Application closes You can enjoy visual or audio content applications and TV broadcasts or external input by starting TV Application Home screen Unknown The actual screen may differ in appearance Turning theTV on Switching on theTV Connect the powe...

Page 14: ...tortion Control Stand TV Mounting Dynamic Range Control Audio Level Offset Audio Description 0 APPLICATIONS Guide Media Player Programme Timers On Timer 00 00 Off Sleep Timer Continuous Viewing Timer System Settings SETUP Singapore Home Country Auto Tuning ATV Manual Tuning DTV Manual Tuning DTV Settings Quick Setup Location System Information Reset TV NOTE In the video input mode VIDEO HDMI and P...

Page 15: ...o display SETUP menu 2 Press or to select Country and press OK SETUP Home Auto Tuning ATV Manual Tuning DTV Manual Tuning DTV Settings Quick Setup Location System Information Reset TV Singapore Country Quick Setup confirmation screen will appear 3 Press or to select Yes and press OK 4 Press or to select the desired country Once the Country has been selected you will proceed to the Primary Subtitle...

Page 16: ...l appear Auto Tuning Tuning Mode Start Scan DTV and ATV Scan Type Auto Signal Booster Quick Scan On Press or to select Tuning Mode Scan Type or Auto Signal Booster and press or to select an option Tuning Mode Press or to select DTV and ATV DTV or ATV Scan Type only for Tuning Mode DTV and ATV or DTV mode Press or to select Quick Scan or Full Scan The Quick Scan is a simplified version of the Full ...

Page 17: ...ual Fine Tuning Press or until better picture and sound are obtained I Signal Booster If the receiving signal is weak strong and the picture is noisy the picture may be improved when using this function Press the or to turn the Signal Booster On or Off J Label Station labels appear on the right side of the programme position display each time you turn on the TV select a channel or press To change ...

Page 18: ...lect DTV Settings and press OK 2 Select Channels and press OK DTV Settings Subtitle and Audio Parental Control Local Time Setting Dynamic Scan On Signal Booster Over the air Upgrade PIN Setting Channels 3 For your convenience you can jump to specific places in the list by Line Number Jump Channels 2 7 40 51 ABC TWO ABC THREE ABC 24 ABCi Line No 1 10 Pos Name 1 ABC ONE 822 823 AA AC Type Line Numbe...

Page 19: ...tion Channels 2 7 40 51 ABC TWO ABC THREE ABC 24 ABCi Line No 1 10 Pos Name 1 ABC ONE 822 823 AA AC Type Sort Press the YELLOW button A confirmation window will appear Press or to select Yes and press OK Dynamic Scan If the broadcast information has changed in your Digital Broadcasting receiving area the TV detects the changes and add the new channels automatically if updated If you do not wish fo...

Page 20: ...nput signal format the picture is displayed with side panels and or bars at the top and bottom e g VGA input source Normal Sets the size to full screen without changing the aspect ratio when watching a video stored on a USB device Zoom Sets the size to full screen keeping the 21 9 circularity ratio when watching a video stored on a USB device NOTE Using the special functions to change the size of ...

Page 21: ...the TV 1 From the PICTURE menu press or to select Picture Settings and press OK PICTURE Off Fluorescent Light On 3D Colour Management Lighting Type Base Colour Adjustment Active Backlight Control Picture Analyser Picture Settings 2 Press or to select Picture Mode Standard Picture Settings Picture Mode Backlight Contrast Brightness Colour Tint Sharpness Contrast Booster Middle 0 0 0 0 70 100 3 Pres...

Page 22: ...e Colour Temperature menu press or to select Reset then press OK 2 A confirmation message will appear Press or to select Yes and then press OK Activating the Noise Reduction NR If the receiving signal of MPEG is a mosquito grained noise depending on the compression and conversion the picture is weak and the picture is blurry the picture may be improved when using this function 1 From the Picture S...

Page 23: ...light Control In order to improve screen visibility the Active Backlight Control sets the screen brightness automatically during dark scenes This function cannot be selected in the following cases When the input source is PC When Intelligent Scene Optimiser is set to Game When Picture Mode is set to Intelligent AutoView 1 From the PICTURE menu press or to select Active Backlight Control 2 Press or...

Page 24: ...ode Stereo and Bilingual transmissions for ATV programmes Setting the MTS Multi channelTV Sound Auto mode The MTS Auto mode automatically recognize stereo bilingual programmes depending on the broadcast signal 1 Press MENU and then press or to display the SOUND menu SOUND MTS Dual Balance Sound Mode Advanced Sound Settings Auto Auto Dual 1 Low On Audio Distortion Control Stand TV Mounting Dynamic ...

Page 25: ...on type that TV is installed on a wall or a TV stand 1 From the SOUND menu press or to select TV Mounting 2 Press or to select Wall or Stand Sound adjustment Adjusting the sound balance 1 From the SOUND menu press or to select the Balance 2 Press or to adjust the settings as desired Using the Sound Mode Choose your preferred Sound Mode Auto Dynamic Natural or Clear Voice 1 From the SOUND menu pres...

Page 26: ...hen watching a DTV 5 1ch programme this feature is not available Audio Description Audio Description is an additional narrative sound track for visually impaired individuals to understand and enjoy the story line more fully The letters AD will be displayed in the channel banner when programmes contain AD content 1 From the SOUND menu press or to select Audio Description and press OK 2 Press or to ...

Page 27: ...OTE If the power is turned off before the set amount of time has passed the timer is reset If the set amount of time is changed the timer is reset 3 Press or to go through the list adding the details of the programme by using the number buttons and or to make selections Edit Timer 6 00 Wed 10 Apr 2015 Channel Set Timer Delete Timer 000ABC2 Date Start Time Wed 10 Apr 2015 07 00 Repeat Once 4 When a...

Page 28: ...ENCES menu press or until Energy Saving Settings is selected and then press OK 2 Press or to select Eco Mode and press or to select On or Off Setting No Signal Power Down The TV will automatically turn itself off after 15 minutes when no signal is detected You can change the setting to Off for the following purposes Low signal strength of analog channel no signal detection Only Audio L R is connec...

Page 29: ...ons Icon Description Service info Service type TV Radio Text 8 Skip Signal strength Locked status Update Audio info e Mono d Stereo J Dual mono Surround Dolby Digital Audio Coding Dolby Digital Plus HE AAC AD Audio Description UsingtheTV sfeatures Icon Description Event info HD SD Video format HD SD 16 9 4 3 Video Aspect Teletext Subtitle Single Multi Audio track Single Multi 4 18 G PG PG13 NC16 M...

Page 30: ...ent time display GREEN button Switches the time scale to 1 5 or 3 hours BLUE button Displays the Programme Timers list You can set programme timers from the Programme Timers list page 26 Select a programme currently being broadcast and press OK to switch to that programme Select a programme that will be broadcast later and press OK to open the Edit Timer menu To close the Guide press GUIDE Usingth...

Page 31: ...ss or to select a channel and press OK to watch Skip channels This feature allows you to set channels that will be skipped when Pu or PU are used to tune 1 Select the channel you want to skip in your channel list 2 From the Quick Menu press or to select Channel Options and press OK 3 Press or repeatedly to highlight the skip 8 box 4 Press OK to select A tick will appear in the box 5 Repeat steps 1...

Page 32: ...e Setting The clock that is displayed while watching the TV can be set to display time information acquired via the internet or time information acquired via a digital broadcasting signal When purchased the TV displays time information acquired via the internet 1 From the DTV Settings menu press or to select Local Time Setting and press OK 2 Press or to select Enable DTV Clock and use or to select...

Page 33: ... to select Auto PAL SECAM NTSC 4 43 or NTSC 3 58 NOTE Confirm that Colour System is set to Auto If not select Auto with or Labelling video input sources These input labels are shown in the input selector You can label external inputs according to the devices you have connected to the TV 1 From the PREFERENCES menu press or to select AV Connection and press OK 2 Press or to select Input Labelling a...

Page 34: ...s not performed when the television is in standby 1 From the SETUP menu press or to select DTV Settings and press OK 2 Press or to select Over the air Upgrade menu and press OK 3 Press or to select Auto Upgrade 4 Press or to select On or Off Searching for New Software If preferred software upgrades can be searched for manually using Search for New Software 1 From the SETUP menu press or to select ...

Page 35: ...de you will see the page numbers currently stored on the each colour button Sub pages Once in this chosen page if there are sub pages they will automatically load into memory without changing the one you are reading If there are many sub pages it will take a long time for them all to load and this will depend on the speed with which the broadcaster transmits them To access the sub pages in memory ...

Page 36: ...er In List mode Press to return to the 100 page or initial page To reveal concealed text Some pages cover topics such as quizzes and jokes To discover the solutions press To hold a wanted page This function is included as it is part of the broadcast teletext system but you will not need it as this TV allows you to control the display of sub pages To enlarge the teletext display size Press once to ...

Page 37: ...r s manual of the connected equipment as well When you connect the TV to other equipment be sure to turn off the power and unplug all of the equipment from the wall outlet before making any connections The output sound of the TV has a wide dynamic range Be sure to adjust the audio amplifier s volume to a moderate listening level before turning on the power Otherwise the speakers and your hearing m...

Page 38: ...from CEA 861 D compliant consumer electronic devices such as a set top box and DVD player with HDMI and DVI output The HDMI input is designed for best performance with 1080i 50 60 Hz and 1080p 24 50 60 Hz high definition video signals but will also accept and display 480i 480p 576i 576p and 720p 50 60 Hz and VGA VESA 640 480 60 72 75 Hz signals HDMI High Definition Multimedia Interface HDCP High b...

Page 39: ...VI device connected to the HDMI input terminals from three modes Auto Digital or Analogue NOTE This function is available only when the PC HDMI 1 Audio mode is set to HDMI1 1 From the AV Connection menu press or to select HDMI 1 Audio 2 Press or to select Auto Digital or Analogue Connecting a computer To connect a PC to the RGB PC terminal on theTV An analogue RGB 15 pin computer cable can be conn...

Page 40: ...PC to TV connection TV back view NOTE The edges of the images may be hidden If connecting a certain PC model that signal is particular the PC signal may not be detected correctly Signal names for mini D sub 15 pin connector Pin assignment for RGB PC terminal Pin No Signal name Pin No Signal name 1 R 9 NC 2 G 10 Ground 3 B 11 NC 4 NC not connected 12 DDC Data 5 Ground 13 H sync 6 Ground 14 V sync 7...

Page 41: ...PC Settings The Reset function adjusts the PC Settings to the factory settings 1 From the PC Settings menu press or to select Reset 2 Press OK 3 A confirmation message will appear Press or to select Yes and then press OK NOTE When a PC is connected using HDMI none of these function will be available Using the Easy remote control to operate the TV The following TV operations can be performed using ...

Page 42: ...the desktop area on the home screen When purchased icons such as the TOSHIBA Information and Browser icon are located on the desktop area of the home screen The desktop areas can be customized 4 Screen slide button You move to the desktop area to the left or right The home screen is located at the centre and the desktop areas to the left and right are prepared Desktop area Home screen 5 Dock bar a...

Page 43: ... notification icon that appears when there is a notification is displayed on the left side The unit status icon and time are displayed on the right side Checking detailed information When the focus is on the status bar and you press and hold and tilt the pointing key downward notification messages are displayed If you select a notification message and then press the pointing key the related applic...

Page 44: ...ting a network page 46 Some features require an always on broadband internet connection firmware update and or additional bandwidth dedicated to this product Third party internet services may change or be discontinued or restricted at any time TOSHIBA makes no warranties representations or assurances about the content availability or functionality of third party content or services Use of third pa...

Page 45: ... WIDGET screen Customizing the Dock bar Placing shortcut icons on the Dock bar Up to 7 shortcuts can be placed in the dock bar 1 Select the icon to place in the dock bar on the desktop press and hold the pointing key and move the icon to the dock bar 2 Release the pointing key Removing shortcut icons 1 Select the icon to remove on the dock bar press and hold the pointing key and move the icon to t...

Page 46: ...Mirroring software is active other applications may not be usable When Screen Mirroring is used you cannot connect to the Internet using the TV To exit Screen Mirroring Exit using your tablet smartphone or PC or by pressing EXIT on the TV remote control NOTE It may not be possible to connect some tablets smartphones and PCs to the TV Connecting a network The LAN port allows your TOSHIBA TV to conn...

Page 47: ...es or services is perceived or identified as harmful If you are uncertain of the policy that applies to the use of wireless devices in a specific organization or environment you are encouraged to ask for authorization to use the Wireless LAN device prior to turning on the equipment Setting up the wireless LAN Configure the TV so it can be connected to a wireless LAN access point wirelessly NOTE Co...

Page 48: ...nd then press the pointing key To change the setting select on the upper right and then press the pointing key Data usage Check the usage status of the internal memory To display the current usage status of the internal memory select Data usage and then press the pointing key More Set up a VPN Virtual Private Network To display the setup screen select More and then press the pointing key Sound Con...

Page 49: ...age 61 Storage Check the storage and available capacity for each item To display the storage and available capacity for each item select Storage and then press the pointing key Apps Check the applications Select Apps and then press the pointing key The preinstalled and downloaded applications are displayed A bar appears on the lower side indicating the size of the installed applications If you sel...

Page 50: ...ointing key Place the mark to enable Sleep Timer Select and then press the pointing key The advanced setup screen appears and you can set Sleep Timer Automatic Power Down Set Automatic Power Down The TV will automatically turn itself off standby after approximately 4 hours if you do not operate the control buttons on the remote control or on the TV control panel To display the setup screen select ...

Page 51: ...be used to operate Android features when the Easy remote control cannot be used NOTE Not all the Android features can be operated MENU When is displayed on the screen pressing MENU redisplays the home screen Select an item OK Confirm the selected item Using to select an item and pressing OK works the same as using the pointing key BACK Go back to the upper layer EXIT Return to the home screen 4050...

Page 52: ...must obtain any required permission from copyright owners to download or use copyrighted content TOSHIBA cannot and does not grant such permission Starting Media Player Starting Media Player while you are watchingTV 1 Press QUICK to open the Quick Menu 2 Press or to select Media Player and press OK The top screen of the Media Player appears Alternatively press MENU and select Media Player from the...

Page 53: ...e Photos xxxxxxxxxxxxxxx xxxxxxxxxxxxxxx xxxxxxxx xxxxxxxx xxxxxxxx xxxxxxxx xxxxxxxx xxxxxxxx xxxxxxxx xxxxxxxx xxxxxxxx xxxxxxxx xxxxxxxx 5 999 Title xxxxxxxxxxxxxxxxxxxxxx jpg Date xxxx xxx xxxxx xxxxx Size 1920 x 1080 The initial highlighted position will be on the top left thumbnail in the Multi View 1 Press or to select a photo or folder PU Pu buttons can be used to page up down the Multi Vi...

Page 54: ...g NOTE Using the zoom function while in the Slide Show mode will stop the slideshow and zoom in the photo To close the PhotoViewer 1 Press EXIT The top screen of the Media Player appears Using the Easy remote control to operate MultiView Photos xxxxxxxxxxxxxxx xxxxxxxxxxxxxxx xxxxxxxx xxxxxxxx xxxxxxxx xxxxxxxx xxxxxxxx xxxxxxxx xxxxxxxx xxxxxxxx xxxxxxxx xxxxxxxx xxxxxxxx 5 999 Title xxxxxxxxxxxx...

Page 55: ... SOUND menu functions from the Quick Menu During playback Press W to pause To resume normal playback press c play PAUSE may not be available depending on the contents To play in fast reverse or fast forward directions press CC or cc during playback Each time you press CC or cc the playback speed will change Press z to skip to the next track Press Z to skip to the beginning of the current track Pre...

Page 56: ... xxxxxxxxxxxxxxxxxxxxxx mov Date xxxxx xxxx xxxxx xxxxx USB xxxxxxxx xxxx xxxx ccc abc xxxx ccc abc xxxx ccc abc xxxx ccc abc xxxx ccc abc xxxx ccc abc xxxx ccc abc xxxx ccc abc xxxx ccc abc 00 20 00 03 00 00 03 00 00 03 00 00 03 00 00 03 00 00 03 00 00 03 00 00 03 00 00 03 00 00 1 Press or to select a file or folder PU Pu buttons can be used to page up down the List View when there are more files...

Page 57: ...ed position NOTE If you play different content or exit Media Player the memorized stopped position will be deleted To close the MovieViewer 1 Press EXIT The top screen of the Media Player appears To register yourTV to a DivX account This TV allows you to play back files purchased or rented from DivX Video On Demand VOD services When you purchase or rent DivX VOD files on the internet you will be a...

Page 58: ...ent The playback speed CC cc may not change depending on the stream Using MultiTitle and AlternativeTimelines MultiTitle DivX Plus HD files may contain up to 100 titles You can change the title It contains same video file by pressing the RED button When the RED button is pressed it will display the title change window at the bottom on the screen same as Subtitle or Audio change window The title is...

Page 59: ...99 Title xxxxxxxxxxxxxxxxxxxxxx mov Date xxxxx xxxx xxxxx xxxxx USB xxxxxxxx xxxx xxxx ccc abc xxxx ccc abc xxxx ccc abc xxxx ccc abc xxxx ccc abc xxxx ccc abc xxxx ccc abc xxxx ccc abc xxxx ccc abc 00 20 00 03 00 00 03 00 00 03 00 00 03 00 00 03 00 00 03 00 00 03 00 00 03 00 00 03 00 00 1 If you select a file and then press the pointing key playback starts If you select a folder and then press th...

Page 60: ...t the content again Copying the content may take some time Copying cannot be cancelled Some files may not be viewable depending on the device An icon will be displayed on the Multi View or List View preview screen During playback you cannot move to the next or previous content using Z or z Stop playback and select the content from the Multi View or List View Slide Show playback is not possible for...

Page 61: ...HDMI input and the TV input will automatically switch to that device If the TV is in standby it will be turned on automatically Configure settings on the HDMI CEC Setup menu NOTE Even if the device is showing a menu the TV may automatically show the video input source on screen display HDMI CEC system standby This feature automatically turns the connected device into standby when the TV goes into ...

Page 62: ...onnected 3 Press and a second selection screen will appear showing all connected HDMI CEC Control equipment HDMI 2 HDMI 1 PC HDMI 3 TV VIDEO2 VIDEO1 Inputs 1 DVD 2 VCR DVR 3 CBL SAT 4 GAME TV 5 AUX 4 Press or to select the desired input source and then press OK NOTE These functions depend on the device connected If you select the HDMI CEC Control input source from the popup window some HDMI CEC Co...

Page 63: ...I avi Video H 264 MPEG 4 AVC DivX 3 4 5 6 Xvid MJPEG Maximum number of files 4096 per folder Maximum viewable resolution 1920x1080 Supported format of External Subtitle srt sub smi ssa ass txt psb ttxt idx sub Some files may not be played Audio MPEG 1 2 Layer2 MPEG 1 2 Layer3 Dolby Digital AC 3 L PCM ADPCM MPEG 2 PS mpg mpeg dat Video MPEG 1 Video MPEG 2 Video Audio MPEG 1 2 Layer2 MPEG 1 2 Layer3...

Page 64: ...DPCM DivX divx div Video DivX 3 4 5 6 Audio MPEG 1 2 Layer3 Dolby Digital AC 3 MKV mkv xdiv Video MPEG 2 Video MPEG 4 part2 H 264 MPEG 4 AVC Xvid Audio MPEG 1 2 Layer2 MPEG 1 2 Layer3 Dolby Digital AC 3 MPEG 2 4 LC AAC RealMedia rm rmvb Video RealVideo 8 9 10 Audio RA COOK Flash Video FLV1 flv Video Sorenson H 263 FLV1 H 264 MPEG 4 AVC Audio MPEG 1 2 Layer3 MPEG 2 4 LC AAC 3GPP 3gp Video MPEG 4 pa...

Page 65: ...5 C58 767 25 C59 775 25 C60 783 25 C61 791 25 C62 799 25 C63 807 25 C64 815 25 C65 823 25 C66 831 25 C67 839 25 C68 847 25 C69 855 25 C70 863 25 S mode OSD RF Frequency MHz S1 105 25 S2 112 25 S3 119 25 S4 126 25 S5 133 25 S6 140 25 S7 147 25 S8 154 25 OSD RF Frequency MHz S9 161 25 S10 168 25 S11 231 25 S13 238 25 S14 245 25 S15 252 25 S16 259 25 S17 266 25 S18 273 25 S19 280 25 S20 287 25 S21 29...

Page 66: ...o not light up The LCD display panel is manufactured using an extremely high level of precision technology however sometimes some pixels of the screen may be missing picture elements or have luminous spots This is not a sign of a malfunction The picture brightness varies when you switch theTV on If you switch the TV on at 0 C or under it takes some time for the TV to warm up Multiple images The st...

Page 67: ...ayback NTSC recorded video tapes through PAL TV equipment Specifications Power source 110V 240V AC 50 60Hz Power consumption 40 80 W 0 5 W standby 50 97 W 0 4 W standby 55 147 W 0 4 W standby Dimensions 40 904 mm W 568 mm H 181 mm D 50 1122 mm W 703 mm H 214 mm D 55 1241 mm W 771 mm H 214 mm D Mass Weight 40 11 5 kg 50 17 5 kg 55 17 5 kg TV system Aerial input Analog broadcast systems Channel cove...

Page 68: ...udio L Mono R o RGB PC Input Mini D sub 15 pin Analogue RGB o PC HDMI 1 Input AUDIO 3 5 mm Diameter stereo o HDMI1 3 Input type A 19 pin A V Digital HDMI Lip Sync USB port 1 2 Media Player Interface version USB 2 0 USB class Mass Storage File system FAT16 and FAT32 LAN port RJ 45 Operating condition Temperature 0 C 35 C Humidity 20 80 No moisture condensation Supplied accessories 40L555 Series 50L...

Page 69: ...TIVITY AND OR WAS OBTAINED FROM A VIDEO PROVIDER LICENSED TO PROVIDE AVC VIDEO NO LICENSE IS GRANTED OR SHALL BE IMPLIED FOR ANY OTHER USE ADDITIONAL INFORMATION MAY BE OBTAINED FROM MPEG LA L L C SEE HTTP WWW MPEGLA COM MPEG Layer 3 audio coding technology licensed from Fraunhofer LLS and Thomson THIS PRODUCT IS LICENSED UNDER THE MPEG 4 VISUAL PATENT PORTFOLIO LICENSE FOR THE PERSONAL AND NON CO...

Page 70: ...OUT WARRANTY OF ANY KIND BY TOSHIBA UNLESS NON TOSHIBA SOFTWARE MANUFACTURERS SUPPLIERS EXPRESSLY OFFER THEIR OWN WARRANTIES End User License Agreement IMPORTANT THIS END USER LICENSE AGREEMENT EULA IS A LEGAL AGREEMENT BETWEEN YOU AND TOSHIBA CORPORATION AND OR TOSHIBA LIFESTYLE PRODUCTS SERVICES CORPORATION JOINTLY OR SEVERALLY TOSHIBA CAREFU CAREFULLY READ THIS EULA USE OF ANY TOSHIBA AND THIRD...

Page 71: ...th all Export Laws to assure that the Software is not exported directly or indirectly in contravention of the Export laws 9 Governing Law This EULA will be governed by the laws of Japan or other applicable country excluding its conflict of law provisions 10 Severability If any provision of this EULA shall be held to be invalid illegal or unenforceable the validity legality and enforceability of th...

Page 72: ...is strictly prohibited TRA REGISTERED No ER38254 15 DEALER No DA35500 14 40L5550 TRA REGISTERED No ER38277 15 DEALER No DA35500 14 50L5550 TRA REGISTERED No ER38278 15 DEALER No DA35500 14 55L5550 OMAN TRA R 2452 15 D100428 OMAN TRA R 2451 15 D100428 OMAN TRA R 2450 15 D100428 405055L5550Series EEEV En indd 72 405055L5550Series EEEV En indd 72 27 05 18 13 15 07 27 05 18 13 15 07 ...

Reviews: