21
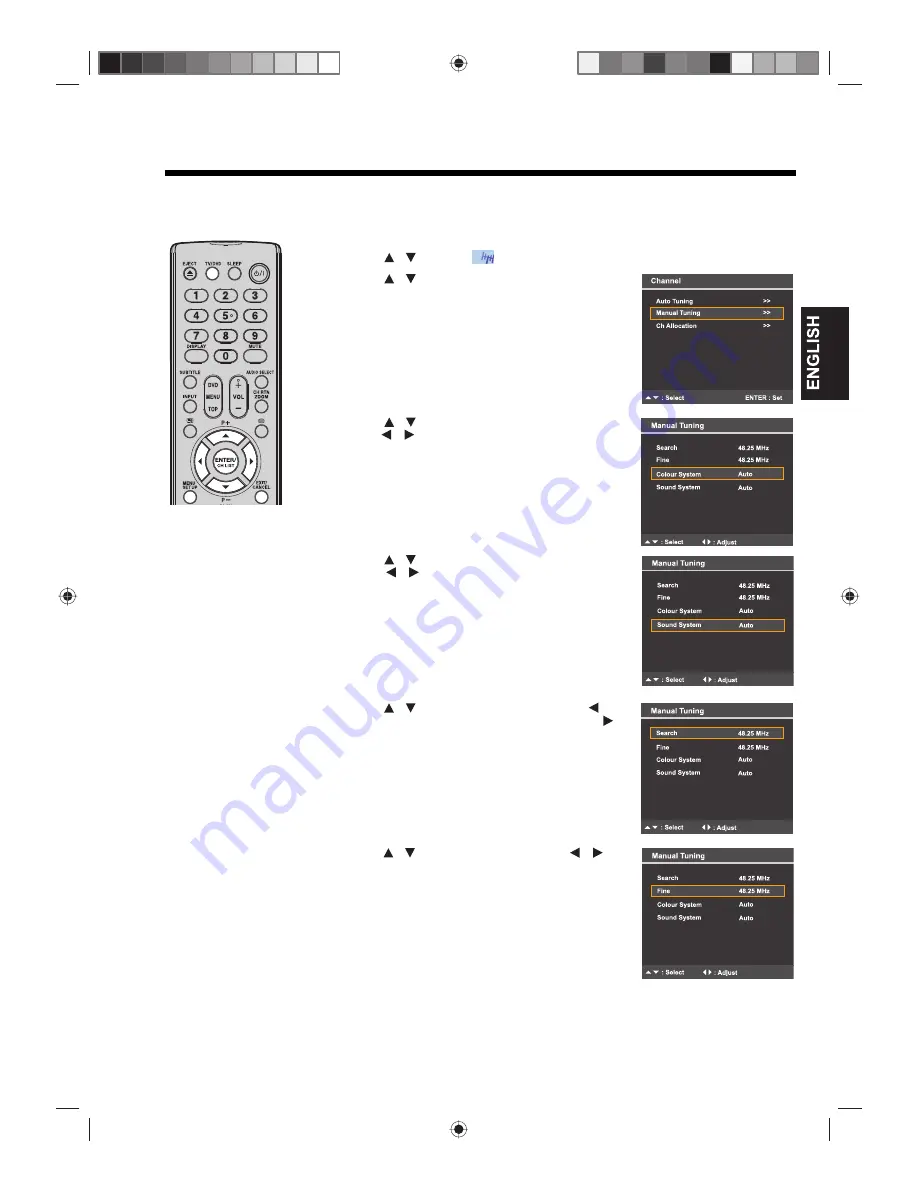
Manual tuning
The Auto Tuning process stores all available stations in the reception area. However, some stations with weak or
poor reception may not be detected. If this is the case and you still want to store these stations in the TV, perform
the manual tuning procedure described below.
1
Press
TV/DVD
to switch to TV mode, then press
MENU
.
Press
to select
“Channel”, then press
ENTER
.
2
Press
to select “Manual Tuning”, then
press
ENTER
.
3
Press
to select “Colour System”, then
press
to select the TV system applicable to
your area (“PAL” or “SECAM”).
If you’re not certain of the correct option, select
“Auto”.
4
Press
to select “Sound System”, then
press
to select the sound system
applicable to your area (“B/G”, “I”, “D/K” or “L/L’”).
If you are receiving a SECAM broadcast, select
“L/L’”.
If you’re not certain of the correct option, select
“Auto”.
Note:
Sometimes when “Auto” is selected, there
will be no sound output. If this happens, select an
option other than “Auto”
.
5
Press
to select “Search”, then press
to
search for channels in the lower frequency or
to search for channels in the higher frequency.
The search will begin. It will stop at each station
that has a good reception.
If you want to stop the search, press
ENTER
.
6
Press
to select “Fine”, then press
to
fine tune until the station is adjusted to the best
position.
7
Press
EXIT
to return to the normal screen.
Fine Tuning adjustment
Under a normal receiving
condition, the station
search will stop
automatically at the best
receiving position. That
picture will appear without
disturbance. This
receiving position will be
automatically saved. You
don’t need to fine tune it
(“Fine” option in step 6 on
the right).
In the rare case of a bad
receiving condition, the
station search might not
stop at the best receiving
position. The picture
display in that station will
appear disturbed, (e.g.
wavy lines). Only in this
case will you need to
manually fine tune the
station’s position.
/
/
/
/
/
/
/
/
/


