


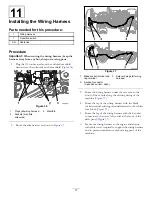


Removing the ROPS Panel and Seat
Shroud
1.
Remove the 6 carriage bolts and 6 nuts that secure the
ROPS panel to the mounting brackets on the ROPS
bar (
Figure 12
1.
Nuts
3.
ROPS panel
2.
Mounting bracket (ROPS
bar)
4.
Carriage bolts
2.
Remove the ROPS panel from the machine (
)
3.
Lift the seat shroud up and remove it from the machine
(
).
Figure 13
1.
Seat shroud
5
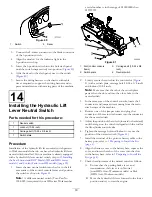
Removing the Hydraulic Lift
Lines
No Parts Required
Disconnecting the Hydraulic Lift Hoses
(3000 and 4000 series Workman)
Disconnect the extend and retract hoses from the straight
fittings that are connected to the male and female quick
couplers at the quick disconnect bracket for the lift cylinders.
Removing the Hydraulic Lift Tubes (HD,
HDX, and HDX Auto series Workman)
1.
Disconnect the tube nuts for the extend and retract
tubes from the straight fittings that are connected
to the male and female quick couplers at the quick
disconnect bracket for the lift cylinders (
Note:
Allow the hydraulic fluid to drain from the
tubes into a drain pan.
Figure 14
1.
Back of the machine
3.
Tube (lift cylinder—retract
circuit)
2.
Tube (lift cylinder—extend
circuit)
4.
Quick disconnect bracket
2.
Remove the 5/16 x 1-1/2 inch bolt and clamp that
secures the extend and retract tubes to the tube support
bracket.
3.
Disconnect the extend and retract tubes at the lift
cylinder control valve (
8


