


11
Installing the Wiring Harness
Parts needed for this procedure:
1
Wiring Harness
1
3-position switch
AR
Cable ties
Procedure
Important:
When routing the wiring harness, keep the
harness away from any hot, sharp or moving parts.
1.
Plug the (2) connectors from the enclosed manifold
harness into the solenoids on the manifold (
Figure 36
1.
Plugs (kit wiring harness)
3.
Manifold
2.
Sockets (manifold
solenoids)
2.
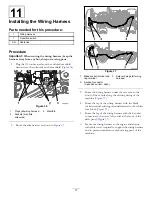
Route the wire harness as shown in
Figure 37
1.
Blade socket terminal and
ring terminal
3.
Solenoid plugs (kit wiring
harness)
2.
8-socket connector
(3–position switch—dash)
3.
Route the wiring harness under the seat area to the
front of the vehicle along the existing wiring of the
machine (
).
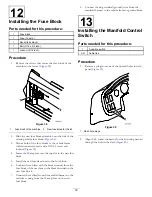
4.
Route the leg of the wiring harness with the blade
socket terminal and ring terminal forward to the vehicle
fuse block (
5.
Route the leg of the wiring harness with the 8-socket
connector to the lower left corner at the front of the
dash panel (
6.
Secure the wiring harness to the engine and chassis
with cable ties as required to support the wiring harness
and to prevent interference with moving parts of the
machine.
17


