


12
Installing the Fuse Block
Parts needed for this procedure:
1
Fuse block
1
Fuse (12 amp)
1
Decal (fuse block)
1
Bolt (5/16 x 3/4 inch)
1
Locknut (5/16 inch)
Procedure
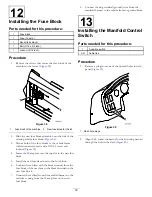
1.
Remove the screws that secure the fuse block of the
machine to the frame (
).
G010461
1
2
Figure 38
1.
Fuse block of the machine
2.
New fuse block for the kit
2.
Slide the new fuse block assembly onto the side of the
existing vehicle fuse block (
3.
Mount both of the fuse blocks to the vehicle frame
with fasteners removed and a #10-24 screw and
locknut (
).
4.
Insert the 10 amp fuse into the top slot in the new fuse
block
5.
Install the new fuse decal next to the fuse block.
6.
Connect the red lead with the black terminal from the
fuse block of the machine to the black terminal on the
new fuse block.
7.
Connect the red lead from the manifold harness to the
red wire coming from the 10 amp fuse on the new
fuse block.
8.
Connect the ring terminal (ground) wire from the
manifold harness to the vehicle frame or ground block.
13
Installing the Manifold Control
Switch
Parts needed for this procedure:
1
3-position switch
AR
Cable ties
Procedure
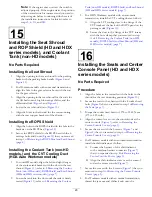
1.
Remove a plug from one of the unused holes in dash
panel (
G010462
1
Figure 39
1.
Dash hole plugs
2.
Align the 8-socket connector for the kit wiring harness
through the hole in the dash (
18


