


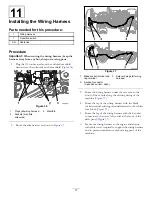


Figure 15
1.
Front of the machine
3.
Tube (lift cylinder—retract
circuit)
2.
Lift cylinder control valve
4.
Tube (lift cylinder—extend
circuit)
4.
Remove the tubes from the machine.
Note:
Discard the tubes.
6
Removing the Quick
Disconnect Hose Fittings
and the Quick Disconnect
Bracket
No Parts Required
Removing the Quick Disconnect Hose
Fittings
1.
Align drain pan under the fittings at the quick
disconnect bracket at the right rear of the machine
(
).
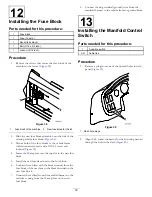
Figure 16
1.
Quick disconnect bracket
3.
Quick disconnect fitting
(female—extend circuit)
2.
Quick disconnect fitting
(male—retract circuit)
2.
Remove the 2 lift cylinder hoses from the quick
disconnect bracket (
3.
Remove the 90° fittings and the quick disconnect
fittings from the end of the 2 lift cylinder hoses (
Note:
Temporarily install a plug into the end of each
hose.
9


