3.
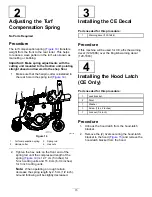
While relieving the spring tension, remove the
bolt and locknut securing the spring actuator to
the bracket (
g034346
Figure 37
1.
Spring
3.
Additional hole locations
2.
Spring actuator
4.
Move the spring actuator to the desired hole
location and secure it with the bolt and the
locknut.
5.
Repeat the procedure on the remaining spring.
Bleeding the Fuel System
1.
Park the machine on a level surface, lower the
cutting units, engage the parking brake, shut off
the engine, and remove the key from the ignition
switch.
2.
Position the machine on a level surface, lower
the cutting units, shut off the engine, and set the
parking brake.
3.
Unlatch and raise the hood.
DANGER
Under certain conditions, diesel fuel and
fuel vapors are highly flammable and
explosive. A fire or explosion from fuel
can burn you and others and damage
property.
•
Use a funnel and fill the fuel tank
outdoors, in an open area, when the
engine is off and is cold. Wipe up any
fuel that spills.
•
Do not fill the fuel tank completely
full. Add fuel to the fuel tank until the
level is 6 to 13 mm (1/4 to 1/2 inch)
below the bottom of the filler neck.
This empty space in the tank allows
the fuel to expand.
•
Never smoke when handling fuel,
and stay away from an open flame or
where fuel fumes may be ignited by
a spark.
•
Store fuel in a clean, safety-approved
container and keep the cap in place.
4.
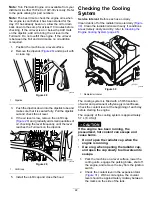
Open the air-bleed screw on the fuel-injection
pump (
).
g008891
Figure 38
1.
Fuel-injection pump bleed screw
5.
Turn the key in the ignition switch to the
O
N
position. The electric fuel pump begins
operation, thereby forcing air out around the
air-bleed screw.
Note:
Leave the key in the O
N
position until a
solid stream of fuel flows out around the screw.
6.
Tighten the screw and turn the key to the O
FF
position.
Note:
Normally the engine should start after the
above bleeding procedures are followed. However, if
29
Summary of Contents for 03820
Page 53: ...Notes ...
Page 54: ...Notes ...

