11
S200
AUTOMATION INSTALLATION
S200 with pulling sliding
elbow arm
DRILLING HOLES
1.
Check the correct direction of the arrow on the fixing
plate
2.
With a suitable drill, make the 6 holes as per the
position specifications and insert the 6 anchors in the
wall holes
3.
Mark the 2 fixing points for for sliding guide
PLATE FITTING
1.
Fasten the mounting plate with the 4 fixing screws
securely.
2.
Prepare the input for the electrical wires
AUTOMATION FITTING
1.
Pass the electric wires to the inside of the automa
-
tion.
2.
Fasten the automation and tighten the two screws
indicated.
3.
Fit and tighten the four nuts to the plate installed
previously
SLIDING GUIDE ASSEMBLY
1.
Assemble the axle extension , if any, of the motor
axis
2.
Assemble the axle 90° elbow arm
3.
Grease the runner, then fit the guide in the runner
taking care to leave the two larger holes on the
outside.
(
Before installation see the Additional instructions)
SLIDING GUIDE FITTING
1.
Make sure the door is closed and fasten the sliding
fasten the sliding guide with two appropriate screws
in the points previously pre-drilled.
2.
Fit the caps in the front holes
3.
Fit the lateral caps of the guide
ARM FITTING
1.
Make sure the door is closed.
1.
Apply the supplied glue to the upper part on the
outer conical surface of the pin, making a circumfer
-
ence all around the pin
2.
Insert the pivot pin of the arm in the housing on the
actuator, taking care to have previously fitted the
triangular plate
3.
Insert the fastening screws of the arm in the motor
axis and tighten with torque of 38Nm.
REMOVAL OF SPRING PRELOADING
SCREWS
1.
Keep the door locked closed manually
2.
Unscrew the grub screw on the motor side (GLM)
and remove it from its seat
3.
Slightly open the door and remove the grub screw on
the electronic board side (GLS)
instructions for installation
SLIDING PULLING ARM INSTALLATION - ELBOW
Summary of Contents for S200
Page 20: ...20 instructions for installation LIST OF ERROR MESSAGES AND NOTICES S200 ...
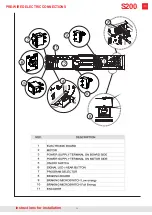
Page 26: ...26 instructions for installation PRE WIRED ELECTRIC CONNECTIONS S200 ...
Page 30: ...30 EC DECLARATION OF CONFORMITY instructions for installation S200 ...


