


10
© Titan Tool Inc. All rights reserved.
Maintenance
Before proceeding, follow the Pressure Relief
Procedure outlined previously in this manual.
additionally, follow all other warnings to reduce
the risk of an injection injury, injury from moving
parts or electric shock. always unplug the sprayer
before servicing!
Daily Maintenance
Two daily procedures are required for routine operator
maintenance on this sprayer:
1. Lubricating the upper packings.
2. Cleaning the filter screen.
Lubricating the upper Packings
Packing Oil
Cup
1. Clean out the paint that has seeped
past the upper packings into the
packing oil reservoir above the fluid
section.
2. Fill the packing oil reservoir 1/2 full
with Piston Lube (P/N 314-480)
supplied by the factory. This will
extend packing life.
NOTE: Do not over-fill the reservoir
so that it overflows and drips
into the paint.
cleaning the Filter Screen
Filter
Screen
Hex
Nut
1. The filter screen will clog and must be
cleaned at least once a day.
2. Loosen the hex nut that secures the
filter screen to the siphon tube.
3. Remove the filter screen from the
bottom of the siphon tube.
4. Clean thoroughly with the appropriate
solvent.
Maintaining the Filter assembly
Clean the filter regularly. Dirty or clogged filters can greatly
reduce filtering ability and cause a number of system problems
including poor spray patterns, clogged spray tips, etc.
cleaning
To clean the filter, perform the following procedure.
1. Follow the “Pressure Relief Procedure” found in the
Operation section of this manual.
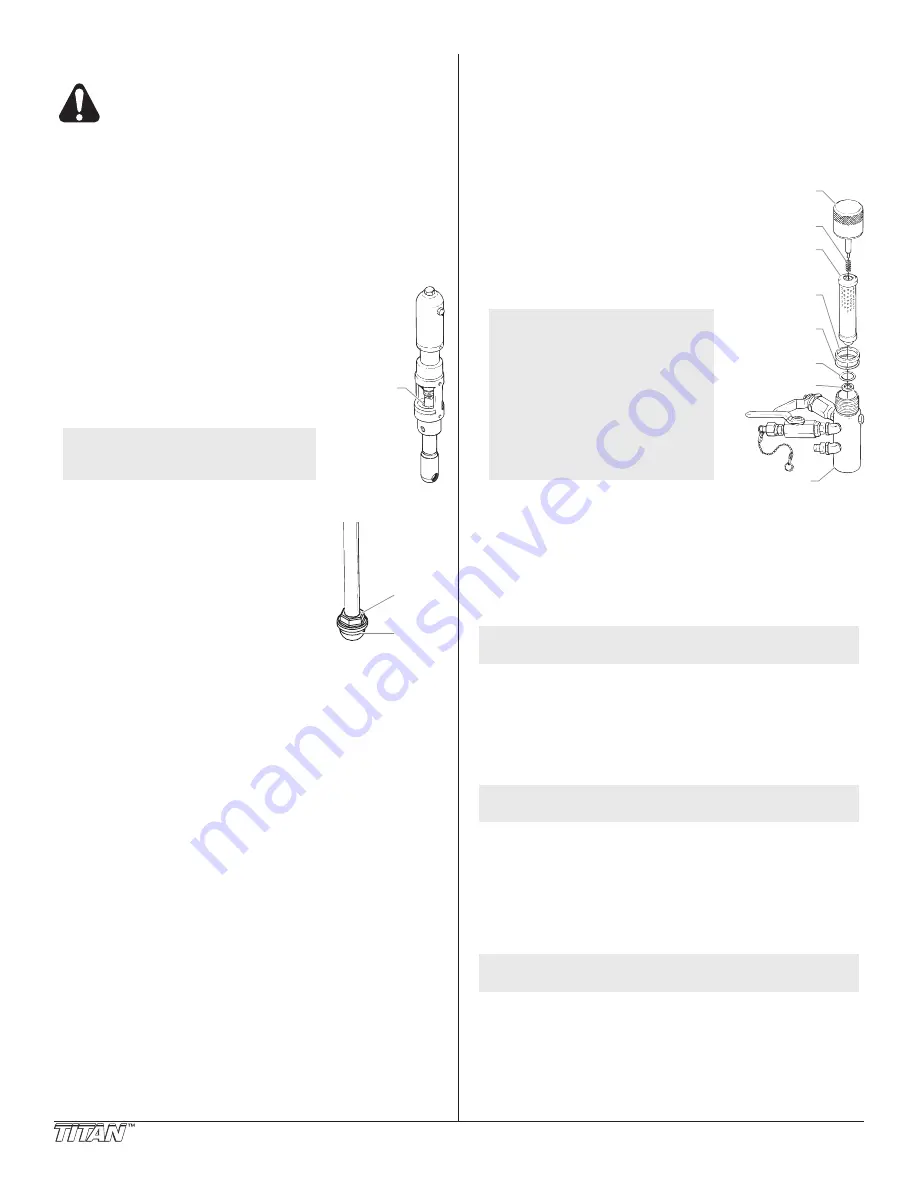
Filter Cap
Assembly
Filter
Element
w/Ball
Teflon Gasket
(thick)
Teflon Gasket
(thin)
Teflon O-ring
Carbide Seat
Filter Body
Spring
2. Remove the filter cap assembly and
spring.
3. Pull the filter element with ball
straight out of the filter body.
4. Clean inside the filter body, filter
element with ball, and filter cap
assembly using the appropriate
solvent.
NOTE: use care in handling
parts as dirt, debris,
scratches, or nicks
may prevent o-rings or
gaskets from sealing.
This filter element filters from the
inside out. Be sure to clean the
filter element thoroughly on the
inside. Soak in solvent to loosen
hardened paint or replace.
Inspection
Inspect all parts of the filter assembly before reassembly.
1. Inspect the ball inside the filter element. If the ball has
pressure cuts or scratches, replace the filter element.
a. If the ball is cut, remove the Teflon o-ring using an
o-ring pick and remove the carbide seat.
b.
Check the seat for nicks or grooves. If the seat is
damaged, replace.
NOTE: Removal of the Teflon o-ring will damage the
o-ring and require replacement.
2. Remove the spring from the spring guide on the filter cap.
a.
Measure the length of the spring uncompressed. If it
measures less than 3/4” from end to end, replace.
b.
Push the spring back onto the spring guide until it
“snaps” back into position.
3. Inspect the two Teflon gaskets and the Teflon o-ring for
deformity, nicks, or cuts. Replace, if needed.
NOTE: The Teflon gaskets, Teflon o-ring, and spring are
packaged in Filter Service Kit P/N 930-050.
Reassembly
After cleaning and inspecting all parts, reassemble the filter.
1. Place the carbide seat into the filter body. Make sure the
beveled side of the seat is facing up.
2. Place the Teflon o-ring into the groove on the outer
diameter of the carbide seat.
3. Place the filter element with ball into the filter body.
NOTE: The top and bottom of the filter element with ball
are identical.
4. Push the spring back onto the spring guide of the filter cap
until it “snaps” back into position, if not already done.
5. Place the thin Teflon gasket onto the step at the top of the
filter body.
6. Place the thick Teflon gasket onto the top of the thin
gasket.
7. Tighten the filter cap assembly onto the filter body.


