background image


Deleting and reconfiguring transponders

Reconfiguring transponders

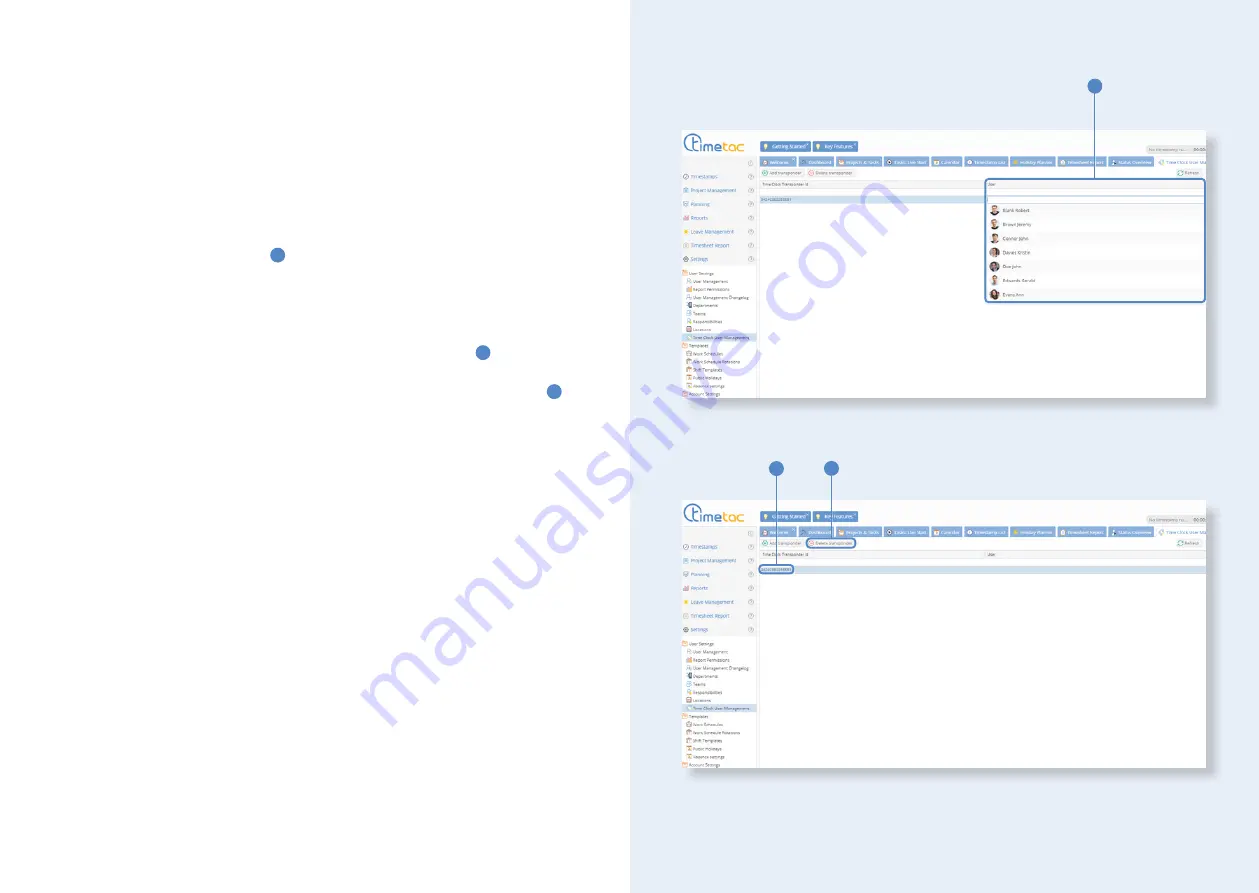
If you wish to assign a transponder to another user, you must open TimeTac wit-
hin the web browser. Be aware of the fact that you must have 

Full Employee 

Access

 in order to reassign transponders. Click on 

Settings > User Settings > 

Time Clock User Management

 in the left side bar. 

Double click in the column 

User


1

 to open the dropdown menu and select the 

user the transponder shall be assigned to.

Deleting transponders

In the case of an employee leaving the company, you can delete the transponder 
and reuse it when needed. Click on the respective transponder ID 

2

 in the 

Time 

Clock User Management

 menu in the web browser. When the row with the lea-

ving employee is highlighted in blue, click on the button 

Delete transponder 

3

.

3

1

2

22

23

Summary of Contents for Evo Basic

Page 1: ...Evo Basic Time Clock Getting started with the www timetac com Information Knowledge Base support timetac com The enterprise solution for time tracking...

Page 2: ...eleting and reconfiguring transponders 22 Time clock with RFID transponder and fingerprint 24 Configuration of transponders 26 Enroll fingerprints 28 Tracking time with your time clock 30 Deleting fin...

Page 3: ...iant Transponder RFID Transponder RFID Fingerprint The buttons that you can see on the start display depend on the presets that have been set for you as well as on the time clock variant In most cases...

Page 4: ...ter Then hang the time clock on the wall and fix it on the lower part by using the included screw 4 Network settings Your company internal network requires the following settings As DNS 8 8 8 8 must...

Page 5: ...e on the right hand side Then insert the SIM card into the slim slot 3 Please ensure that the contact area of the card is on the bottom side Connect the power cable 2 to a socket Further on you must o...

Page 6: ...nu item communication 2 and tap then on Interrupt communication 3 The menu item Interface 4 allows you to change the internet settings from LAN to Wi Fi The HTTP mode 5 must be set to Secure Now follo...

Page 7: ...Wi Fi sources 3 are now displayed Select one of these In the case of your preferred Wi Fi not being displayed swipe up and tap on Add Network Enter the name of the network in order to search for it d...

Page 8: ...f configurations that you have al ready saved Choose one of these in order to switch to that configuration 3 Additionally you can set the Auto Configuration Choice 4 on Yes This way the device connect...

Page 9: ...be vie wed in the web browser as well as in the smartphone app Within the web brow ser you can identify a timestamp that has been registered via time clock by the time clock symbol that appears in the...

Page 10: ...thin the web browser to assign the newly stored transponder to a user Be aware of the fact that only a manager with Full Emp loyee Access can assign transponders Click on Settings User Settings Time C...

Page 11: ...espective absence can be selected in the menu that appears right after Then bring the transponder to the reader unit Create individual absences by contacting our customer support Info Here users can a...

Page 12: ...lock User Management in the left side bar Double click in the column User 1 to open the dropdown menu and select the user the transponder shall be assigned to Deleting transponders In the case of an e...

Page 13: ...of your time clock being offline e g because of internal network adjustments timestamps are saved directly on the time clock As soon as the device is connected to the internet again the data is trans...

Page 14: ...account within the web browser to assign the newly stored transponder to a user Be aware of the fact that only a manager with Full Emp loyee Access can assign transponders Click on Settings User Setti...

Page 15: ...rocess two more times Then you will see the notification Successfully enrol led Quality X Please press key 4 Tap on the green field What to consider when enrolling a fingerprint Hold your finger verti...

Page 16: ...ng on Arrival and bringing the transponder or fingerprint as usual to the reader unit Other Tap on Other to record other absences The respective absence can be selected in the menu that appears right...

Page 17: ...n be deleted within the BioKey Config 1 menu Here tap on Delete finger 2 Select the finger you wish to delete by tou ching it on the display 3 The user whose fingerprints are about to be deleted must...

Page 18: ...lock User Management in the left side bar Double click in the column User 1 to open the dropdown menu and select the user the transponder shall be assigned to Deleting transponders In the case of an e...

Page 19: ...information and system info do not contain in formation that you require for the usage of your time clock The menu item com munication 3 allows you to adjust and check your time clock s network setti...

Page 20: ...es or secure Tap on LAN Parameters 4 Here you define the following settings DHCP is should be set on Yes In order to enable the time clock to establish a functioning internet connection the following...

Page 21: ...tem settings 2 Enter your key and confirm by tapping on enter Tap on display signals and choose either the menu item backlight 3 or signal volume 4 depending on which parameter you would like to adjus...

Page 22: ...g on the name of the respective sensor The proximity sensor initiates your time clock to switch off the display if it is not used If then an employee approaches the time clock the display is switched...

Page 23: ...h further information Error diagnosis Is the time clock connected correctly to power and network Is the time clock switched on 1 and does it respond to your transponder fingerprint Does the symbol bar...

Page 24: ...ht flash If the IP address was derived correctly you must check if all other settings on your time clock are defined according to your company network By default the DNS is defined as 8 8 8 8 If this...

Page 25: ...Have a great start with TimeTac www timetac com...

Reviews: