


15
EN
EN
www.thomsonsecurity.eu
1080P HD WIFI IP CAMERA
D - CONFIGURATION AND USE
• Status menu:
shows you the current status of
the camera: fi rmware version, user name, main
functions activated, last operations performed.
• Basic settings
lets you set the camera name
and time, which can be embedded into the
video of the camera.
•
Network: here you have access to all of the
settings linked to network use: IP confi guration,
WiFi confi guration with the option of switching
the camera from a wired to a wireless
connection, ports used, email alert settings,
access to an FTP server, plug and play access
settings.
• Video:
here you have access to all of the
settings linked to camera video management:
resolution, number of images per second, night
vision operation, confi guration of photos taken
by the camera, contrast settings, brightness,
etc.
• Detector:
here you can activate and confi gure
the movement detection function and the
actions to be launched if intrusion is detected.
• PTZ
(compatible cameras only): here you will
fi nd all of the settings linked to camera motor
management if it is fi tted.
• System:
enables you to reset the camera or
restart it.
When a camera displays its image on the screen,
additional commands are displayed in the bottom
right corner:
1
2
3
4
5
6
1
This icon shows the presence of records on
the computer used (white when idle, green
when programmed/on detection/manual
records are created)
2
Broadcast stopped and image closed
3
Start a recording on the disk of the computer
used*
4
Activation/deactivation of the camera
microphone (cameras fi tted with the
microphone only, your computer must provide
the speakers)
5
Take a photo and store it on the disk of the
computer used*
6
Activation/deactivation of the camera speaker
(cameras fi tted with a speaker only, your
computer must provide a microphone)
* For the save and capture functions to be accessible,
the disk to use must be set beforehand. Click the
System settings icon
to tell the software where
to save the photos and videos on the computer
hard disk.
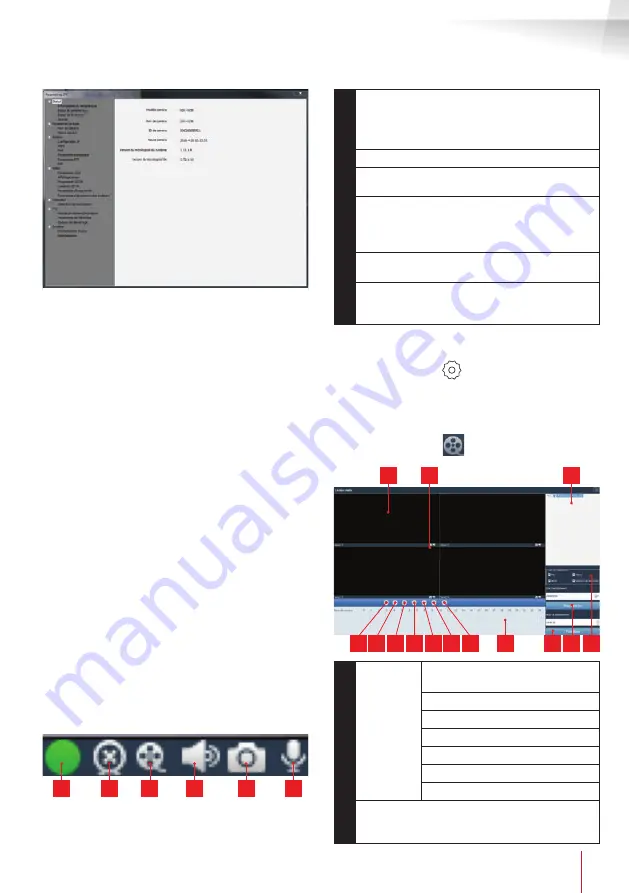
To view videos saved on the computer, click the
Video playback icon
:
9
11
10
4
3
2
1
7
6
5
14 13 12
8
1
P l a y b a c k
controls
Open an external video fi le
2
Quick scroll forward
3
Quick scroll back
4
Stop playback
5
Progress image by image
6
Start playback
7
Pause
8
Current operating day: the coloured time
intervals indicate the presence of videos and
their approximate start and end times


