background image

All installations and services must be performed by qualified service personnel.


51 


VI. TROUBLESHOOTING 
 
NOTICE:

 Before troubleshooting, familiarize yourself with the startup and checkout procedures. 


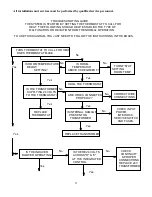
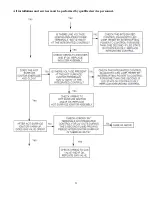
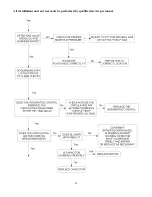
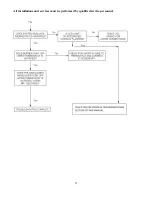
To assist you in troubleshooting this furnace, it is equipped with an integrated ignition control with 
diagnostics. These diagnostics evaluate what control system has experienced a failure and will activate a 
flashing light on the control in different sequences to help pinpoint the failure which has occurred. 
 

IMPORTANT:

 For your convenience, Thermo Products has installed a sight glass in the blower door of 

this furnace. The number of flashes in groups should be observed through this sight glass and recorded 
before turning off power to the furnace. Momentarily pressing the “Last Error” button on the control 
board will initiate the display of the last 5 failure codes, even if the furnace power has been shut off.  
Holding the “Last Error” button for 5 seconds, or more, will erase the error history.  
 
DIAGNOSTIC FEATURES 


The integrated control continuously monitors its own operation and the operation of the system. If a 
failure occurs, the LED will indicate a failure code as shown below. If the failure is internal to the control, 
the light will stay on continuously. In this case, the entire control should be replaced, as the control is not 
field-repairable. 
 
If the sensed failure is in the system (external to the control), the LED will flash in the following flash-
pause sequences to indicate failure status (each flash will last approximately 0.25 seconds, and each pause 
will last approximately 1 second). 
 

CLQS1 (Single Stage Furnaces) 


LED Off - No power to control, pushbutton switch pressed, or control fault 
LED steady ON (Any color) - Control hardware fault detected 
Slow Green flash - No call for heat, no active errors 
Slow Orange flash - Call for heat present, no active errors 
1 RED flash - High limit switch open 
2 RED flashes - Pressure switch open with inducer on 
3 RED flashes - Pressure switch closed with inducer off 
4 RED flashes - 1 hour lockout code 
5 RED flashes - Incorrect line voltage polarity or incorrect polarity on 24 VAC line from 
transformer 
6 RED flashes – Too many limit trips in one call for heat 
7 RED flashes – Pressure switch cycle lockout 
8 RED flashes - Too many flame dropouts detected 
9 RED flashes – Not Used 
10 RED flashes – Flame present with gas valve off 
Rapid flash – Incorrect 24 VAC phasing/twinning error 


: Power must be disconnected before servicing. 

Summary of Contents for CLQS1-050T36N

Page 1: ...0N PLEASE READ THESE INSTRUCTIONS PRIOR TO INSTALLATION INITIAL FIRING AND BEFORE PERFORMING ANY SERVICE OR MAINTENANCE THESE INSTRUCTIONS MUST BE LEFT WITH THE HOMEOWNER AND SHOULD BE RETAINED FOR FU...

Page 2: ......

Page 3: ...12 E GENERAL REQUIREMENTS FOR VENTING 13 F SIDEWALL VENTING 17 G CONNECTING FURNACE TO ROOF VENT INTAKE TERMS 22 H CONNECTING FURNACE TO VENT INTAKE TERMS 23 I CONDENSATE DRAIN LINE TRAP ASSY 27 J GE...

Page 4: ......

Page 5: ...VISIONS FOR VENTILATING AIR CETTE CHAUDI RE DOIT TRE INSTALL E DE MANI RE ASSURER UN AIR DE VENTILATION I SAFETY INFORMATION This and the following page contain reproductions of the various warning an...

Page 6: ...r ou les remplacer par des filtres neufs identiques Ne pas enlever cette tiquette POUR VOTRE S CURIT FIRE AND EXPLOSION HAZARD Can result in serious injury or death Do not store or use gasoline or oth...

Page 7: ...la chaudi re 3 Pour fermer la valve de commande de gaz enlevez le couvercle du compartiment du br leur 4 Mettez l interrupteur de commande de gaz la position OFF 5 Replacez le couvercle du compartime...

Page 8: ...or vapors to the combustion and ventilation air supply Such chemicals include but are not limited to chlorinated and or fluorinated hydrocarbons such as found in refrigerants aerosol propellants dry c...

Page 9: ...rnace by anyone other than a qualified heating contractor Only the homeowner user routine maintenance described in the Users Information Manual may be performed by the user FURNACE MODEL NO NOMENCLATU...

Page 10: ...91 1813 1617 MED SPEED BLUE 987 797 1189 982 1416 1229 1710 1513 ML SPEED PURPLE 827 610 1133 933 1357 1186 1553 1330 LO SPEED RED HEATING 672 420 1025 800 1178 976 1444 1180 TEMPERATURE RISE 60 60 60...

Page 11: ...sing 350750 1 Flange for 2 PVC air intake 614524 1 S00S4566 LP Gas Conversion Kit 050 AOPS7746 1 S00S4567 LP Gas Conversion Kit 075 AOPS7747 1 S00S4568 LP Gas Conversion Kit 100 AOPS7748 1 S00S4569 LP...

Page 12: ...the absence of local codes with the National Fuel Gas Codes ANSI Z223 1 or latest edition and these instructions This furnace is not to be used for temporary heating of buildings or structures under c...

Page 13: ...OM 0 IN 1 IN 5 8 IN PLENUM FRONT 5 8 IN 5 8 IN 5 8 IN VENT 0 IN 0 IN 0 IN TABLE 1 Figure 101 The furnaces may be installed on combustible flooring as an Upflow or Horizontal a Non combustible base is...

Page 14: ...urnace is level after installation to ensure proper drainage and operation 4 This furnace must be connected to a drain in accordance with these instructions If it is not practical to connect the unit...

Page 15: ...y MUST be replaced with the 20 piece provided in the parts package Move cap to the unused coil outlet port 4 HORIZONTAL RIGHT a Install plenum adapters 4 provided b Inducer MUST be removed rotated 180...

Page 16: ...t as large as the exhaust vent air intake pipe specified by Thermo Products Size reduction is never permissible The required exhaust vent air intake pipe sizes are 2 inch PVC thermoplastic pipe for mo...

Page 17: ...shortest possible intake and exhaust systems Each system should contain as few elbows as possible to insure the satisfactory operation of the furnace However system length should never be less than 5...

Page 18: ...shall be insulated with 1 inch thick foil faced fiberglass insulation or equivalent to prevent freezing of condensate within the pipe 11 No clearance is required from the outer surface of the thermopl...

Page 19: ...ior sidewall building materials are subject to degradation from contact with flue gases or moisture a minimum 24 inch diameter shield shall be fabricated from stainless steel or UV resistant plastic s...

Page 20: ...NFGC b The vent terminal shall be at least 12 inches below 12 inches horizontally from or 12 inches above any door window or gravity air inlet into a building The bottom of the vent terminal shall be...

Page 21: ...All installations and services must be performed by qualified service personnel 19 Figure 3 NFGC Minimum Clearances Between the Vent Terminal and Various Building Features...

Page 22: ...e a location that protects the vent from strong winds such as behind a fence or hedge In geographical areas with considerable snowfall it is advisable to locate the vent terminal much higher than the...

Page 23: ...ree optional vent kits are available for direct vent terminations refer to Figure 5 The concentric vent kits Thermo Products p n AOPS7488 AOPS7489 provide a means for the vent and intake to be install...

Page 24: ...evailing winds do not blow directly into the open vent termination G CONNECTING FURNACE TO ROOF VENT INTAKE TERMINATIONS If it is not desirable or feasible to vent the furnace through a sidewall it ma...

Page 25: ...re 7A D depict typical exhaust vent and air intake connections for the furnace model series CLQS1 as well as a list of required parts to correctly install each system For the 100 125 models which requ...

Page 26: ...All installations and services must be performed by qualified service personnel 24 Figure 7A Upflow Vent Air Inlet Options...

Page 27: ...tions and services must be performed by qualified service personnel 25 Figure 7B Downflow Vent Air Inlet Options Figure 7C Horizontal Left Vent Air Inlet Options Figure 7D Horizontal Right Vent Air In...

Page 28: ...e 4 nuts which attach the inducer as that may cause the inducer s internal blower wheel to rub Replace the 5 16 ID tubing which ran from the inducer to the pressure switch Now re install the Door Latc...

Page 29: ...priate knock out and install the Intake Air Flange provided using 4 self tapping screws b A section of 2 inch PVC pipe should then be inserted into the Intake Air Flange using silicone caulk to seal t...

Page 30: ...All installations and services must be performed by qualified service personnel 28 Figure 8B Figure 8A Figure 8D Figure 8C Upflow Condensate Trap Options...

Page 31: ...ions and services must be performed by qualified service personnel 29 Figure 8E Downflow Condensate Trap Options Figure 8F Horizontal Left Figure 8G Horizontal Right Condensate Trap Options Condensate...

Page 32: ...using the remaining knockout Connect to drain trap and trim excess as necessary If inducer points Left and condensate exits Right see figure 8C a Remove inducer rotate 180 and reinstall Remove yellow...

Page 33: ...t port b Clear condensate tube to the rubber drain at the exit of the inducer must be moved to the bottom port of the drain The plastic internal tube support must also be moved to the bottom port of t...

Page 34: ...ardous exhaust may occur CAUTION Do not bypass pressure switches They are critical safety features If a pressure switch functions check for blockage Do not circumvent pressure switches 7 Plan source a...

Page 35: ...setting b Flush the drain system by removing the drain hose from the Coil Front Cover of the secondary heat exchanger and running tap water into the open end of the tubing Run at least a quart of wate...

Page 36: ...All installations and services must be performed by qualified service personnel 34 Figure 10A Upflow Gas Piping Options Figure 10B Downflow Gas Piping Options...

Page 37: ...lure to install a drip leg may void the limited warranty on the furnace 3 A 1 8 inch NPT plugged tapping accessible for test gage connection must be installed immediately upstream of the gas supply co...

Page 38: ...nating outside the space containing the furnace 3 The return air duct system must equal the supply air duct system in its capabilities Use a supplier s catalog for proper sizing of outlet and return a...

Page 39: ...45 F to 75 F temperature rise for heating when an air conditioning coil is installed This depends on the static resistance of an individual duct system and the size of the air conditioner L FILTERS I...

Page 40: ...he return air opening Figure 12 NOTICE While scribing the return air opening the filter rack can be held into position by tape or similar means Position the open end of the filter rack so that it is a...

Page 41: ...are the minimum areas required based on the CFM generated by the furnace for standard heating speeds only The following formula can be used to determine the minimum filter area required for cooling i...

Page 42: ...and the common leg to the white line lead in the field mounted junction box The hot leg must pass through the disconnect switch in all cases to prevent the hazard of electrical shock when servicing IM...

Page 43: ...ore attempting to change blower speed wiring A The furnace is factory wired to the ignition control with standard heating and cooling speeds When changing motor speeds simply switch the needed speed t...

Page 44: ...o remove the blower assembly first remove the Door Latch Channel by removing it s 4 screws Then remove the 2 screws which retain the blower assembly These 2 screws are visible above the control board...

Page 45: ...dary of the two systems must be in phase All thermostat connections are made to one control only The twin without thermostat connections is to have the call for heat supplied by an external isolation...

Page 46: ...All installations and services must be performed by qualified service personnel 44 IV STARTING THE UNIT A SEQUENCE OF OPERATIONS...

Page 47: ...All installations and services must be performed by qualified service personnel 45...

Page 48: ...one by a qualified heating contractor If excessive gas escapes when purging the gas supply at the union allow the area to ventilate for at least 15 minutes before attempting to start the furnace LP ga...

Page 49: ...n usually one two or five The unit must have been in operation at least 10 minutes before clocking FORMULA BTU Content x Number of CU FT x 3600 Time Required for Revolution Input BTU Hr EXAMPLE The ga...

Page 50: ...e adjustment screw Refer to Figure 15 decrease the pressure by turning the screw counterclockwise or increase it by turning the screw clockwise ADJUSTMENTS TO THE LISTED PRESSURE MUST NOT EXCEED THE V...

Page 51: ...cteristics Combustion door should always be in place when operating furnace E FURNACE CHECKOUT PROCEDURE Before any system of gas piping is finally put into service it shall be carefully tested to ass...

Page 52: ...he users information manual must be kept along with instructions for any accessories in the plastic pouch on the outside of the furnace 2 The location and use of the manual gas shut off valve and furn...

Page 53: ...s the LED will indicate a failure code as shown below If the failure is internal to the control the light will stay on continuously In this case the entire control should be replaced as the control is...

Page 54: ...MOSTAT MAKE IS ROOM TEMPERATURE BELOW SETTING IS ROOM TEMPERATUR ABOVE 90 DEGREES F TURN T STAT SETTING ROOM TEMP COOL THE THERMOSTAT IS THE TRANSFORMER SUPPLYING 24 VOLTS TO THE THERMOSTAT REPLACE TH...

Page 55: ...All installations and services must be performed by qualified service personnel 53...

Page 56: ...All installations and services must be performed by qualified service personnel 54...

Page 57: ...All installations and services must be performed by qualified service personnel 55...

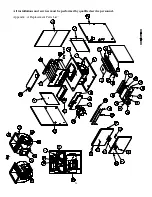
Page 58: ...All installations and services must be performed by qualified service personnel 56 Appendix A Replacement Parts List...

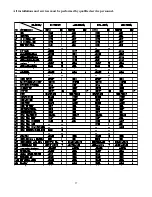
Page 59: ...All installations and services must be performed by qualified service personnel 57...

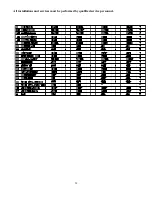
Page 60: ...All installations and services must be performed by qualified service personnel 58...

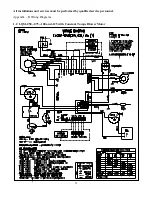
Page 61: ...All installations and services must be performed by qualified service personnel 59 Appendix B Wiring Diagrams 1 CLQS1 050 075 100 and 125 with Constant Torque Blower Motor...

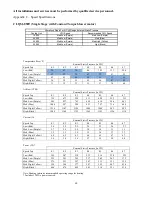
Page 62: ...1193 1156 1110 Current A External Static Pressure in WC Speed Tap 0 1 0 2 0 3 0 4 0 5 0 6 0 7 Low Red 2 4 2 5 2 5 2 5 2 5 2 6 2 7 Med Low Purple 2 7 2 8 2 9 3 0 3 0 3 1 3 1 Med Blue 3 2 3 3 3 4 3 5 3...

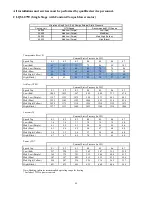
Page 63: ...4 1086 Current A External Static Pressure in WC Speed Tap 0 1 0 2 0 3 0 4 0 5 0 6 0 7 Low Red 3 6 3 6 3 7 3 8 3 9 3 9 4 0 Med Low Purple 4 1 4 2 4 3 4 4 4 5 4 5 4 6 Med Blue 4 3 4 4 4 5 4 6 4 7 4 8 4...

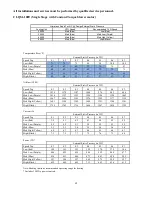
Page 64: ...1646 1547 1438 1322 Current A External Static Pressure in WC Speed Tap 0 1 0 2 0 3 0 4 0 5 0 6 0 7 Low Red 3 9 4 1 4 2 4 3 4 4 4 5 4 5 Med Low Purple 4 8 4 9 5 1 5 2 5 2 5 3 5 5 Med Blue 5 1 5 2 5 4...

Page 65: ...1819 1745 Current A External Static Pressure in WC Speed Tap 0 1 0 2 0 3 0 4 0 5 0 6 0 7 Low Red 4 4 4 6 4 7 4 8 4 9 5 0 5 1 Med Low Purple 5 2 5 4 5 5 5 6 5 7 5 9 6 0 Med Blue 6 0 6 3 6 4 6 5 6 7 6...

Reviews: