background image

- 4 -

5. OPERATION

BEFORE CHARGING

NB: Before charging check that the capacity of the 

battery (Ah) which is to be charged, is not inferior to 

that reported on the data table. (C min).

Follow the instructions, taking great care to respect 

the order given below.

-  Remove the caps of the battery charger (if foreseen) so 

as to let the gas produced go out.

-  Check that the level of the electrolyte covers the plates 

of the battery. If these were not covered add distilled 

water and cover them up to 5÷10 mm.

WARNING:  USE  THE  MAXIMUM  CAUTION 

DURING THIS OPERATION AS THE 

ELECTROLYTE IS A HIGHLY CORROSIVE 

ACID.

-  Make sure the battery charger is disconnected from the 

power supply.

-  Check the polarities of the battery terminals: positive 

for the + symbol and negative for the - symbol.


NOTE:


if the symbols are indistinguishable remember 

that the positive terminal is the one not connected to 

the vehicle chassis.

-  Connect the red charge clamp to the positive terminal 

of the battery ( + symbol).

-   Connect the black charge clamp to the vehicle chassis, 

at a safe distance from the battery and the fuel pipe.


NOTE: if the battery is not installed in the vehicle, 

connect the clamp directly to the negative terminal of 

the battery (- symbol).

CHARGE

- Power the battery charger by inserting the power 

supply cable into the mains outlet.

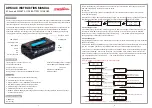
-  Select the battery type (and, only for the T-CHARGE 

20 model, the charge voltage) using the key shown in 

fig.A-5.

-  Select the charge current using the button shown in fig. 

A-1. During this phase the battery charger will operate, 

keeping the charge current constant.

END OF CHARGE

- The battery charger indicates that charging has 

finished by lighting up the green “FULL” LED (fig. A-3).

-  Disconnect the power supply to the battery charger by 

removing the power supply cable from the mains outlet.

-  Disconnect the black charge clamp from the chassis of 

the vehicle or from the negative terminal of the battery 

(- symbol).

-  Disconnect the red charge clamp from the positive 

terminal of the battery (+ symbol).

-  Store the battery charger in a dry place.

-  Close up the battery cells with the appropriate plugs (if 

present).

6. BATTERY CHARGER PROTECTIONS

The battery charger protects itself from:

-  Overloads  (too  much  current  delivered  towards  the 

battery).

-  Short circuit (charging clamps set in contact with one 

another).

-  Polarity reversal of the battery.

- The appliance is protected against overload, short 

circuits and reverse polarity by means of internal 

electronic safeguards.

7. USEFUL ADVICE

-  Clean the positive and negative terminals of possible 

oxidation so as to ensure good contact with the clamps.

-  If the battery charger is used with a battery which 

is always connected to a vehicle, check the 

instruction and/or maintenance manual of the vehicle 

under  the  paragraph:  “ELECTRIC  SYSTEM”  or 

“MAINTENANCE”.  Before  charging  it  is  advisable 

to disconnect the positive cable which is part of the 

electrical system of the vehicle.

_____________________(IT)_____________________

MANUALE D’ISTRUZIONE


ATTENZIONE: PRIMA DI UTILIZZARE IL 

CARICABATTERIE LEGGERE ATTENTAMENTE IL 

MANUALE D’ ISTRUZIONE!

1. SICUREZZA GENERALE PER L’USO DI QUESTO 

CARICABATTERIE

Durante la carica le batterie emanano gas 

esplosivi,  evitate  che  si  formino  fiamme  e 

scintille. NON FUMARE.

-  Posizionare le batterie in carica in un luogo areato.

Le  persone  inesperte  devono  essere 

opportunamente istruite prima di utilizzare 

l’apparecchio.

- Le persone (bambini compresi) le cui capacità 

fisiche, sensoriali, mentali siano insufficienti ai fini 

di  utilizzare  correttamente  l’apparecchio  devono 

essere  sorvegliate  da  una  persona  responsabile 

della loro sicurezza durante l’uso dello stesso.

-  I bambini devono essere sorvegliati per sincerarsi 

che non giochino con l’apparecchio.

-  Disinserire il cavo di alimentazione dalla rete prima di 

connettere o sconnettere i cavi di carica dalla batteria.

-   Non collegare ne scollegare le pinze alla batteria con il 

caricabatterie funzionante.

-  Non usare nel modo più assoluto il caricabatterie 

all’interno di un’autovettura o del cofano.

-  Sostituire il cavo di alimentazione solo con un cavo 

originale.

-  Non utilizzare il caricabatterie per ricaricare batterie di 

tipo non ricaricabili.

-  Verificare che la tensione di alimentazione disponibile 

sia corrispondente a quella indicata sulla targa dati del 

caricabatterie.

-  Per non danneggiare l’elettronica dei veicoli, leggere, 

conservare, rispettare scrupolosamente le avvertenze 

fornite dai costruttori dei veicoli stessi, quando si 

utilizza il caricabatterie sia in carica che in avviamento; 

lo stesso vale per le indicazioni fornite dal costruttore 

di batterie.

-  Questo caricabatterie comprende parti, quali interruttori 

o relè, che possono provocare archi o scintille; pertanto 

se usato in una autorimessa o in un ambiente simile, 

porre il caricabatterie in un locale o in una custodia 

adatta allo scopo.

- Interventi di riparazione o manutenzione all’interno 

del caricabatterie devono essere eseguiti solo da 

personale esperto.

-


ATTENZIONE: DISINSERIRE SEMPRE IL CAVO 

DI ALIMENTAZIONE DALLA RETE PRIMA DI 

EFFETTUARE QUALSIASI INTERVENTO DI 

SEMPLICE MANUTENZIONE DEL CARICA-

BATTERIE, PERICOLO!

2. INTRODUZIONE E DESCRIZIONE GENERALE

-  Questo caricabatterie permette la carica di batterie al 

piombo ad elettrolita libero usate su veicoli a motore 

(benzina  e  diesel),  motocicli,  imbarcazioni,  etc.  ed  è 

indicato per la carica di batterie ermetiche.

Summary of Contents for T-CHARGE 20 BOOST 12-24V

Page 1: ...PR NGFARE R J HDYSVAARA FARE FOR EKSPLOSJON FARA F R EXPLOSION ROBBAN S VESZ LYE PERICOL DE EXPLOZIE NIEBEZPIECZE STWO WYBUCHU NEBEZPE V BUCHU NEBEZPE ENSTVO V BUCHU NEVARNOST EKSPLOZIJE OPASNOST OD E...

Page 2: ...allet uten henvende seg til autoriserte oppsamlingssentraler Symbol som indikerar separat sopsortering av elektriska och elektroniska apparater Anv ndaren f r inte sortera denna anordning tillsammans...

Page 3: ...V 50 60Hz single phase power supply with electronically controlled constant current and voltage The charge current and voltage supplied by the appliance follow the IU charge curve Standard accessories...

Page 4: ...If the battery charger is used with a battery which is always connected to a vehicle check the instruction and or maintenance manual of the vehicle under the paragraph ELECTRIC SYSTEM or MAINTENANCE...

Page 5: ...ensione di funzionamento La linea di alimentazione dovr essere dotata di sistemi di protezione quali fusibili o interruttori automatici sufficienti per sopportare l assorbimento massimo dell apparecch...

Page 6: ...ons fournies par le constructeur des batteries Ce chargeur de batterie comporte des parties comme interrupteurs ou relais risquant de provoquer des arcs lectriques ou des tincelles par cons quent en c...

Page 7: ...ch e au ch ssis de la machine Connecter la pince de charge de couleur rouge la borne positive de la batterie symbole Connecter la pince de charge de couleur noire au ch ssis de la machine loin de la b...

Page 8: ...lektrolyt die auf Motorfahrzeugen Benzin und Diesel Motorr dern Booten etc benutzt werden Es ist zum Laden hermetischer Batterien geeignet Aufladbare Akkumulatoren je nach der bereitgestellten Ausgang...

Page 9: ...tung entfernt ANMERKUNG Wenn die Batterie sich nicht im Fahrzeug befindet schlie en Sie die schwarze Klemme direkt an den Minuspol der Batterie an Zeichen LADEN Das Batterieladeger t durch Einf hren d...

Page 10: ...cumuladores recargables en funci n de la tensi n de salida disponible 6V 3 celdas 12V 6 celdas 24V 12 celdas Este modelo es un cargador de bater as con alimentaci n 230 V 50 60 Hz monof sico con corri...

Page 11: ...ivos tapones si est n presentes 6 PROTECCIONES DEL CARGABATER AS El cargador de bater as se autoprotege en caso de Sobrecarga excesiva corriente hacia la bater a Cortocircuito pinzas de carga en conta...

Page 12: ...carga da bateria e a sua manuten o no tempo Os tipos de bateria que podem ser seleccionados s o fig A 4 WET baterias de chumbo com electr lito l quido GEL AGM baterias de chumbo lacradas com electr l...

Page 13: ...adequate manier opgeleid worden voordat ze het toestel gebruiken De personen kinderen inbegrepen waarvan de lichamelijke zintuiglijke en mentale capaciteiten onvoldoende zijn voor een correct gebruik...

Page 14: ...illen met de voedingskabel of met de kabel van het opladen AANSLUITING OP HET NET De batterijlader mag uitsluitend aangesloten worden op een voedingssysteem met een neutraalgeleider verbonden met de a...

Page 15: ...assende vis f r de tager apparatet i brug Personer derunder b rn hvis psykiske fysiske og sensoriske evner ikke er tilstr kkelige til at anvende dette apparat korrekt skal overv ges af en person der e...

Page 16: ...om at de anvendte batteriers ydeevne Ah ikke er lavere end hvad der er angivet p pladen C min Foretag proceduren n je i den nedenst ende r kkef lge Fjern batteriets l g hvis de forefindes s at gasarte...

Page 17: ...ansy tt on yksivaiheinen 230V 50 60Hz elektronisesti valvotuilla pysyvill virralla ja j nnitteell Laitteen tuottamat latausvirta ja j nnite seuraavat IU latausk yr Sarjavarusteet Laitteenulostuloonvoi...

Page 18: ...RILADEREN SKAL DU LESE H NDBOKA N YE 1 GENERELLE FORHOLDSREGLER FOR BRUK AV DENNE BATTERILADEREN Under batteriladningen dannes det eksplosive gasser Unng farer som flammer og gnistdannelser IKKE R YK...

Page 19: ...h som De har tenkt lade ikke er mindre enn som indikert p skiltet C min Utf r instruksene ved n ye f lge den orden som er indikert Fjern batteriets deksler dersom de er tilstede slik at gassene som pr...

Page 20: ...r 12V 6 celler 24V 12 celler Denna modell r en enfas batteriladdare med matning p 230V 50 60Hz med elektroniskt kontrollerad konstant str m och sp nning Laddningsstr mmen och sp nningen som f rdelas a...

Page 21: ...ngssp nning men endast f r modell T CHARGE 20 med hj lp av knappen i Bild A 5 V lj laddningsstr m med hj lp av knappen i fig A 1 Under denna fas uppr tth ller batteriladdaren en konstant laddningsstr...

Page 22: ...60Hz IU B 2 B 1 3 A 1 T CHARGE 18 2A 4A 8A T CHARGE 20 2A 4A 8A 12V T CHARGE 26 4A 8A 16A BOOST A 2 A 3 A 5 CHARGE CHARGE PULSE TRONIC PULSE TRONIC PULSE TRONIC A 4 WET GEL AGM GEL 4 5 Ah C min 5 10 m...

Page 23: ...23 6 7 ____________________ RU ____________________ 1...

Page 24: ...3 12 6 24 12 230 50 60 IU B 2 B 1 3 1 T CHARGE 18 2A 4A 8A T CHARGE 20 2A 4A 8A 12V T CHARGE 26 4A 8A 16A BOOST 2 A 3 5 CHARGE CHARGE PULSE TRONIC PULSE TRONIC PULSE TRONIC 4 WET GEL AGM GEL 4 5 Ah C...

Page 25: ...er lje le Ne haszn lja az akkumul tort lt t nem t lthet t pus akkumul torok t lt s re Vizsg lja meg hogy a rendelkez sre ll t pfesz lts g megfelel e az akkumul tort lt adatt bl j n megjel lt t pfesz l...

Page 26: ...sel s re alkalmasak A h l zati csatlakoztat st a megfelel k bellel kell elv gezni Az esetleges t pk bel hosszabb t knak megfelel keresztmetszettel kell rendelkezni k amely soha nem lehet kisebb a tart...

Page 27: ...este folosit ntr un garaj sau ntr un spa iu asem n tor pune i redresorul ntr o nc pere sau ntr o cutie corespunz toare acestui scop Interven iile de repara ie sau ntre inere n interiorul redresorului...

Page 28: ...i ridicarea redresorului cu ajutorul cablului de alimentare sau al cablului de nc rcare CONECTARE LA RE EAUA DE ALIMENTARE Redresorul trebuie s fie conectat numai la un sistem de alimentare cu conduc...

Page 29: ...C jest zalecany w przypadku kiedy nie jest znana technologia konstrukcyjna lub typ akumulatora przeznaczonego do adowania W trybie PULSE TRONIC bardziej wyszukanym od poprzedniego po ustawieniu z pomo...

Page 30: ...umul tor uvol uj v bu n plyny a proto zabra te vzniku plamen a jisker NEKU TE Um st te nab jen akumul tory do v tran ho prostoru Osoby kter nemaj zku enosti se za zen m by m ly b t p ed jeho pou v n m...

Page 31: ...t provedeno pou it m p slu n ho kabelu P padn prodlu ovac kabely nap jec ho kabelu mus m t vhodn pr ez kter nesm b t v dn m p pad men ne pr ez dodan ho kabelu 5 INNOST P PRAVA K NAB JEN POZN Ne p isto...

Page 32: ...umul torov v r mci opr v alebo dr by m e vykona u len sk sen person l UPOZORNENIE POZOR NEBEZPE ENSTVO PRED VYKONAN M AK HOKO VEK KONU V R MCI JEDNODUCHEJ DR BY NAB JA KY AKUMUL TOROV ODPOJTE NAP JAC...

Page 33: ...nab jania Odpojte nap janie nab ja ky odpojen m nap jacieho k bla zo z suvky elektrickej siete Odpojte nab jacie klie te iernej farby od podvozku auta alebo zo z porn ho p lu akumul tora symbol Odpoj...

Page 34: ...v povezavi s tehnologijo TRONIC zagotavlja odli ne pogoje polnjenja akumulatorja in njegovo vzdr evanje skozi as Izbrati je mogo e naslednje tipe akumulatorjev risba A 4 WET svin ev akumulator s teko...

Page 35: ...u ure aja moraju biti pod nadzorom osobe koja e se brinuti o njihovoj sigurnosti tijekom upotrebe ure aja Djeca moraju biti pod nadzorom kako bi se izbjeglo da se igraju ure ajem Izvu i kabel za napaj...

Page 36: ...C min Izvr iti upute pa ljivo slijede i navedeni redoslijed Ukloniti poklopce baterija ako su prisutni kako bi plinovi koji se stvaraju tijekom punjenja mogli izlaziti Provjeriti da razina elektrolit...

Page 37: ...disponuojamos i jimo tampos 6V 3 element 12V 6 element 24V 12 element is akumuliatoriaus kroviklio modelis yra maitinamas monofaz je 230V 50 60Hz pastovi srov ir tampa yra kontroliuojamos elektroni ka...

Page 38: ...rintas geras gnybt kontaktas Jei akumuliatorius su kuriuo ketinama naudoti krovikl yra stacionariai statytas transporto priemon je b tina per i r ti ir automobilio instrukcij ir arba technin s prie i...

Page 39: ...til C min kirjas Viige j rgnevad operatsioonid l bi t pselt siin ratoodud j rjekorras Eemaldage akult v imalikud korgid et laadimise k igus eralduvad gaasid v lja p seksid Kontrollige et akus olev ele...

Page 40: ...vad ta Ier ces padodam uzl d anas str vas un sprieguma v rt ba seko IU uzl d anas l knei Standartapr kojums Ier ces izejai var pievienot da da veida akumulatoru uzl d anas vadus ar spail m apr kotus...

Page 41: ...js padod nemain gu uzl d anas str vu UZL D ANAS PABEIG ANA Uz uzl d anas pabeig anu nor da za as gaismas diodes FULL z m A 3 iesl g an s uz akumulatoru l d t ja Izsl dziet akumulatoru l d t ju atvieno...

Page 42: ...60Hz IU B 2 B 1 3 A 1 T CHARGE 18 2A 4A 8A T CHARGE 20 2A 4A 8A 12V T CHARGE 26 4A 8A 16A BOOST A 2 A 3 A 5 CHARGE CHARGE PULSE TRONIC PULSE TRONIC PULSE TRONIC A 4 WET GEL AGM GEL 4 5 Ah C min 5 10 m...

Page 43: ...43 6 7...

Page 44: ...44 FIG A FIG B 12V 12V T CHARGE 18 T CHARGE 20 T CHARGE 26 3 2 2 2 1 5 1 5 1 5 4 4 4 3 3 1 2...

Page 45: ...n Regelungen ausgenommen sind Maschinen die nach der Europ ischen Richtlinie 1999 44 EG unter die Verbrauchsg ter fallen und nur dann wenn sie in einem Mitgliedstaat der EU verkauft worden sind Der Ga...

Page 46: ...tiperioden skal skikkes FRAKTFRITT och skal sendes tilbake MED BETALNING AV MOTTAKEREN unntatt maskinene som tilh rer forbrukningsvarer if lge europadirektiv 1999 44 EC kun hvis de selges i en av EUs...

Page 47: ...Z ru n list je platn len v pr pade ke je predlo en spolu s tenkou alebo dodac m listom Poruchy vypl vaj ce z nespr vneho pou itia neopr vnen ho z sahu alebo nedostato nej starostlivosti nespadaj do z...

Page 48: ...felel a k vetkez knek Produsul este conform cu Produkt spe nia wymagania nast puj cych Dyrektyw V robok je v s lade so V robek je ve shod se Proizvod je v skladu z Proizvod je u skladu sa Produktas at...

Reviews: