7. CREATING/NAMING PARTITIONS
TR-824 User’s Manual
29
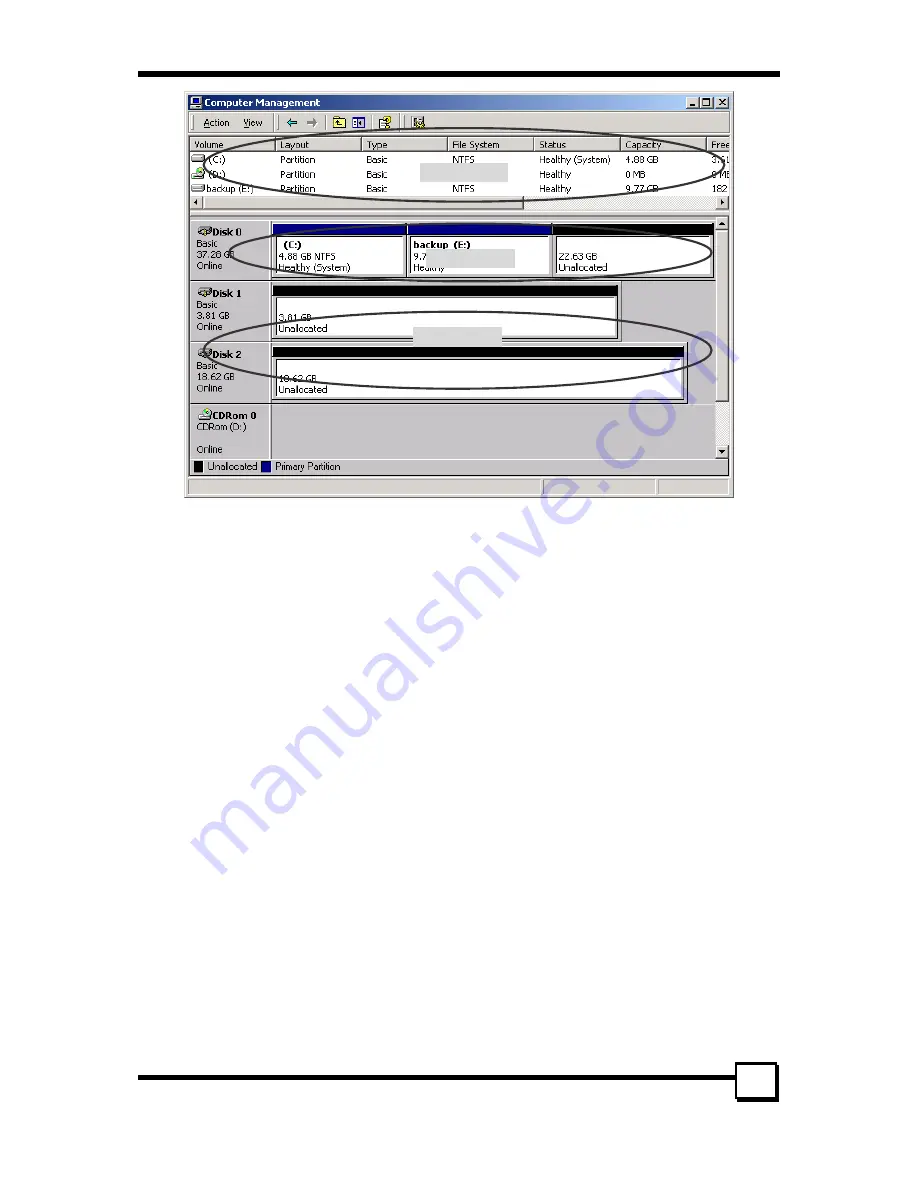
This window has three main sections:
SECTION 1:
System listing of all formatted and available disks/RAID Sets.
SECTION 2:
Report of physical connection of disks/RAID Sets.
SECTION 3:
Report of partition status, disk letter, and volume name.
7.1.1 Initial Window
In
SECTION 2
, every disk should report as:
Basic
Disk Size (the actual available disk space will be reported here)
Online
Instead of “Basic,” a disk may also report as either “Unknown” or “Dynamic.”
If the disk reports as “Unknown”, right-click on the disk (
SECTION 2
) and click on
Write Signature
.
At this point, a window will appear with the disk in question (all “Unknown” disks may appear in this
window). Make sure the box next to each disk is checked, and then click
OK
.
The disk should now report as “
Basic
.”
If a disk reports as “
Dynamic
,” right-click on
SECTION 2
of that disk, and click on “Return disk to
Basic...” Within seconds the disk should report as
Basic
.
7.1.2 Creating Partitions
In
SECTION 2
, the disk order corresponds directly to the order the Sets appear in the BIOS. Therefore,
the first Unallocated Partition represents Set 1, and so on.
1.
At this point, there should be three disks with Unallocated partitions. Right-click on the partition of the
first disk and click on “Create Partition.” The “Create Partition Wizard” should appear.
1.
The first window is an introductory window to the Wizard. Click
Next
.
2.
The second window designates the partition as a primary partition. Click
Next
.
3.
The third window designates the partition size. Since this is a Striped RAID set, utilizing 2 disk
drives, the size of the partition should be approximately double the size of a single disk drive
(assuming all disks are of identical size). Click
Next
.
4.
The fourth window designates the drive letter of the partition.
5.
The fifth window allows the user to label the volume name, and choose the type of formatting to
take place upon the creation of the partition. Choose whichever drive letter is desired (the lowest
SECTION 1
SECTION 2
SECTION 3


