background image

TFP-121x Series Analogue Addressable Fire Alarm Control Panels 


TFP-121X INSTALLATION AND OPERATION MANUAL 

22 


7


Using the Panel 

In this section you will find information about using the panel and other features of the panel. 

7.1


Status Window 

The status window is the message window showing the "Fire", "Error" and "Warning" messages related to the 
instantaneous operational data of the panel. Messages displayed in the status window are of great importance in 
terms of maintaining and managing the panel. The user is required to take measures against warning messages if 
there is any message, and if user can't take measures, then he must notify the senior executives. In order to access 
the status window: 
1


Go to "Main Screen" and press "ESC" key, 

2


The menus regarding "Fire, if any, "Errors", if any and "Warnings", if any, will be listed in the status window. 

3


In order to get more detailed information, select the relevant option with "UP" and "DOWN" keys, then press 
"OK" button to get detailed message list. 

7.1.1


Fire Window 

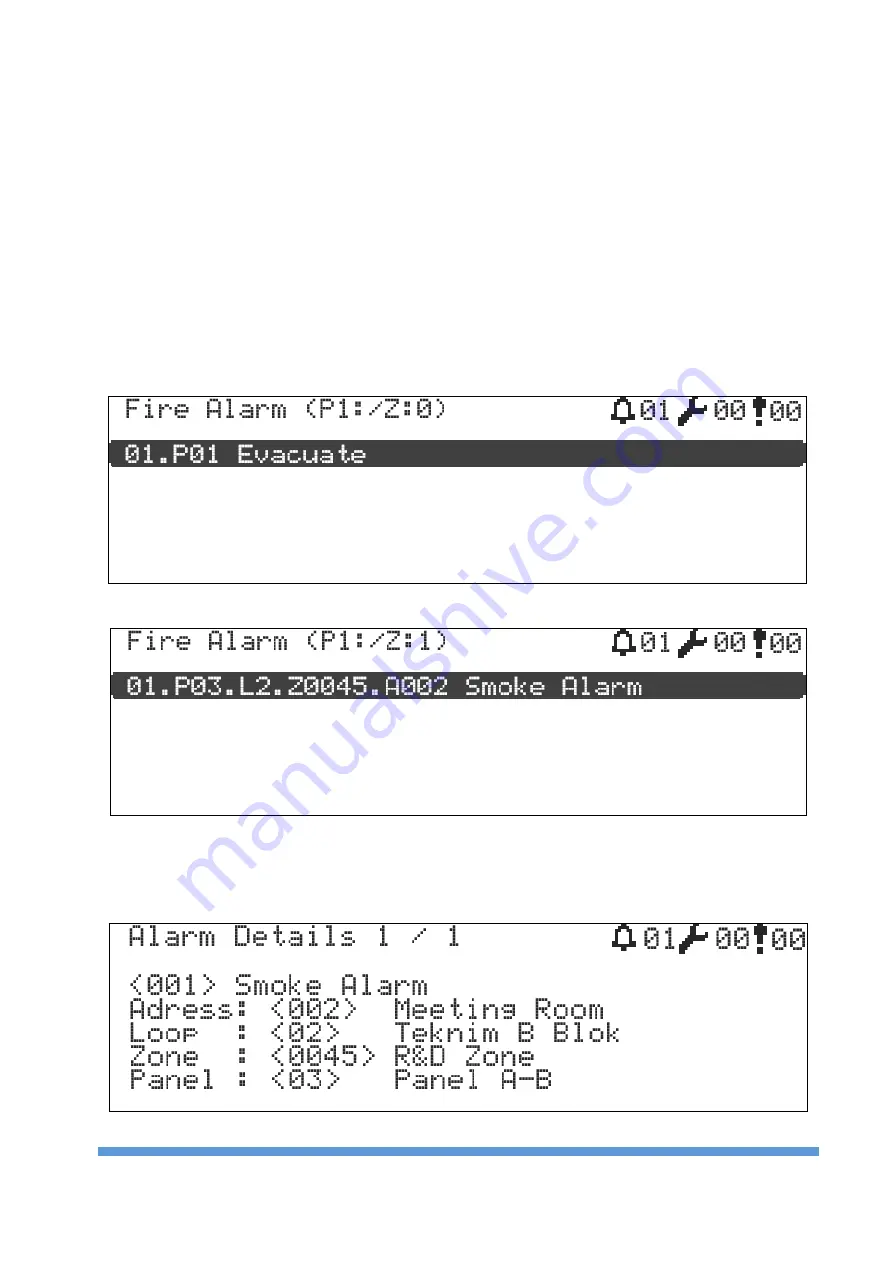
In order to reach the fire list, select "Fire Alarm" in the "STATUS" window and then press "OK" button. All resulting 
fires will be listed within this window together with the fire sequence number, label and zone label.  


Figure  14 

 Evacuation Warning Message 


Figure  15 - Smoke Alarm Warning Message 

For more detailed definition about the fire, a fire is selected from the fire list with the "UP" and "DOWN" keys and  
the definitions of these spaces can be reached together with the loop address, zone address and locale address of 
the fire by pressing the "OK" key. 


Figure  16 - Alarm Detail Window 

Summary of Contents for TFP-121 Series

Page 1: ...TFP 121x Series Analogue Addressable Fire Alarm Control Panel Installation Operating Manual Issue Date 25 08 2017 Rev 00 ...

Page 2: ...B Loop Connection 11 5 9 Network Card Connection 11 5 10 Repeater Panel Connection 11 6 Configuration 12 6 1 Panel Activation 12 6 1 1 Activation process 12 6 1 2 Generation of the activation code 12 6 2 User Levels 12 6 2 1 Level 1 12 6 2 2 Level 2 12 6 2 3 Level 3 13 6 2 4 Level 4 13 6 2 5 Level Timeout 13 6 3 Configuration using the Computer 13 6 3 1 TCP IP Configuration 14 6 4 Configuration th...

Page 3: ...te Device 31 7 9 6 Loop Parameters 31 7 10 TdNET Functions 32 7 10 1 TdNET Map 32 7 10 2 TdNET Parameters 32 7 10 3 Incoming Commands 33 7 10 4 Outgoing Commands 33 7 11 Users 34 7 12 Service Warning 35 8 Conditions requiring Maintenance Repair or Servicing 36 8 1 Maintenance and Inspections the Users can Do 36 8 1 1 Loop Line Open Circuit Error 36 8 1 2 Device Missing Error 36 8 1 3 Regular Inspe...

Page 4: ...ting 23 Figure 9 Error Detail Window 23 Figure 10 Warnings Window 25 Figure 11 Warning Details Window 25 Figure 12 Sample Event Memory Window 26 Figure 13 Disabled Devices Window 27 Figure 14 Disabled Zones 27 Figure 15 Disabled Sirens Window 28 Figure 16 Loop Parameters 28 Figure 17 Zone Test Settings Window 29 Figure 18 Device LED Test Window 29 Figure 19 Addition of New Devices 30 Figure 20 Del...

Page 5: ...n end of line resistors Battery cable Battery mounting bracket and 1 screw 4 sets of screw dowel for wall mounting Allen key Operation manual 2 Warnings The panel is equipped with printed circuit boards comprising digital analogue circuits Therefore it should not be used before reading the complete operation manual thoroughly In case of any malfunctions or any need that the panel requires maintena...

Page 6: ...2 pcs 24VDC 15 devices per output each device 30mA Siren Fuse 2 pcs 500mA F6 F7 Siren End of Line Resistor 4K7 ohm 5 1 4W General Fault and Fire Relay 2 pcs General Fault Relay 1 pcs NC NO dry contact 30V 2A Fire Relay 1 pcs NC NO dry contact 30V 2A Auxiliary Output AUX 1 pcs 24VDC Auxiliary Output AUX Fuse 1 pcs 500mA F4 Cable Type 2 x 1 5mm J Y St Y Lg Recommended Loop Data Number of Terminals 2...

Page 7: ...teams with ease of use for the configuration process With TdNET protocol support it provides such possibility that up to 16 panels can be networked 4 1 Panel Properties 72 programmable zones Wide graphic display with 240 x 64 pixel resolution and LED indicators Feature to assign different delays to each zone Easily conducted zone test Easily manageable loop configuration and information menus Auto...

Page 8: ...ER Mutes Buzzer in the event of an error or an alarm C MUTE May be used in Level 2 and Level 3 Mutes sirens in case of alarm D RESET May be used in Level 2 and Level 3 Reset command is sent to all devices connected to the panel It restores the panel in alarm or fault status to normal operating status E EVACUATION May be used in Level 2 and Level 3 Starts the evacuation procedure activates sirens P...

Page 9: ...ates that one or more zones are in a test state N A Yellow O Night Mode Indicates that the system is in night mode N A Yellow P Delay Indicates that the output delays are active N A Yellow R General Failure Indicates that there is a system error system error lights up together with associated LED Reveals that there is any error in the system Yellow S System Failure Indicates that there is a system...

Page 10: ...ont Cover Screws with the Allen key supplied together with the panel 2 Using the panel as the template mark the wall from the A2 screw holes shown in 9 1 Appendix Mechanical Figure 28 Mounting Screw Holes 3 Drill the holes marked on the wall and complete the anchoring process with minimum 4 mm dowel and screws 4 Then proceed to battery and cable connection procedures 5 3 Power Supply Input The pan...

Page 11: ...acts and used to control another system In order for the active relay to be restored the fire status has to be eliminated and the Reset button on the panel has to be pressed Error Relay It is activated by changing contacts in case of a fault alert originating from the system and when the power is not supplied to the panel Error relay automatically returns to its previous position with the eliminat...

Page 12: ...connected Class B connection form is to be monitored against short circuit condition This warning message can not be issued even when there is any open circuit condition Important Note Class B loops are not compatible with EN54 13 Class B loop can not support more than 32 devices 5 9 Network Card Connection TFP 121x series Teknim Analogue addressable panels are networkable systems In order to acti...

Page 13: ... by entering the desired information in the form that opens 6 2 User Levels Some features of the panel are restricted by user levels and there are 4 user levels in the panel 6 2 1 Level 1 Level 1 is defined as the default user level with the most basic features The panel will be offering Level 1 if the user is not logged in Authorizations provided to a level 1 user is listed below For schematic re...

Page 14: ...el Defining zone parameters and label General delay parameters Zonal delay parameters Displaying panel values Panel parameters Date time settings Loop functions TdNET functions Users Service time setting TCP IP settings 6 2 4 Level 4 Level 4 can be entered via a special apparatus and software provided by the manufacturer At this level the user can access the memory where the program is located and...

Page 15: ...ith the arrow keys 4 Go to the form to be changed and press OK 5 Use arrow keys to enter a new value and press the OK key 6 Numeric keypad can also be used to enter the new value 7 Press ESC key to save new values After saving the socket connection is out of service for approximately 5 seconds and is reactivated with new values and resume communicating 6 4 Configuration through Panel The TFP 121x ...

Page 16: ... delay setting 6 Addition of new devices 7 Device parameters 8 Zone parameters 9 TdNET Network parameters 6 4 2 Login to Level 3 System administrator is required to first login to Level 3 in order to make configuration settings For the procedure for login to Level 3 refer to the topic 6 2 3 Level 3 6 4 3 Panel Clock and Date Settings The proper setting of the panel clock and date ensures real time...

Page 17: ... panel is not included in the network the address should be assigned to as 1 6 4 4 2 Night time Day time Mode In order to change day and night mode go to the Mode form and press OK button Night Day functionality is operative by being dependent upon the time values in the time parameters defined in the automatic mode Delays introduced to the outputs and detector sensitivities are taken into account...

Page 18: ...ange it to either Yes or No 3 Then press OK key 6 4 4 8 Buzzer during Testing Process Whether the buzzer will be activated or not for each detector set to alarm status during the course of zone alarm testing can be changed by means of this option For this 1 Select Activate Buzzer positioned under the option Under Test 2 2 Change it to either Yes or No 3 Then press OK key 6 4 4 9 Zone Start Address...

Page 19: ...zone specific delay should be applied to the zone in question In order to set some zone specific delays 1 Go to Menu Programming Delays Zonal Delay menu 2 Select the Zone form and enter the number of the zone required to be changed 3 Select the Delay form and change it in a ZONAL manner 4 Period form is displayed when ZONAL is selected 5 Select Period forms and delay period is set in the form of h...

Page 20: ...FP 121x series panels allow labels having a maximum of 16 characters for each device In order to write a label 1 Select Label form hereafter proceed to the page where labels are written 2 write a 16 character label on the label page using the keypad 3 After the operation is finished press the ESC key and the label will be saved 6 4 8 3 Day Night Sensitivity In day and night modes it may be desirab...

Page 21: ...occur will always be reported to the panel or the status change will be evaluated once until a reset command is delivered to the module 1 Latching The change in status input or error value in the input module is evaluated once transmitted to the panel The input values are not changed even though a new situation occurs until a reset command is delivered 2 Non Latching The change in status input or ...

Page 22: ... then ESC key 6 4 9 Zone Parameters Apart from device parameters there are zone labels and disabled parameters related to zones Under this heading the zonal parameters and their associated meanings will be discussed In order to set zone parameters firstly 1 Go to Menu Programming Device Programming menu 2 Select the zone required to be programmed and press OK key 6 4 9 1 Zone Label It may not be e...

Page 23: ...us window 1 Go to Main Screen and press ESC key 2 The menus regarding Fire if any Errors if any and Warnings if any will be listed in the status window 3 In order to get more detailed information select the relevant option with UP and DOWN keys then press OK button to get detailed message list 7 1 1 Fire Window In order to reach the fire list select Fire Alarm in the STATUS window and then press O...

Page 24: ... No battery is displayed on the error screen The event is saved as No battery in the memory 2 Empty Battery Voltage under 20 5V is considered to be empty Battery empty is displayed on the error screen The event is stored in the memory as Empty Battery 3 High Battery Resistance Internal resistance value of the battery is above the specified value The battery must be replaced 4 No SMPS Either SMPS i...

Page 25: ...It needs to be cleaned 18 Device x Type Error This error is generated in cases when another type of device is connected to an address other than the current configuration 19 Loop Card X N A Loop card doesn t respond to motherboard queries There may be a problem with the cable connection between the motherboard and the loop card The loop card may be defective or locked In such case restart and test...

Page 26: ...he system user of the existence of the data listed below Disabled devices Disabled zones Disabled outputs Disabled loops Zones under testing Newly detected devices Scenario rules becoming effective 7 2 Event Log The event log is the section where situations that are important to the Teknim addressable panel are recorded and displayed In the event log records are divided into 10 categories and each...

Page 27: ...ternal Supply Error Type Error Error Loop Loop N A Loop Inactive Loop New Devices Loop Short Circuit Loop Open Circuit Loop Init Loop Configured Panel Panel Init Reset Evacuation Panel Configured System Error Panel N A Service Warning SMPS Power Supply N A Charging Circuit Error Battery Battery N A High Battery Resistance Empty Battery Sirens Short Circuit Open Circuit Zone Zone Configured Network...

Page 28: ...ed Zones Devices located in the disabled zones continue to communicate with the panel however they do not participate in a fire state When disabling provision imposed on the zone is removed the devices in the zone resume fire detection In order to disable any zone switch to at least the level 2 and then follow the steps below 1 Go to the Menu Disable Disabled Zones menu 2 Select the required zone ...

Page 29: ...n follow the steps below 1 Go to Menu Programming Loop Functions Loop Parameters menu 2 Change the option Disable into Yes 3 Then press the ESC key in order to complete the saving process 4 Change the disable option into No if you want to reactivate the loop Figure 25 Loop Parameters 7 4 Zone Test Zone testing is a feature that is used to test the alarm functions of fire detection devices In cases...

Page 30: ...vents that are outside the intervention of a level 2 user when an emergency occurs Contact information can only be accessed by level 2 users This information consists of executive name company name company address web address and telephone number Switch to the Level 2 in order to display and then 1 Go to Menu Contact Information menu 7 7 Alarm Counter It keeps the number of alarm states that the p...

Page 31: ...ined 7 9 3 Loop Information The loop information window provides access to the such status information related to the selected loop as loop input output voltages loop current loop scan time categorical numbers of the types of added devices and version information of the loop card 7 9 4 Add Device 1 Go to Menu Programming Loop Functions Loop Selection Add Device menu 2 Number of the devices to be n...

Page 32: ...elect Active form and change the option to either NO or YES 3 Select Disable form and change the option to either NO or YES 4 Select Connection form and change the option to either Class A or Class B 5 Select Label form and type the desired label 6 Finally press ESC key in order to save the values For detailed information on loop connection read the topic 5 7 Loop Lines 7 9 6 1 Loop Active Paramet...

Page 33: ...s selected from such list and addition to and deletion from the network memory with either ACTIVE or PASSIVE option of the selected panel can be achieved In order to add a panel to the map follow the instructions provided below 1 Go to Menu Programming TdNET Functions TdNET Map menu 2 Select the panel required to be added using Up and Down keys 3 Press OK key and change the form value to the ACTIV...

Page 34: ...dNET map should be evaluated or not These are Alarm Error Warnings Reset Buzzer Muted Siren Muted Evacuation commands All incoming commands are set to PASSIVE as default In order to set incoming commands the panel to be set must be added to the TdNET map in the first place Later on follow the instructions provided below 1 Go to Menu Programming TdNET Functions Incoming Commands menu 2 Select a pan...

Page 35: ...elected as active passive Figure 33 Users List In order program the users 1 Go to Menu Programming Users menu 2 Select any of the users with OK key 3 Change the Status form to ACTIVE in the user programming window that opens PASSIVE users can not login to the panel 4 Change the Label form as required 5 Change the Level form to 2 or 3 6 Define a 4 digit password in the Password form 7 Finally press...

Page 36: ...tivate the service warning feature change the Service Error form to ACTIVE If Service Error is selected as PASSIVE the panel will not give service warnings 3 Set the Date and Time forms to the time that the service reminder is requested 4 7 Finally press ESC key and save the values The panel starts giving service warnings 24 hours before the specified time The service warning is displayed in the E...

Page 37: ...has maintenance diagnostics and control mechanisms for some error conditions These will be explained in the subparagraphs 8 1 1 Loop Line Open Circuit Error If you see this error on the screen it may be one of the following reasons There is a discontinuity in the loop line at any point Loop output cable not connected Loop input cable not connected In order to remove the error it is necessary to id...

Page 38: ...should be used for each test The results of the tests should be recorded After the test is finished the activated alarm button should be restored to its former state Important Note Before testing the fire alarm system auxiliary outputs is supposed to be isolated from the system 8 1 3 3 Quadrennial The TFP 121x series analogue addressable fire detection panels contain 2 units of dry type leak proof...

Page 39: ...ssable Fire Alarm Control Panels TFP 121X INSTALLATION AND OPERATION MANUAL 38 9 Appendices Appendices are divided into 4 categories as Mechanical Electrical Menu and Level 9 1 Appendix Mechanical Figure 36 Panel Front Cover Screws ...

Page 40: ...TFP 121x Series Analogue Addressable Fire Alarm Control Panels TFP 121X INSTALLATION AND OPERATION MANUAL 39 Figure 37 Mounting Screw Holes ...

Page 41: ...TFP 121x Series Analogue Addressable Fire Alarm Control Panels TFP 121X INSTALLATION AND OPERATION MANUAL 40 Figure 38 Electrical Connections ...

Page 42: ...1X INSTALLATION AND OPERATION MANUAL 41 Figure 39 Battery Connection Battery brackets marked with B1 are fixed through the screw locations B3 and B5 are connected with battery jumper cable B2 and B4 are connected to the battery supply socket with the battery supply cable ...

Page 43: ...TFP 121x Series Analogue Addressable Fire Alarm Control Panels TFP 121X INSTALLATION AND OPERATION MANUAL 42 Figure 40 Loop Card Network Card and Repeater Panel Connection Points ...

Page 44: ...TFP 121x Series Analogue Addressable Fire Alarm Control Panels TFP 121X INSTALLATION AND OPERATION MANUAL 43 Figure 41 TFC 1201 Network Card ...

Page 45: ...TFP 121x Series Analogue Addressable Fire Alarm Control Panels TFP 121X INSTALLATION AND OPERATION MANUAL 44 Figure 42 TFC 1201 Loop Card ...

Page 46: ...TFP 121x Series Analogue Addressable Fire Alarm Control Panels TFP 121X INSTALLATION AND OPERATION MANUAL 45 9 2 Appendix Electrical Figure 43 RTC Battery Connection ...

Page 47: ...TFP 121x Series Analogue Addressable Fire Alarm Control Panels TFP 121X INSTALLATION AND OPERATION MANUAL 46 Figure 44 Sounders Connection Figure 45 Loop Connection ...

Page 48: ...21x Series Analogue Addressable Fire Alarm Control Panels TFP 121X INSTALLATION AND OPERATION MANUAL 47 9 3 Appendix Menu Figure 46 Level 1 Menu Flow Main Menu 01 Logs Log Page Log Page 2 Log Page N 02 Enter ...

Page 49: ...t Day General Delay ON OFF 03 Time Set Time 04 Contact Info Adress Company Name Phone number e mail 05 Disablements 01 Devices Disablement Device List 1 240 ENAB DIS 02 Zones Disablement Zone List 1 72 ENAB DIS 03 Sounder Diasablement Sounder 1 2 ENAB DIS 06 Test Zones Zone List 1 72 TEST NORMAL 07 Test Device Led Device List 1 240 ON OFF 08 Alarm Counter Alarm Counter N 09 Device List Device List...

Page 50: ...blement Device List 1 240 ENAB DIS 02 Zones Disablement Zone List 1 72 ENAB DIS 03 Sounder Diasablement Sounder 1 2 ENAB DIS 06 Test Zones Zone List 1 72 TEST NORMAL 07 Test Device Led Device List 1 240 ON OFF 08 Alarm Counter Alarm Counter N 09 Programming 01 Device Settings Device List 1 240 EDIT Zone 1 72 Label Device NNN Sensitivity Day High Midium Low Night High Midium Low Disablement DIS ENA...

Page 51: ...er xx x VDC Bat zz z VDC Temp aa C SYST yy y VDC SNDR 1 bb b VDC SNDR 2 bb b VDC Main Board Ver X X X X X X Display Ver Y Y Y Y Y Y IP Adress Port Adress 05 Parameters Adress 01 16 Label Mode Auto Night Day Language Turkish English Led Blink No Yes On New Zone Alarm Re sound ENAB DIS In alarm case Maximum Led X In test Case Play Siren Yes No Plasy Buzzer Yes No Zone Start 1 73 Date Time Set Date X...

Page 52: ...hursday XX XX YY YY Friday XX XX YY YY Saturday XX XX YY YY Sunday XX XX YY YY 07 Loop Functions Device List Loop Check O xxx I xxx Loop Info EMP XXX SHD XXX HD XXX SD XXX MCP XXX GD XXX NGD XXX COD XXX CO2 XXX SIR XXX IOS XXX IM XXX OS XXX IOR XXX OR XXX CON XXX Add Device XXX New Device Remove Device XXX Loss Devices Loop Parameters Label Loop XX Class Class A Class B ...

Page 53: ...rk Local Delays ENAB DIS Wiring ClassA ClassB Outgoing Commands Alarm ENAB DIS Fault ENAB DIS Warning ENAB DIS Reset ENAB DIS Buzzer Slnc ENAB DIS Sounder Slnc ENAB DIS Evacuate ENAB DIS Incoming Commands Reset ENAB DIS Buzzer Slnc ENAB DIS Sounder Slnc ENAB DIS Evacuate ENAB DIS 09 TCP IP IP xxx yyy zzz aaa Port cccc 10 Users Users State ENAB DIS Label Label Level 1 2 3 Password 11 Mainterenance ...

Page 54: ...TFP 121x Series Analogue Addressable Fire Alarm Control Panels TFP 121X INSTALLATION AND OPERATION MANUAL 53 9 4 Appendix PC Connection Figure 49 PC Ethernet Connection ...

Page 55: ...22 Bilgi Elektronik San ve Tic A Ş Dudullu OSB 1 Cad İsmet Tarman İş Merkezi No 1 Kat 2 32 Ümraniye İstanbul Turkiye 17 1922 CPD 0876 EN 54 2 1997 EN 54 2 1997 AC 1999 EN 54 2 1997 A1 2006 Control and indicating equipment for fire detection and fire alarm systems for buildings TFP 1211 TFP 1212 Provided options Output for fire alarm devices Output delays Alarm counter Error signals from points Dis...

Page 56: ...TFP 121x Series Analogue Addressable Fire Alarm Control Panels TFP 121X INSTALLATION AND OPERATION MANUAL 55 9 6 Appendix Maintenance Table Date Tested Device Device Location Explanation ...

Page 57: ...TFP 121x Series Analogue Addressable Fire Alarm Control Panels TFP 121X INSTALLATION AND OPERATION MANUAL 56 Date Tested Device Device Location Explanation ...

Page 58: ...TFP 121x Series Analogue Addressable Fire Alarm Control Panels TFP 121X INSTALLATION AND OPERATION MANUAL 57 Date Tested Device Device Location Explanation ...

Page 59: ...TFP 121x Series Analogue Addressable Fire Alarm Control Panels TFP 121X INSTALLATION AND OPERATION MANUAL 58 Date Tested Device Device Location Explanation ...

Page 60: ...portation The device should be carried carefully so as not to subject it to any external impacts and to prevent liquid penetration Malfunctions arising due to improper handling are outside the scope of warranty Complies with Directive 2002 96 EC This product is produced from recyclable and reusable high quality parts and materials Therefore do not dispose of the product together with the household...

Reviews: