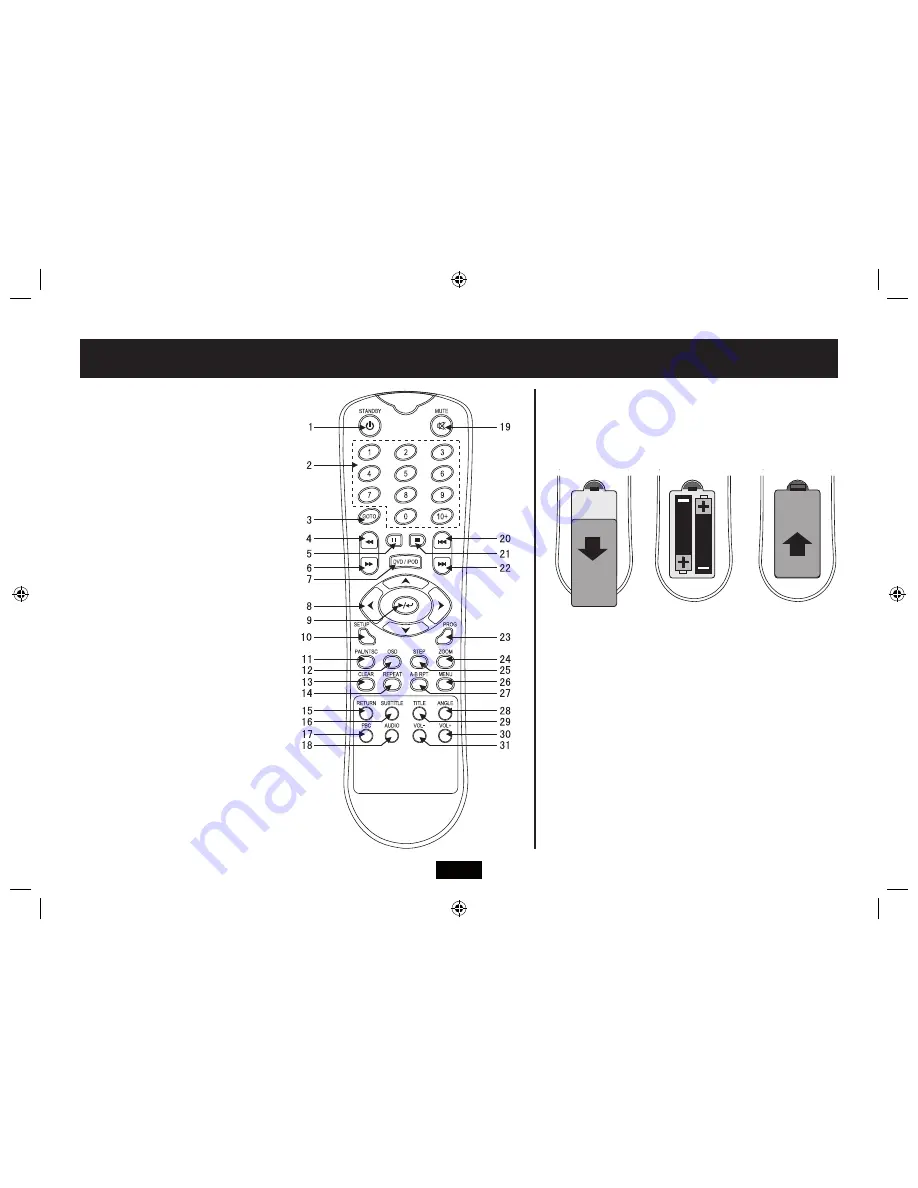
background image

Page  9

KEY

1   STANDBY
2   DIGIT KEYS
3   GOTO KEY
4   FAST REWIND
5   PAUSE
6   FAST FORWARD
7   DVD/iPOD SELECT
8   NAVIGATION KEYS
9   ENTER/PLAY KEY
10   SETUP
11   PAL/NTSC SELECT
12   OSD
13   CLEAR
14   REPEAT
15   RETURN

16   SUBTITLE
17   PBC
18   AUDIO
19   MUTE
20   PREVIOUS
21   STOP
22   NEXT
23   PROG
24   ZOOM
25   STEP
26   MENU
27   A-B REPEAT
28   ANGLE
29.  TITLE
30.  VOLUME UP (+)
31.  VOLUME DOWN (–) 

HANDSET BATTERIES

When the handset becomes erratic or ceases to work you should 
replace the batteries.  
Page 2 contains guidance for battery replacement and disposal.

USING THE HANDSET

Point the handset directly at the remote sensor of the player. The 
handset must be no more than 8 metres from the player and at an 
angle of no more than 30º for reliable operation. If operation is erratic 
in bright sunlight,  move the player to a shady location.

Insert 2 AAA batteries 
with their polarities 
as shown.

Replace the cover.

Invert the handset. 
Slide off the battery 
cover.

This illustration refers to handset functions when 
playing a Disc.
For iPod control functions refer to Page 22.

THE REMOTE HANDSET

Summary of Contents for HTK2CHID

Page 1: ...UserGuide HTK2CHID HDMI 2 0 Home Theatre Systemwith iPod Dock...

Page 2: ......

Page 3: ...n the disc drawer is open a safety interlock disconnects power to the laser Do not defeat this safety interlock The rating and marking information are located the bottom of the unit IMPORTANT This equ...

Page 4: ...TTING STARTED 11 PLAYING A DVD 12 PLAYING AN AUDIO CD 15 PLAYING A JPG DISC 16 CUSTOMISING PLAYER SETTINGS 17 SETTING AND CHANGING THE PASSWORD 18 PARENTAL CONTROL SETTINGS 18 RESTORING SYSTEM DEFAULT...

Page 5: ...of DVD discs to certain age groups as below I KID SAFE 2 G 3 PG 4 PG 13 5 PGR 6 R 7 NC17 8 ADULT Your DVD disc and packaging has information about the clas sification of the disc If there are young c...

Page 6: ...STOP 5 Volume DOWN 6 Play Pause 7 Volume UP 8 Next Track Fast Forward 9 STANDBY 10 Previous Track Fast Reverse 11 Power Indicator 12 Display Screen 13 Remote Control Sensor 14 Stereo Loudspeaker Outpu...

Page 7: ...s you may have to turn the volume on theTV off or mute theTV audio sound Refer to yourTV handbook for further information If yourTV does not have an HDMI input and or if there is no available SCART in...

Page 8: ...connection offers the best performance If you have an AV System with an HDMI input you can connect the HDMI output from the unit to an HDMI input on the AV system Con nect a second HDMI cable from the...

Page 9: ...es to work you should replace the batteries Page 2 contains guidance for battery replacement and disposal USING THE HANDSET Point the handset directly at the remote sensor of the player The handset mu...

Page 10: ...n Select a subtitle language Requires disc support Display the PBC manu on aVCD Disc requires disc support Select a language audio format requires disc support Press to mute unmute the sound Press to...

Page 11: ...ational HDMI CONNECTION When you switch on theTV and the player will handshake and the correct resolution will be set by the system You can set the resolution manually see Page 17 but do NOT set a res...

Page 12: ...mode 8 To alter the volume Use theVOL keys on the handset to alter volume from 0 min up to 15 max 9 To mute unmute the volume Press on the handset 10 Repeat Play Pressing the REPEAT key will A Repeat...

Page 13: ...the information abut the disc Direct Selection During Play You can change chapters by pressing the chapter number To select a number between 0 and 9 enter the number To enter the number 10 press 10 T...

Page 14: ...features some support none Some features may require setting up from the main menu of the DVD disc The OSD facility on this DVD player will help you to see the features which are available CHANGINGTHE...

Page 15: ...tinuously Press A B RPT to resume normal play A B CANCEL 9 DirectTrack Selection Press the OSD key to hide the OSD menu Enter the track with the number keys 10 Stopping the Disc Press on the handset o...

Page 16: ...to choose from Repeat Modes Pressing the REPEAT key will A Repeat an image B Repeat all images in a folder C Repeat all images on the disc D Cancel REPEAT Press or RETURN to stop the disc and go to t...

Page 17: ...is set to PAL If aVideo is in NTSC it will force NTSC for the duration of the video Press to highlight SCREEN SAVER Press Press to choose ON OFF Press to confirm Even if you are using aTFT screen we a...

Page 18: ...g to control level set by the user See Page 5 To change the ratings Press to highlight PASSWORD Press Enter the password Thesystemisnowunlocked Press to highlight RATING Press Press to select a rating...

Page 19: ...PDIF Press SETUP to enter the Setup menu Press to go to AUDIO OUT Press Press to enter the list Press to select a parameter Press to confirm and return or Press to return without confirming SPDIF OFF...

Page 20: ...to DOLBY Press to go to DRC Press to enter the DRC menu Press to adjust DRC Press or to confirm and return DRC Dynamic Range Compression manages the difference in intensity between loud and soft soun...

Page 21: ...icular iPod and is necessary to ensure that your iPod is securely held when docked DOCKING AN iPod DOCKING YOUR iPod To dock your iPod Check that the correct iPod adaptor is fitted to the docking bay...

Page 22: ...Press the button to stop playback Press the REPEAT button on the Remote Control to cycle through the repeat modes available on the iPod These are Repeat 1 Repeat All and Repeat Off Therepeatmodesetwi...

Page 23: ...laying h Name of the album playing i Time remaining for the track playing 1 Bargraph display of elapsed time 1 Time elapsed for the track playing 1 Album cover image iPod MUSIC PLAYBACK DISPLAY When p...

Page 24: ...following buttons Press the II button to Pause the slideshow Press the button to re start the slideshow When playing the slideshow press the or button to select the previous or next photo Press the bu...

Page 25: ...but there is no picture or the picture is very distorted HDMI connection The HDMI resolution has been set to a value too high for the screen Switch the player andTV off Disconnect the HDMI cable and...

Page 26: ...ents to the surface of a disc WARRANTY YourTechnika appliance is covered by a warranty for 12 months from the date of purchase If a fault develops during this period please contact theTESCO electrical...

Page 27: ......

Page 28: ...Tesco Stores Ltd Delamare Road Cheshunt Herts EN8 9SL...

Reviews: