background image

Page  11

POSITIONING THE SYSTEM

Place the player and the speakers on a level surface where 
they are unlikely  to be knocked over or fall and where the 
connecting leads do not constitute a cause of danger.
Tne means of disconnection from the mains supply is 
via the mains plug on the power cord. This must not be 
obstructed and be readily operable at all times.
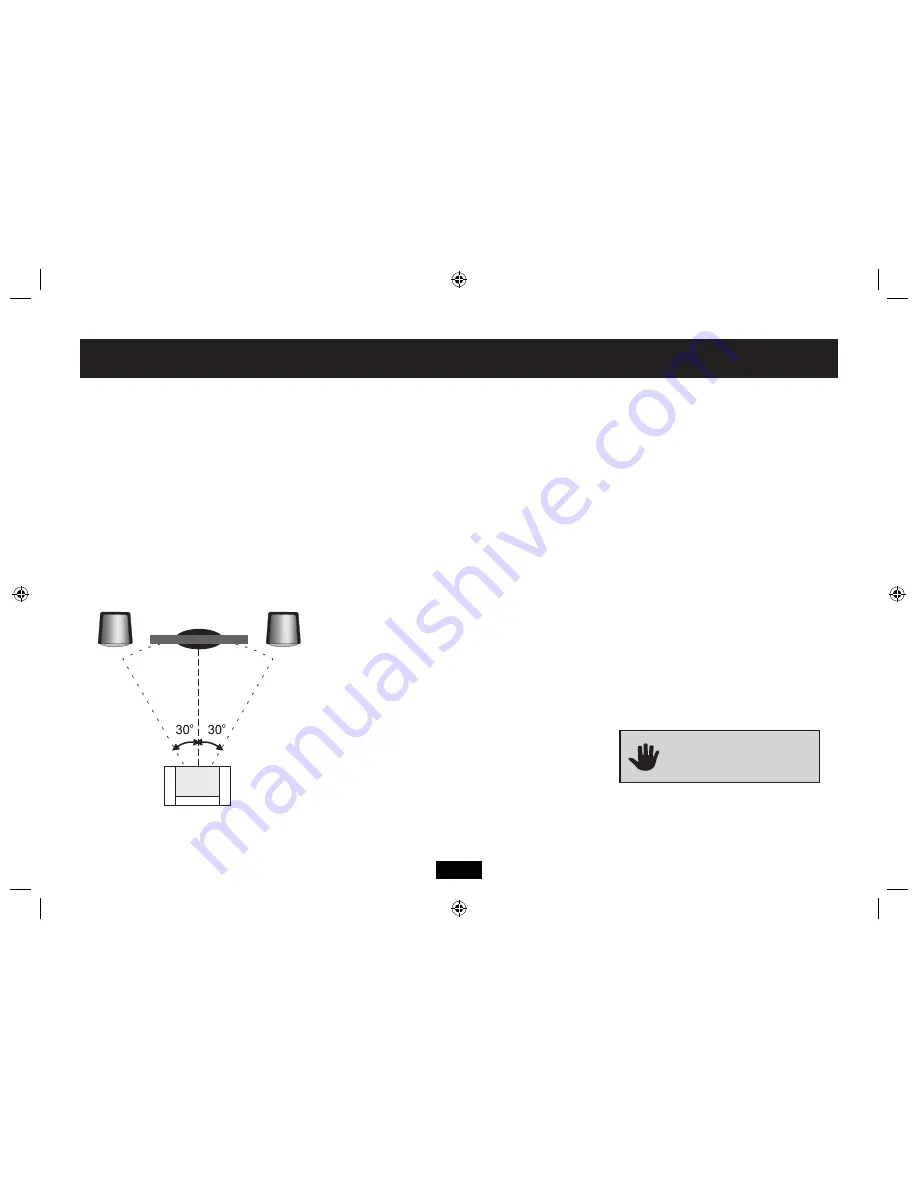
The loudspeakers should be placed 1.5-3 metres apart, on 
either side of the TV and central to the listener. If you wish 
you can angle the speakers inward (toe-in) by as much 
as 30°. Ideally the speakers should be at head height to a 
seated listener.

You may disable the sound on your TV or turn it off if you wish. 

CONNECTING THE PLAYER

Make sure all system units are switched OFF.
Connect the player to your TV (and Sound system if 
required) as shown on Pages 5 and 6. Use the SCART or the 
HDMI connection (preferred) but NOT BOTH.  
Switch on the TV (and the Sound System).
Make sure the TV is set to the correct input. (Some TVs have 
auto sensing - refer to your TV user manual).

SWITCHING ON THE PLAYER

•  Plug the mains plug into the mains outlet 
•  Switch on the power.  The indicator on the player will  
 

light to show power is connected.

•  Press the STANDBY key on the player or the handset. 
The screen display will light and


the player is operational.

HDMI CONNECTION

When you switch on:  the TV and the player will ‘handshake’ 
and the correct resolution will be set by the system.You can set 
the resolution manually - see Page 17 but do NOT set a resolu-
tion above that of your monitor or the picture will be very 
distorted and you may lose the picture altogether. Consult your 
TV user handbook before manually setting the resolution.

SCART CONNECTION

This is the standard mode supported by virtually all TVs and 
monitors. 

LOADING A DISC

  Press down lightly on the disc cover to open it

  Load a disc into the tray, label side up. Align the centre 

of the disc with the centre of the disc guide. Press gently 
on the disc to snap it into place. 
•  Close the disc cover. The disc will now load. Some 
formats take more time to load than others as the player 
has to download the Table of Contents (TOC).
DVD discs will display the ROOT or TITLE menu. In excep-
tional cases where there is one title and nothing else the 
disc may play.
The ROOT menu is the basic menu of a DVD disc and 
contains all the information relating to the DVD disc This 
menu loads when you first insert a disc. To access this 
menu at other times, press the MENU key. The TITLE shows 
the titles available on the DVD disc. On many DVDs the 
ROOT and TITLE menus are the same. Each TITLE is divided 
into CHAPTERS. So you can play all, or any part of the disc 
as you choose.

If you give the player an invalid
 command it will be ignored and a 
“hand” will flash on screen.   

GETTING STARTED

Summary of Contents for HTK2CHID

Page 1: ...UserGuide HTK2CHID HDMI 2 0 Home Theatre Systemwith iPod Dock...

Page 2: ......

Page 3: ...n the disc drawer is open a safety interlock disconnects power to the laser Do not defeat this safety interlock The rating and marking information are located the bottom of the unit IMPORTANT This equ...

Page 4: ...TTING STARTED 11 PLAYING A DVD 12 PLAYING AN AUDIO CD 15 PLAYING A JPG DISC 16 CUSTOMISING PLAYER SETTINGS 17 SETTING AND CHANGING THE PASSWORD 18 PARENTAL CONTROL SETTINGS 18 RESTORING SYSTEM DEFAULT...

Page 5: ...of DVD discs to certain age groups as below I KID SAFE 2 G 3 PG 4 PG 13 5 PGR 6 R 7 NC17 8 ADULT Your DVD disc and packaging has information about the clas sification of the disc If there are young c...

Page 6: ...STOP 5 Volume DOWN 6 Play Pause 7 Volume UP 8 Next Track Fast Forward 9 STANDBY 10 Previous Track Fast Reverse 11 Power Indicator 12 Display Screen 13 Remote Control Sensor 14 Stereo Loudspeaker Outpu...

Page 7: ...s you may have to turn the volume on theTV off or mute theTV audio sound Refer to yourTV handbook for further information If yourTV does not have an HDMI input and or if there is no available SCART in...

Page 8: ...connection offers the best performance If you have an AV System with an HDMI input you can connect the HDMI output from the unit to an HDMI input on the AV system Con nect a second HDMI cable from the...

Page 9: ...es to work you should replace the batteries Page 2 contains guidance for battery replacement and disposal USING THE HANDSET Point the handset directly at the remote sensor of the player The handset mu...

Page 10: ...n Select a subtitle language Requires disc support Display the PBC manu on aVCD Disc requires disc support Select a language audio format requires disc support Press to mute unmute the sound Press to...

Page 11: ...ational HDMI CONNECTION When you switch on theTV and the player will handshake and the correct resolution will be set by the system You can set the resolution manually see Page 17 but do NOT set a res...

Page 12: ...mode 8 To alter the volume Use theVOL keys on the handset to alter volume from 0 min up to 15 max 9 To mute unmute the volume Press on the handset 10 Repeat Play Pressing the REPEAT key will A Repeat...

Page 13: ...the information abut the disc Direct Selection During Play You can change chapters by pressing the chapter number To select a number between 0 and 9 enter the number To enter the number 10 press 10 T...

Page 14: ...features some support none Some features may require setting up from the main menu of the DVD disc The OSD facility on this DVD player will help you to see the features which are available CHANGINGTHE...

Page 15: ...tinuously Press A B RPT to resume normal play A B CANCEL 9 DirectTrack Selection Press the OSD key to hide the OSD menu Enter the track with the number keys 10 Stopping the Disc Press on the handset o...

Page 16: ...to choose from Repeat Modes Pressing the REPEAT key will A Repeat an image B Repeat all images in a folder C Repeat all images on the disc D Cancel REPEAT Press or RETURN to stop the disc and go to t...

Page 17: ...is set to PAL If aVideo is in NTSC it will force NTSC for the duration of the video Press to highlight SCREEN SAVER Press Press to choose ON OFF Press to confirm Even if you are using aTFT screen we a...

Page 18: ...g to control level set by the user See Page 5 To change the ratings Press to highlight PASSWORD Press Enter the password Thesystemisnowunlocked Press to highlight RATING Press Press to select a rating...

Page 19: ...PDIF Press SETUP to enter the Setup menu Press to go to AUDIO OUT Press Press to enter the list Press to select a parameter Press to confirm and return or Press to return without confirming SPDIF OFF...

Page 20: ...to DOLBY Press to go to DRC Press to enter the DRC menu Press to adjust DRC Press or to confirm and return DRC Dynamic Range Compression manages the difference in intensity between loud and soft soun...

Page 21: ...icular iPod and is necessary to ensure that your iPod is securely held when docked DOCKING AN iPod DOCKING YOUR iPod To dock your iPod Check that the correct iPod adaptor is fitted to the docking bay...

Page 22: ...Press the button to stop playback Press the REPEAT button on the Remote Control to cycle through the repeat modes available on the iPod These are Repeat 1 Repeat All and Repeat Off Therepeatmodesetwi...

Page 23: ...laying h Name of the album playing i Time remaining for the track playing 1 Bargraph display of elapsed time 1 Time elapsed for the track playing 1 Album cover image iPod MUSIC PLAYBACK DISPLAY When p...

Page 24: ...following buttons Press the II button to Pause the slideshow Press the button to re start the slideshow When playing the slideshow press the or button to select the previous or next photo Press the bu...

Page 25: ...but there is no picture or the picture is very distorted HDMI connection The HDMI resolution has been set to a value too high for the screen Switch the player andTV off Disconnect the HDMI cable and...

Page 26: ...ents to the surface of a disc WARRANTY YourTechnika appliance is covered by a warranty for 12 months from the date of purchase If a fault develops during this period please contact theTESCO electrical...

Page 27: ......

Page 28: ...Tesco Stores Ltd Delamare Road Cheshunt Herts EN8 9SL...

Reviews: