background image


CM4 App Note 260424 issue 2.1.docx 

Document No. 260424   

Page 18 of 29 


Output Current Measurement 

The output current of the module can be measured using the I

CONTROL

 signal. If this pin is not loaded its output voltage will follow the typical 

equation, 

V

I_OUT

 = 4*I

OUT

/I

RATED

, where I

RATED

 is the maximum rated current for the module.  

Note that the I

CONTROL

 output voltage is representative of the internal inductor current not the actual load current.  However, this will only have an 

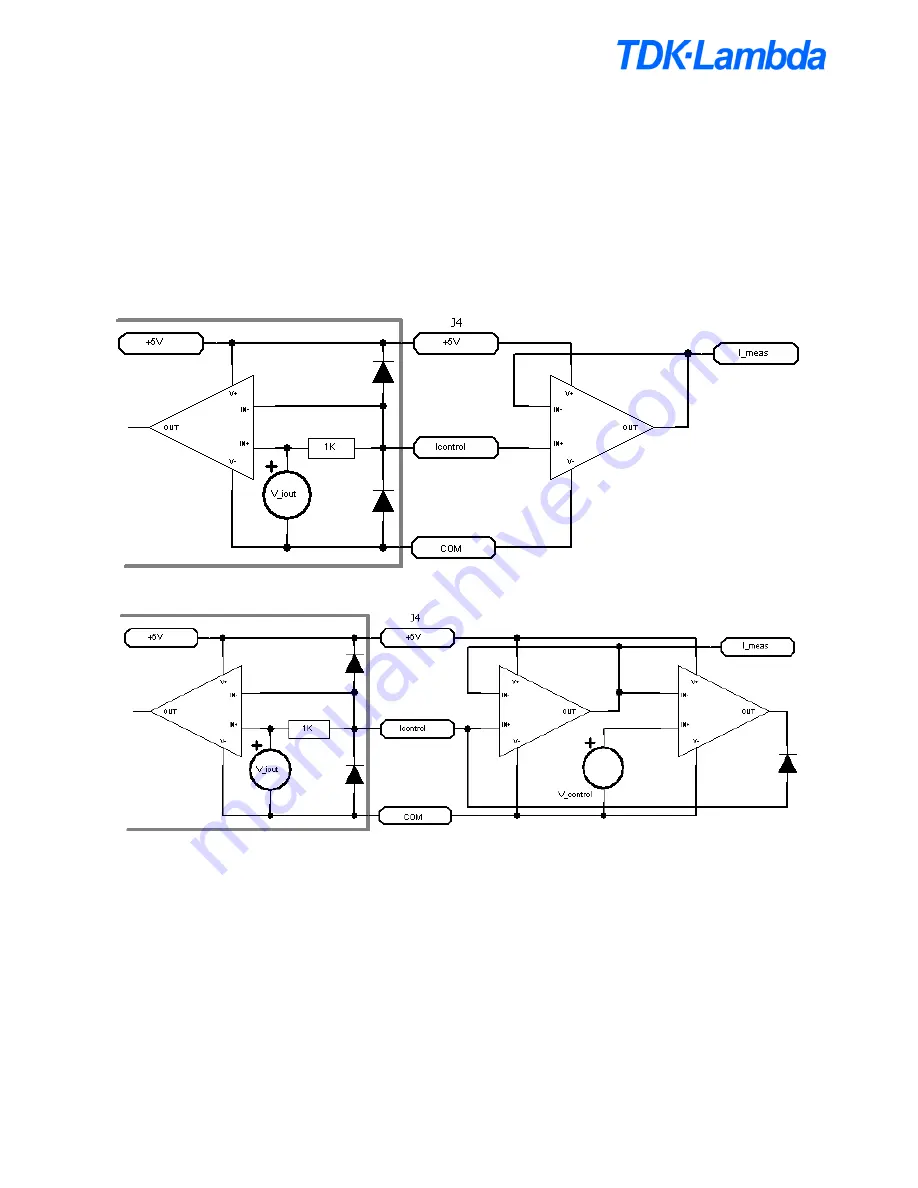
influence during dynamic events. It is recommended to add an external buffer amplifier (as shown below) when using the I

CONTROL

 signal to 

measure the output current as loading the I

CONTROL

 signal, even with microamps can cause the current limit to be reduced. If it is required to 

measure the output current and adjust the output current limit simultaneously, this can be achieved by using a clamp circuit instead of a voltage 
source to adjust the current limit, while continuing to use an amplifier to measure the output current. An example circuit is shown below. In this 
case V

CONTROL


will control the current limit while the buffered I

CONTROL

 signal will provide a measurement of the output current. 


Measuring output current 


Measuring & controlling output current 


Summary of Contents for CM4

Page 1: ...CM4 App Note 260424 issue 2 1 docx Document No 260424 Page 1 of 29 CM4 AC DC Modular Power Supply Series APPLICATION NOTES...

Page 2: ...tion 5 4 Efficiency Performance 6 5 Power Ratings 7 6 System Cooling 8 7 Signalling 11 8 Output Module Operation 13 9 Advanced Output Module Features 16 10 Series Connected Outputs 20 11 Parallel Conn...

Page 3: ...tion to the AC line Once the internal capacitances have been charged the resistive element is bypassed to reduce losses Active Power Factor Correction PFC is used to ensure an accurate input current w...

Page 4: ...tput voltages fall below the power good threshold level This allows the application to prepare for the impending loss of power The 5V bias supply will remain on for typically 100 ms after the output m...

Page 5: ...e power remains within ratings Note that input module de ratings apply to both rated power and peak power 3 Input Module Protection Over current protection OCP The input module is protected from exces...

Page 6: ...ne voltage load level and on the combination of output modules The plots below show typical efficiencies of a CM4 product fitted with all modules S1 S2 S3 or S4 The plots cover the full load and line...

Page 7: ...te temperatures 1 2 3 4 5 6 7 VIN VRMS 120 85 85 120 120 100 120 Normalised VIN Rating A 1 0 708 0 708 1 1 0 833 1 TAMBIENT C 70 50 70 50 60 60 50 Normalised TAMBIENT Rating B 0 5 1 0 5 1 0 75 0 75 1...

Page 8: ...0 50 100 150 200 250 300 350 400 450 500 550 40 30 20 10 0 10 20 30 40 50 60 70 80 Pout Ambient Temperature S1 120Vin 4x5Vout A B CD EF 0 50 100 150 200 250 300 350 400 450 500 550 40 30 20 10 0 10 20...

Page 9: ...40 50 60 70 80 Pout Ambient Temperature S1 220Vin 4x5Vout 2MS 1 1 5MS 1 1MS 1 0 5MS 1 0 50 100 150 200 250 300 350 400 450 500 550 600 650 40 30 20 10 0 10 20 30 40 50 60 70 80 Pout Ambient Temperatu...

Page 10: ...ermocouple in place 2 Setup the application in worst case conditions considering Input line voltage Output power ambient temperature airflow and cooling restrictions 3 Power the system and monitor the...

Page 11: ...nals to Chassis 500 VDC Signals to Output 500 VDC Bias Supply 5V Power The CM4 series has one isolated bias supply located on the transformer module J3 beside slot 4 The output side bias supply genera...

Page 12: ...t The signals circuit provides an inhibit input to disable each output module individually Each inhibit input is internally connected through an opto isolator to the respective output modules The basi...

Page 13: ...tage Protection OVP In the event of an output module fault the modules are protected against excessive output voltages This is implemented as a fixed voltage threshold VOVP in the table above If the o...

Page 14: ...possible when the output voltage is adjusted to VMAX and the maximum current is drawn from the module Note that both average and peak power ratings are subject to the same temperature derating as the...

Page 15: ...are within specifications the unit will restart Note that no warning is given on the AC_OK signal for faults of this type Transient Response The CM output modules have been especially designed to hav...

Page 16: ...t voltage of the module Equivalent internal circuit Control function The output voltage can be controlled from 0 to 131 5 of the preset voltage using this control method However care must be taken to...

Page 17: ...te the following equation ILIMIT IRATED VCTRL 4 where IRATED is the maximum rated current for the module It is not possible to increase the maximum current limit of the module and control voltages exc...

Page 18: ...ommended to add an external buffer amplifier as shown below when using the ICONTROL signal to measure the output current as loading the ICONTROL signal even with microamps can cause the current limit...

Page 19: ...must be taken to ensure power cables have a sufficiently low voltage drop at maximum load current to ensure this protection does not activate unintentionally In systems where remote sensing is not us...

Page 20: ...or current control is possible with series connected modules using the advanced VCONTROL and ICONTROL functions described earlier However individual control of each module can be complex as the variou...

Page 21: ...odule continues delivering full current This process repeats for the total number of paralleled modules The diagram above shows the VI curve for such a system Output modules that are not delivering cu...

Page 22: ...tem failure However the diode introduces voltage drops between the supply and the load that significantly degrade the load regulation To counteract this the remote sense lines can be used to regulate...

Page 23: ...ss Multiple Products Paralleling across multiple products is not possible without external protection such as external diodes or controlled MOSFETs to prevent circulating currents between each product...

Page 24: ...ng SCREWS Location Details Penetration Tightening Baseplate Mount M1 M6 Hole size Diameter 5 00mm 4mm Baseplate thickness 0 55 NM Output Module Connection M4 0 35 NM Input Module Connection 6 32 0 8 N...

Page 25: ...NNECTORS Ref Details Manufacturer Housing Terminal J1 Mains Input 3 Pin Barrier 6 32 Steel Screws 0 8 Nm or 7 Lb In Torque 1 J2 Standby control 2 Pin 1 25mm with Friction Lock 28 30AWG MOLEX 051021020...

Page 26: ...hould be used to mount both the power supply and the load Both input and output cables should be fixed as close as possible to the ground plate or metal enclosure Input and output cables should be sep...

Page 27: ...embled system Assembly Failure Rate FPMH MTBF Hrs Input module 0 962972 1038452 Transformer 0 371919 2688754 S1 0 415368 2407499 S2 0 397808 2513774 S3 0 398170 2511487 S4 0 405630 2465300 CM4 with 4...

Page 28: ...ut module in need of adjustment Attaching a heatsink or cooling plate For improved performance the baseplate of the CM4 unit can be attached to a heatsink or cooling plate TDK Lambda has a range of he...

Page 29: ...0450 Input Cable Set 1x Signals cable 200mm 1x Standby cable 200mm 3x Power terminals 200449 CM4 Heatsink1 Provided with 6x M4 x 10mm Posi Drive screws for baseplate mounting and thermal interface ACC...

Reviews: