background image

R

2800 LAURA LANE • MIDDLETON, WI 53562 • (800) 288-9383 • FAX (608) 836-9044 • www.tcsbasys.com

9

Programming - Pulse Meter      

The utility pulse meter module portion of this panel is an 

SEQ100.

METER INPUTS

There are four meter inputs available. Each one is setup 

for a dry contact and cannot be changed. Each input 

(Meter 1, Meter 2, Meter 3 & Meter 4) can be configured 

to accept signals representing electrical, BTU, water or 

gas usage. The required parameters will be provided 

by either the utility company involved or on the current 

transducer (CT) used to generate the pulse signal.

METER TYPES

The SEQ100 supports various meter types. Selecting a 

meter type changes the default values as they are used 

to calculate meter consumption and demand for that par-

ticular meter. For each of the four SEQ100 meter inputs, 

there are five selectable options: 


ELEC 1 PH: Electric single phase meter.


ELEC 3 PH: Electric three phase meter.


GAS: Gas meter.


WATER: Water meter


BTU: BTU meter

Utility pulse meters can be one of two different types, 

depending on whether they count the leading and trail-

ing edges of the pulse or only the leading edge of the 

pulse as a single count. A pulse output can be either a 

mechanical relay or solid state device. The pulse output 

corresponds to a unit/time of a monitored quantity. The 

amount of time between states of a pulse output corre-

sponds to the meter demand and the number of pulses 

is proportional to the meter’s consumption. 
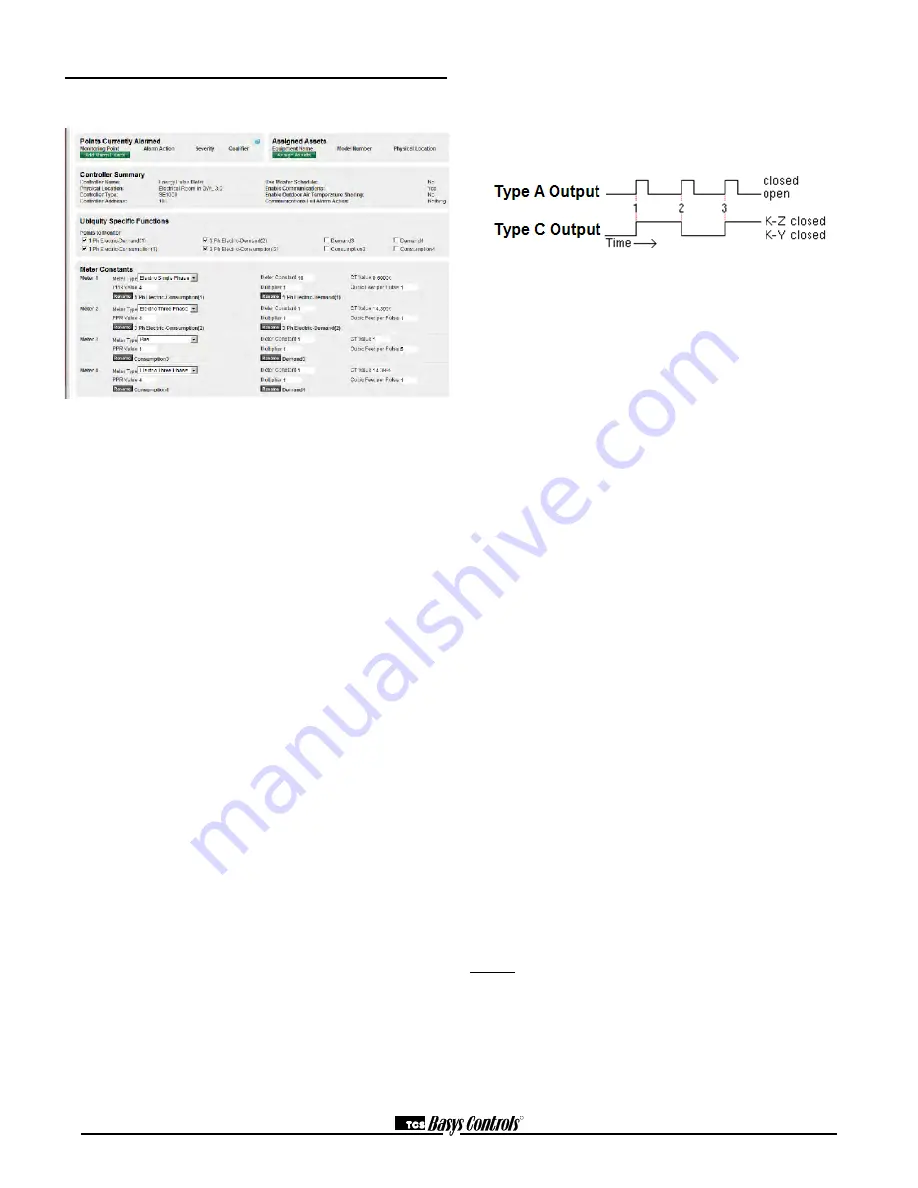
Below is a diagram depicting two types of utility meter 

pulse outputs. Meter Type A counts only the leading 

edge as a single pulse and the trailing edge is ignored. 

Meter Type C is known as a true KYZ meter and counts 

both the leading and trailing edges as a pulse, effectively 

doubling the number of pulses as seen by Meter Type 

A. The SEQ100 measures Type A output only; however, 

KYZ functionality can be mimicked by using a “Meter 

Multiplier” value of 2.
In the following picture, both Type A and C are shown. 

Three pulses are shown, labelled 1, 2, and 3. Notice 

how the Type A output closes and opens for each pulse, 

where the Type C output simply changes state.

If you have a Type C device (3 terminals KYZ), you will 

need to double the multiplier. The SEQ100 only counts 

the contact closures for the K and Z terminals. Doubling 

the multiplier will correct this problem.

PROGRAMMING THE METER CONSTANTS:

CT Value: The value of the CT wired to the meter. This 

value is usually provided on the CT or on the utility out-

put meter. This value is only used for and electric meter.
P/REV:  The Pulses per revolution for the meter. This 

value is usually provided from the utility company.  
CONSTANT: The value of the constant for the meter 

is usually provided from the utility company and many 

times is located on the electric or gas bill.  
CU FT/P: The value for Cubic Feet per pulse. This only 

applies to Water, GAS and BTU, and is usually found on 

the utility meter itself. 
MULT: The multiplier for the meter can be used to scale 

the meter output or correct for KYZ meter. The multi-

plier is used to convert the pulses to engineering unit 

data. For example, if your meter provides one pulse per 

0.01KWH, then a constant of 0.01 is required.

MULTIPLIER:

Each model of power meter is different and has a differ-

ent multiplier. For example, if the meter is a Type A and 

reports 1/10 kWh per pulse, set the input multiplier to 

0.1. If the meter is a Type C and reports 1/10 kWh per 

pulse, set the input multiplier to 0.2.
You must obtain the correct pulse multiplier from the 

meter manufacturer prior to configuring the SEQ100.
Some power meters have an option to configure the mul-

tiplier. Options often include 1, 0.1, 0.01, kWh per pulse. 

The best method to configure the pulse is to select the 

smallest multiplier available, considering the maximum 

load and pulse rate. To calculate the pulse rate, use the 

following formula: 
Pulses = KW*3600*multiplier

Second 

Summary of Contents for QWL 3.1 2 Series

Page 1: ... Astronomical clock External time clock or occupancy sensor input for each channel Channel status LEDs Selectable normally open or normally closed relays Built in 2 Amp relays with hand off auto switches Contents Description 1 Features 1 Factory IP Network Address Configuration 1 Mounting 2 Wiring 2 RS 485 Controller Network Wiring Setup 3 Gateway Configuration Page 4 Commissioning Tools 5 Program...

Page 2: ...ev 2 Series Panel accepts two 0 to 5 VDC inputs 8 dry contact digital inputs and 4 pulse meter inputs POWERING THE QWL 3 1 REV 2 SERIES PANEL The QWL 3 1 Rev 2 Series Panel is powered from a 120VAC 60HZ to 12VDC power supply module includ ed The QWL 3 1 Rev 2 Series Panel is designed to contain 24 VAC devices and wiring ONLY No line voltage 120 VAC or greater is to be installed within this panel M...

Page 3: ...ev 2 Series Panel 4 NOTES 1 If using more than 64 control lers use additional QD1010 adapters 2 Each controller must use the same baud rate and be assigned a unique address B wires If the QWL 3 1 Rev 2 Series Panel will be at one end of the network hard wire a 120 Ω terminating resistor across the A and B terminals at the QWL 3 1 Rev 2 Series Panel See 1 below If the QWL 3 1 Rev 2 Series Panel wil...

Page 4: ...elect a Controller Network Polling Cycle time for the QWL 3 1 Rev 2 Series Panel This is the time interval that the unit will poll the entire network of controllers on all ports The default setting is 1 min ute Select whether to allow caching the host name via DNS Typically this is left unchecked Select how often the QWL 3 1 Rev 2 Series Panel connects to the central server Typically this is set t...

Page 5: ...ontrol the security of the gateway within the QWL 3 1 Rev 2 Series Panel and whether or not it can be accessed through the web interface Enabling Secure Mode disables all web interfaces including the configuration page and requires a specially configured USB flash drive or TCS Technical Support access to the QWL Panel if it is online with Ubiquity central server to unlock it Also the default login...

Page 6: ...eight independent channels each with its own schedule If the occupied or ON time for a particular day is from 8 00AM to 5 00PM In the schedule enter 8 00 to 17 00 Within the Ubiquity programming page the desired schedule is simply selected from the drop down menu for each channel If the desired schedule is not shown in the drop down new schedules can be created or existing schedules can be edited ...

Page 7: ...ing high limit Select whether you want the time clock output Digital Output Mode to be Normally Open or Normally Closed during on periods The Channel Power Threshold is basically a setpoint to which AI2 is compared to determine when to turn off the selected channel s The Channel Power Hysteresis is a buffer value which prevents the channel from cycling off on prematurely For example if the AI2 inp...

Page 8: ...d override and if so whether it will be a schedule or chan nel override HOLIDAY VANISHING Choose whether to enable the Holiday Vanishing Feature If checked the controller will make the number of days for a holiday 0 after the holiday is over This will keep the holiday from occurring in subsequent years if it is not reprogrammed DIGITAL INPUT DELAY FILTER Enable the Digital Input Delay if you want ...

Page 9: ...nality can be mimicked by using a Meter Multiplier value of 2 In the following picture both Type A and C are shown Three pulses are shown labelled 1 2 and 3 Notice how the Type A output closes and opens for each pulse where the Type C output simply changes state If you have a Type C device 3 terminals KYZ you will need to double the multiplier The SEQ100 only counts the contact closures for the K ...

Page 10: ...o reboot the entire QWL 3 1 Rev 2 series panel This is accomplished by pushing and holding the button for 5 7 seconds Note During a reboot the lights associated with the Lighting Module of this product could go out it is recommended that you open the panel and place the Hand Off Auto switch for the corresponding channel in the Hand position to ensure that the lights that should be on remain on CPU...

Page 11: ...pically a problem with wir ing Check wiring Make sure that communication wir ing runs are at least 5 away from fluorescent lights motors etc Make sure that all controllers on a net work have a unique address Make sure that the A and B wires are not switched or shorted Make sure that there is no stray voltage on the A and B wires B to A should measure between 0 5 VDC and 3 6 VDC B to A should measu...

Reviews: