Curtis PMC Troubleshooting
Page 12
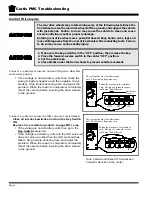
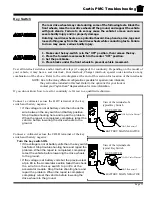
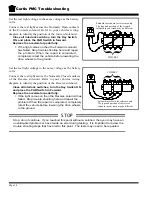
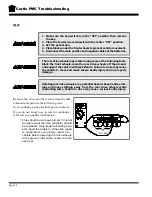
The COLD terminal is the
Violet/Black wire on either
end of the switch
Battery Negative
Or,
The HOT terminal is the Violet/Black
wire on the center terminal
Battery Negative
Violet/Black
Forward and Reverse Side
Typical configuration of the
terminals on a Forward and
Reverse Switch as viewed
from the back
KSI Side
Blue/Black
Green/Black
White/Black
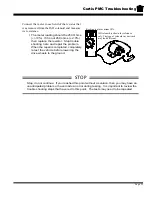
For your reference, shown at the right are the Forward and
Reverse switch wire connections for a typical control system.
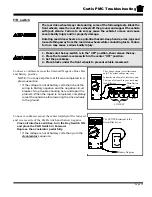
Connect a voltmeter across the HOT terminal of the KSI
side of the F&R switch and battery negative.
Turn the key switch ON.
•
If the voltage is not at battery volts then go to the
Accelerator
sequence.
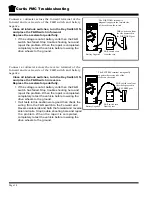
Connect a voltmeter across one of the COLD terminals of
the KSI side of the F&R switch and battery negative.
Close all interlock switches, turn the Key Switch ON,
and place the F&R Switch in Forward.
•
If the voltage is not at battery volts then the F&R
switch has failed. Stop trouble shooting here and
repair the problem. When the repair is completed,
completely retest the vehicle before lowering the
drive wheels to the ground.
•
If the voltage is at battery volts and the test at the
PMC KSI terminal in the Control Wire Inputs section
failed then check the wiring between COLD terminals
of the KSI side of the F&R switch and the PMC KSI
terminal. Stop trouble shooting here and repair the
problem. When the repair is completed, completely
retest the vehicle before lowering the drive wheels
to the ground.
Summary of Contents for B0-012-10
Page 2: ......
Page 26: ...TAYLOR DUNN...
Page 53: ...Maintenance Service and Repair Steering Page 15 Exploded View of Steering Gear...
Page 54: ...TAYLOR DUNN...
Page 72: ...TAYLOR DUNN...
Page 85: ...Maintenance Service and Repair F2 F3 Transmission Page 13 EXPLODED VIEW...
Page 86: ...TAYLOR DUNN...
Page 94: ...TAYLOR DUNN...
Page 100: ...TAYLOR DUNN...
Page 106: ...TAYLOR DUNN...
Page 116: ...TAYLOR DUNN...
Page 172: ...Illustrated Parts Parts Page 2 Front Axle...
Page 176: ...Illustrated Parts Parts Page 6 STEERING...
Page 178: ...Illustrated Parts Parts Page 8 STEERING GEAR...
Page 180: ...Illustrated Parts Parts Page 10 PARK BRAKE...
Page 182: ...Illustrated Parts Parts Page 12 DEADMAN SEAT BRAKE optional...
Page 184: ...Illustrated Parts Parts Page 14 MASTER CYLINDER BRAKE LINKAGE...
Page 186: ...Illustrated Parts Parts Page 16 HYDRAULIC BRAKE LINES...
Page 188: ...Illustrated Parts Parts Page 18 FRONT BRAKES optional REAR BRAKES...
Page 195: ...Illustrated Parts Parts Page 25 This page intentionally left blank...
Page 202: ...Illustrated Parts Parts Page 32 POWER TRACTION DRIVE...
Page 204: ...Illustrated Parts Parts Page 34 REAR DIFFERENTIAL...
Page 208: ...Illustrated Parts Parts Page 38 Tires Wheels 10 Ref wheel hub 1 2 5 assembly 4 3 6 7 8 9...
Page 210: ...Illustrated Parts Parts Page 40 CONTROL PANEL...
Page 212: ...Illustrated Parts Parts Page 42 CONTROL PANEL EE...
Page 216: ...Illustrated Parts Parts Page 46 DECALS MISCELLANEOUS STANDARD PARTS...
Page 218: ...Illustrated Parts Parts Page 48 MISCELLANEOUS STANDARD PARTS Cont d...
Page 220: ...Illustrated Parts Parts Page 50 Options...
Page 222: ...Illustrated Parts Parts Page 52...
Page 224: ...Illustrated Parts Parts Page 54...
Page 226: ...Illustrated Parts Parts Page 56...
Page 228: ...Illustrated Parts Parts Page 58...
Page 230: ...Illustrated Parts Parts Page 60...
Page 232: ...Illustrated Parts Parts Page 62...
Page 234: ...Illustrated Parts Parts Page 64...
Page 238: ...Illustrated Parts Parts Page 68...
Page 244: ...Illustrated Parts Parts Page 74...
Page 246: ...TAYLOR DUNN...

