background image

TSR 5200 HDD 


Advanced Settings 

55 

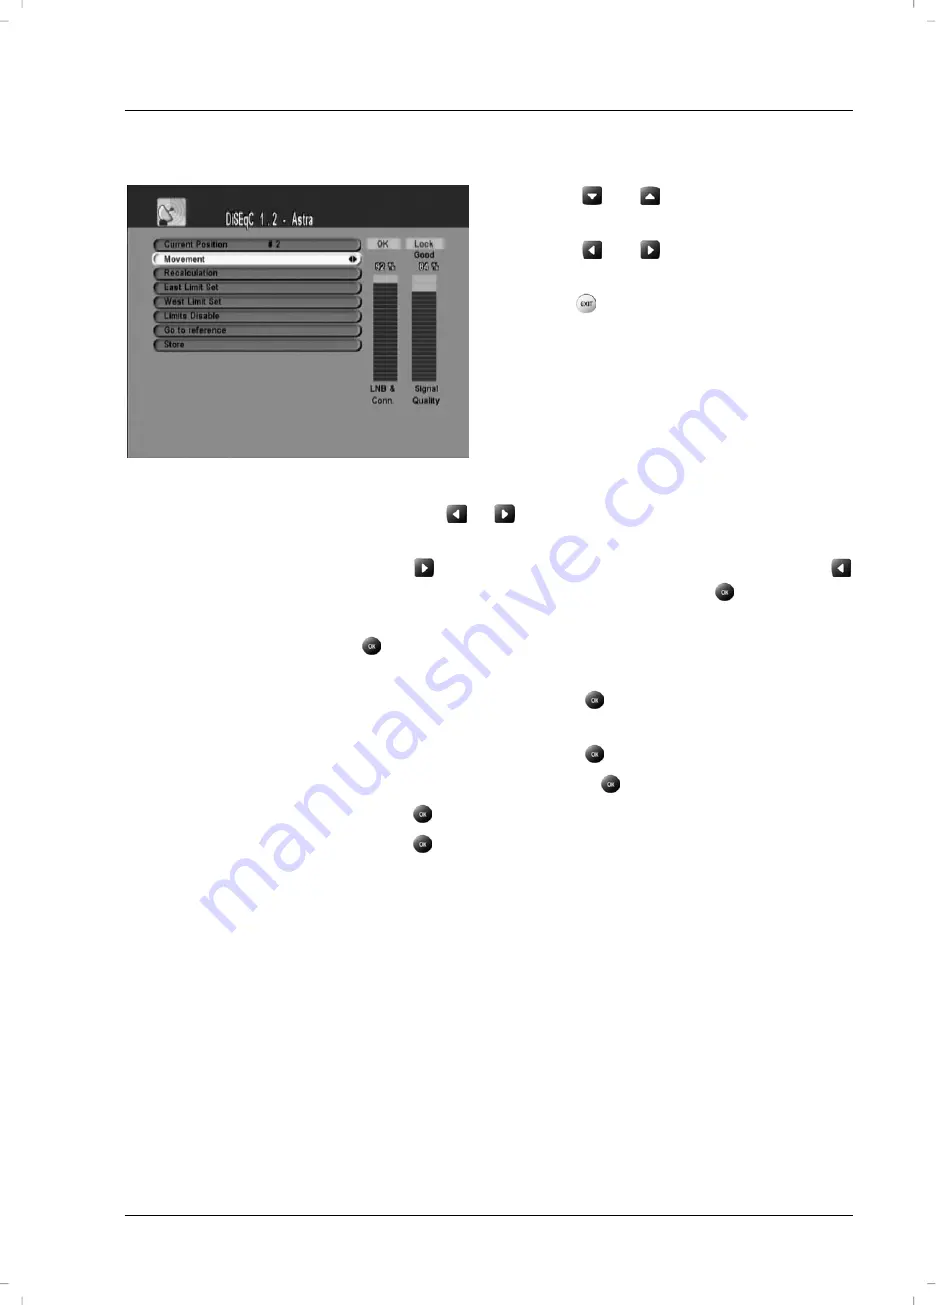
Positioner Control via DiSEqC 1.2 


-

 Press


 or 

 to select the desired 

menu item. 

-

 Press


 or 

 to select the desired 

setting. 

-

 Press 

 to exit the menu. 


The following settings are available: 

Current position 

Press the


 or 

 buttons to choose the position. Positions 

0-26 are preset, positions 27-49 are user-defined. 

Movement Press 

 to turn the satellite antenna to the West or press 


to move East. To stop the movement, press 

Recalculation 

Recalculates the position for all satellites. To do this, press 

East Limit Set 

Move the satellite antenna to the furthest easterly position. 
To save this position, press 

West Limit Set 

Move the satellite antenna to the furthest westerly position. 
To save this position, press 

Limits Disable 

To delete the limits set, press 

Go to reference 

Press 

 to move to the reference point. 

Store Press 

 to save all settings. 


Summary of Contents for TSR 5200 HDD

Page 1: ...ut video 12 CVBS output video 13 YPbPr output video 14 Input for terrestrial antenna signal 15 Scart output TV 16 IF 1 output 17 IF 1 input 18 Power switch 19 Audio output left right 20 Antenna signal...

Page 2: ...unit safe for transport and in plain packaging please send it for warranty processing with the RMA noted on the outside of the package to the address given to you by our hotline employee After receivi...

Page 3: ...NAS 5 CONNECTING TO TV 6 SCART EURO AV CONNECTOR 6 COAXIAL TV ANTENNA CONNECTOR 7 VIDEO CONNECTOR 7 S VHS CONNECTOR 7 COMPONENT CONNECTOR 8 CONNECTING TO A VIDEO RECORDER 9 CONNECTING TO A VIDEO RECOR...

Page 4: ...25 FAST FORWARD AND REWIND 25 SLOW MOTION FORWARD AND REWIND 25 STEP BY STEP PLAYBACK FORWARD BACKWARD 25 PAUSE 25 STOPPING PLAYBACK 25 BOOKMARKS 26 INSERTING BOOKMARKS 26 GOING TO A BOOKMARK 26 DELE...

Page 5: ...ING 43 SYSTEM INFORMATION 43 MENU LOCK 43 FINDING THE SATELLITE 44 THE HARD DISK 45 FORMATTING THE HARD DISK 45 SAVING THE CHANNEL LIST ON THE HARD DISK 46 UPDATING THE CHANNEL LIST ON THE HARD DISK 4...

Page 6: ...S 60 EDITING TRANSPONDERS 61 TRANSFERRING SOFTWARE 62 SYSTEM UPGRADE 62 EXCHANGING DATA WITH THE PC 64 USING THE REMOTE CONTROL WITH OTHER DEVICES 65 APPENDIX 66 CLEANING AND TROUBLESHOOTING 66 CLEANI...

Page 7: ...hould be positioned in a way that assures unobstructed access to the wall outlet so that the power plug can be immediately pulled out in an emergency situation To avoid the danger of fire if the devic...

Page 8: ...ted to the product be sure that the antenna system is grounded so as to provide sufficient protection against voltage surges and built up static charges If you are not using the device within the Repu...

Page 9: ...arately from household waste at established bodies Avoid damaging the environment and danger to your personal health by disposing of the device properly This device fulfils all that relates to CE Conf...

Page 10: ...e satellite antenna is not grounded power surges may occur which can damage the device and can cause a build up of static electricity Single user satellite system To use this system with a single user...

Page 11: ...shown in the following figure Two Satellite Antennas If you are using two different satellite antennas connect the coaxial cable of the first satellite antenna to the connector labelled IF 1 INPUT 17...

Page 12: ...pages Scart Euro AV connector Plug the Scart cable into the upper Scart jack of the TSR 5200 HDD labelled SCART 1 TV 15 Insert the other end of the Scart cable into the Scart jack of the TV The pictur...

Page 13: ...u are additionally using a video recorder via the antenna cable make sure that its output frequency is not tuned to channel 38 If this is the case select another output frequency for the video recorde...

Page 14: ...Many modern TVs and projectors have this means of connection If required connect the component connector 13 to the connector jack of your TV or projector using a triple cinch cable Please note that on...

Page 15: ...the video recorder Connecting to a Video Recorder using a Coaxial Cable If your video recorder has no Scart jack you can also connect the TSR 5200 HDD to the video recorder using a coaxial cable To d...

Page 16: ...ch on the power switch on the back of the device Inserting the Batteries Insert the supplied batteries type LR03 size AAA into the remote control Be sure to respect the polarity The polarity is indica...

Page 17: ...on the back of the device to 0 see figure on page 10 Getting Started Please note that when you next switch on the device using the power switch 18 on the back of the TSR 5200 HDD it will take a few m...

Page 18: ...Setting the Time In order to be able to enter the correct time for recording you must set the clock in your satellite receiver The TSR 5200 HDD receives the current time from the respective programme...

Page 19: ...13 Select the desired setting with the and buttons Press the and buttons to alter the respective settings or enter the data using the numeric keypad Press to exit Time Setting the changes will be save...

Page 20: ...Menu is as follows Press the button on the remote control to go to the Main Menu Select the menu option User Setup using the or buttons Press to go to the User Setup menu Aspect Ratio In this menu yo...

Page 21: ...ight and left hand sides Select the Display Mode menu option with or Press or to change between Full and LetterBox or between Full and Center Press to exit User Setup the changes will be saved TV Type...

Page 22: ...ssword the Restart Change Output to RGB message appears Whilst restarting the display 6 on the front side of the device shows the booting information Restarting takes about 35 seconds CVBS Color Video...

Page 23: ...1 9 with and Select the menu option Week Mode with or and then either Once Daily or Weekly with and If you have chosen weekly recording you can select the day in the next line Select the menu option W...

Page 24: ...the PAL G PAL K PAL I and NTSC standards Press to exit User Setup the changes will be saved Modulator Channel The modulator channel determines the frequency that the TSR 5200 HDD outputs to its antenn...

Page 25: ...lower transparency and 70 higher transparency Select the OSD Transparence menu option with or Press or to select a value between 5 and 70 Press to exit User Setup the changes will be saved OSD Timeout...

Page 26: ...u displayed on screen press as many times as necessary until all menus have been closed The currently tuned in TV channel will appear Press to go to the All Channels menu Press or to select the desire...

Page 27: ...ected favourite channels Press or to select the desired channel Press to enable the selected channel the menu Favorites will close automatically By default the favourite list contains the groups ALL N...

Page 28: ...proceed as follows Press the button on the remote control to go to the Main Menu Press or to select the menu item Channel Edit Press to go to the Channel Edit menu Press or to select the menu item Fa...

Page 29: ...ss to save the new name or press EXIT to cancel and go back Press to exit the menu Select to save your setting or to quit the menu without saving any changes Programming Favorites You can add custom c...

Page 30: ...sing once again will remove that channel from the favourite list Repeat the above steps to add more channels to the favourite list Press to exit the menu Select to save your setting or to quit the men...

Page 31: ...the remote control to resume playback Slow Motion Forward and Rewind Pressing the button 36 on the remote control repeatedly will decelerate playback to 1 2 1 4 and 1 8 Pressing the button 35 on the r...

Page 32: ...PIP Picture In Picture allows you to display a second TV channel while viewing another one This function will only be available while both tuners of the TSR 5200 HDD are receiving a signal If you have...

Page 33: ...on the remote control to select the desired setting Press to enable the selected setting Press or to select a channel from the table Press to enable a channel To finish this display mode press After e...

Page 34: ...available for all channels when using a single user antenna system only To record the second show proceed as for the first show Stopping Recording Press the button 32 on the remote control to stop rec...

Page 35: ...It depends on the station whether this information is available or not Press or to select the desired day Press or to select the desired programme Press 31 to program the selected TV show A popup stat...

Page 36: ...nt and the following seven TV channels The current programme is marked in green Press and to move the yellow marker to select a programme Here you can also press 31 to program the selected show Procee...

Page 37: ...lect the menu option Prerecording and press or to DISABLE the function all TV programme specific data will be erased Select the menu option Save using the or buttons and press to confirm The event num...

Page 38: ...the recording date by pressing or on the remote control or by using the numeric keys if you have selected the Recording Mode Daily this option won t appear if you have selected Weekly press or to ent...

Page 39: ...will be occupied until the specific programmed recording has been completed or erased If you want to add further programmed recordings select a new free event number and repeat the above steps Editin...

Page 40: ...r the new name and to overwrite the existing name Press to enter the selected character Repeat the above steps until you have written the full name Press or to move the cursor to the field OK and pres...

Page 41: ...c scenes out of a recording Press the button on the remote control to go to the Main Menu Select the menu option HDD Interface using the or buttons Press to go to the HDD Interface menu Select the men...

Page 42: ...n the monitor window Press 24 to set the beginning of the segment Press 26 to set the end of the segment Press 23 to confirm your selection if you made a mistake you can press 25 to remove the defined...

Page 43: ...ack through the TV set Listening to the Radio Press 8 on the remote control to switch to radio mode Radio Station Settings To configure any radio station proceed as described for TV stations Please no...

Page 44: ...ption for radio stations is equivalent to those of the TV stations see page 40 Editing TV Channels Recording Radio Broadcasts If you want to record a radio programme proceed as for recording TV shows...

Page 45: ...older or music title Press to open the selected folder or press 42 to play the selected music title Press 32 to stop playback Press to exit the menu Press the button when a music title has been highli...

Page 46: ...nnel Edit Press to go to the Channel Edit menu Select the menu option TV Channel using the or buttons Press and enter the password using the numeric keypad the factory default password is 0000 to open...

Page 47: ...lete Delete channel Sort Alphabet Sorts the channels alphabetically Sort FTA SCR Sorts the channels by code Sort P_Lock Sorts the channels by child lock Sort TP Sorts the channels by transponder order...

Page 48: ...ol Here you can change the PIN code Select Parental Control from the System Setup menu see above and press on the remote control Enter the current PIN code the default PIN code is 0000 If entered corr...

Page 49: ...reboot This process may take a few minutes System Information Here you can view the current software version and the system date of your TSR 5200 HDD Select System Information from the System Setup m...

Page 50: ...to the Antenna Setup menu Select the menu option Satellite using the or buttons Press and then press or to select the desired satellite our example shows ASTRA Orientate your satellite antenna to the...

Page 51: ...rd disk drive This function allows you to erase all data from the hard disk and to restore its factory default configuration All recording channel lists and software data stored on the hard disk will...

Page 52: ...he backup file and the word Success will appear after a while Updating the Channel List on the Hard Disk If you want to restore a previously saved channel list or if you have obtained a new channel li...

Page 53: ...nded that you backup the channel list before executing this procedure see page 46 Saving the Channel List on the Hard Disk so you can restore it after the process is completed see page 46 Updating the...

Page 54: ...page 27 Time Shift Function Later you can resume the TV show from where you have paused it The entire broadcast from the time of pausing will be temporarily saved on the hard disk To use the Time Shif...

Page 55: ...anel door To open the front panel door press the marking on the upper part of the door To configure the card proceed as follows Press the button on the remote control to go to the Main Menu Select the...

Page 56: ...satellite antenna input connector only on the TSR 5200 HDD Tuner 2 Uses the second tuner IF 2 INPUT 24 Use this setting if you are using only the second satellite antenna input connector on the TSR 52...

Page 57: ...ions Universal 1 Universal 2 Single SL Single SH and Standard This setting will determine the local LNB frequency that will be shown in the following line Universal 1 A Universal LNB receives in the l...

Page 58: ...kHz signal for switching the frequency band but for switching different satellite positions Select the menu option 22kHz using the or buttons Select the menu option ON or OFF using the or buttons Pres...

Page 59: ...y when using multiple satellite antennas or multi feed systems one antenna with multiple LNBs that are interconnected via a multi switch OFF DiSEqC is disabled DiSEqC is not necessary when using a sin...

Page 60: ...nder using the or buttons Press to exit the menu the changes cannot be saved This function is for monitoring purposes only While configuring the TSR 5200 HDD for your satellite antenna system you can...

Page 61: ...ed Movement Press to turn the satellite antenna to the West or press to move East To stop the movement press Recalculation Recalculates the position for all satellites To do this press East Limit Set...

Page 62: ...the numeric keys My Latitude Enter the latitude via the numeric keys Reference Position Save the present position as reference Move Start the desired movement by pressing Store Save the present positi...

Page 63: ...option Installation using the or buttons Press to go to the Installation menu Press or to select the menu option Scan Mode and then a combination of FTA SCR and D see above description Press the butto...

Page 64: ...7 and press on the remote control To control the Network Scan proceed as for the Transponder Scan see above This function allows you to search for other stations if the selected transponder contains i...

Page 65: ...ans packet identifier The video PID is a three to four digit number determining the channel to be received from the transponder This is only required for TV stations as the video PID is only used for...

Page 66: ...he remote control Press or to select the desired satellite Press Press or to select the desired setting Press Press several times to exit all menus The following settings are available Rename From her...

Page 67: ...ss to open a menu showing the transponder settings Press or to select the desired setting Enter the numbers via the numeric keys switch the polarity pressing and Press to quit the menu without saving...

Page 68: ...ou can load the latest device software directly from the satellite You can have the system do this automatically or you can manually specify the transponder if you know the location of the upgrade Sel...

Page 69: ...at any time press As soon as all data has been loaded the TSR 5200 HDD will restart After your TSR 5200 HDD has restarted you have to restore the factory default configuration in order for the new so...

Page 70: ...ear on the front panel display 6 On your PC open My Computer The hard disk will appear as a new storage device and you will be able to copy or delete data movies recordings music etc For music titles...

Page 71: ...seconds enter the code for your TV set if there is more than one code for the manufacturer of your TV set use the first code that appears in the list 4 If the code is correct the TV set will power of...

Page 72: ...ains and have been powered on Check if all connection cables are free of damage and seat properly in the respective jacks on the TSR 5200 HDD and the TV set When using a coaxial cable make sure that t...

Page 73: ...perly into the remote control and they are charged To verify replace the batteries Check if you have pressed a function key for a different device the active function key blinks when operating the rem...

Page 74: ...umption max 500mA overload protection 22kHz signal 22 kHz 1 kHz Amplitude 0 6V 0 2V DiSEqC switch Compatibility Version 1 3 Demodulation QPSK Symbol rate 1 45 Msps SCPC MCPC Viterbi decoder rate 1 2 2...

Page 75: ...I NTSC Preset channel CH 38 can be changed via menu Card slots PCMCIA 2 CI slots Front panel 4 digit display Channel indicator 8 buttons Stand By Channel up down Menu Exit OK Volume up down Back panel...

Page 76: ...TSR 5200 HDD Appendix 70 Device codes TV sets...

Page 77: ...TSR 5200 HDD Appendix 71 TV sets...

Page 78: ...TSR 5200 HDD Appendix 72 TV sets...

Page 79: ...TSR 5200 HDD Appendix 73 TV sets...

Page 80: ...TSR 5200 HDD Appendix 74 TV sets...

Page 81: ...TSR 5200 HDD Appendix 75 TV sets...

Page 82: ...TSR 5200 HDD Appendix 76 TV sets...

Page 83: ...TSR 5200 HDD Appendix 77 TV sets...

Page 84: ...TSR 5200 HDD Appendix 78 TV sets...

Page 85: ...TSR 5200 HDD Appendix 79 TV sets...

Page 86: ...TSR 5200 HDD Appendix 80 TV sets...

Page 87: ...TSR 5200 HDD Appendix 81 TV sets...

Page 88: ...TSR 5200 HDD Appendix 82 Video recorders...

Page 89: ...TSR 5200 HDD Appendix 83 Video recorders...

Page 90: ...TSR 5200 HDD Appendix 84 Video recorders...

Page 91: ...TSR 5200 HDD Appendix 85 Video recorders...

Page 92: ...TSR 5200 HDD Appendix 86 DVD Players...

Page 93: ...TSR 5200 HDD Appendix 87 DVD Players...

Page 94: ...TSR 5200 HDD Appendix 88 DVD Players...

Reviews: