background image

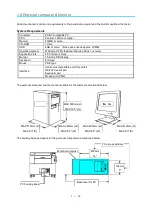
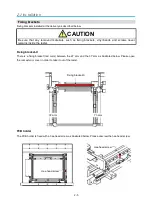
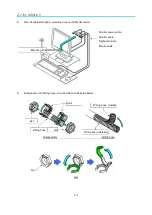
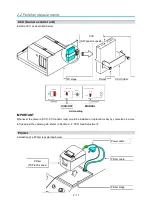
 2-2 Peripheral equipments

2 - 12

Wiring connection

 All wiring connection of peripheral equipments is described below.

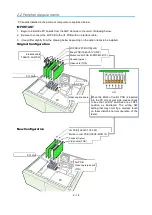
Original Configuration

(DC12V TM13)

Terminal

CCD

Camera power cable

VM2-20(TTG)

Video cable (TOS) BS-631(TTG)

Connect

Camera cable

CCU

Vision card (TOS/TTG)

Motion control PCB (JAPMC-MC2110)

(ZPCIOO1T@L00)

I/F PCB TAKAYA TVX-30P

VME relay cable

Motor driver (X4)

LS-470-01

Relay cable

Printer (TSP-600 series)

Monitor

Keyboard

Mouse

PC

Monitor cable

Power cable

Mouse relay cable

Printer cable

(Option)

Power cable

M

5

  cable

Terminal

(TM3)

Terminal

(TM3)

VME PCB

TAKAYA TVX-30V

Keyboard relay cable

Power cable

I/O PCB

LS-431-02

Video cable (TOS)

Summary of Contents for APT-9411 Series

Page 1: ...F F i ix xt tur ure ele less Te ss Test ste er r A AP PT 94 T 941 11 S 1 Se er ri ie es s Se Ser rv vi ic ce e M Ma an nu ua al l TAKAYA CORP TAKAYA CORP...

Page 2: ......

Page 3: ......

Page 4: ...AKAYA TVX A TVX 30Z 30Z 2 4 2 4 Safe Safe cover cover opening opening position position Additional explanation on the procedure for sw Additional explanation on the procedure for switching the Safe co...

Page 5: ......

Page 6: ...by any means without the express written permission of TAKAYA Corporation 3 The content in the service manual shall be changed without any advance notice Composition of a manual Specification It descr...

Page 7: ...s DANGER Calls attention to a procedure practice or condition that could possibly cause serious accident or death WARNING Calls attention to a procedure practice or condition that could possibly cause...

Page 8: ...Monitor 1 12 1 5 Accessories 1 13 2 Installation 2 1 Tester Movement 2 2 Height adjustment 2 3 Level pad 2 3 Level surface 2 4 Release fittings 2 5 Monitor base 2 6 2 2 Peripheral equipments Personal...

Page 9: ...s drivers Type Type and and position position 3 16 3 16 Fixed method 3 17 Fixed method 3 17 Connect Connect 3 17 3 17 Setup Setup of of SW SW 3 18 3 18 4 Electric diagrams 4 Electric diagrams 4 1 4 1...

Page 10: ...Y2 3 slid slid base base 5 5 23 23 Probe 1 4 5 25 Probe 1 4 5 25 Probe 2 3 5 27 Probe 2 3 5 27 IC IC open open Option Option 5 29 5 29 Camera Camera LED LED lamp lamp 5 31 5 31 5 4 5 4 PCB PCB holder...

Page 11: ...ns 1 1 1 1 Dimensions Dimensions and and weight weight 1 2 1 2 1 2 1 2 Names Names and and function function of of parts parts Exterior Exterior 1 3 1 3 XY arm 1 5 XY arm 1 5 Z Z arm arm 1 7 1 7 PCB P...

Page 12: ...ke them into account especially when this is your first time installation or movement Dimensions Weight Dimensions W1370mm 54 X D1270mm 50 X H1300mm 51 cm Weight Approx 1 000Kgs 690mm 27 1370mm 54 127...

Page 13: ...below Emergency stop SW Reset SW Operation panel Tester terminal PC access window Earth terminal Power ON lamp Monitor Power SW Clamp lever Mouse Keyboard Cover SW Right side Cover SW Left side Person...

Page 14: ...have versatile measurements Personal computer Mail controller to manage the whole product Page 1 12 Personal computer Monitor Page 2 10 Personal computer Monitor Displaying the system software Mouse...

Page 15: ...tor Y1 sensor Y2 sensor Y4 sensor Y3 sensor X1 2 stopper X3 4 stopper X2 3 stopper X1 stopper X4 stopper X2 sensor X3 sensor X1 sensor X4 sensor X4 cover plate X2 cover plate X3 cover plate X1 cover p...

Page 16: ...s to turn on and off the Home sensors X1 2 stopper X2 3 stopper X3 4 stopper Mechanical stopper to prevent each axis from an unexpected clash with others X1 stopper X4 stopper Mechanical stopper to pr...

Page 17: ...obe pin Cable holder Fitting to hold on a probe wire Sensor Home sensor for Z arm Page 3 15 Position of sensors Cover plate Plate for turning on and off the Home sensor Camera For capturing the board...

Page 18: ...tor needle It indicates the width cm between the front and the rear PCB holder Handle Used for moving the rear PCB holder back and forth directly Bottom probe Probe accessible to the PC boards from th...

Page 19: ...ction of the parts inside the chassis are explained below Motor driver PCU rack Measurement rack Noise filter CCU camera Safe relay board Down transformer Noise filter Personal computer Terminal 14 Te...

Page 20: ...er panel Power panel for measurement unit Switching power supplies etc Safe relay board Safe relays etc Page 4 1 Electric part layout Motor driver For X Y Z axis Page 3 16 Motor drivers Measurement ra...

Page 21: ...on the back This serial number will be necessary for efficient maintenance service Be sure to tell us the serial number whenever the maintenance parts or some optional items would be required M A DE I...

Page 22: ...re Expansion slots 4 PCI slots or more Monitor 15 inch LCD display Keyboard Full type Mouse PS 2 type Centronics compatible port for printer RS 232C serial port Keyboard port Interface Mouse port PS 2...

Page 23: ...Probe wire TAKAYA LS 457 01 4 Probe 2 3 5 Probe pin PTP 2N1LLM 3R 2 6 Cable holder 2 Bottom probe 7 Test lead cable TLA 201 1 8 Back up pin SP 0101 7 9 Operation manual 1 10 Tool box 1 11 Hexagon wren...

Page 24: ...able height margin 2 3 Leveling pad 2 3 Leveling the tester 2 4 Fixing brackets 2 5 Monitor base 2 6 2 2 Peripheral equipments Personal computer 2 10 CCU 2 11 Printer 2 11 Wiring connection 2 12 2 3 C...

Page 25: ...ANGER Never fail to use the fork lift that supports the weight of the tester and deal with the frame size In addition be sure to insert the forks near the center of the tester until they reach to the...

Page 26: ...ust the leveling pads is explained below CAUTION In order to level the tester adjust the four leveling pads equipped under the chassis little by little carefully The iron bar 10 is in the tool box del...

Page 27: ...n 1 as indicated in the figure below 2 Adjust Adjuster bolts while checking that the tester stands on the floor in parallel within the tolerance of 0 1mm 1000mm 3 Put a water level on the position 2 4...

Page 28: ...never remains inside the tester Fixing bracket X There is a fixing bracket red color between the 2Y arm and the 3Y arm as illustrated below Please open the rear exterior cover in order to take it out...

Page 29: ...itor on the Monitor base and fix it with Monitor brackets 3 Install the keyboard on the Keyboard base and fix it with Keyboard brackets 4 Put the mouse on the Keyboard base Keyboard bracket Press Mous...

Page 30: ...le on the Monitor base 6 Break down into Wiring hose Joint and Nut as illustrated below Disassembly Wiring hose Nut Wiring hose Nut Joint Nut Wiring hose Outside Wiring hose Inside Nut Monitor power c...

Page 31: ...hose Inside and cover it with the Wiring hose Outside 8 Install the Nuts at both ends of the Wiring hose 9 Put the Nut on the cables Cable Joint Joint Wiring hose Wiring hose Inside Wiring hose Insid...

Page 32: ...put the Nut on the cables inside the Side cover 12 Fix the Wiring hose to the side cover with the Nut as illustrated below 13 Refer to Section 2 2 Peripheral equipments for the cable connection Joint...

Page 33: ...l trouble Remove Front cover to draw PC stage out of the tester and place a personal computer there Refer to 1 4 Personal computer Monitor for the maximum size of the personal computer IMPORTANT After...

Page 34: ...00B CCU setting IMPORTANT Whenever the camera CCD CCU and or lens would be installed or replaced locally by yourselves be sure to fine adjust the camera gain Refer to Section 2 4 CCD Gain Adjustment P...

Page 35: ...Connect Camera cable CCU Vision card TOS TTG Motion control PCB JAPMC MC2110 ZPCIOO1T L00 I F PCB TAKAYA TVX 30P VME relay cable Motor driver X4 LS 470 01 Relay cable Printer TSP 600 series Monitor K...

Page 36: ...card TOS TTG Motion control PCB JAPMC MC2110 I O PCB TAKAYA TVX 30Z VME relay cable Motor driver X4 Printer TSP 600 series Monitor Keyboard Mouse PC Monitor cable Power cable Mouse relay cable Printer...

Page 37: ...ation Video capture board When the Motion Control PCB is inserted into the PC slot at your side please check to see that all DIP switches are at OFF position as illustrated The wrong SW setting that m...

Page 38: ...2 Peripheral equipments 2 15 Terminal TM 3 14 is explained below NOTE Refer to 1 2 Names and function of parts for the terminal TM 3 14 TM3 200V 220V 240V TM14 100V AC FG AC FG Size 6 6mm max 3 2mm mi...

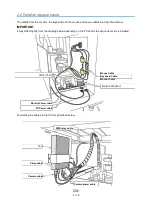
Page 39: ...T It may differ slightly from the drawing below depending on the PC and or the option items to be installed Connecting the cables to the CCU is described below CCU Camera cable Video cable Camera powe...

Page 40: ...ms to be installed Rear PC Original Configuration PC Slots Video cable Vision card VME relay cable I F PCB TAKAYA TVX 30P M Motion control PCB JAPMC MC2110 Monitor cable Printer cable Mouse relay cabl...

Page 41: ...2 2 Peripheral equipments 2 18 New Configuration PC Slots M5cable VME relay cable Vision card TOS Motion control PCB JAPMC MC2110 I O PCB TAKAYA TVX 30Z Video cable TOS...

Page 42: ...elocated to another place where they have another local power source verify the AC power source matches the input voltage setting preset in the tester The transformer could be visible from the right s...

Page 43: ...r cable has different length and nose shape depending on the user specifications It is always necessary to earth the Earth terminal on the rear tester using a thick wire 0 75mm or more except the case...

Page 44: ...in the tester 1 CAUTION The Camera adjustment jig is assembled precisely to minimize the mechanical tolerance in the testers So never disassemble this Camera Adjustment Jig otherwise unscrew except tw...

Page 45: ...the PCB width lock lever and the Clamp lever Refer to Fig 1 NOTE The Camera Adjustment Jig Table must be set under the lens installed on Probe 4 6 Push the Camera Adjustment Jig Table against the fron...

Page 46: ...serious trouble Fig 3 11 Drive the CCD in the lens tightly Refer to Fig 4 12 Loose the CCD bit by bit and fix it temporarily at the position where Directional line indicating the direction of the CCD...

Page 47: ...target in parallel with the Marker on the Camera Adjustment Jig Slider Then fix the Camera bracket 2 with the Allen screw tightly Refer to Fig 7 NOTE In addition please make sure Position check line...

Page 48: ...is installed correctly But if they don t get together it is necessary to adjust the camera focus according the process described in the next page Fig 9 18 Drive the Lock nut in the CCD tightly Refer t...

Page 49: ...to Fig 3 NOTE We suppose it s convenient to use a rule for this adjustment Refer to Fig 4 Fig 3 Fig 4 3 Loose two Allen screws which fix the Camera bracket 1 Refer to Fig 5 4 Fine adjust the height o...

Page 50: ...ig Slider toward the 4Y axis 7 Rotate the coupling Silver block for the 4Y axis until the lens head touches the Camera Adjustment Jig Slider lightly Refer to Viewed from Arrow A in Fig 8 8 Drive Knob...

Page 51: ...ding to the following procedure Operating procedures 25 Power on the tester to boot up the APT system software 26 Open the lid and put the Gain adjustment plate on the test position Refer to Fig 1 IMP...

Page 52: ...fer to Fig 5 34 Turn the GAIN VR carefully with a standard screw driver in order to adjust the histogram value on the Optical data review menu NOTE Turning the VR clockwise the histogram value will be...

Page 53: ...opening position of the Safety cover by relocating Gas spring joints that are installed at both sides of the Safety cover Operating step Remove flanged nut that fixes the Gas spring joint to the Safe...

Page 54: ...ing printer paper 3 5 3 3 Replacing probe pin Probe 1 4 3 8 Probe 2 3 3 9 Bottom probe 3 10 3 4 Replacing probe wire Probe 1 4 3 11 Probe 2 3 3 12 3 4 IC open Replacing sensor probe 3 13 Replacement o...

Page 55: ...ssibly cause bodily injury or mechanical trouble CAUTION Once grease run out the moving speed may not only go down but also the probe contact accuracy may decrease due to the increased friction As the...

Page 56: ...tion with cloth or the brush Li Soap grease lubricant We will give a simple explanation as to how the mechanical parts on the Z axes should be lubricated with grease Parts Position Method Type LM guid...

Page 57: ...lanation as to how the mechanical parts on the PCB holder unit should be lubricated with grease Parts Position Method Type LM guide Rail Direct application with cloth or the brush Li Soap grease lubri...

Page 58: ...Opening the top cover or touching Cover open lever is strictly prohibited any time when it is printing the data In addition as the printer head and its surrounding parts get very hot during and right...

Page 59: ...3 2 Printer 3 6 2 Put a roll of printer paper into the printer as shown below 3 Draw a tip of the printer paper out of the printer Draw out Printer paper Direction of printer paper Printer paper...

Page 60: ...4 Close the top cover by pushing both ends down CAUTION Be sure that the top cover was fully closed and either side of the top cover is not open 5 Pull the chip of the roll paper and cut it out Printe...

Page 61: ...the probe holder 5 Exchanges the probe with a new one 6 Put the probe socket back in the probe holder and fix it again NOTE Pay attention to the direction of installing the robe socket Refer to the dr...

Page 62: ...he hex head screw to pull the probe socket out of the probe holder 5 Exchanges the probe with a new one 6 Put the probe socket back in the probe holder and fix it again NOTE Pay attention to the direc...

Page 63: ...care should be paid to the keen edged head of the probes to be replaced Otherwise it may be an injury to your body 1 Pull the probe out of the socket using needle nose pliers so on 2 Insert a new prob...

Page 64: ...obe 1 4 is TAKAYA LS 458 01 L 280mm 6 Install the probe wire up to the PCB in the direction which a figure below directs 7 Put two Markers attached on the probe wire between cable holders Two position...

Page 65: ...probe wire to the probe and install the probe holder NOTE Probe wire for Probe 2 3 is TAKAYA LS 457 01 L 310mm 6 Install the probe wire up to the PCB in the direction which a figure below directs 7 P...

Page 66: ...Probe 3 on the system and press TEST START SW Probe moves to the front side9 2 Open the safe cover 3 Unscrew the hex head screw and remove the sensor probe 4 Disconnect a connector of the sensor prob...

Page 67: ...g sensor probe 3 14 6 Fix the Sensor probe cable with the Cable holder ASSY 7 Close the Safe cover then select Close and press RESET SW TEST STOP SW Cable holder ASSY Fix the Sensor probe cable here S...

Page 68: ...e it any more Also pay much attention to the mounting direction See below How to install 1 Fit the CS8000 S21 in the pins at the sensor probe after faced its green side in the direction where the cabl...

Page 69: ...tric sensors carelessly nor vary the position intentionally because it may cause a serious accident Prior authorization must be obtained from the manufacturer before they would be replaced and or repo...

Page 70: ...he model name of these motor drivers are shown blow Model name of motor driver The model name and the serial number are written on the product as shown below Position of Model name Position of Serial...

Page 71: ...the switch positions according to instruction in following page To access the screw to remove or install the motor driver used a Philips screw driver No 2 with 130mm length or more Wiring Cable connec...

Page 72: ...on the motor driver as shown below SW 1 and SW2 The switches setting for each motor driver depend on the moving axis that it is used as follows IMPORTANT Your change of the SW setting could be valid j...

Page 73: ...s layout Major electric parts 4 2 Switching power supplies 4 3 Motor drivers 4 3 PCBs 4 4 4 2 Circuit diagram System block connection diagram 4 5 Power supply circuit diagram 4 7 Emergency connection...

Page 74: ...es relays terminals and power supplies is introduced below C SW1 XCS PA591 C SW2 XCS PA591 E SW1 RESET C B1 GV2 M14 TM14 C B4 GB2 CB06 1A C B3 GB2 CB09 4A TM3 TM2 TM7 TM8 N F2 MZ2 1206 33 TM13 N F1 MZ...

Page 75: ...drivers Physical layout of motor drivers is introduced below P S6 RWS30A 5 A P S7 JWS50 24 A P S8 RWS30A 12 A P S5 JWS100 24 A P S4 RWS15A 48 A P S3 RWS15A 15 A P S2 RWS30A 15 A P S1 JWS50 5 A Motor...

Page 76: ...ion TAKAYATVX 12E 10 Coaxial Scanner PCB Option TAKAYATVX 12M 11 Extension Scanner PCB Option TAKAYATVX 14 12 Programmable DC Power Supply PCB Option TAKAYATVX 13M 13 PCU rack 0 Receiver PCB TAKAYA TV...

Page 77: ...N3 CN2 TVX 30V PCI V ME I F CN5 CN3 CN4 CN2 CN1 TVX 35R Recei ve P C B Sensor Contr ol P C B TVX 36M CN3 CN4 CN5 6 CN7 8 ADC P C B CN1 CN2 4 2 Circuit diagram 4 6 New Configuration PCI I F CN1 TVX 30Z...

Reviews: