background image


Annex


9—8


9.3


Assemble


divided


rotor


for


DV


60,


DV


80,


DV


100,


DV


120


og


DV


150


Summary of Contents for Danvent DV

Page 1: ...4 Annex 4 12 for the User Manual Air handling units Danvent TIME and Danvent DV With control system Version 1 01 04 Master for translated versions of annex 4 12 Original version for this air handling...

Page 2: ...ction number Annex 2 Technical data unique data for every unit Annex 3 Spare part lists Annex 13 for the User Manual printed on separate pages delivered with the unit Annex 13 Commissioning protocol p...

Page 3: ...8 2 Mount rails Units of size 10 15 20 and 25 8 2 8 3 Mount rails Units of size 30 and units larger than size 30 8 2 8 4 Roof overhang along the long sides of the unit 8 3 8 5 Calculation of the over...

Page 4: ...ce 10 3 10 15 Manual operation 10 3 10 16 Running hours and hotgas activations 10 3 10 17 Alarm 10 3 10 17 1 Alarm 10 3 10 17 2 Alarm Log 10 4 10 18 Modified software in Danfoss frequency converter fo...

Page 5: ...Bilag 4 1 Assemble base frames height 150 mm for units sizes 10 40 Annex 4 A Corner B Splice C Length profile D Width profile...

Page 6: ...2 1026 DV 20 2 1176 DV 25 2 1326 DV 30 2 1476 DV 40 2 1626 C A Frame length mm Quantity Length mm Quantity 700 770 2 520 4 770 920 2 670 4 920 1070 2 820 4 1070 1220 2 970 4 1220 1370 2 1120 4 1370 1...

Page 7: ...gth mm Quantity Quantity 2420 2570 2 1120 2 1200 4 2 2570 2640 2 1270 2 1200 4 2 2640 2790 2 1270 2 1270 4 2 2790 2940 2 1270 2 1420 4 2 2940 3090 2 1420 2 1420 4 2 3090 3240 2 1420 2 1570 4 2 3240 33...

Page 8: ...h mm Number Length mm Qty Qty 4590 4740 2 1420 2 1500 2 1570 4 4 4740 4890 2 1570 2 1570 2 1500 4 4 4890 5040 2 1720 2 1500 2 1570 4 4 5040 5110 2 1720 2 1720 2 1500 4 4 5110 5260 2 1720 2 1720 2 1570...

Page 9: ...Bilag 5 1 Assemble base frames height 150 mm for units sizes 50 150 Annex 5 A Corner B Splice C Spacer D Length profile E Spacer profile F Width profile...

Page 10: ...0 2 2170 DV 80 2 2170 DV 100 2 2370 DV 120 2 2590 DV 150 2 2890 D A Frame length mm Quantity Length mm Quantity 700 770 3 520 6 770 920 3 670 6 920 1070 3 820 6 1070 1220 3 970 6 1220 1370 3 1120 6 13...

Page 11: ...mm Quantity Quantity Quantity Quantity 2420 2570 3 1120 3 1200 6 3 1 2 2570 2640 3 1270 3 1200 6 3 1 2 2640 2790 3 1270 3 1270 6 3 1 2 2790 2940 3 1270 3 1420 6 3 1 2 2940 3090 3 1420 3 1420 6 3 1 2 3...

Page 12: ...ngth mm Qty Length mm Qty Qtyl Qty Qty 4590 4740 3 1420 3 1500 3 1570 6 6 2 4 4740 4890 3 1570 3 1570 3 1500 6 6 2 4 4890 5040 3 1720 3 1500 3 1570 6 6 2 4 5040 5110 3 1720 3 1720 3 1500 6 6 2 4 5110...

Page 13: ...Bilag 6 1 Assemble base frames height 250 mm for units sizes 10 40 Annex 6 A Corner B Splice C Length profile D Spacer profile E Width profile...

Page 14: ...2 1020 DV 20 2 1170 DV 25 2 1320 DV 30 2 1470 DV 40 2 1620 C A Frame length mm Quantity Length mm Quantity 700 770 2 520 4 770 920 2 670 4 920 1070 2 820 4 1070 1220 2 970 4 1220 1370 2 1120 4 1370 1...

Page 15: ...ngth mm Quantity Length mm Qty Qty Qty 2420 2570 2 1120 2 1200 4 2 1 2570 2640 2 1270 2 1200 4 2 1 2640 2790 2 1270 2 1270 4 2 1 2790 2940 2 1270 2 1420 4 2 1 2940 3090 2 1420 2 1420 4 2 1 3090 3240 2...

Page 16: ...h mm Qty Length mm Qty Length mm Qty Qty Qty 4590 4740 2 1420 2 1500 2 1570 4 4 2 4740 4890 2 1570 2 1570 2 1500 4 4 2 4890 5040 2 1720 2 1500 2 1570 4 4 2 5040 5110 2 1720 2 1720 2 1500 4 4 2 5110 52...

Page 17: ...Bilag 7 1 Assemble base frames height 250 mm for units sizes 50 150 Annex 7 A Corner B Splice C Splice D Spacer E Length profile F Spacer profile G Width profile...

Page 18: ...70 DV 100 2 2270 DV 120 2 2490 DV 150 2 2790 E A B Frame length mm Quantity Length mm Quantity Quantity 700 770 3 520 4 2 770 920 3 670 4 2 920 1070 3 820 4 2 1070 1220 3 970 4 2 1220 1370 3 1120 4 2...

Page 19: ...Qty Qty Qty 2420 2570 3 1120 3 1200 4 2 3 1 2 2570 2640 3 1270 3 1200 4 2 3 1 2 2640 2790 3 1270 3 1270 4 2 3 1 2 2790 2940 3 1270 3 1420 4 2 3 1 2 2940 3090 3 1420 3 1420 4 2 3 1 2 3090 3240 3 1420 3...

Page 20: ...Length mm Qty Qty Qty Qty Qty 4590 4740 3 1420 3 1500 3 1570 4 2 6 2 4 4740 4890 3 1570 3 1570 3 1500 4 2 6 2 4 4890 5040 3 1720 3 1500 3 1570 4 2 6 2 4 5040 5110 3 1720 3 1720 3 1500 4 2 6 2 4 5110 5...

Page 21: ...r support of roof plates Calculate overhang of the roof at both ends of the unit and mount roof overhang profile G1 on the first trapezoidal roof plate F1 before the roof plate is mounted Place and mo...

Page 22: ...ffers the advantage that the rail D4 can be slid inside the rail C3 to adjust the length of rail D4 accurately to the length of the unit In this way it is not necessary to spend time and effort on cut...

Page 23: ...hold the trapezoidal roof plates Notice that rail Z fits over the lower rail Y and this offers the advantage that the rail Z can be slided on the rail Y to adjust the length of rail Z accurately to t...

Page 24: ...plate to the roof overhang profile The total cover width of the trapezoidal roof plates always changes with the pitch of 207 mm between the trapezoidal ribs making up a total length of the complete r...

Page 25: ...2912 3112 3312 5810 6010 6210 8708 8908 9108 3119 3319 3519 6017 6217 6417 8915 9115 9315 3326 3526 3726 6224 6424 6624 9122 9322 9522 3533 3733 3933 6431 6631 6831 9329 9529 9729 3740 3940 4140 6638...

Page 26: ...tes some of them are overlapping by 2 ribs The width of each plate is always 1 035 mm and some of the plates have to overlap by 2 ribs to achieve the optimal total length of the whole roof see the ill...

Page 27: ...er the profile N Mounted in this order the profile O can match the end of the roof and the surplus length of the profile O will just cover part of the previous profile N Mount the profiles L and M alo...

Page 28: ...Bilag 8 8...

Page 29: ...the 3 different motors used for the 14 sizes of air handling units The sliding levers are set and the function is checked at the factory The positions of the levers appear from the tables below 9 1 1...

Page 30: ...150 160 190 160 240 160 9 1 2 Indication of operation mode via red and green LED as well as test of motor The LED is in the cover of the cabinet LED indication Value No indication Power off Green Ordi...

Page 31: ...Motor sizes Ohm 90TYD S214 M 40 120TYD S214 M 18 120TYD S214 L 10 Setting of constant speed Set fourth DIP switch lever in position ON Test Set fourth DIP switch lever in position ON Press the test bu...

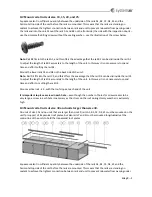
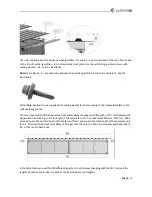
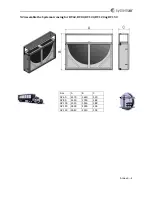
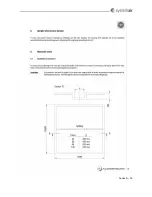
Page 32: ...Annex 9 4 9 2 Assemble the Systemair casing for DV60 DV80 DV100 DV120 og DV150 Size A B C DV 60 2170 1640 520 DV 80 2320 1790 588 DV 100 2520 1940 588 DV 120 2890 2090 558 DV 150 3040 2240 558...

Page 33: ...Annex 9 5...

Page 34: ...Annex 9 6 A1 Size Quantity Length mm DV 60 4 1014 DV 80 4 1164 DV 100 4 1314 DV 120 4 1464 DV 150 4 1614 A1...

Page 35: ...0 1 10722610 DV 100 1 10122710 4 11200410 4 21000210 1 10722710 DV 120 1 10122810 4 12100410 4 21000230 1 10722810 DV 150 1 10122910 4 11200420 4 21000220 1 10722910 B5 Size Number DV 150 2 12100510 S...

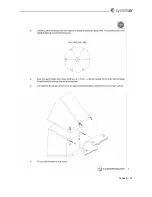
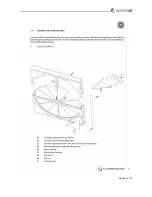
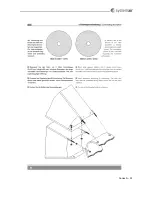
Page 36: ...Annex 9 8 9 3 Assemble divided rotor for DV 60 DV 80 DV 100 DV 120 og DV 150...

Page 37: ...Annex 9 9...

Page 38: ...Annex 9 10...

Page 39: ...Annex 9 11...

Page 40: ...Annex 9 12...

Page 41: ...Annex 9 13...

Page 42: ...Annex 9 14...

Page 43: ...Annex 9 15...

Page 44: ...Annex 9 16...

Page 45: ...Annex 9 17...

Page 46: ...Annex 9 18...

Page 47: ...Annex 9 19 9 4 Assemble divided rotor for DV 190 og DV 240...

Page 48: ...Annex 9 20...

Page 49: ...Annex 9 21...

Page 50: ...Annex 9 22...

Page 51: ...Annex 9 23...

Page 52: ...Annex 9 24...

Page 53: ...Annex 9 25...

Page 54: ...Annex 9 26...

Page 55: ...Annex 9 27...

Page 56: ...Annex 9 28...

Page 57: ...Annex 9 29...

Page 58: ...Annex 9 30...

Page 59: ...Annex 9 31 9 5 Installation of motor that turns rotor and sensor for rotation Installation of rotor motor and sensor for control of rotation in DVC module after assembly of divided rotor Fig 1...

Page 60: ...to the customer Fig 3 4 and 5 The motor and console is secured to the motor plate by 4 shock absorbers mounted by M8 bolts Fig 2 og 6 The drive belt must be placed around the rotor and in the center p...

Page 61: ...er The distance must be 1 4 mm from the outmost brackets used for the assembly of the rotor segments Fig 9 Please be aware of the height of the brackets that are used for the assembly of the rotor seg...

Page 62: ...the cooling capacity is regulated by the frequency converter FC in the illustration below to the strictly necessary revolutions of the compressor By declining demand with the compressor at the lowest...

Page 63: ...ternal controller for the cooling compressor system The potentiometer is the only tool for the selection of menus and for changing parameters in the DVU internal controller The potentiometer is at the...

Page 64: ...stability of the temperature to a degree that can be proven by measurements If the number of seconds is reduced the number of times that the valve is opened and closed will be increased maybe conside...

Page 65: ...etting for some reason the above mentioned modifications must be carried If the modifications are not carried out correctly the compressor will not be switched on at all 10 19 Maintenance General main...

Page 66: ...o reduce the capacity further the lowest cooling capacity equals 10 of the capacity at 90 Hz If the temperature and humidity conditions on the site deviate from the above mentioned conditions accurate...

Page 67: ...reduced outdoor air temperature before the cooling coil the electricity consumption of the cooling compressor is reduced DVU C sektionen ligner DVU sektionen med den markante forskel at kondensator b...

Page 68: ...0 5 10 Max increase og cooling capacity in per sec MENU UP MENU UP SERVICE MENU UP LMC 251 Ver 1 05 Software Version MANUAL MENU UP FC OFF OFF OFF ON Manuel operation of frequency converter HOTGAS OFF...

Page 69: ...x 12 1 Connection of fan motor and set up for frekv conv Annex 12 12 1 Connection of fan motor Delta connection for low speed is shown to the left and star connection for high speed is shown to the ri...

Page 70: ...papers 1 42 Motor Cable Length 3m 1 50 Motor Magnetisation at zero speed 0 1 52 Min Speed Normal Magnetisation 10 Hz 1 73 Flying Start 0 Disabled 1 90 Motor Thermal Protection 2 Thermistor trip 3 15...

Page 71: ...Annex 12 3...

Page 72: ...motor plate 1 25 Motor Nominal Speed According to motor plate 1 29 Automatic motor adption AMA 1 Kompl motor adaption to Turn power off and on 1 42 Motor Cable Length Order specific 1 50 Motor Magnet...

Page 73: ...to motor plate Schedule 1 40 Back EMF at 1000 RPM According to motor plate Schedule 1 42 Motor Cable Length 3m 1 90 Motor Thermal Protection 2 Thermistor trip 3 15 Reference 1 Source 2 Analog input AI...

Page 74: ...0 64 6 4 2650 9 6 1 250 10 75 8 87 182 194 HPS 90 2350 76 7 6 2350 13 0 800 10 00 8 103 159 172 HPS 90 2100 63 6 3 2100 10 5 1 500 14 75 8 101 142 154 HPS 90 2050 100 10 2050 19 0 810 8 75 8 115 140 1...

Page 75: ...Annex 12 7...

Page 76: ...Annex 12 8 Systemair A S Ved Milep len 7 DK 8361 Hasselager Tel 0045 8738 7500 www systemair dk...

Reviews: