


Bilag
8—3
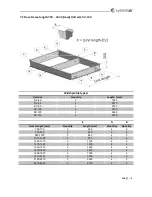
the
rails
and
into
the
unit.
Mount
the
rails
A1
and
B2
on
the
front
side
(the
side
with
the
inspection
doors)
–
use
the
simple
self
drilling
screws
without
the
sealing
washer
–
see
the
illustration
of
the
screw
below.
Note:
Rail
B2
fits
into
the
rail
A1,
and
this
offers
the
advantage
that
the
rail
B2
can
be
slid
inside
the
rail
A1
to
adjust
the
length
of
rail
B2
accurately
to
the
length
of
the
unit.
In
this
way
it
is
not
necessary
to
spend
time
and
effort
cutting
the
rail
B2.
Mount
the
lower
rails
C3
and
D4
on
the
back
side
of
the
unit.
Note:
Rail
D4
fits
into
the
rail
C3,
and
this
offers
the
advantage
that
the
rail
D4
can
be
slid
inside
the
rail
C3
to
adjust
the
length
of
rail
D4
accurately
to
the
length
of
the
unit.
In
this
way
it
is
not
necessary
to
spend
time
and
effort
cutting
the
rail
D4.
Mount
vertical
rail
–
E5
‐
with
the
roof
slope
at
each
end
of
the
unit.
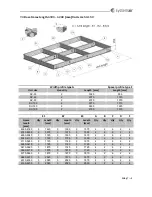
Mount
the
rails
Y
and
Z
on
the
unit
with
the
centre
‐
line
of
the
rails
exactly
over
the
centre
‐
line
of
the
unit.
It
is
longitudinal
on
the
middle
of
the
units
to
hold
the
trapezoidal
roof
plates.
Notice,
that
rail
Z
fits
over
the
lower
rail
Y,
and
this
offers
the
advantage
that
the
rail
Z
can
be
slided
on
the
rail
Y
to
adjust
the
length
of
rail
Z
accurately
to
the
length
of
the
unit.
In
this
way
it
is
not
necessary
to
spent
time
and
effort
on
cutting
the
rail
Z.
It
is
important
to
place
a
screw
in
each
hole
–
even
though
the
number
of
holes
for
screws
seems
to
be
very
large,
a
screw
in
each
hole
is
necessary
as
the
stress
on
the
roof
during
stormy
weather
is
extremely
high.
8.4
Roof
overhang
along
the
long
sides
of
the
unit
The
roof
plates
are
longer
than
the
width
of
the
unit
to
ensure
sufficient
overhang
along
the
sides
of
the
unit.
The
overhang
is
100
mm
along
each
side
of
the
smallest
unit
–
size
10.
The
overhang
is
150
mm
along
each
side
of
the
units
–
size
15,
20,
25.
The
overhang
is
175
mm
along
each
side
of
the
biggest
units
–
including
size
30.
8.5
Calculation
of
the
overhang
at
the
ends
of
the
unit.
Mount
overhang
profile
–
G1.
The
roof
must
be
between
200
and
400
mm
longer
than
the
length
of
the
unit
to
secure
a
roof
overhang
between
100
mm
and
200
mm
at
the
each
of
the
2
ends
of
the
unit,
and
the
length
of
this
overhang
must
be
calculated
before
the
first
roof
plate
is
mounted.
Summary of Contents for Danvent DV
Page 28: ...Bilag 8 8...
Page 33: ...Annex 9 5...
Page 36: ...Annex 9 8 9 3 Assemble divided rotor for DV 60 DV 80 DV 100 DV 120 og DV 150...
Page 37: ...Annex 9 9...
Page 38: ...Annex 9 10...
Page 39: ...Annex 9 11...
Page 40: ...Annex 9 12...
Page 41: ...Annex 9 13...
Page 42: ...Annex 9 14...
Page 43: ...Annex 9 15...
Page 44: ...Annex 9 16...
Page 45: ...Annex 9 17...
Page 46: ...Annex 9 18...
Page 47: ...Annex 9 19 9 4 Assemble divided rotor for DV 190 og DV 240...
Page 48: ...Annex 9 20...
Page 49: ...Annex 9 21...
Page 50: ...Annex 9 22...
Page 51: ...Annex 9 23...
Page 52: ...Annex 9 24...
Page 53: ...Annex 9 25...
Page 54: ...Annex 9 26...
Page 55: ...Annex 9 27...
Page 56: ...Annex 9 28...
Page 57: ...Annex 9 29...
Page 58: ...Annex 9 30...
Page 71: ...Annex 12 3...
Page 75: ...Annex 12 7...